Blocks for ACF Fields — Display Custom Fields in the Block Editor
| 开发者 | gamaup |
|---|---|
| 更新时间 | 2026年6月27日 14:48 |
| PHP版本: | 7.4 及以上 |
| WordPress版本: | 7.0 |
| 版权: | GPL-2.0-or-later |
| 版权网址: | 版权信息 |
详情介绍:
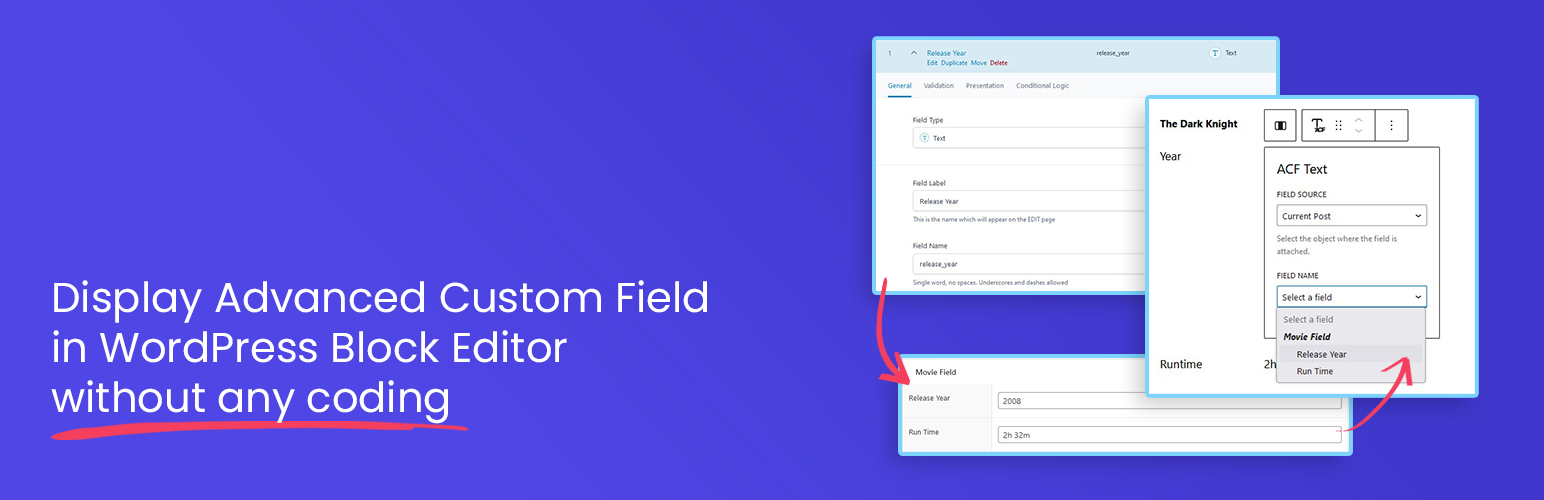
- No Code Needed – Display your ACF & SCF fields directly in the editor without building a custom block.
- One Block for All Fields – Load almost any field type using just a single, versatile block.
- Smart Field Picker – No need to type field names. Choose from a dropdown that automatically shows only the ACF & SCF fields available for the post, page, or template you're editing.
- Flexible Output Control – Style and format your field values directly in the editor, with output that always works correctly regardless of the field's return setting.
- Works With Most Field Types – From plain text and numbers to images, links, embeds, dates, and icons — most commonly used ACF/SCF field types render right out of the box.
- Supports All Field Locations – Works with post fields, options pages, term fields, and user fields.
- Full Site Editing Ready – Fully compatible with the WordPress Site Editor for building custom templates and theme parts.
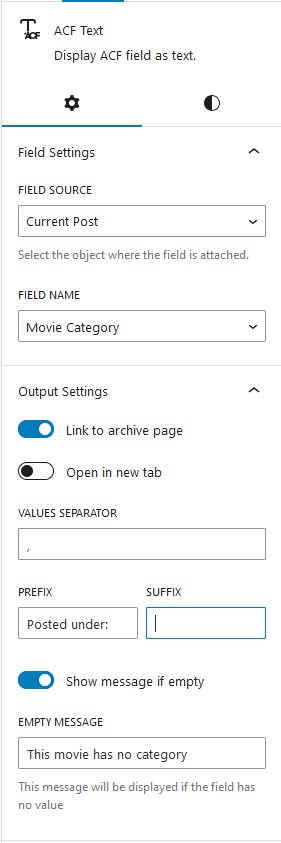
- Dynamic Layouts Ready – Seamlessly works inside Query Loops and reusable patterns for dynamic layouts. In addition to choosing which field to display, you also have control over how it appears. Text-based fields (including multiple-value fields like Select or Checkbox) can be shown as plain text or formatted with typography options. Image fields can be displayed as actual images with the same styling options as core Image blocks. For URL-return fields (such as Link or Post Object), you can render them as clickable buttons that automatically match your theme's design.
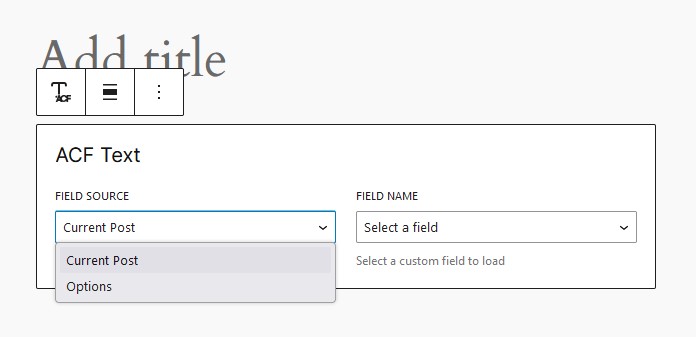
- Post (any post type) – Load fields attached to the post you're currently editing, whether it's a post, page, or any custom post type.
- Option – Pull global option fields, perfect for site-wide settings like logos, contact info, or social links.
- User – Display fields attached to a user profile. Available when editing author templates, making it easy to showcase author bios, avatars, or custom user data.
- Taxonomy – Load fields attached to taxonomy terms. Available when editing term archive templates, ideal for creating custom category, tag, or taxonomy layouts.
安装:
- Go to your WordPress Plugin installation menu (Dashboard > Plugins > Add New)
- In the search field type Blocks for ACF Fields and press enter.
- \"Install Now\" and then click \"Active\"
- Download the plugin and unzip it
- Using an FTP program or CPanel upload the unzipped plugin folder to your WordPress installation's wp-content/plugins/ directory.
- Activate the plugin from the Plugins menu (Dashboard > Plugins > Installed Plugins) within the WordPress admin.
屏幕截图:
常见问题:
What are the requirements to use this plugin?
You need to have WordPress version 6.5+ and Advanced Custom Fields plugin version 6.1.0 or newer.
Do I need the pro version of Advanced Custom Fields?
No, you can still use the free version of Advanced Custom Fields as long as it is version 6.1.0 or newer.
Who is this plugin for?
This plugin is built with developers in mind — perfect for those who want to save time without sacrificing flexibility. At the same time, it's intuitive and easy enough for end users to use without technical knowledge.
Which ACF field types are supported?
The free version supports most commonly used field types right out of the box. A few advanced types — Repeater, Group, Gallery, and Google Maps (as an interactive map) — require the PRO version, and Flexible Content is not currently supported in either version.
Can this plugin save or update ACF field values?
No. This plugin is read-only — it's designed solely to display ACF field values in the block editor. Creating or saving field data should be done through the ACF interface or other editing tools.
Does this plugin support the Site Editor?
Yes, of course.
更新日志:
- SECURITY: Added an object-level authorization check to the field values REST endpoint, preventing Author-level users from reading ACF values of posts they can't access, such as private posts and drafts (CVE-2026-12428, reported by Wordfence)
- [PRO Only] FIX: Fixed an editor freeze (infinite render loop) when using the Single Post / Post Loop display inside a Site Editor template with a Cover block set to use the post's featured image
- UPDATE: ACF Image block now supports linking the image — link to the media file, attachment page, a custom URL, or a URL pulled from another field, with "open in new tab" and "nofollow" options
- FIX: Date Picker, Date Time Picker, and Time Picker fields now render using the field's configured return format in both the editor and on the frontend
- [PRO Only] NEW: New "Specific" field sources — pull field values from a specific post, term, or user instead of the current context
- [PRO Only] NEW: New "URL Param" field source — resolve the field source dynamically from a URL query parameter at render time
- UPDATE: The ACF Field block's field loader now opens in a focused modal dialog instead of an inline placeholder, giving a clearer setup flow and room for advanced options
- UPDATE: ACF Field blocks now display the selected field's label in the editor's List View and breadcrumb, making it easier to identify which field each block is showing
- UPDATE: Reworked the sidebar "Field Settings" panel (renamed to "Field Info") into a compact, read-only summary of the selected source and field with a "Replace Field" button that opens the same picker modal used when inserting a block
- FIX: Fixed "Objects are not valid as a React child" error when displaying User or Taxonomy fields in the editor
- [PRO Only] NEW: Embed Popup block — display oEmbed/URL fields in a lightbox popup that loads only on click
- [PRO Only] NEW: Display Google Map fields as interactive maps with custom marker and styling
- NEW: Display Google Map fields as text with multiple return format options (Address, Lat/Lng, State, Country, Post Code, etc.)
- NEW: Display ACF Icon Picker fields as icons with customizable size, color, and alignment
- NEW: Added info tooltip to "Display Field As" dropdown showing descriptions for each display option
- FIX: Fixed PHP 8+ error when
get_the_content()is called without a valid post object
- FIX: Fixed PHP 8+ error when
get_the_content()is called without a valid post object - FIX: Fixed WYSIWYG field output to properly apply ACF content filters instead of using
nl2br()
- FIX: Fixed ACF version check timing by moving initialization to
after_setup_themehook - [PRO Only] FIX: Fixed REST API validation errors when using block visibility controls on server-side rendered blocks by stripping visibility attributes from block render requests
- [PRO Only] FIX: Grid style broken on frontend side
- NEW: Display oEmbed and URL fields as embed
- [PRO Only] NEW: Display Repeater fields as accordions
- [PRO Only] NEW: Display Repeater fields as tabs
- [PRO Only] FIX: Add reset post data after loads field as posts loop
- UPDATE: Add supports to load term custom field inside term query
- [PRO Only] UPDATE: Removes option to load Post Object, Relationship, Taxonomy, User field as List/Grid/Carousel if multiple value is set to false
- UPDATE: Previewed field values will now automatically update after the post is saved
- UPDATE: ACF Field blocks displayed as text, button, or image now supports interactivity to allow being inserted inside Query Loop block with Reload full page is set to false
- [PRO Only] NEW: Control block visibility based on ACF/SCF values
- NEW: Standardized block hook filters
- UPDATE: Removed the "Open in new tab" and "Mark as nofollow" options from Email fields displayed as buttons
- UPDATE: Renamed the "Link Text" option to "Button Text" when displaying fields as buttons
- FIX: Field options were not showing on single templates for custom post types with dashes in their slugs
- [PRO Only] FIX: Resolved an issue where ACF post loops did not load custom fields from the linked post type inside nested blocks
- FIX: Resolved "sprintf is not defined" error on ACF Image fields
- [PRO Only] UPDATE: Set a default item count when the value is empty for Post Object, Taxonomy, and User fields using grid layouts. The default count now follows the "Items per Row" setting for consistent grid output
- [PRO Only] FIX: Allowed adding Content blocks inside the ACF Posts List block
- [PRO Only] FIX: Prevented "acf-field-blocks/data" store from being registered multiple times
- [PRO Only] UPDATE: Updated Freemius SDK to v2.12.2
- NEW: Options to select which value to display for User fields, including Display Name, User Email, User Login, User Nickname, and User URL
- NEW: Options to select which value to display for Taxonomy fields, including Name, Slug, and Description
- [PRO Only] NEW: Display Repeater fields as a carousel
- [PRO Only] NEW: Display Post fields as a carousel
- [PRO Only] NEW: Display Taxonomy fields as a carousel
- [PRO Only] NEW: Display User fields as a carousel
- [PRO Only] NEW: Display Gallery fields using a masonry layout
- UPDATE: Added an upgrade notice when selecting unsupported field types
- UPDATE: Added a review notice
- FIX: Resolved an undefined
get_current_screencall introduced in the previous update
- FIX: Fixed broken styles on several admin pages
- PRO: Initial PRO version release
- FIX: Fixed "Class Fields not found" error
- FIX: Fixed an error with ACF Image fields from the previous update
- FIX: Hide ACF Button when the value is empty
- FIX: Fixed an issue where ACF Button text was not loading correctly when using an alternative field option
- UPDATE: Refactored several field helper functions
- FIX: Fixed an error when loading blocks in the Pattern Editor
- NEW: Introduced a unified "ACF Field" block to load all field types; previously separated field-type blocks are now hidden from the inserter
- NEW: Added hooks to filter field output
- UPDATE: Added shadow support to the ACF Image block
- UPDATE: Added UL and OL tag options to the ACF Text block, enabling list output for multi-value fields
- UPDATE: Updated all editor components to prevent deprecation warnings
- UPDATE: Removed the "Open in New Tab" option for linked Email fields
- FIX: New lines were not rendered correctly in Textarea fields
- FIX: Post Object and Relationship fields were not rendered correctly on the frontend
- FIX: Date field values (Date, DateTime, Time) were not formatted according to the field’s date format settings
- Initial release