
Advanced IP Blocker
| 开发者 | inilerm |
|---|---|
| 更新时间 | 2026年7月22日 15:28 |
| 捐献地址: | 去捐款 |
| PHP版本: | 8.1 及以上 |
| WordPress版本: | 7.0 |
| 版权: | GPLv2 or later |
| 版权网址: | 版权信息 |
标签
下载
详情介绍:
Important Note on PHP Version: To ensure maximum security and access to all features, we strongly recommend using PHP 8.1 or higher. Some advanced features (like the local MaxMind database or full 2FA management via WP-CLI) require PHP 8.1.Key Features:
- (NEW) Block Ghost IPs: Automatically block IPs without ASN and Reverse DNS to stop anonymous traffic (Warning: Could cause false positives if rDNS is misconfigured by ISPs).
- (NEW) Captcha Integrations (Turnstile & hCaptcha): Seamlessly integrate modern verification challenges like Cloudflare Turnstile and hCaptcha, with granular control per module and a smart fallback to our invisible JS Challenge to prevent accidental lockouts.
- (NEW) Rate Limiting Advanced Rules: Create highly specific rate limits for different endpoints. For example, set a strict limit with a Turnstile challenge for
/login, while keeping a more generous limit with a temporary block for your main API, all without affecting the rest of the site. - (NEW) Distributed Attack Protection (Auto-Panic): Automatically shields your entire site with a global JS challenge during massive traffic spikes, keeping your server online while intelligently bypassing trusted bots and excluded routes.
- IP & ASN Diagnostics Tool: A complete Inspector tool integrated directly into the admin bar. Quickly audit any IP or ASN against your Geolocation database, Threat Scoring system, Spamhaus drops, and manual blocking rules in real-time.
- Advanced Rules Import/Export: Seamlessly migrate or backup your complex custom security rules across multiple WordPress websites. With full JSON validation, structural deduplication, and "cost-zero" client-side file generation, agency users can clone their perfect firewall setups in seconds.
- Granular JS Challenge Modes: You can now choose exactly how the security challenge behaves. Select "Managed" for ultimate security requiring human interaction (a checkbox), or "Automatic" for an invisible, transparent Proof-of-Work execution that stops bots silently. Apply different modes per module!
- Country Selector Copy/Paste: Say goodbye to manually selecting 50+ countries. You can now instantly copy and paste a raw list of 2-letter country codes directly into Geoblocking, Geo-Challenge, and Whitelist Login fields.
- AIB Cloud Network V3: Upgrade to the next-generation distributed threat intelligence network. The new API V3 provides secure, individual API Keys per site, drastically improving synchronization reliability, threat telemetry, and global network stability.
- Whitelist Login Countries: Take absolute control over administrative access. Easily restrict your WordPress login page and XML-RPC to only allow connections from specific, whitelisted countries, instantly blocking unauthorized foreign login attempts.
- (IMPROVED) Bulk Import/Export for Blocked IPs & Whitelist: Seamlessly import massive lists of IPs via CSV or manual entry. The system now features a bulletproof "Bulk Import" type, strict duration inheritance, and intelligent conflict resolution.
- Internal Security & Forensics: A complete audit suite solely for WordPress. Track every sensitive event (plugin installs, settings changes, user logins) and monitor your critical files for unauthorized modifications with the integrated File Integrity Monitor.
- Activity Audit Log: Gain complete visibility into what's happening on your site. Who deactivated a plugin? Who changed a setting? The Audit Log answers these questions with timestamped, immutable records.
- Deep Scan Email Reports: Get a weekly security summary delivered to your inbox, detailing pending updates, vulnerability status, and recent attack trends.
- Username Blocking & Rules: Gain granular control over login security. Creating Advanced Rules to block, challenge, or score specific usernames (e.g., "admin", "test").
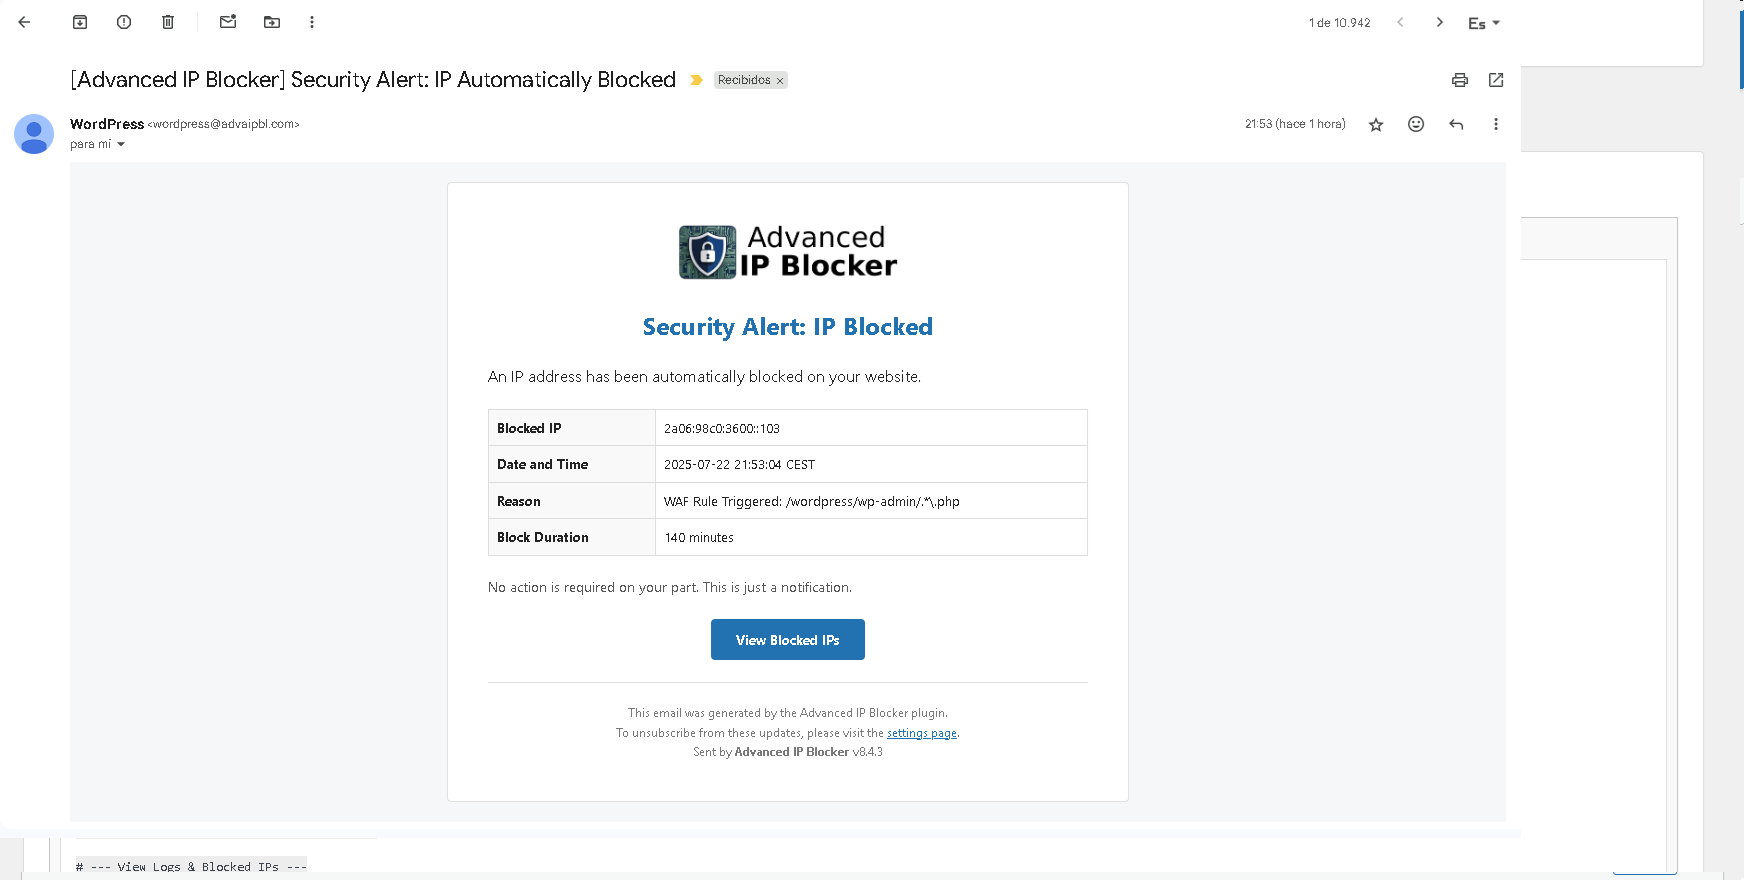
- Enhanced Lockdown Notifications: Distributed Lockdowns (404/403) now fully support Email and Push notifications, ensuring you never miss a critical security event.
- Improved Logging: New "Endpoint Challenge" event type provides deeper visibility into challenges served during automated lockdowns.
- **Server IP Reputation Check. Instantly audit your web server's IP address against major blacklists (Spamhaus, AbuseIPDB) to diagnose SEO and email delivery issues.
- HTTP Security Headers. Easily configure essential security headers like HSTS, X-Frame-Options, and Permissions-Policy to harden your site against clickjacking, sniffing, and other browser-based attacks. Includes a "Report-Only" mode for CSP.
- **Site Health & Vulnerability Scanner. Audit your WordPress environment instantly. Detects outdated plugins, insecure PHP versions, and checks your installed plugins against a database of 30,000+ known vulnerabilities.
- **PERFORMANCE BOOST: High-Speed Community Database. Migrated the "Community Defense Network" blocklist to a dedicated, indexed database table. This allows checking thousands of malicious IPs in microseconds with zero impact on site memory usage.
- **Community Defense Network. Join forces with other WordPress admins. The plugin now shares anonymous attack data to build a global, real-time blocklist of verified threats. Protect your site with community-powered intelligence.
- **Auto-Cleaning Logic. Smart expiration handling ensures your blocklists stay fresh and performant, automatically removing stale IPs from both the database and external firewalls (Cloudflare/.htaccess).
- **Cloud Edge Defense (Cloudflare). Connect your site directly to Cloudflare's global network. Automatically sync your blocklists to the cloud to stop attackers before they reach your server. Zero server load protection.
- **Server-Level Firewall (.htaccess). Extreme performance upgrade. Write blocking rules and file hardening protections directly to your .htaccess file. Blocks threats instantly without loading PHP or WordPress.
- **IMPROVED: Smart Bot Verification. Enhanced logic to correctly identify legitimate traffic from iOS devices (iCloud Private Relay) and social media previews, eliminating false positives while keeping impostors out.
- File Hardening. Protect your most sensitive files (
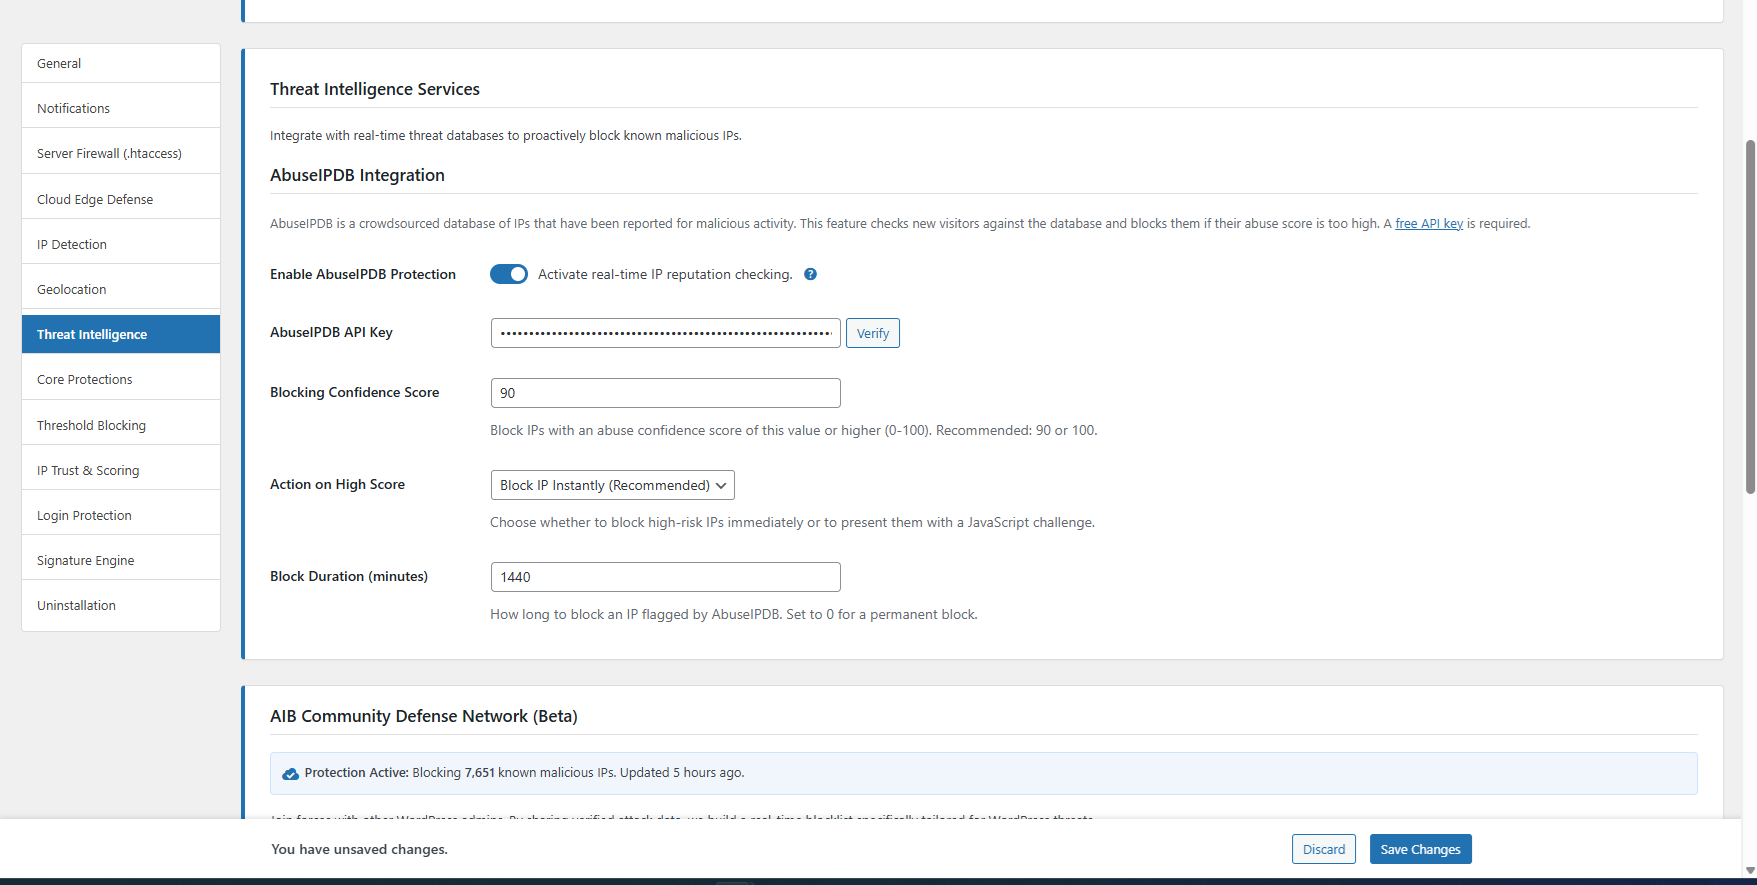
wp-config.php,readme.html,.git) at the server level with a single click. - AbuseIPDB Integration. Proactively block attackers before they strike. The plugin can now check visitor IPs against AbuseIPDB's real-time, crowdsourced database of malicious IPs and block those with a high abuse score on their very first request.
- Edge Firewall Mode! Protect any PHP file or standalone application within your WordPress directory (even if it's not part of WordPress). Ideal for securing custom scripts, legacy applications, or folders like
/scan/. (Requires manual configuration). - Advanced Rules Engine! Create powerful, custom security rules with multiple conditions (IP, Country, ASN, URI, User-Agent, Request Method, Referer) and actions (Block, Challenge, or add Threat Score).
- Known Bot Verification. A powerful new security layer that uses reverse DNS lookups to verify legitimate crawlers like Googlebot and Bingbot. This completely neutralizes attackers who try to bypass security rules by faking their User-Agent, assigning high threat scores to impostors.
- Verify Monitoring Bots (IP List). A brand new feature that downloads and caches official IP lists from popular uptime monitoring services (like UptimeRobot and Pingdom) to ensure they are never incorrectly blocked or challenged.
- Onboarding Setup Wizard. A brand new step-by-step wizard that guides new users through the essential security configurations (IP whitelisting, WAF, and bot traps) in under a minute, ensuring a strong security posture from day one.
- Major Refactor: Codebase Modernization. The entire plugin architecture has been refactored into a modern, modular structure. Logic for admin pages, AJAX, actions, and settings is now handled by dedicated classes, making the plugin more stable, performant, and easier to maintain and extend in the future.
- Advanced IP Spoofing Protection. A zero-trust "Trusted Proxies" system ensures the plugin always identifies the true visitor IP, even behind complex setups like Cloudflare or a custom reverse proxy. It neutralizes attacks that attempt to fake their IP, preventing block evasion and the framing of innocent users.
- Geo-Challenge. A smarter way to handle traffic from high-risk countries. Instead of a hard block, it presents a quick, invisible JavaScript challenge that stops bots but is seamless for human visitors. This reduces unwanted traffic without affecting potential legitimate users.
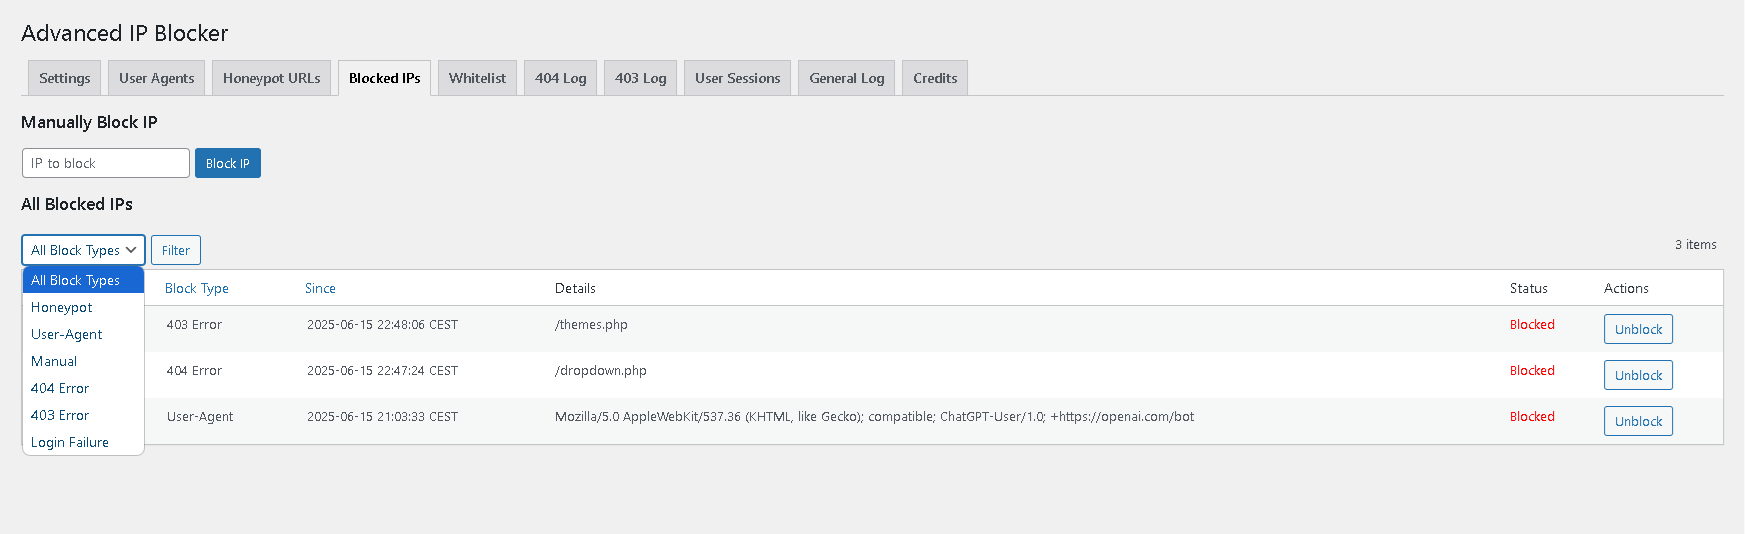
- ENHANCEMENT: Full Bulk-Action Support. IP management is now faster than ever. Both the Whitelist and the Blocked IPs list now support full bulk actions, allowing you to select and remove multiple entries at once, or unblock all IPs with a single click.
- Endpoint Lockdown Mode: Automatically shields
wp-login.phpandxmlrpc.phpwith a JavaScript challenge during sustained distributed attacks, preventing server overload. - Two-Factor Authentication (2FA): Secure user accounts with industry-standard TOTP authentication, backup codes, role enforcement, and a central admin management dashboard.
- IP Trust & Threat Scoring System: An intelligent defense that assigns "threat points" to IPs for malicious actions, blocking them only when they reach a configurable score. More accurate and context-aware than simple rules.
- Attack Signature Engine: Proactively stops distributed botnet attacks by identifying and blocking the attacker's "fingerprint" (signature) instead of just individual IPs.
- Web Application Firewall (WAF): Block malicious requests (SQLi, XSS, etc.) with a customizable ruleset.
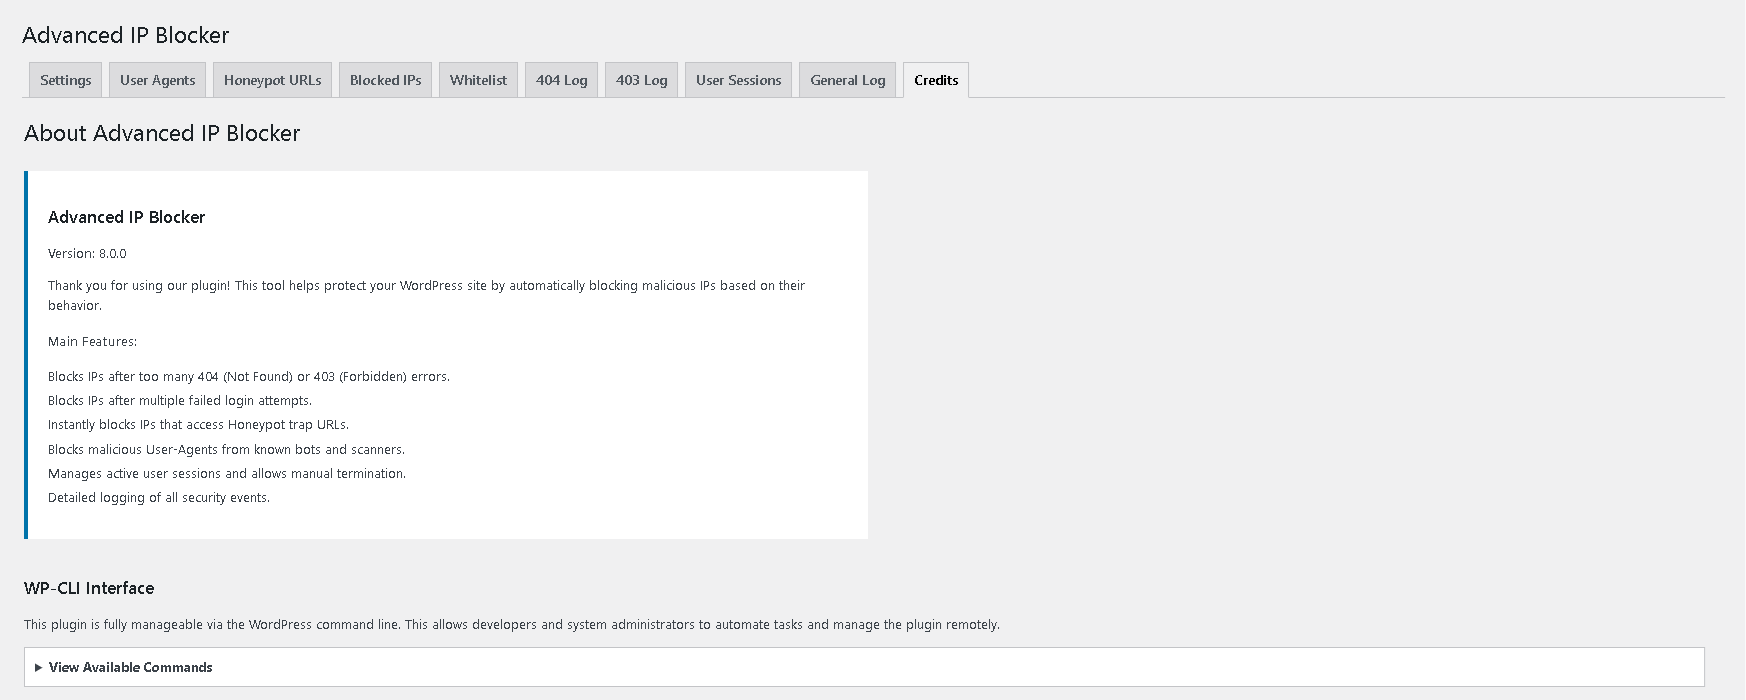
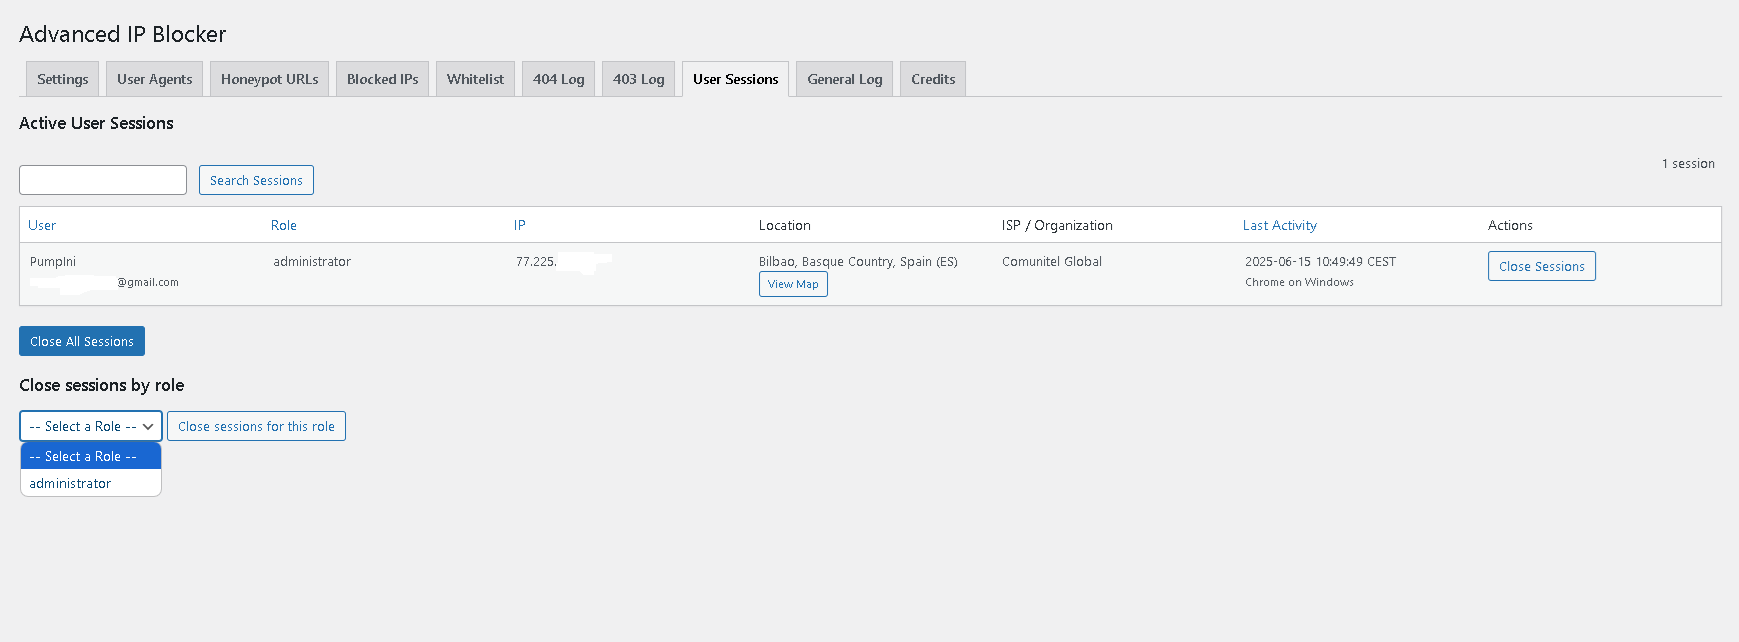
- And much more: Rate Limiting, Country & ASN Blocking (with Spamhaus support), ASN Whitelisting, Push Notifications, Google reCAPTCHA, Honeypots, Active User Session Management, and Full WP-CLI Support.
安装:
- Upload the
advanced-ip-blockerfolder to the/wp-content/plugins/directory. - Activate the plugin through the 'Plugins' menu in WordPress.
- A new "Security" menu item will appear in your admin sidebar. All settings are located there.
- Crucial: Visit
Security > Dashboard > System Statusto ensure your IP and your server's IP are whitelisted. Use the one-click buttons if they are not.
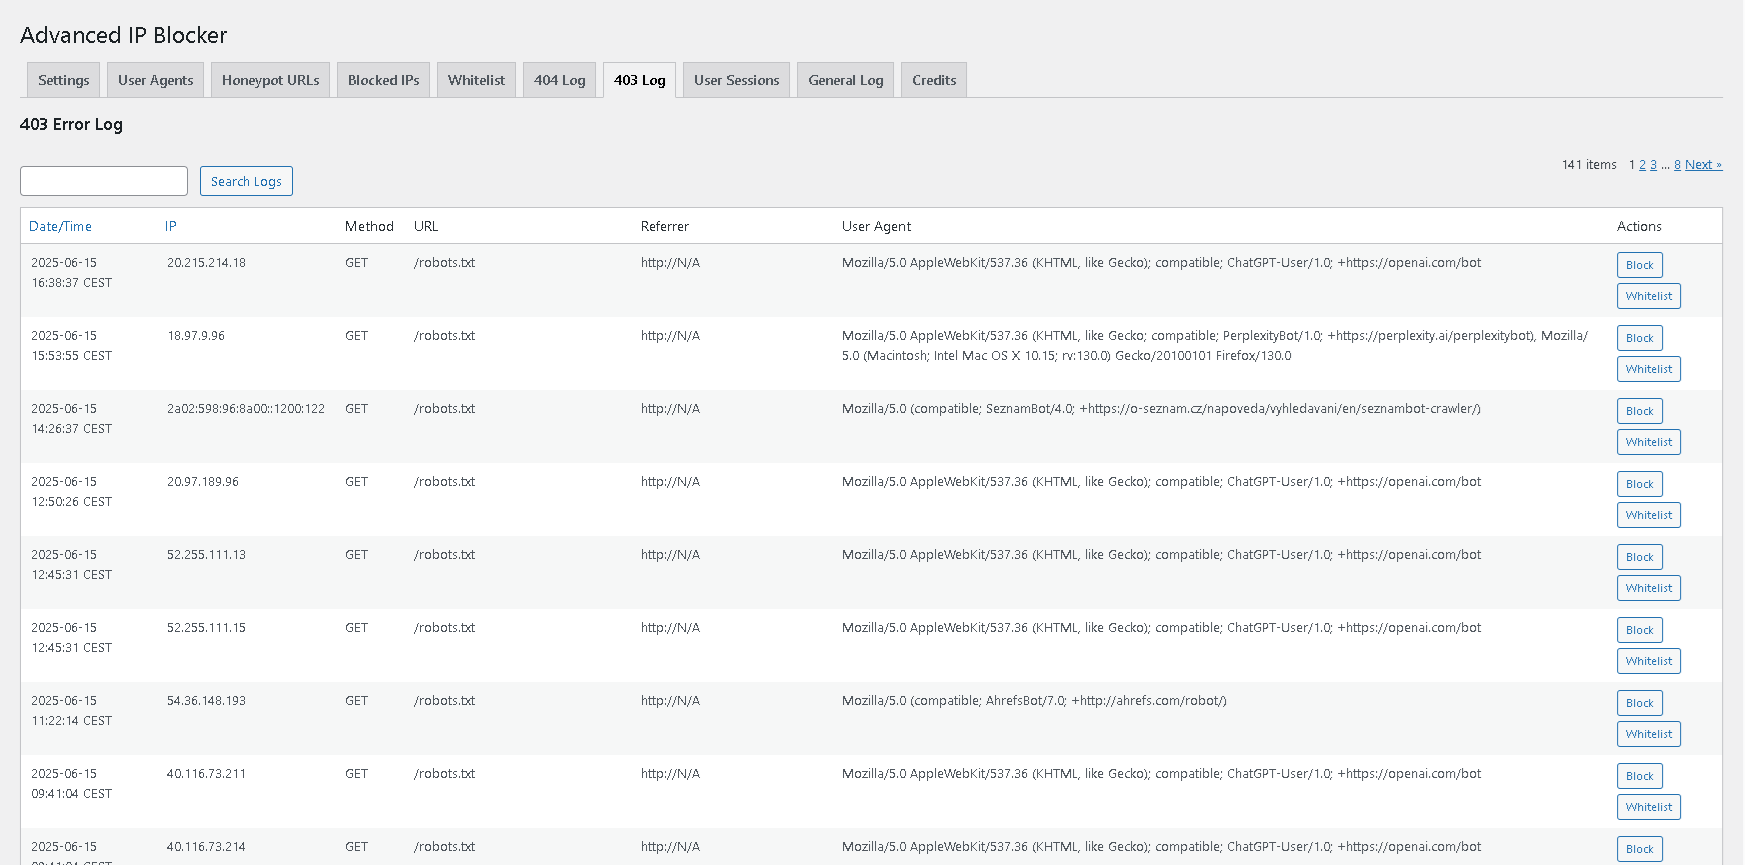
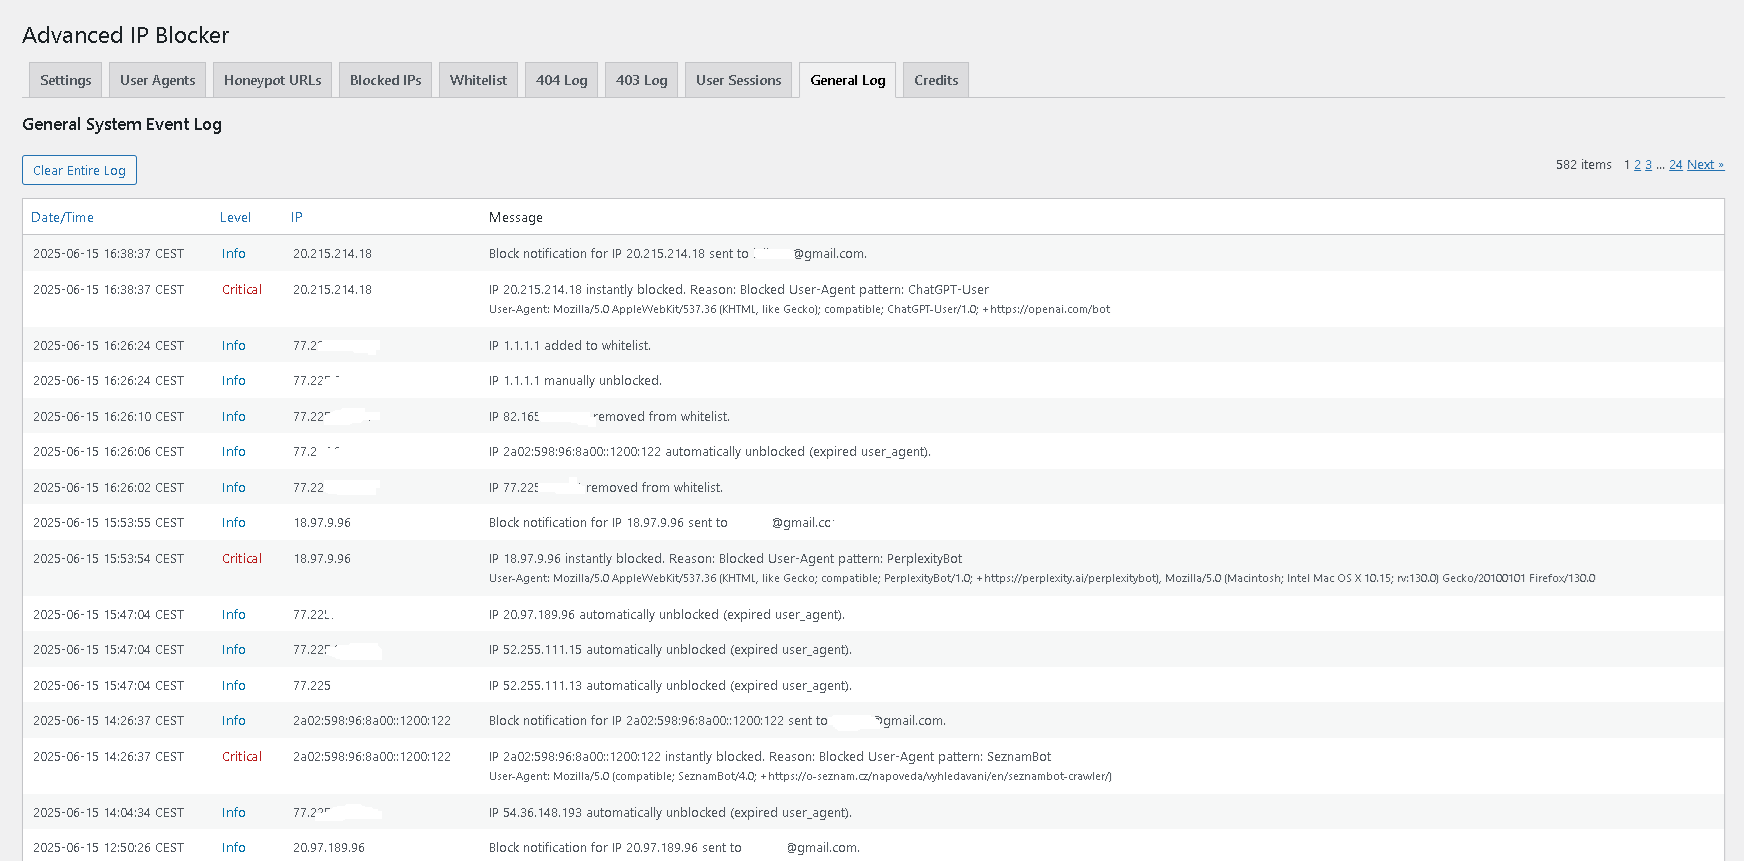
屏幕截图:

常见问题:
What is Block Ghost IPs?
This feature automatically blocks incoming traffic from IP addresses that lack an Autonomous System Number (ASN) and Reverse DNS (rDNS) record. Since legitimate traffic almost always has these identifiers, Ghost IPs are often malicious actors trying to hide. Please note that this can cause false positives if a legitimate Internet Service Provider (ISP) has misconfigured their rDNS.
What are Captcha Integrations (Turnstile & hCaptcha)?
Our new Captcha Integrations allow you to seamlessly connect modern verification challenges like Cloudflare Turnstile and hCaptcha to your security modules. You can set a Global Default Engine and even apply different challenges granularly per module. To ensure your site never breaks, it includes a smart fallback to our invisible JS Challenge if your API keys are ever misconfigured or missing.
How do Rate Limiting Advanced Rules work?
Instead of a single global rate limit for your entire site, Advanced Rules allow you to define custom limits for specific URLs or endpoints. You can define the maximum number of requests, the time window, and the specific action (like returning a 429 error, a 403 block, or triggering a Turnstile/hCaptcha challenge) for each endpoint independently. This is ideal for protecting sensitive areas like login pages or APIs with stricter limits while allowing normal traffic on the rest of the site.
What is Distributed Attack Protection (Auto-Panic)?
This feature automatically engages a global JavaScript challenge to protect your server resources from massive spikes in malicious traffic. It monitors the number of blocks within a specific time window and, if the threshold is reached, it shields the entire site. Legitimate administrators, verified bots (like Googlebot), and explicitly excluded URLs are bypassed. You can configure the thresholds and notification preferences under Security > Settings > Core Protections.
What is the IP & ASN Diagnostics Tool (IP Inspector)?
It is a powerful built-in utility located in your Security menu (and top admin bar) that allows you to manually inspect any IP address or Autonomous System Number (ASN). It instantly cross-references the subject against your Geolocation databases, Threat Scoring system, AbuseIPDB, Spamhaus drops, and local whitelists/blocklists. It is the ultimate tool for investigating suspicious traffic or verifying if a legitimate user was blocked by a specific rule.
How does the Vulnerability Scanner work?
The scanner checks your site in two ways: Local Scan: Checks for outdated PHP versions, WordPress core updates, debug mode risks, and SSL status. This runs locally and instantly. Deep Scan (Vulnerability Audit): Checks your installed plugins and themes against our central database of known security vulnerabilities (CVEs). This process is manual (you click a button) to ensure it never slows down your site during normal operation.
What is the new Audit Log?
The Audit Log is your site's "black box". It records critical administrative actions such as plugin activations, settings changes, and file modifications. This helps you identify "who did what and when," which is essential for troubleshooting and security forensics.
How does the File Integrity Monitor (FIM) work?
The FIM scans your critical core files (wp-config.php, .htaccess, index.php) and specific plugin files daily. It takes a "fingerprint" (hash) of the file. If the file changes (e.g., malware adds a line of code), the fingerprint changes, and the plugin alerts you immediately via email.
Why did you move the Community Blocklist to a custom table?
To ensure maximum performance as the network grows. Storing thousands of IPs in standard WordPress options (wp_options) can slow down a site. By moving this data to a dedicated, indexed database table (wp_advaipbl_community_ips), we ensure that lookups are lightning-fast (O(1) complexity) and consume negligible memory, regardless of how many threats we track.
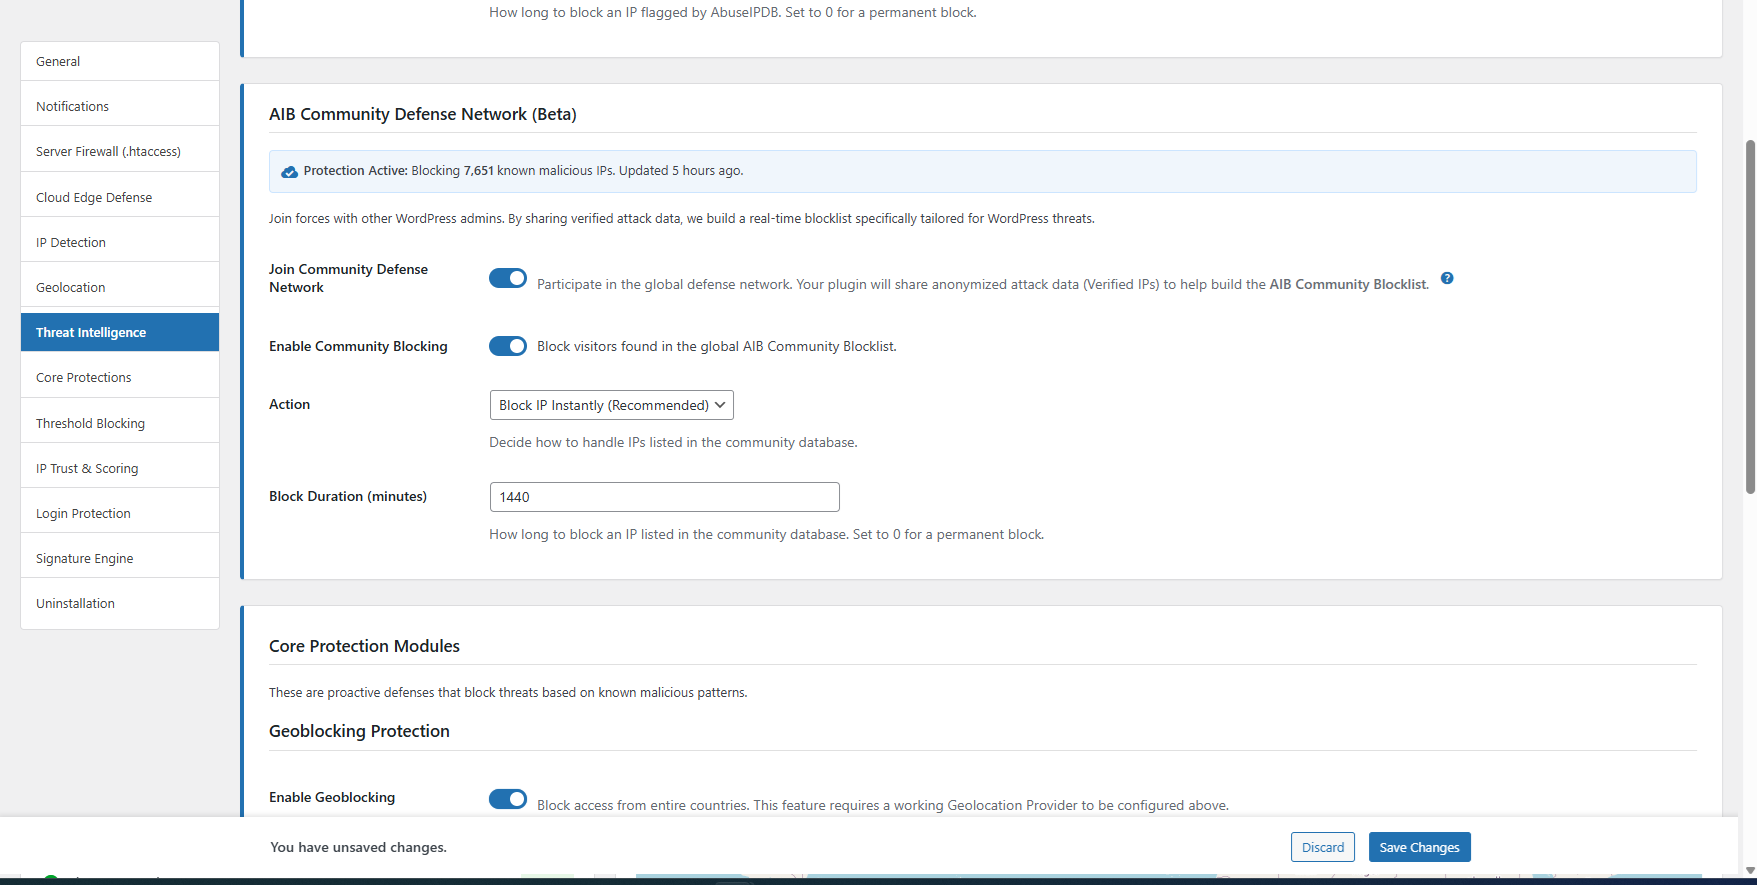
What is the Community Defense Network?
It is a collaborative security feature where users share anonymized data about verified attacks (like SQL injections caught by the WAF or IPs flagged by AbuseIPDB). Our central server aggregates this data to create a global blocklist of active threats. You can choose to contribute data ("Join") and/or use the global list to protect your site ("Enable Blocking").
Does the Community Network slow down my site?
No. The data sharing happens in the background via a low-priority scheduled task (Cron) just a few times a day. The global blocklist is downloaded locally and cached, so checking an IP against it is instant (microseconds) and does not require external API calls.
How do I set up Cloud Edge Defense (Cloudflare)?
You need a free Cloudflare account and your domain must be using Cloudflare's nameservers.
- Go to Security > Settings > Cloud Edge Defense.
- Enter your Cloudflare API Token (with "Zone > Firewall Services > Edit" permissions) and Zone ID.
- Click "Verify" and save. The plugin will now automatically push your blocked IPs to Cloudflare's Firewall. For a step-by-step guide with screenshots, click the help icon in the settings or visit our website.
Is the Server-Level Firewall (.htaccess) safe?
Yes. Safety is our priority.
- Backups: The plugin automatically creates a timestamped backup of your .htaccess file in a protected folder every time it writes new rules.
- Compatibility: It automatically detects your server type and generates valid syntax for Apache 2.2 or 2.4.
- Safety Limit: It includes a safety limit on the number of IPs written to the file to prevent server memory issues.
What if I use Nginx instead of Apache?
The "Server-Level Firewall (.htaccess)" feature relies on Apache/LiteSpeed specific files. If you use Nginx (without Apache), these local rules will be ignored by the server. Recommendation: For Nginx users, we strongly recommend enabling the Cloud Edge Defense (Cloudflare) feature. It provides the same "pre-execution" blocking benefits but works on any server environment since the blocking happens in the cloud.
How should I configure the plugin for my specific website?
While every website's security needs are unique, here is a general guide to get you started. For a deep dive into every feature, please consult our Comprehensive Feature Guide.
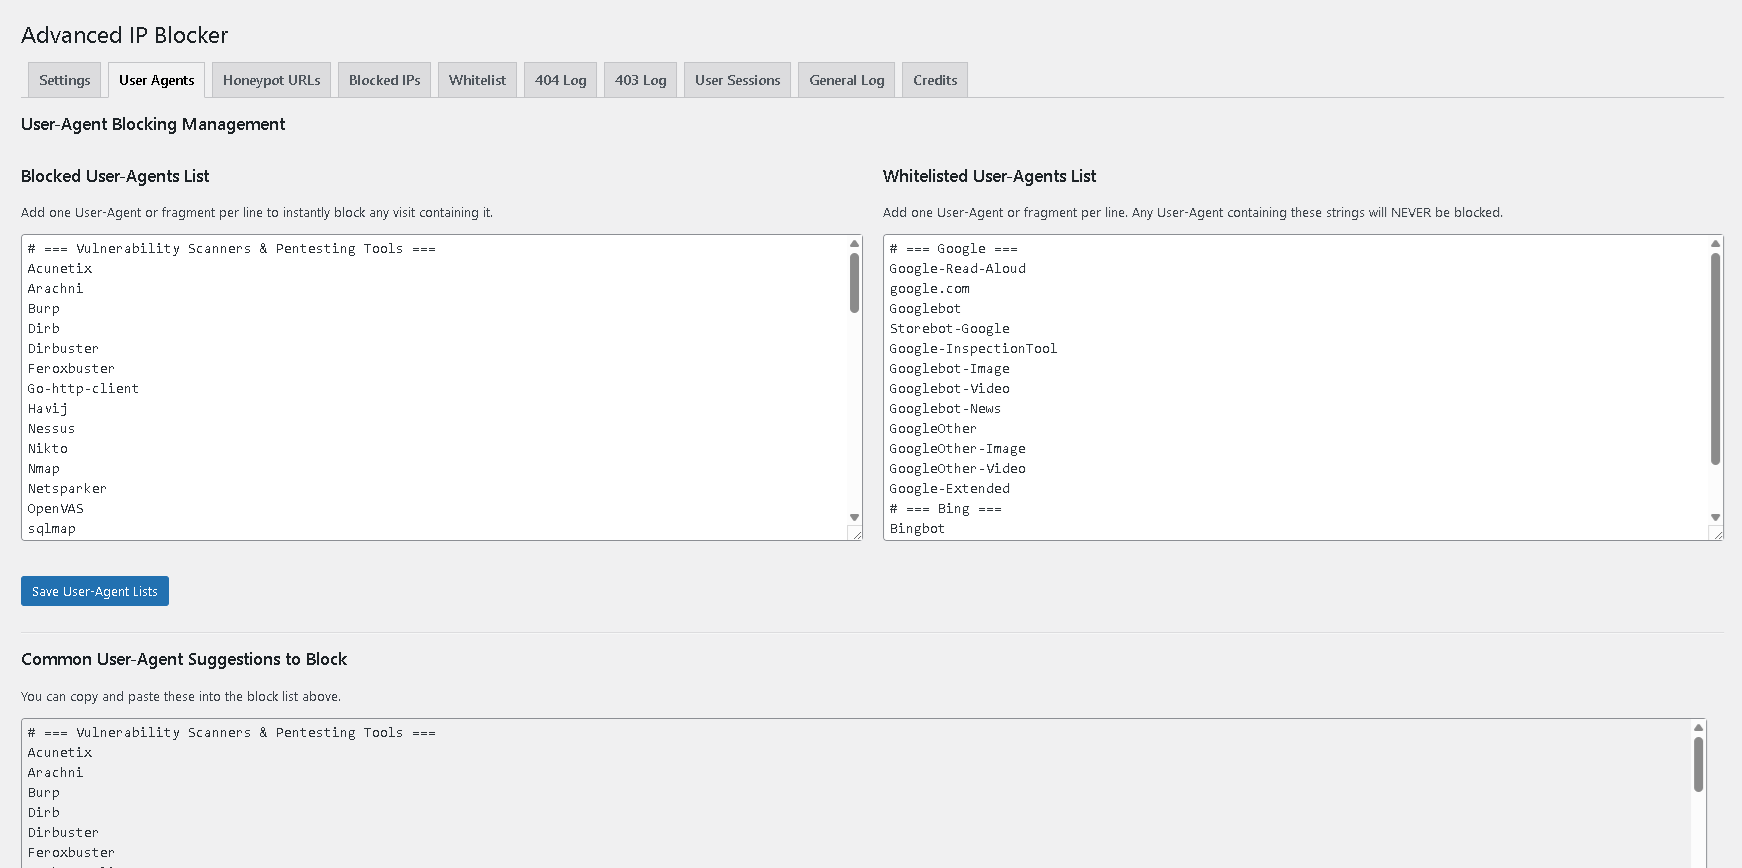
- Essential First Steps (All Sites): After installation, run the Setup Wizard or manually go to
Security > Dashboard > System Statusto whitelist your IP and your server's IP. Then, enable logging. - Blogs/Business Sites: Enable the "IP Trust & Threat Scoring System", "WAF", "Rate Limiting", and "Spamhaus ASN Protection".
- E-commerce/Membership Sites: Enable "Two-Factor Authentication (2FA)" for admin roles and use "Geo-Challenge" instead of hard geoblocking for countries where you have customers. Do not use "Whitelist Login Access".
- Sites with a CDN (Cloudflare): Go to
Security > Settings > IP Detectionand add your CDN's ASN (e.g.,AS13335for Cloudflare) to the "Trusted Proxies" list. This is critical for accurate IP detection.
What is AbuseIPDB Protection and how does it work?
AbuseIPDB is a global, crowdsourced project that tracks and reports malicious IP addresses in real-time. Our new integration allows the plugin to check the reputation of a new, unknown visitor against this database on their first visit. If the IP has been recently reported by others for activities like hacking, spam, or brute-force attacks, and its "abuse confidence score" is above your configured threshold, the plugin will block it instantly. This acts as a proactive shield against known bad actors, stopping them before they even have a chance to test your defenses. You can enable it and add your free API key under Security > Settings > Threat Intelligence.
What is "Known Bot Verification"?
This is an advanced security feature that checks if visitors claiming to be from major search engines (like Googlebot) are legitimate. It performs a DNS lookup to verify their IP address. If the check fails, the visitor is identified as an "impersonator" and receives a high threat score, preventing them from exploiting the trust given to real crawlers. This feature is enabled by default under Settings > Core Protections.
What is "Verify Monitoring Bots (IP List)"?
This feature ensures your uptime monitoring services (like UptimeRobot, Pingdom, StatusCake, etc.) can always reach your site to check its status. By automatically downloading and updating official IP lists from these providers, the plugin safely whitelists them from rate limiting or blocking without exposing your site to attackers who might spoof their user agents.
What is "Trusted Proxies" and why do I need it?
This is a critical security feature that prevents IP spoofing. If your site is behind a service like Cloudflare, Varnish, or another reverse proxy, the server's direct connection IP (REMOTE_ADDR) will always be the proxy's IP, not the visitor's. The real visitor IP is sent in an HTTP header (e.g., CF-Connecting-IP). An attacker can fake this header. The "Trusted Proxies" setting tells the plugin: "Only trust these headers if the request comes from an IP address I know is my proxy." You can add IPs, CIDR ranges, or ASNs (like AS13335 for Cloudflare) to this list under Security > Settings > IP Detection.
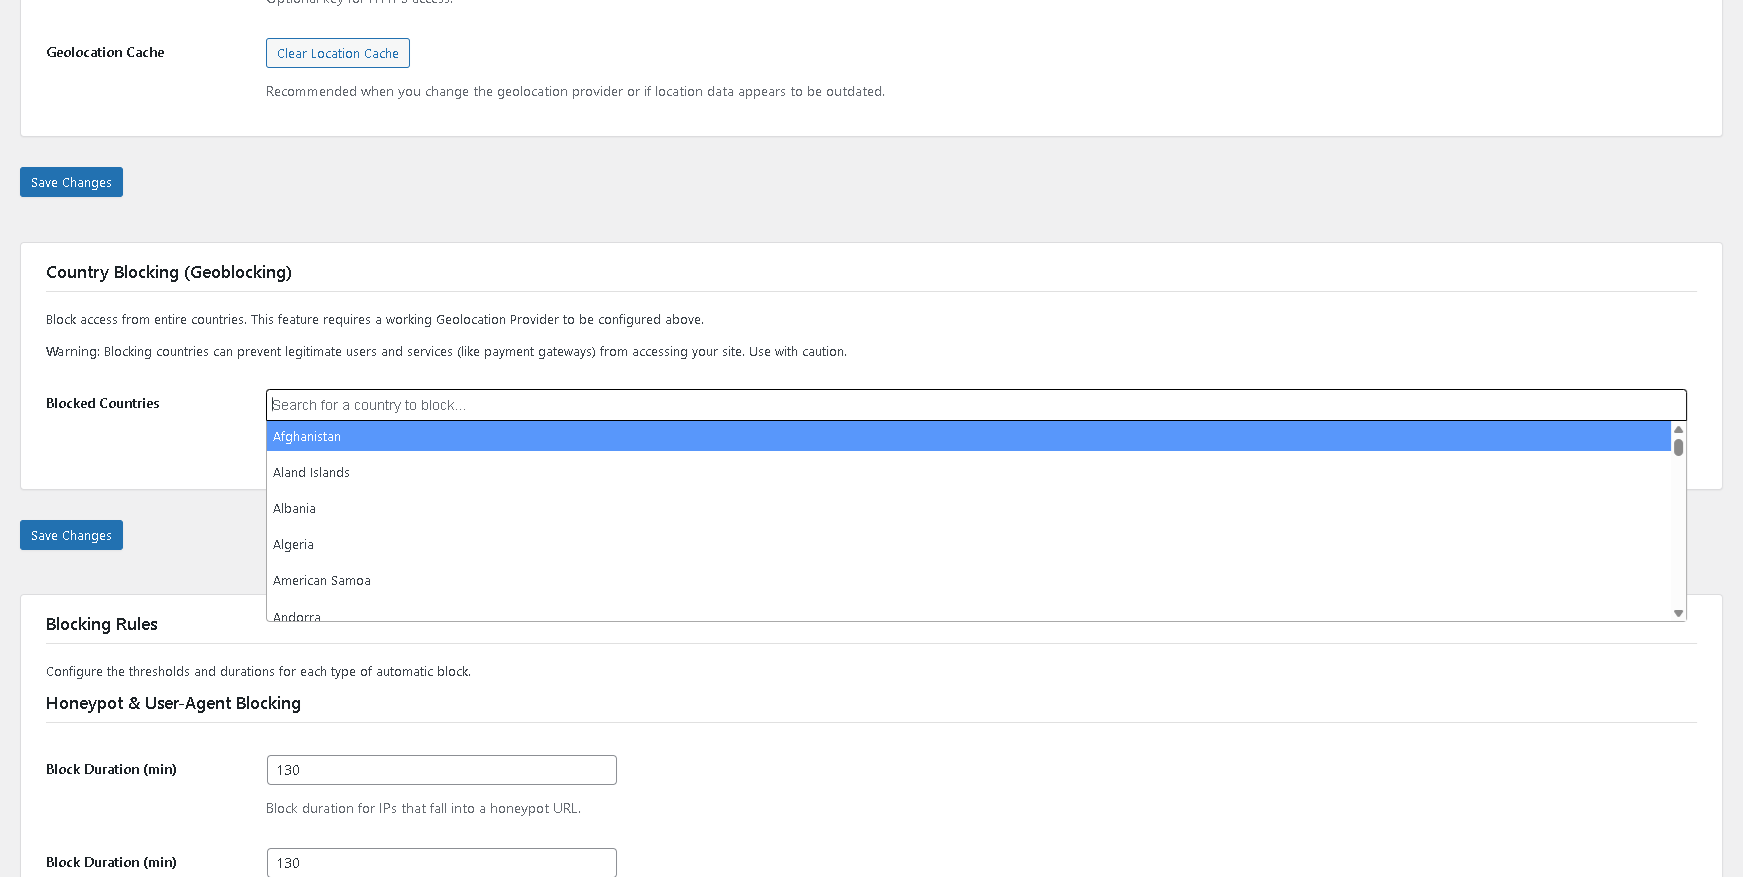
What is Geo-Challenge? How is it different from Geoblocking?
Geoblocking is a hard block. It shows a "403 Access Denied" page to visitors from selected countries.
Geo-Challenge is a soft block. It shows a quick, automated JavaScript test to visitors from selected countries. Legitimate humans pass instantly, while most bots are stopped. This is useful for regions you are suspicious of but do not want to block entirely. You can, for example, block Country A and challenge Country B. You can configure it in Security > Settings > Core Protections.
What is the difference between Automatic and Managed JS Challenge Modes?
Automatic (Transparent execution): The plugin runs a silent Proof-of-Work (PoW) mathematical challenge in the background. If the visitor's browser solves it within 5 seconds, they are automatically redirected to their destination without needing to click anything. Great for a frictionless user experience. Managed (Human interaction required): The visitor must manually click a checkbox ("I am human") and optionally wait a few seconds. This mode is the ultimate defense against advanced headless browsers and intelligent bots that can solve mathematical scripts but cannot simulate human mouse interactions.
How do I solve issues with the JavaScript challenge and caching plugins?
The JavaScript challenge (used by Geo-Challenge, Signature Engine, and Endpoint Lockdown) requires dynamic content. Aggressive page caching can interfere with it. If you experience issues (like a challenge loop or a "Verification failed" error), you must configure your caching plugin (e.g., WP Rocket, WP Fastest Cache, LiteSpeed Cache) to NOT cache pages for visitors who do not have the advaipbl_js_verified cookie. Most caching plugins have a setting like "Never cache pages that use this cookie."
How do I solve issues with the JavaScript challenge and cookie consent (RGPD/GDPR) plugins?
Cookie consent plugins (like CookieYes) may block our security cookie from being set. To fix this, you must go into your cookie plugin's settings and classify the cookie named advaipbl_js_verified as "Strictly Necessary" or "Essential". This will allow the security challenge to function correctly.
What is the new "Local Database" Geolocation Method?
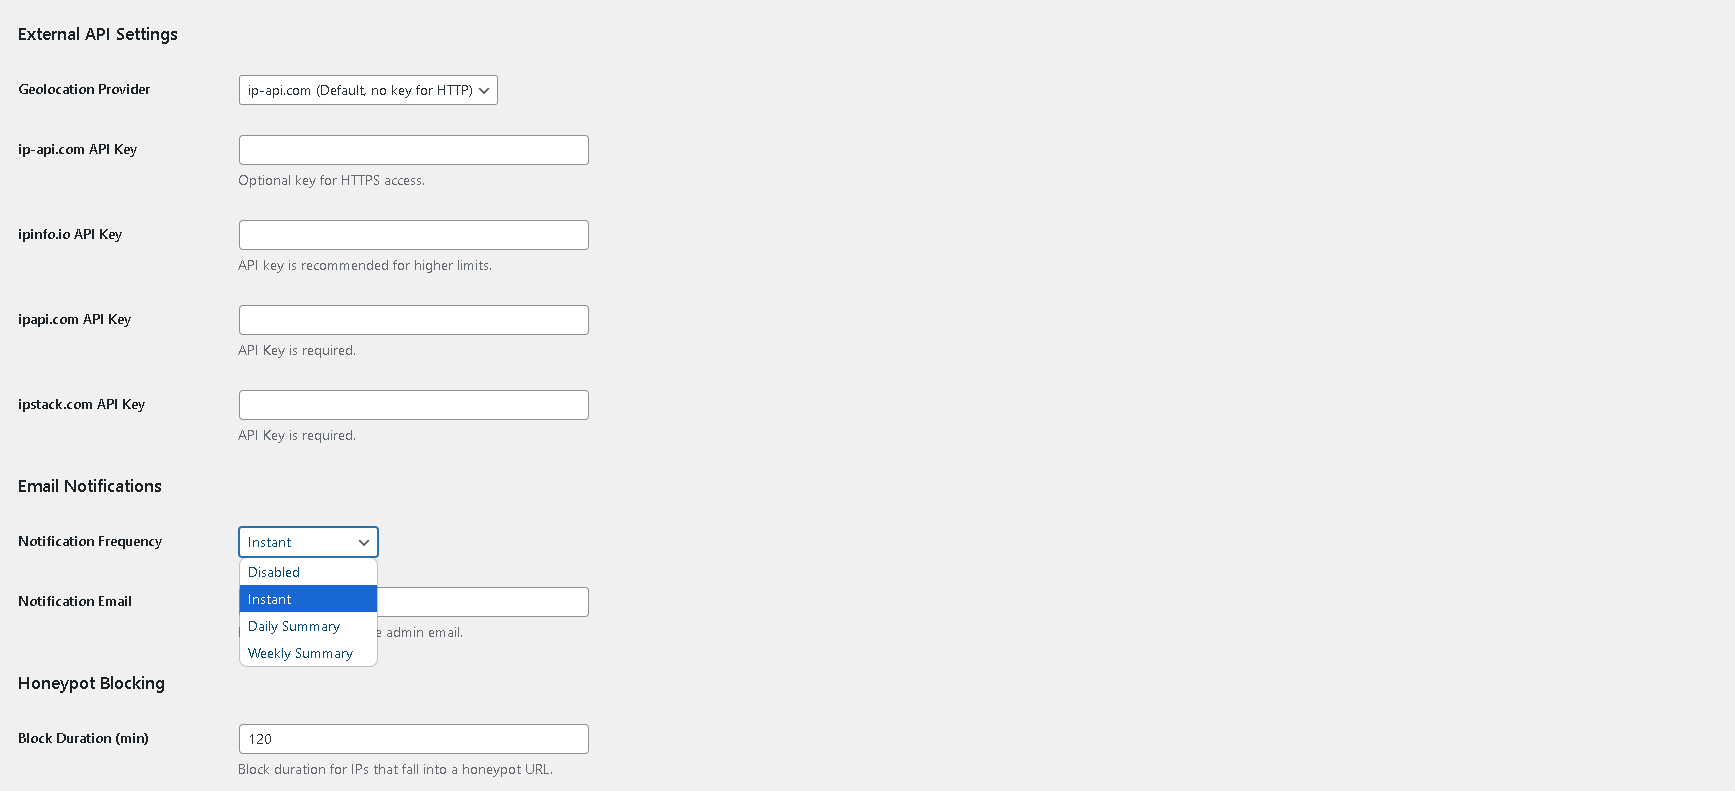
For maximum performance, the plugin offers two ways to identify an IP's location (Security > Settings > Geolocation):
- Real-time API (Default): Easy to set up and great for most websites.
- Local Database (Highest Performance): Downloads the MaxMind GeoLite2 database to your server for instant, offline lookups with zero external API calls. Recommended for high-traffic sites. Requires a free MaxMind license key.
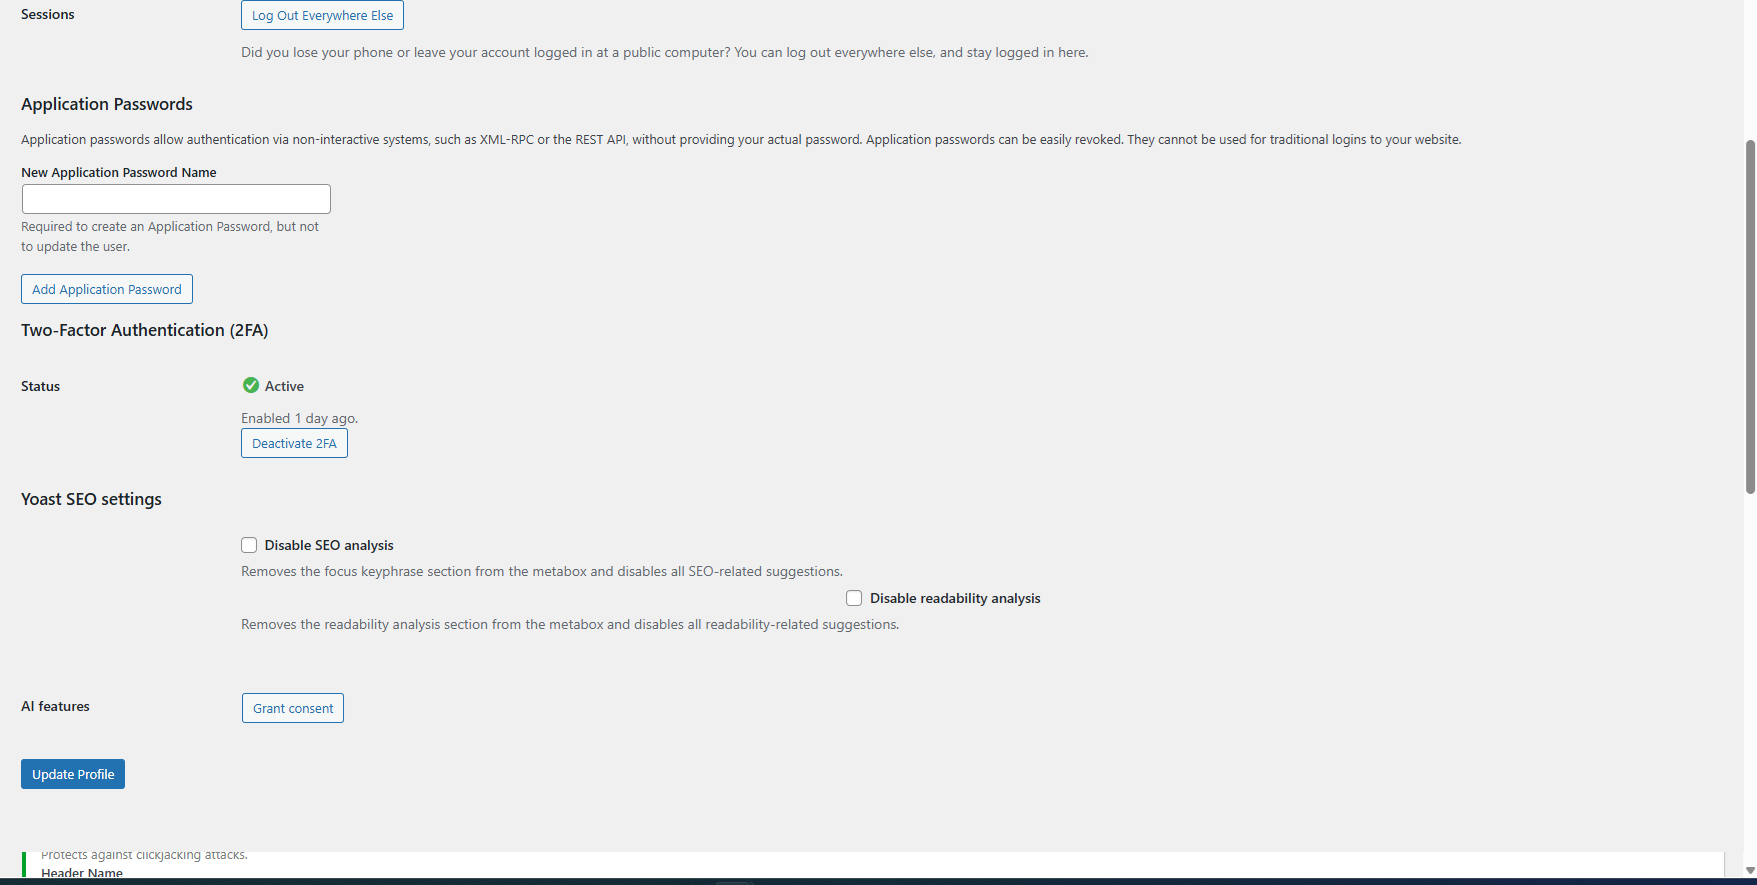
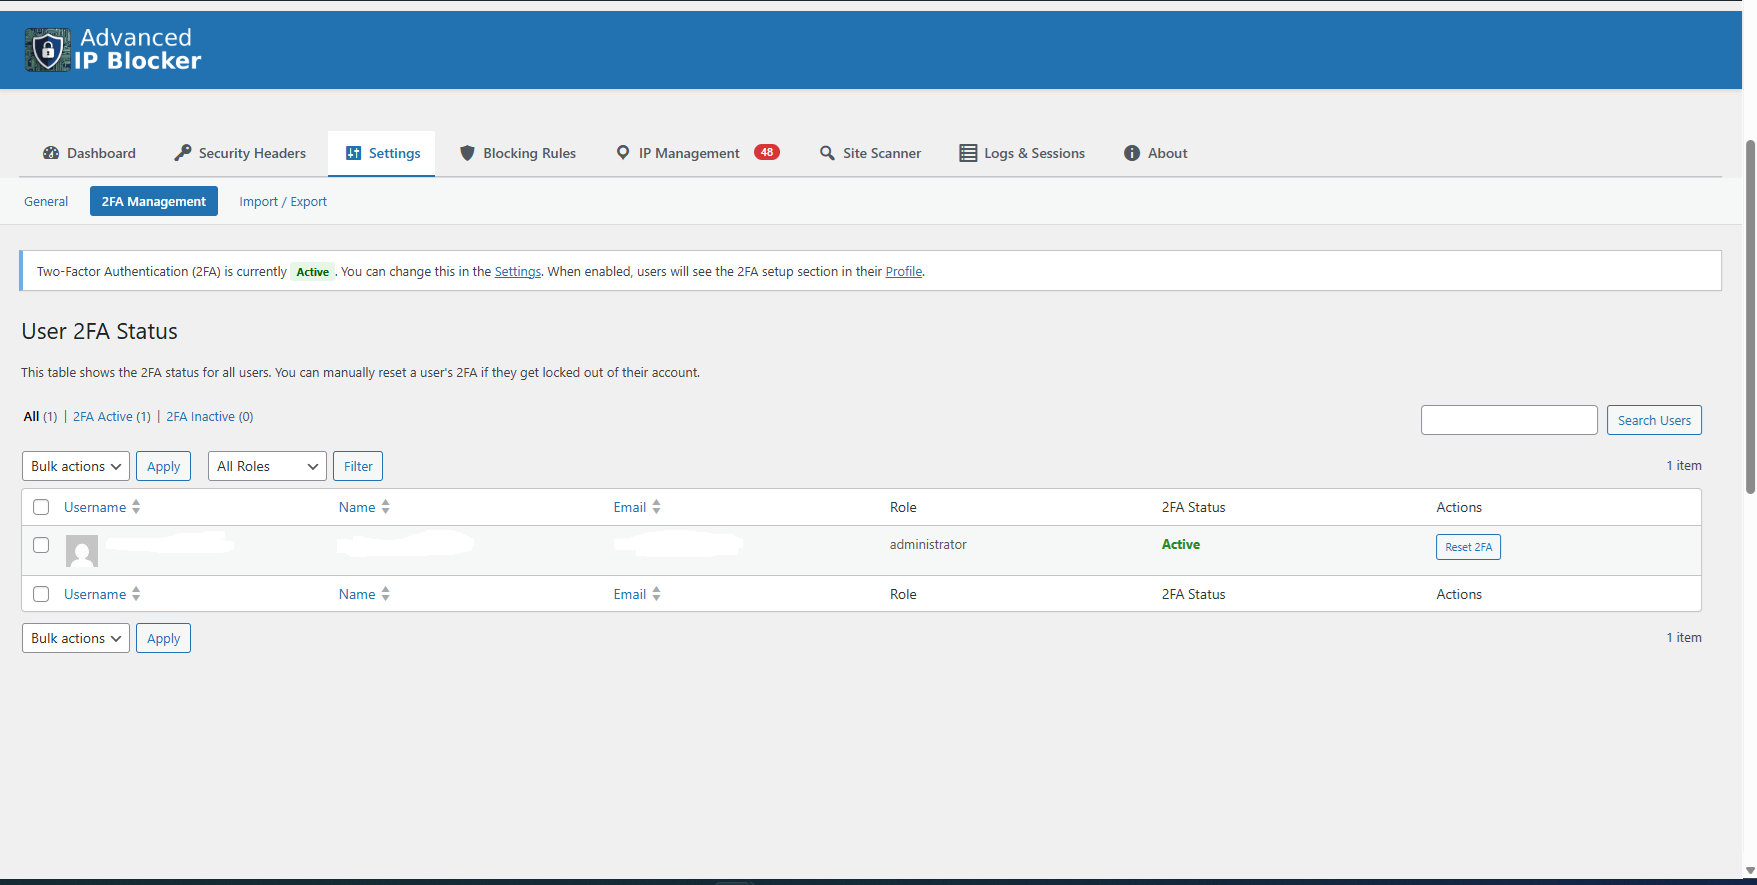
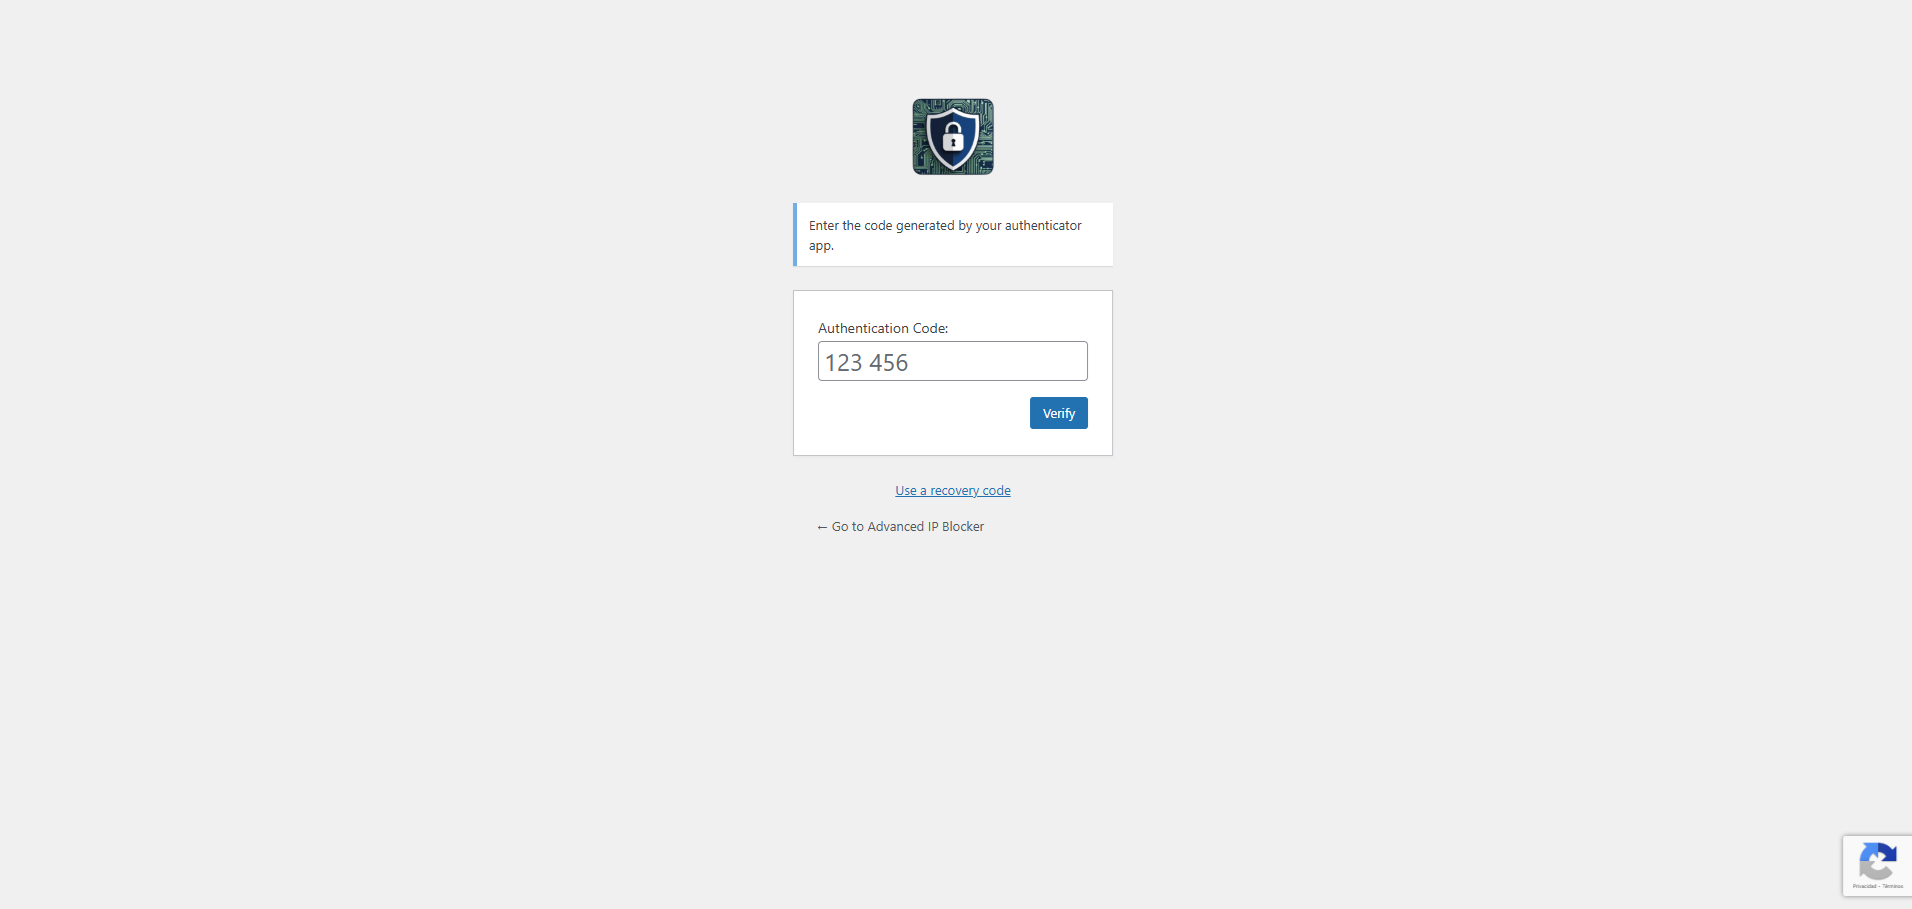
How do I set up Two-Factor Authentication (2FA)?
- Admin: Go to
Security > Settings > Login & User Protectionand enable 2FA globally. You can also enforce it for specific user roles. - User: Go to your WordPress Profile page. You will find a new section to set up 2FA by scanning a QR code with an authenticator app and saving your backup codes.
What is the "Attack Signature Engine"?
This is an advanced defense that stops botnets by blocking the attacker's "fingerprint" (signature), not just their IP. It works in three phases you can enable in Security > Settings > Signature Engine: Logging, Analysis (a background task that finds patterns), and Blocking (presents a JS challenge to malicious signatures). You can manage detected signatures in IP Management > Blocked Signatures.
What is the difference between the WAF, Signature Engine, and Advanced Rules?
Think of them as three layers of defense:
- WAF (Web Application Firewall): The simplest layer. It blocks requests based on simple malicious patterns (e.g.,
union select). It's fast and stops common, generic attacks. - Attack Signature Engine: The automated layer. It looks for patterns of attack from many different IPs (botnets) and blocks the attack's "fingerprint" (signature) for all visitors. You don't create these rules; the plugin does.
- Advanced Rules Engine: The manual control layer. This is where you build your own specific, multi-conditional rules. For example: "IF the visitor is from China AND is trying to access
/wp-admin/THEN Block them permanently." It gives you the ultimate power to create a security policy tailored exactly to your site's needs.
How should I configure the plugin for my specific website?
While every website's security needs are unique, here is a general guide to get you started based on your site's profile. For a deep dive into every feature, please consult our Comprehensive Feature Guide. 1. Essential First Steps (For ALL Websites) No matter your site type, do these three things immediately after installation to ensure a strong baseline security without locking yourself out:
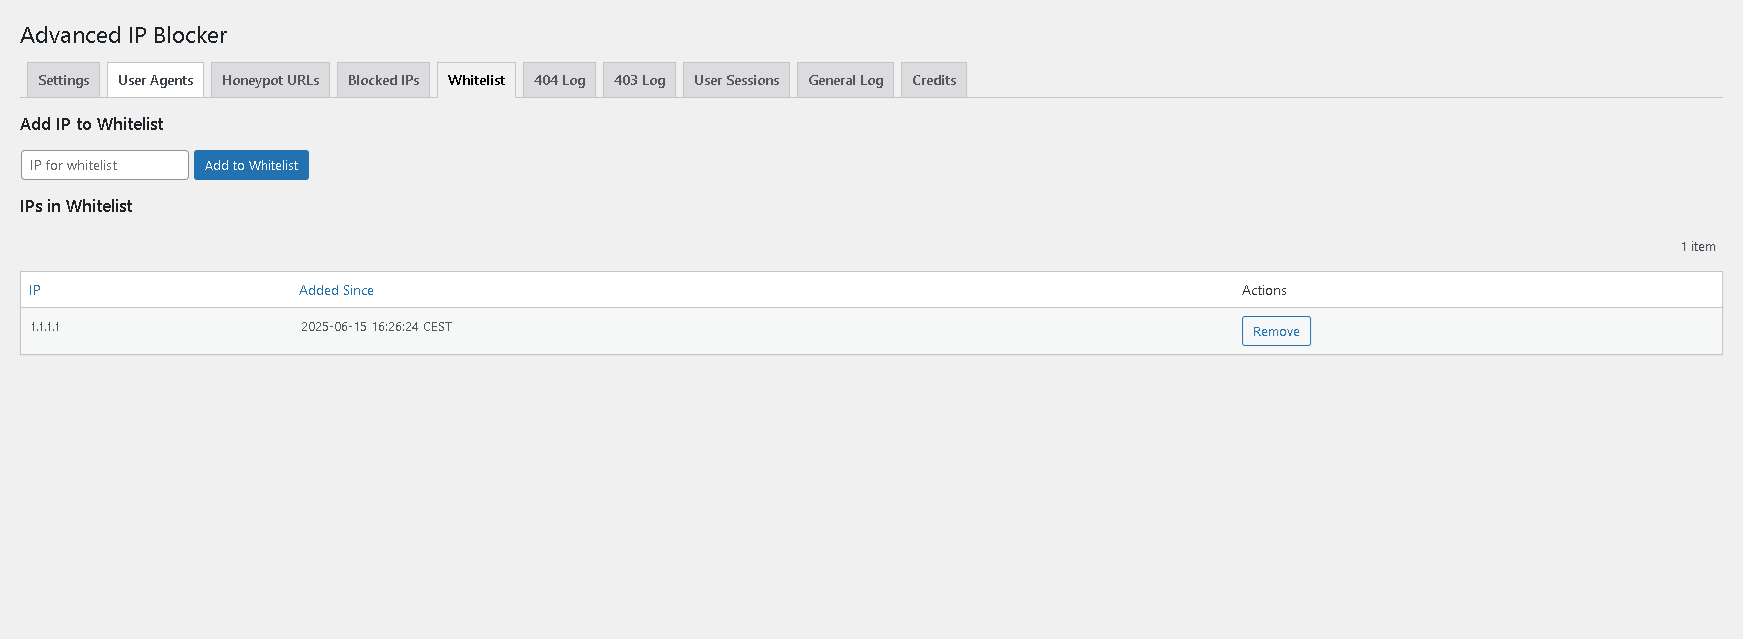
- Whitelist Your IPs: Go to
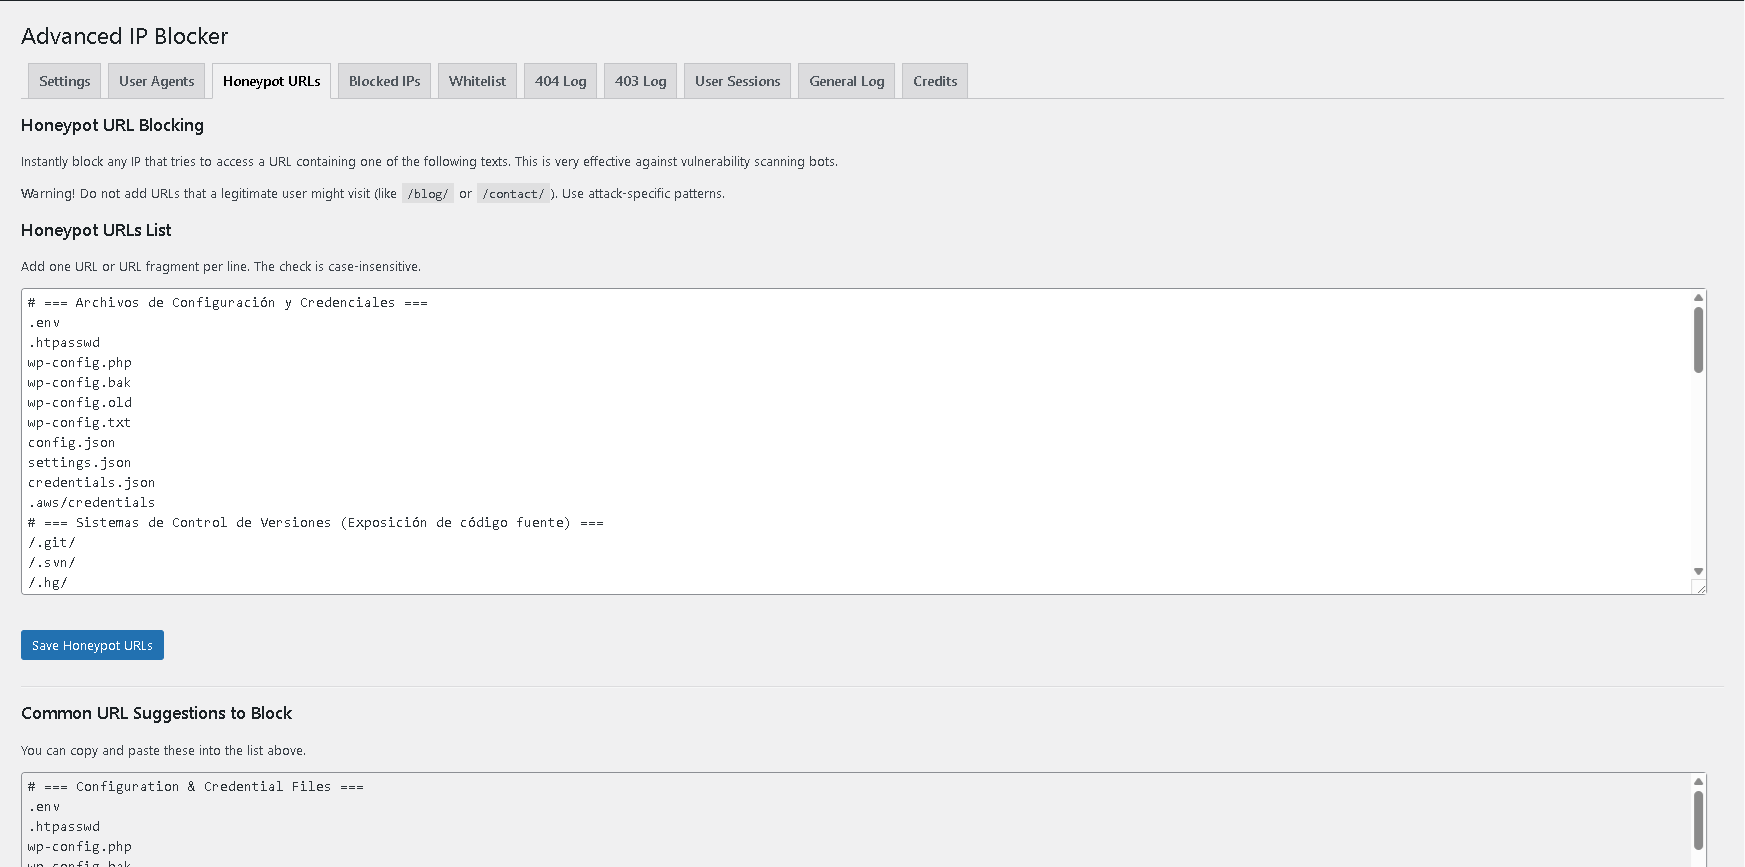
Security > Dashboard > System Statusand use the one-click buttons to add your current IP and your server's IP to the whitelist. This is the most critical step. - Activate Trap Defenses: Go to
Security > Blocking Rules, and in the "User Agents" and "Honeypot URLs" tabs, copy the suggested lists into the active blocklist text areas. This provides immediate protection from thousands of common bots. - Enable Logging: Go to
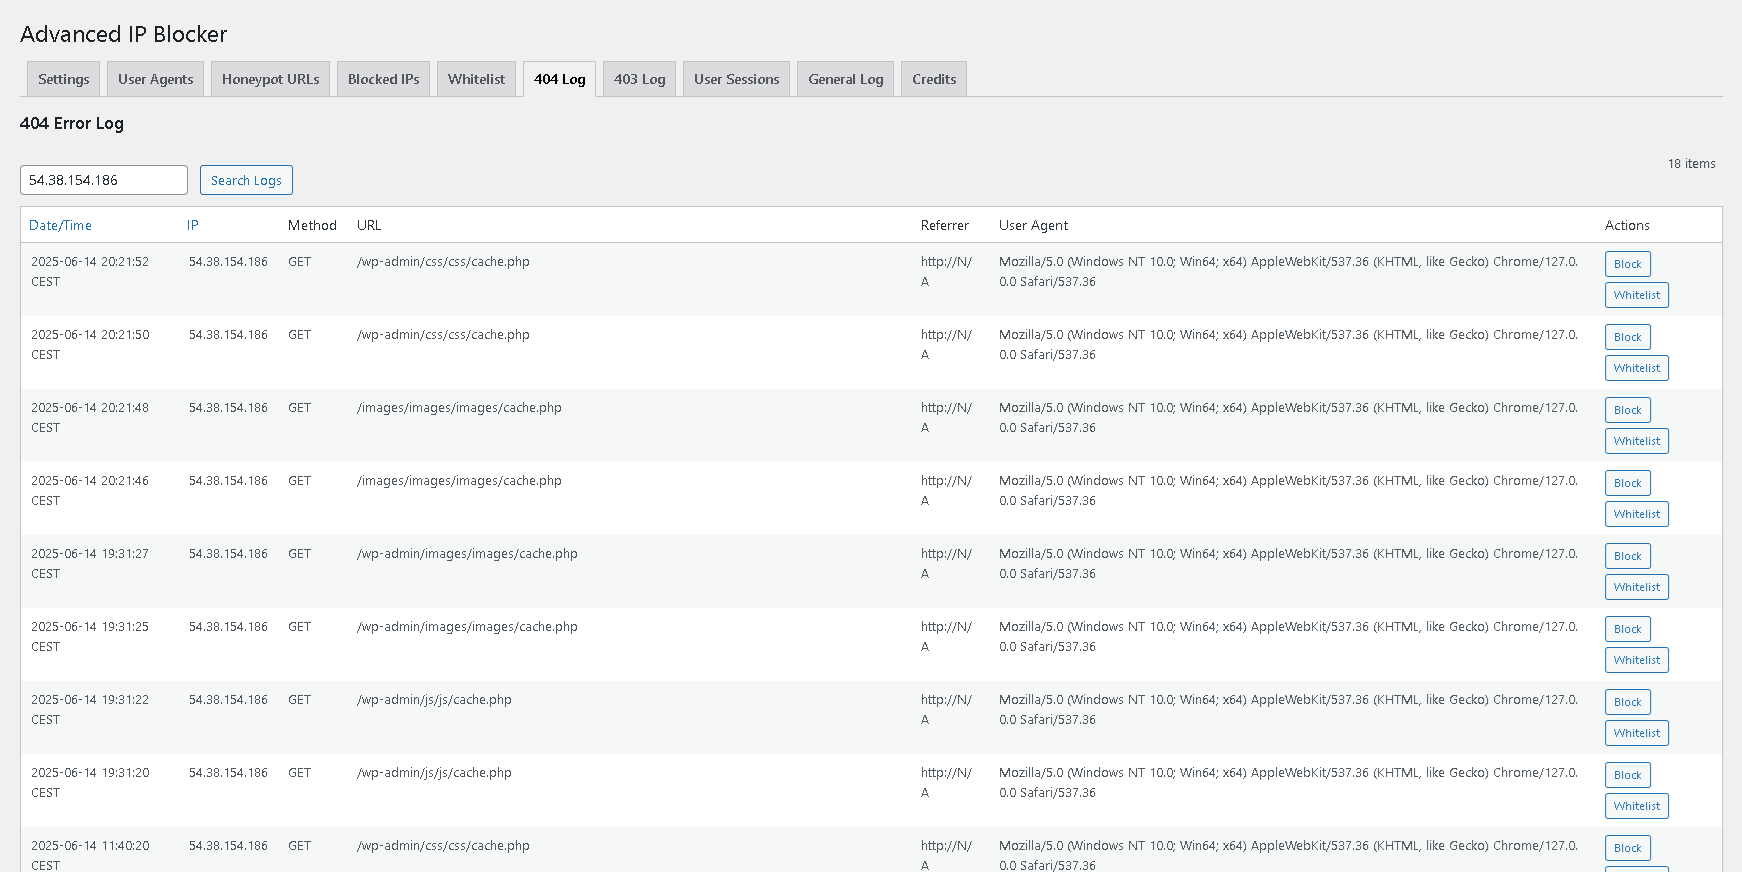
Security > Settings > Generaland ensure "Enable Logging" is turned on. This gives you the visibility you need to understand what is happening on your site.
- Enable the IP Trust & Threat Scoring System: This is the smartest way to block bad actors contextually. The default point values are an excellent starting point. (Found in
Settings > IP Trust & Threat Scoring). - Enable the WAF and Rate Limiting: These are powerful proactive defenses. (Found in
Settings > Core ProtectionsandThreshold Blocking). -
Enable Spamhaus ASN Protection: Let the plugin automatically block thousands of known malicious networks for you. (Found in
Settings > Core Protections). For an E-commerce or Membership Site (WooCommerce, etc.): You need to protect your site while ensuring legitimate customers from around the world are never blocked. -
Enable Two-Factor Authentication (2FA): This is the single best way to protect administrator and shop manager accounts. Enforce it for these roles in
Settings > Login & User Protection. - Use Geo-Challenge Instead of Geoblocking: If you receive attacks from a specific country but also have customers there, use the Geo-Challenge feature instead of a hard block. This will stop bots without affecting human users.
- CRITICAL: DO NOT USE "Whitelist Login Access". This feature will lock out your customers.
- WAF Exclusions: Double-check that URLs for your payment gateways (like Stripe or PayPal webhooks) are in the WAF exclusion list to ensure payments are processed correctly. For Any Site Using a CDN or Reverse Proxy (like Cloudflare): Your top priority is ensuring the plugin detects the correct visitor IP address.
-
Configure Trusted Proxies: Go to
Security > Settings > IP Detection. Add the IPs or, even better, the ASNs of your CDN/proxy service to this list. For Cloudflare, simply addAS13335on a new line. This is essential for the accuracy of all other security features.
How can I protect a non-WordPress folder on my site?
This plugin includes an advanced "Edge Firewall Mode" that allows you to extend its protection to any PHP script on your server. This is perfect for securing custom applications or directories that are not managed by WordPress. To enable it, you need to add a single line of code to the beginning of the PHP file you want to protect. This manual step ensures that the protection is explicit and works on any server environment. For a complete step-by-step guide, please see our documentation: How to Protect Non-WordPress Folders.
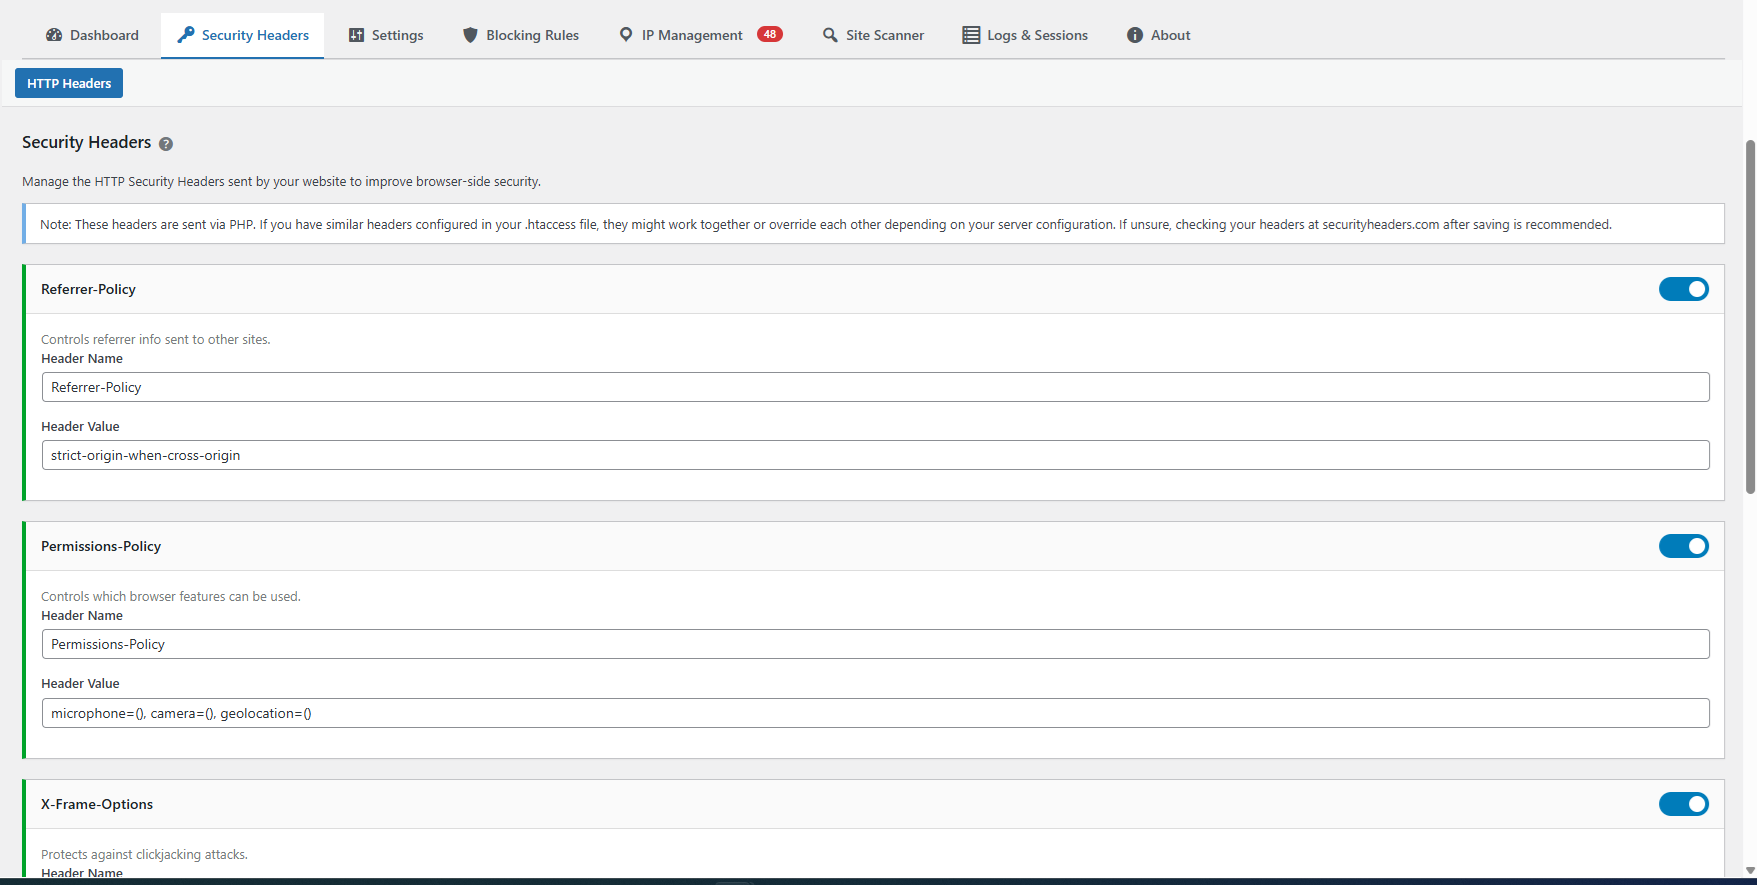
What are HTTP Security Headers and why do I need them?
HTTP Security Headers are instructions sent by your website to the visitor's browser. They tell the browser how to behave to prevent specific types of attacks.
- HSTS: Forces the browser to use a secure HTTPS connection.
- X-Frame-Options: Prevents other sites from embedding your site in an iframe (Clickjacking protection).
- X-Content-Type-Options: Prevents the browser from "guessing" the file type (MIME sniffing protection).
- Permissions-Policy: Controls which features (camera, mic, etc.) legitimate sites can use.
You can configure all of these (and more!) in
Security > Settings > Security Headers.
What does the "Username Blocking" feature do?
It allows you to create aggressive, targeted rules to block login attempts based on the username provided. For example, if you know you never use the username "admin", you can create a rule: IF Username IS "admin" THEN Block. This stops brute-force attacks instantly before they can even guess a password.
Why was the "Direct File Access" warning added for the loader file?
We improved our security compliance checks. The advaipbl-loader.php file is a special file designed to run outside of WordPress in "Edge Mode". We added a specific security check to ensure it can only be run via the auto_prepend_file mechanism and cannot be accessed directly by a browser, further hardening the plugin against probing.
更新日志:
- NEW FEATURE: Asynchronous Challenge & Advanced Rules Metrics. Dashboard now displays real-time performance analytics for challenges served/passed/failed and top Advanced Rules triggered with zero database write-locking overhead.
- CRITICAL FIX: Resolved an interception conflict where AIB would mistakenly attempt to validate third-party Turnstile/hCaptcha responses (e.g. from WP Simple Membership or standard WP Login implementations). AIB now strictly validates its own hidden fields.
- SECURITY HARDENING: Fixed a vulnerability in the Rules Engine where an attacker could bypass a WAF challenge by injecting standard captcha response fields into a POST request.
- ENHANCEMENT: Changed the generic Google recommendation message to suggest Stripe or PayPal when users seek alternative payment options, improving international clarity.
- ENHANCEMENT: Adjusted and improved multiple translations for clarity (backported from previous 8.11.4).
- ENHANCEMENT: Expanded default WAF exclusions to automatically cover generic WooCommerce REST API webhooks (
?wc-api=) to natively support gateways like Mollie, Square, and Coinbase without false positives. - ENHANCEMENT: Added common mobile icons (like
apple-touch-icon.png) and crawler paths (robots.txt,sitemap.xml) to the default global 404/403 exclusions to prevent accidental blocking of legitimate traffic. - ENHANCEMENT: Included an automatic database migration routine to safely inject these new default exclusions into existing installations without overwriting user customizations.
- ENHANCEMENT: Improved UX for the Two-Factor Authentication (2FA) module by adding automatic focus to the verification code input fields.
- SECURITY HARDENING: Synchronized the internal early-detection transient arrays (
detect_http_error_status) with modern block types (abuseipdb,advanced_rule,impersonation,aib_network) to guarantee absolute impermeability against re-entrant loops.
- CRITICAL FIX: Resolved an infinite recursion bug in the firewall block pipeline that could cause an empty HTTP 200 response and poison Nginx/FastCGI page caches (such as Kinsta). This update ensures X-Accel-Expires headers are strictly enforced to prevent cache poisoning. Thanks to @thewatchman3 for the excellent report!
- NEW FEATURE: Added "Block Ghost IPs" global option to automatically block IPs without ASN and Reverse DNS.
- ENHANCEMENT: Added 'is empty' and 'is not empty' conditions to the ASN field in Advanced Rules, and improved 'Hostname / rDNS' targeting for strict custom rules.
- ENHANCEMENT: Added a new toggle switch in the Advanced Rules list to easily activate or deactivate individual rules.
- NEW FEATURE: Added 'Request Method' (GET, POST, etc.) and 'Referer' conditions to the Advanced Rules Engine to effectively block referrer spam and targeted attack vectors.
- PERFORMANCE FIX: Implemented native in-memory caching for bulk-imported CIDR blocks. This prevents "double blocks" by evaluating CIDR ranges natively in PHP before triggering third-party APIs like AbuseIPDB.
- ENHANCEMENT: Advanced Rules that trigger Captcha or JS Challenges are now properly logged and badged in the Live Feed and Challenge Logs.
- ENHANCEMENT: Log retention policies now comprehensively clean up all secondary tracking tables to minimize database footprint on high-traffic sites.
- BUG FIX: Fully resolved Edge Firewall compatibility issues with native redirect exits for early Captcha/Challenge interception.
- BUG FIX: Ensures complete removal of dynamic caches and community network options upon clean uninstallation.
- NEW FEATURE: Captcha Integrations. Native support for Cloudflare Turnstile and hCaptcha, alongside our proprietary invisible JS Challenge. Includes granular control per security module and a smart emergency fallback to prevent accidental lockouts.
- NEW FEATURE: Rate Limiting Advanced Rules. Define custom request limits, time windows, and specific actions (like presenting a Captcha or blocking) for individual URLs and endpoints independently from the global rate limit.
- SECURITY HARDENING: Protected the local GeoIP database folder to prevent unauthorized direct downloads of MaxMind
.mmdbfiles, ensuring full compliance with MaxMind EULA and saving server bandwidth. - PERFORMANCE FIX: Added a circuit-breaker to the bot IP verification engine. Prevents an infinite loop of HTTP timeout delays (potential DoS) if the server is unable to fetch the official bot IP lists due to firewall restrictions.
- SECURITY HARDENING: Added a randomized cryptographic token to
.htaccessbackup filenames to prevent unauthorized enumeration, as recommended by the WordPress Plugin Review Team.
- NEW FEATURE: Verify Monitoring Bots (IP List). The plugin now automatically downloads and verifies official IP lists from monitoring services like Pingdom and UptimeRobot, allowing legitimate pings and safely preventing them from being blocked.
- NEW MAJOR FEATURE: Distributed Attack Protection (Auto-Panic). Automatically shields your entire site with a global JS challenge during massive traffic spikes to prevent server overload.
- ENHANCEMENT: Granular control over Panic Mode alerts. Choose between receiving both Email & Push notifications, Push-only, or completely disabling them for silent operation.