
Plugin Name
| 开发者 |
tosinbot
atarapay xwebyna koderia damilare4atara |
|---|---|
| 更新时间 | 2024年5月1日 14:49 |
| PHP版本: | 5.2.4 及以上 |
| WordPress版本: | 6.4 |
| 版权: | GPLv2 or later |
| 版权网址: | 版权信息 |
详情介绍:
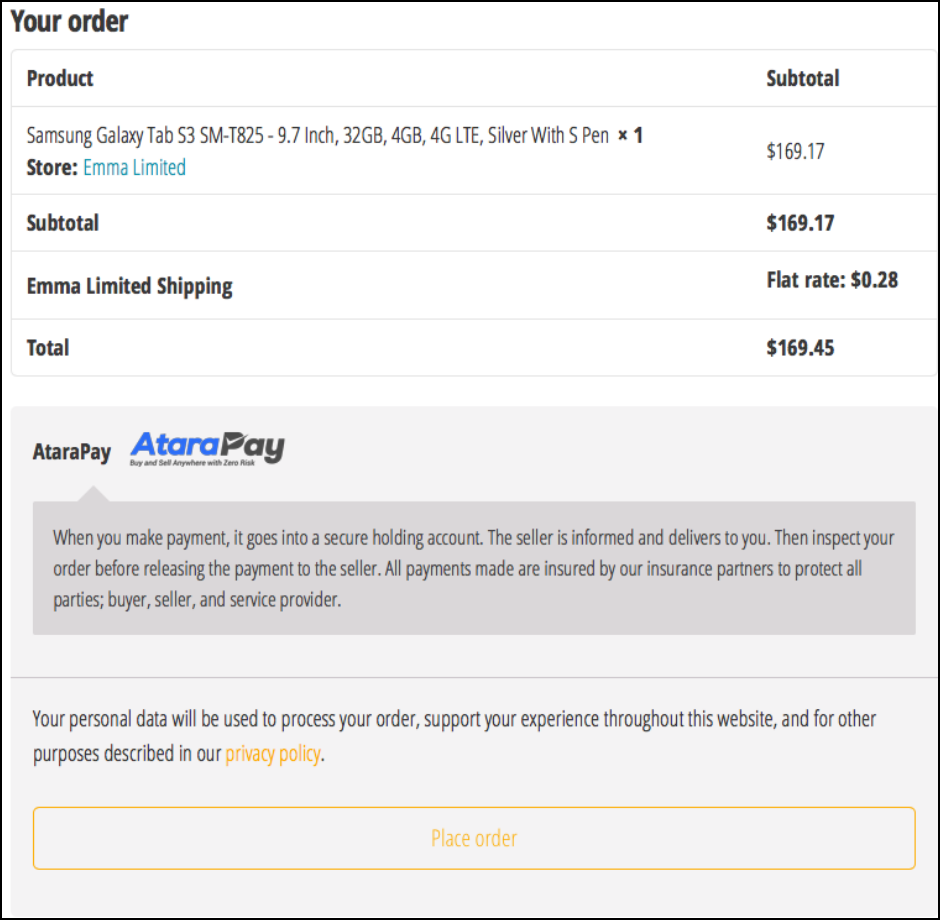
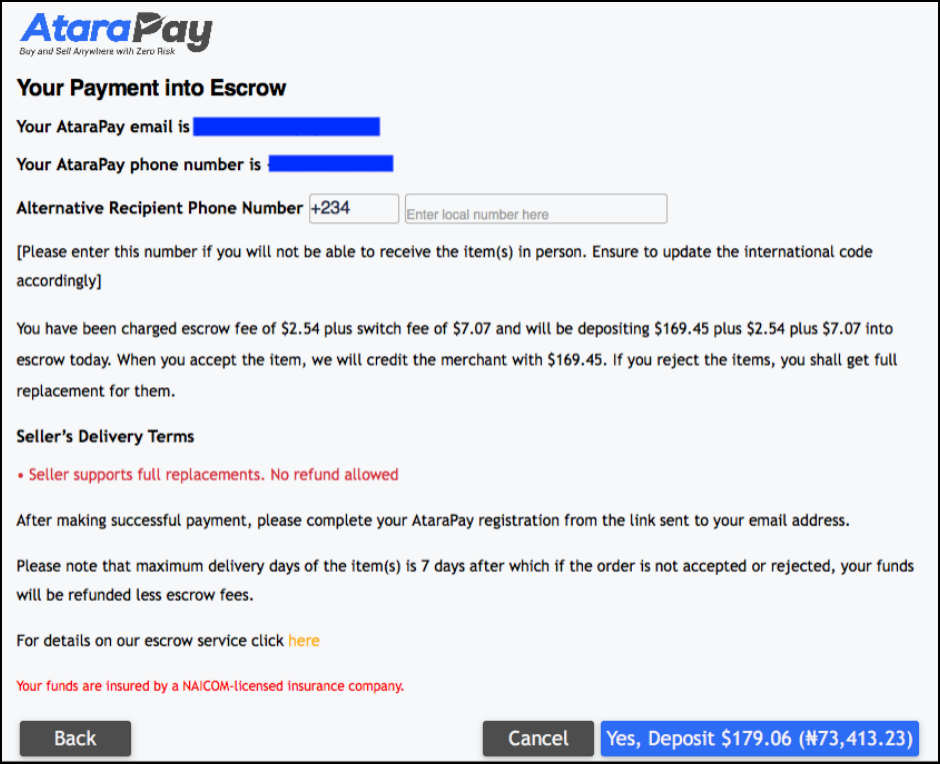
AtaraPay is a web and mobile tool used by seller and buyer for protection during any online or offline commercial transaction through funds held in escrow by a trusted third-party. The prevalence of the use of cash on delivery is a payment method that benefits only the buyer leaving eCommerce sellers with little option to collect payment before delivery. AtaraPay helps to resolve this by creating an escrow-based payment method, where buyer pays into escrow and seller is notified to make delivery. On successful delivery, the buyer inspects the goods or service and expects to accept or reject it using our mobile and web app.
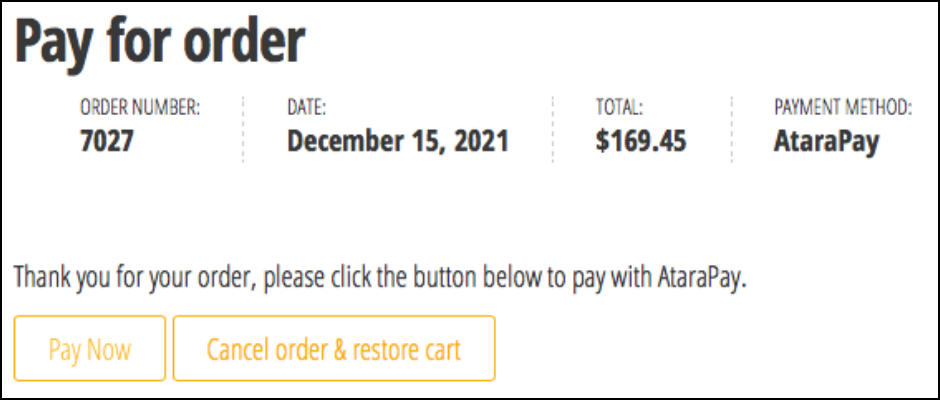
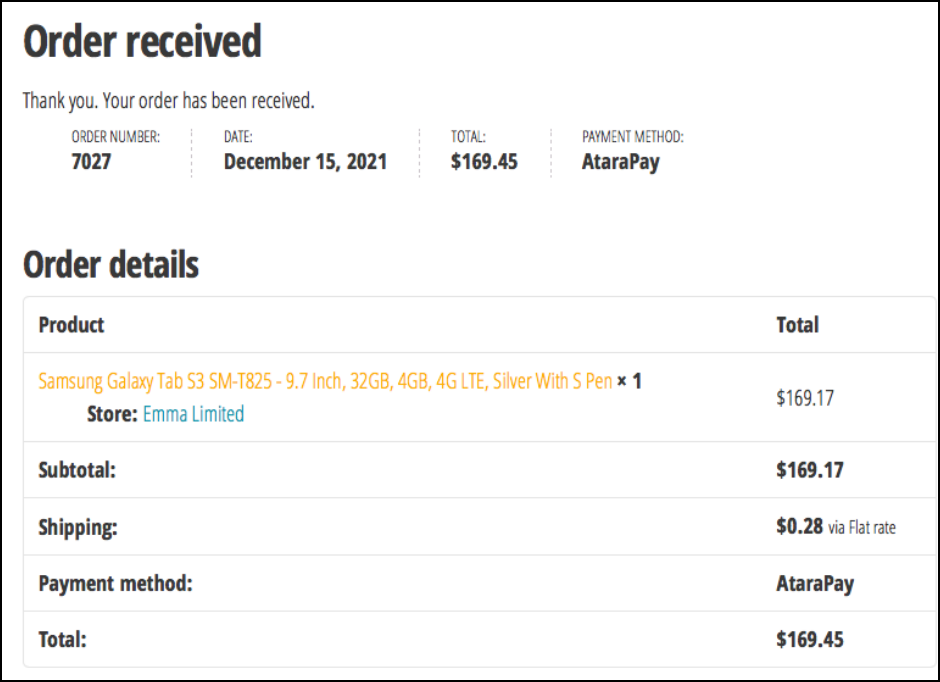
Deploying this extension onto your Wordpress website (single or multi- vendor), provides a seamless and simple way of automating payment with our escrow solution. When a shopper gets to the checkout page, AtaraPay is listed as one of the payment options and selected for payment via credit or debit card, bank transfer and USSD. When payment is made, it is held in escrow on behalf of both seller and buyer until the buyer inspects and accepts that the order is in expected condition. For details on how our escrow solution works, please watch the AtaraPay escrow video.
AtaraPay automates and extremely simplifies the escrow process. It also exposes escrow status APIs that enable seamless integration between AtaraPay and any delivery app service. It automates the delivery or cancellation processes making the escrow process very user friendly and effective. For details on our APIs, visit AtaraPay API Documentation.
AtaraPay will increase prepayment for your Magento store and improve the credibility of your business since shoppers are assured by your willingness to allow them inspect the goods before you are credited. Conversely, you are comforted knowing that the shopper has genuine intent to buy since funds are paid before delivery.
安装:
Stage 1
- Register as an Individual Seller or Business Seller account on the AtaraPay test environment at http://staging.atarapay.com/#/register/seller/.
- Make sure you are able to successfully login to access your account.
- Go to the "API" tab on the sidebar, click "API Key" and copy the Public and Private keys as shown in the screenshot
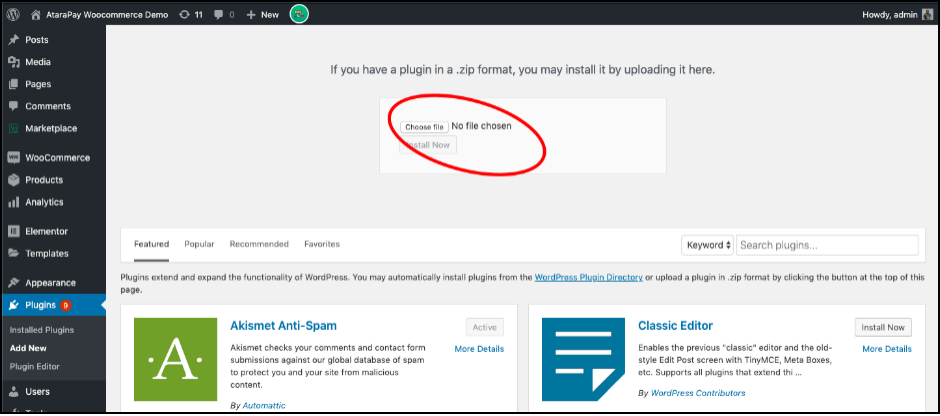
- Download the zip file from WordPress Marketplace
- Login to your WordPress admin dashboard
- On the left pane, navigate to Plugins \> Add New. Click on the Add New button to upload the zip file and hit the Install Now button to install the plugin
- Once it's successfully installed, click the Activate button to activate the plugin
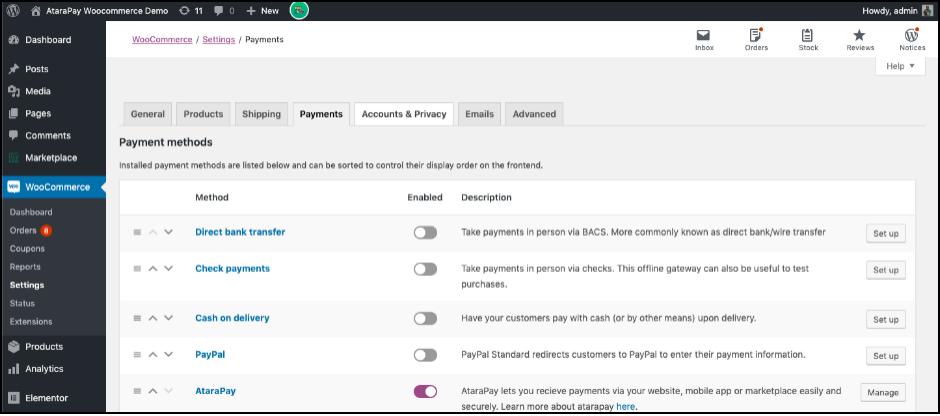
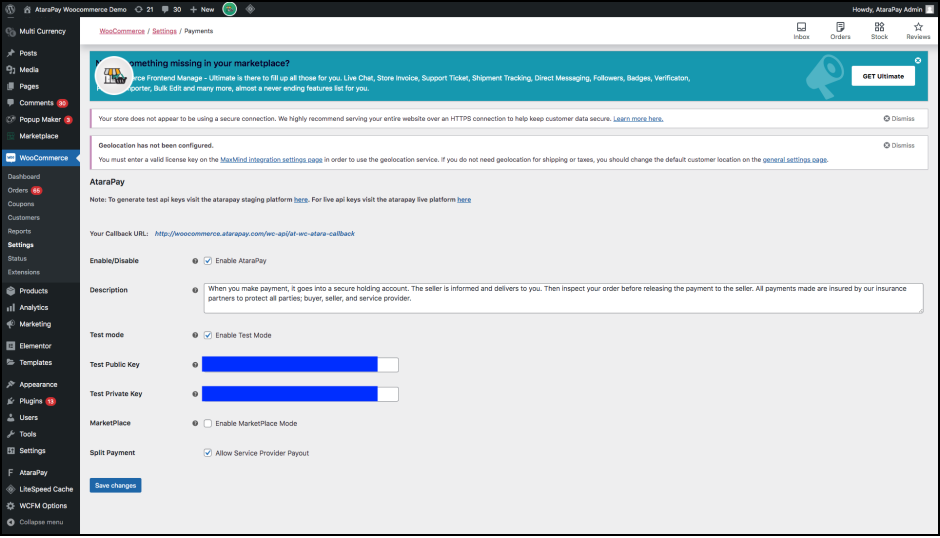
- On the left pane, navigate to WooCommerce \> Settings and click the "Payments" tab
- Click on the Setup or Manage button in front of the AtaraPay plugin block.
- Your Callback URL – Copy the callback URL provided. Then login to your AtaraPay seller dashboard, navigate to the human icon at the top right \> Settings \> Callback URL. Click open the accordion and paste the URL into the text field and hit the Save button to save.
- Enable/Disable – Check the box to enable AtaraPay Payment Gateway.
- Test Mode – Check the box to enable Test Mode if you are using a test key for setup purpose, once you are done testing remember to uncheck the Test Mode to enable LIVE usage.
- Test Public Key – Input the Public Key generated from your http://staging.atarapay.com seller account under the API tab
- Test Private Key – Input the Test Private Key generated from your http://staging.atarapay.com seller account under the API tab.
- MarketPlace – If you are a marketplace seller, check the box Enable MarketPlace Mode.
- Split Payment – Check "Allow Service Provider Payout", if you want to include service providers in commission-based transactions. If not, leave unchecked. Stage 3
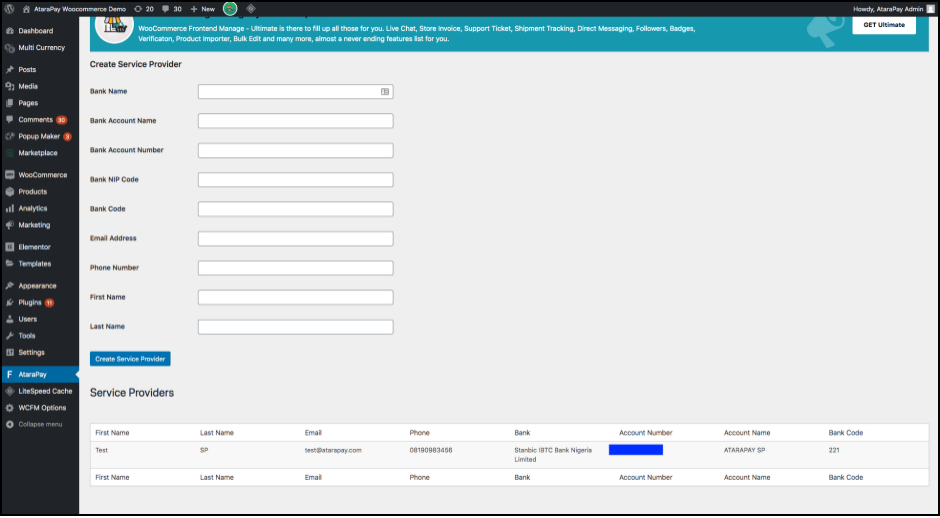
- To add service providers, navigate to AtaraPay tab on the left pane of your WordPress admin dashboard. Here you can add service providers and also see service providers that were already created by you on your AtaraPay dashboard. (Please note that you must first add your own account in your AtaraPay dashboard in order to see the list of service providers on this page).
- To add your own bank account, login to your seller account at http://staging.atarapay.com, then navigate to Payout \> Payout Details and click the Add Bank Details button to add your own bank account.
- You can add service providers from your AtaraPay or WordPress admin dashboards.
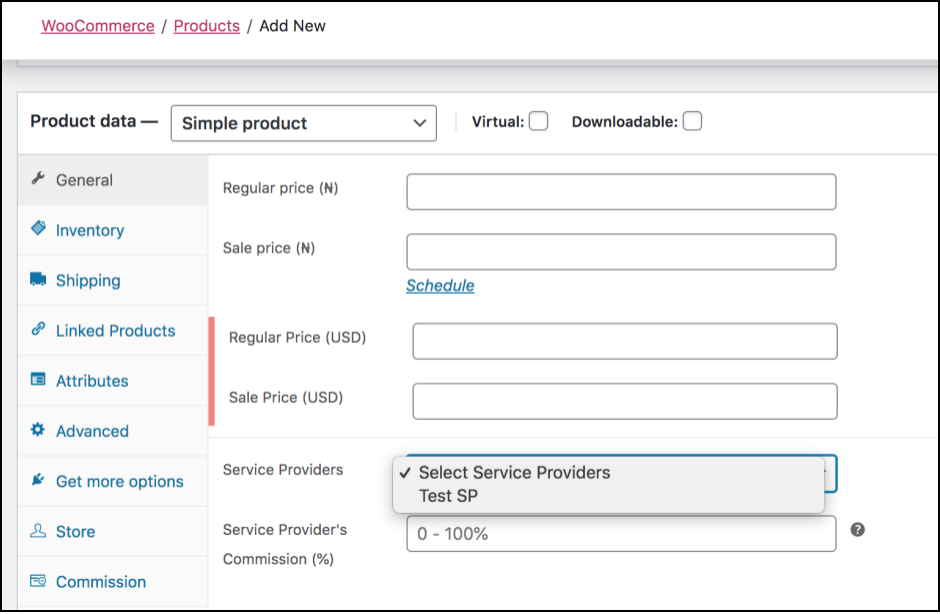
- To associate service provider and their commission per product, login to your WordPress admin dashboard, then navigate to Product \> Add New \> General to add a new product or Product \> All Products to edit an existing one.
- Live Public Key – Once you are done testing and ready to go live, reference step 9 above and do the following;
- Uncheck Test Mode
- Replace the test keys with the live Public and Private Keys generated from your live seller account which you are to create on https://app.atarapay.com seller account
屏幕截图:
更新日志:
1.0
- Initial release
- Fix undefined phone number issue
- Fix undefined phone number issue
- Code clean up
- Include split payment to service provider and merchant
- Ability to choose in the Payment settings page, if merchant's wants split payment with service providers
- Ability to add service providers
- Ability to set commission per product in the Product settings page
- Ability to cancel the transaction from WooCommerce without login into AtaraPay
- Ability to set the delivery status of the transaction from WooCommerce without login into AtaraPay
- Reflects the AtaraPay escrow statuses in the WooCommerce dashboards of the buyer and merchant using the provided Callback URL
- Enabled the ability for users registered as a Marketplace Operator on AtaraPay to seamlessly integrate to the plug-in
- Updated the AtaraPay escrow statuses in the WooCommerce dashboards of the buyer and merchant using the provided Callback URL
- Code clean up
- Fixed issue with USD conversion
- Code clean up
- Add compatibility with WordPress 6.2
- Added compatibility with WooCommerce 7.8.0
- Fixed issue with Paystack plugin
- Added compatibility with WordPress 6.3
- Added compatibility with WooCommerce 7.8.0
- Send products dimensions, weight, details to the AtaraPay API
- Added support for foreign currencies
- Fix minor bugs on checkout page
- Implement debug mode for qa team
- Add missing attributes to product api
- Add support for virtual products
- Add support for HIPOS
- Improve compatibility with WooCommerce 8.2+
- Include a way to submit USD service provider
- Add a way to cancel order on WooCommerce
- Fix issue with Woocommerce Callback API