ClaimPress – Advanced Warranty, Return, Refund & Exchange for WooCommerce
| 开发者 | dominopress |
|---|---|
| 更新时间 | 2026年7月24日 00:31 |
| PHP版本: | 7.2 及以上 |
| WordPress版本: | 7.0 |
| 版权: | GPLv2 or later |
| 版权网址: | 版权信息 |
详情介绍:
- Advanced Warranty System: Create unlimited warranty plans – from simple included warranties to complex paid tiers with multiple price points
- Smart Exchange Management: Let customers effortlessly exchange products for different sizes, colors, or variants
- Flexible Return/Refund System: Build customer trust with customizable money-back guarantees 🎯 For Store Owners: Enable one, two, or all three features on any product with just a few clicks. No coding required. No complex setup. Just powerful functionality that works right out of the box.
- Three Independent Features: Warranty, Exchange, and Return/Refund - Enable one, two, or all three on any product.
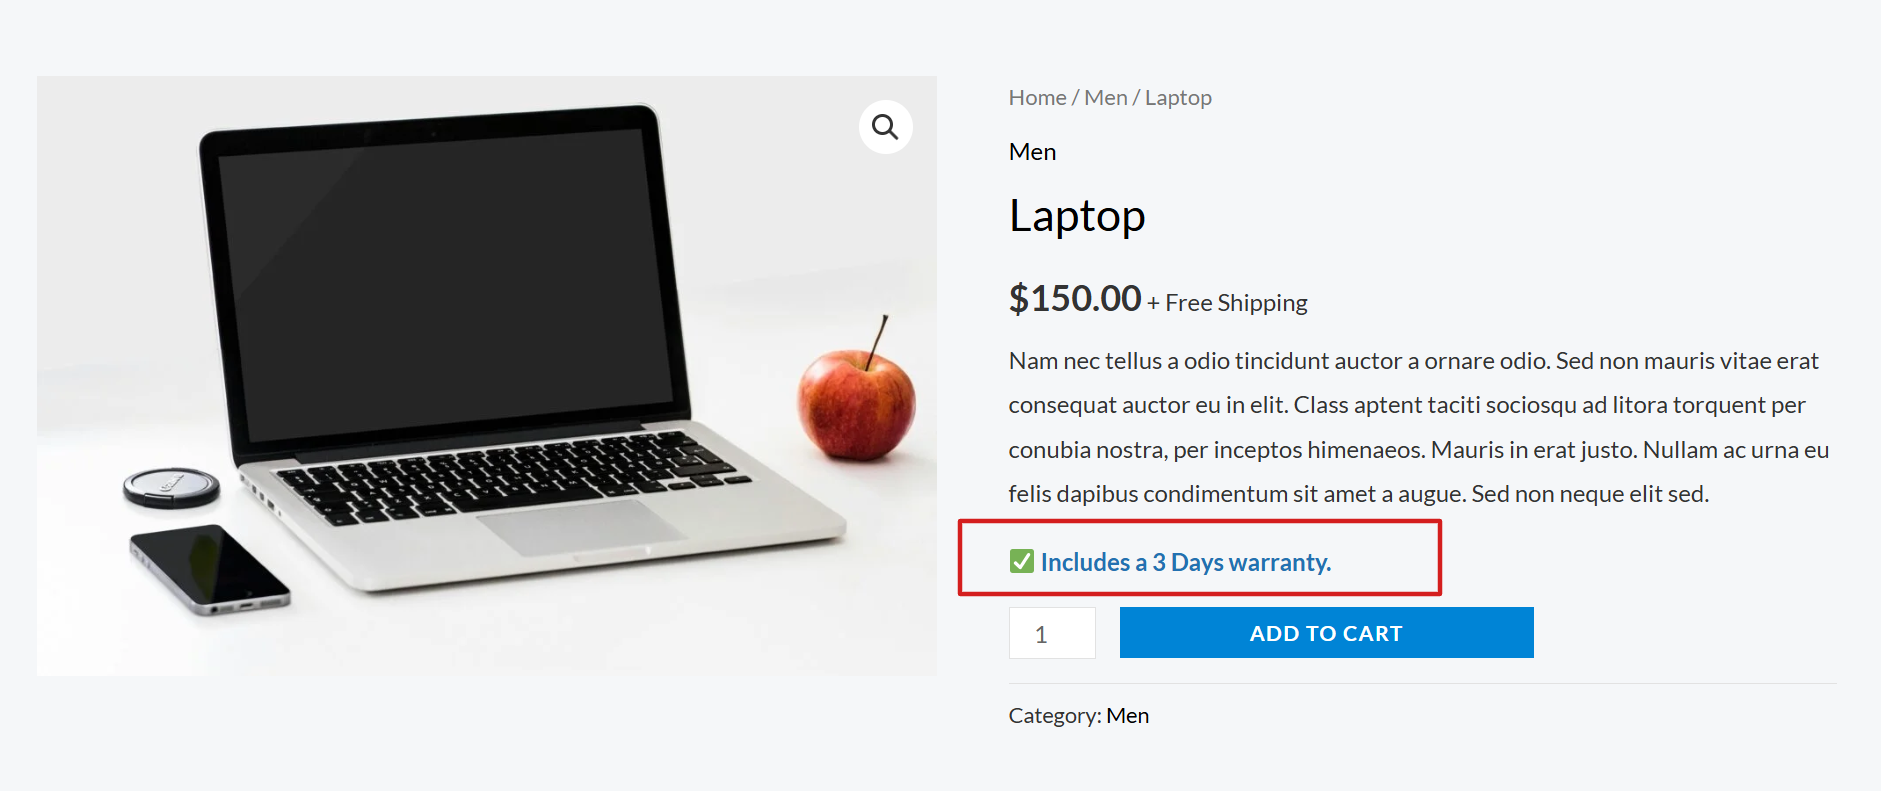
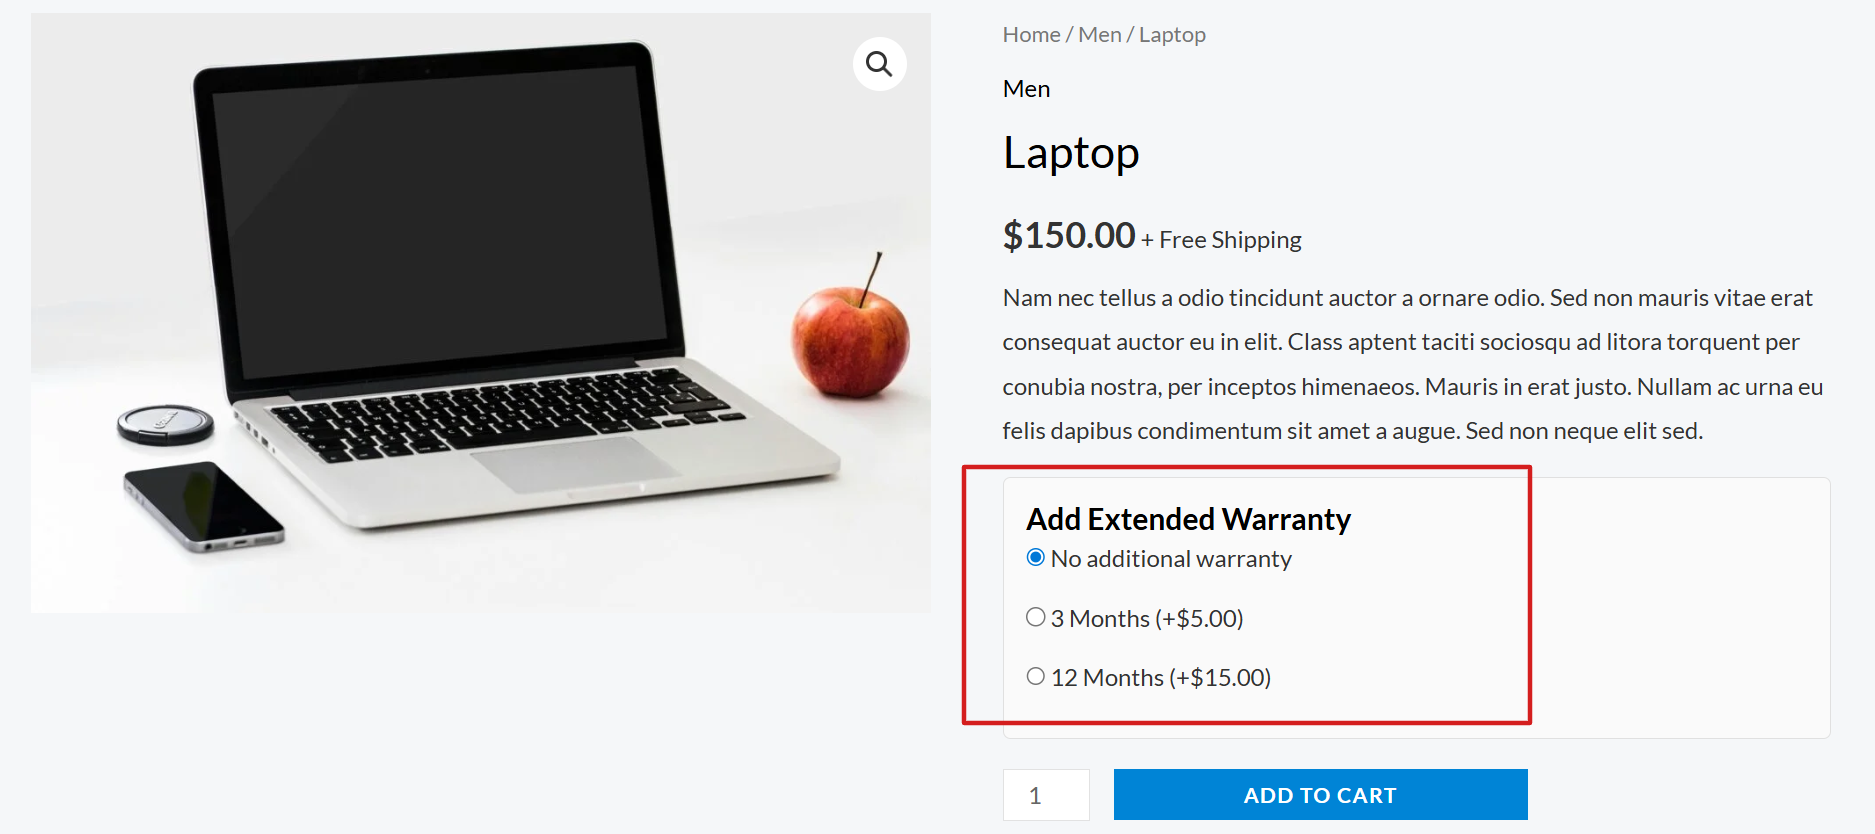
- Flexible Warranty Options: Add free "Included" warranties (e.g., "1 Year Warranty") or "Paid" warranties with multiple tiers (e.g., "3 Years for $10").
- Exchange Management: Let customers exchange products for different sizes, colors, or variants within a specified period.
- Return & Refund System: Offer money-back guarantees with customizable return periods.
- Dual Claim System: Works for both logged-in customers (via "My Account" page) and guest customers (via a shortcode).
- Guest Claim Shortcode: Just add
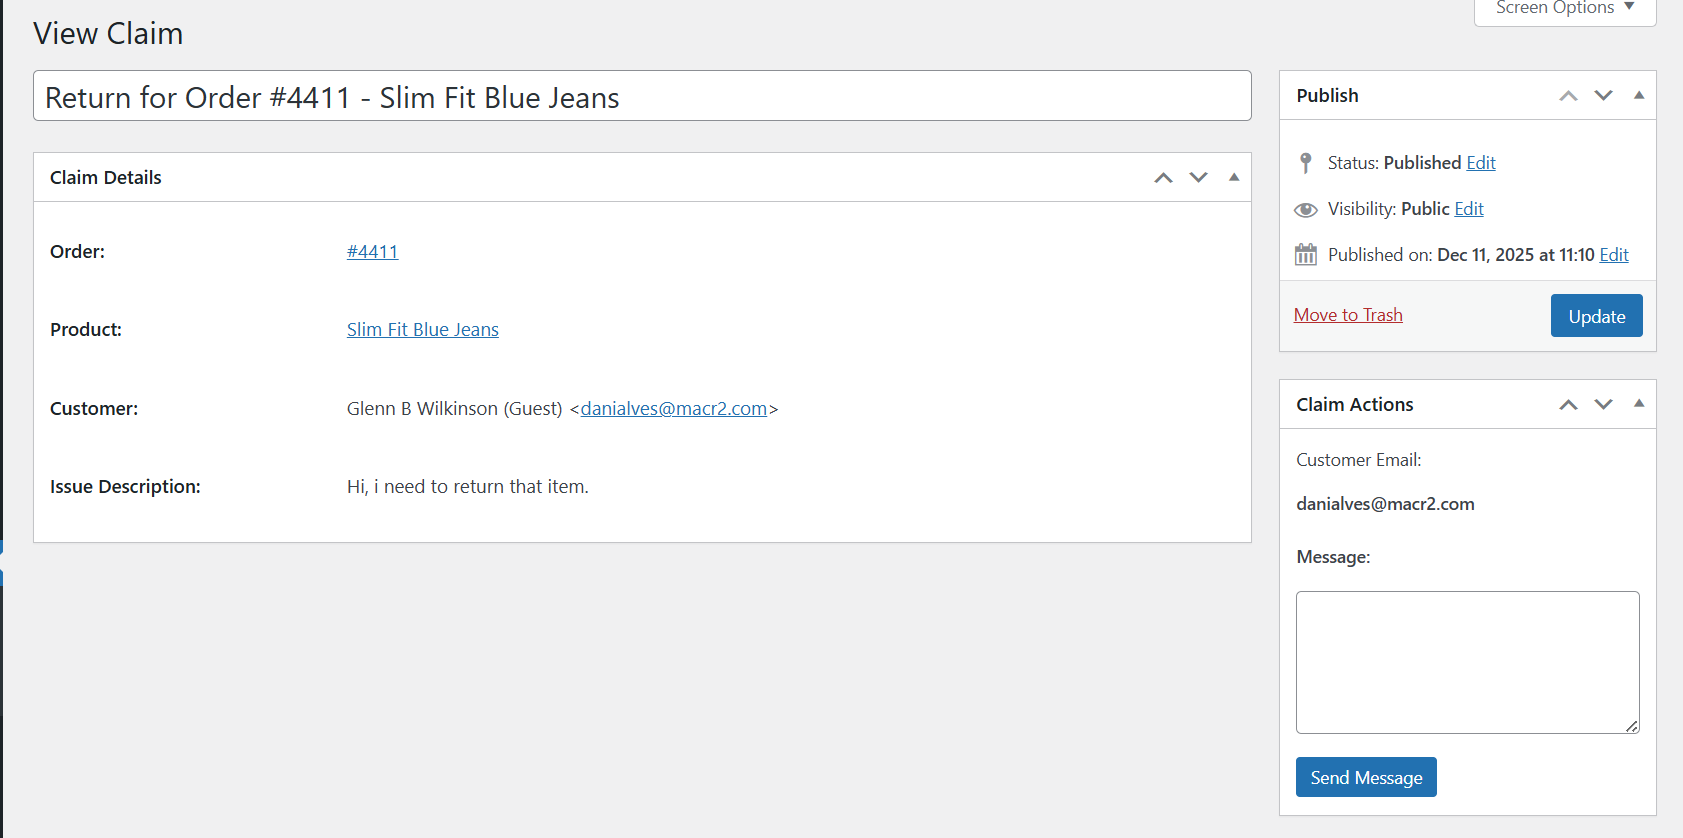
[claimpress_guest_form]to any page to create a secure claim form for guest users. - Centralized Claim Management: A new "ClaimPress" menu item shows all claims with filtering by status and type.
- Claim Statuses: Use statuses like Pending, Approved, and Rejected to manage your workflow.
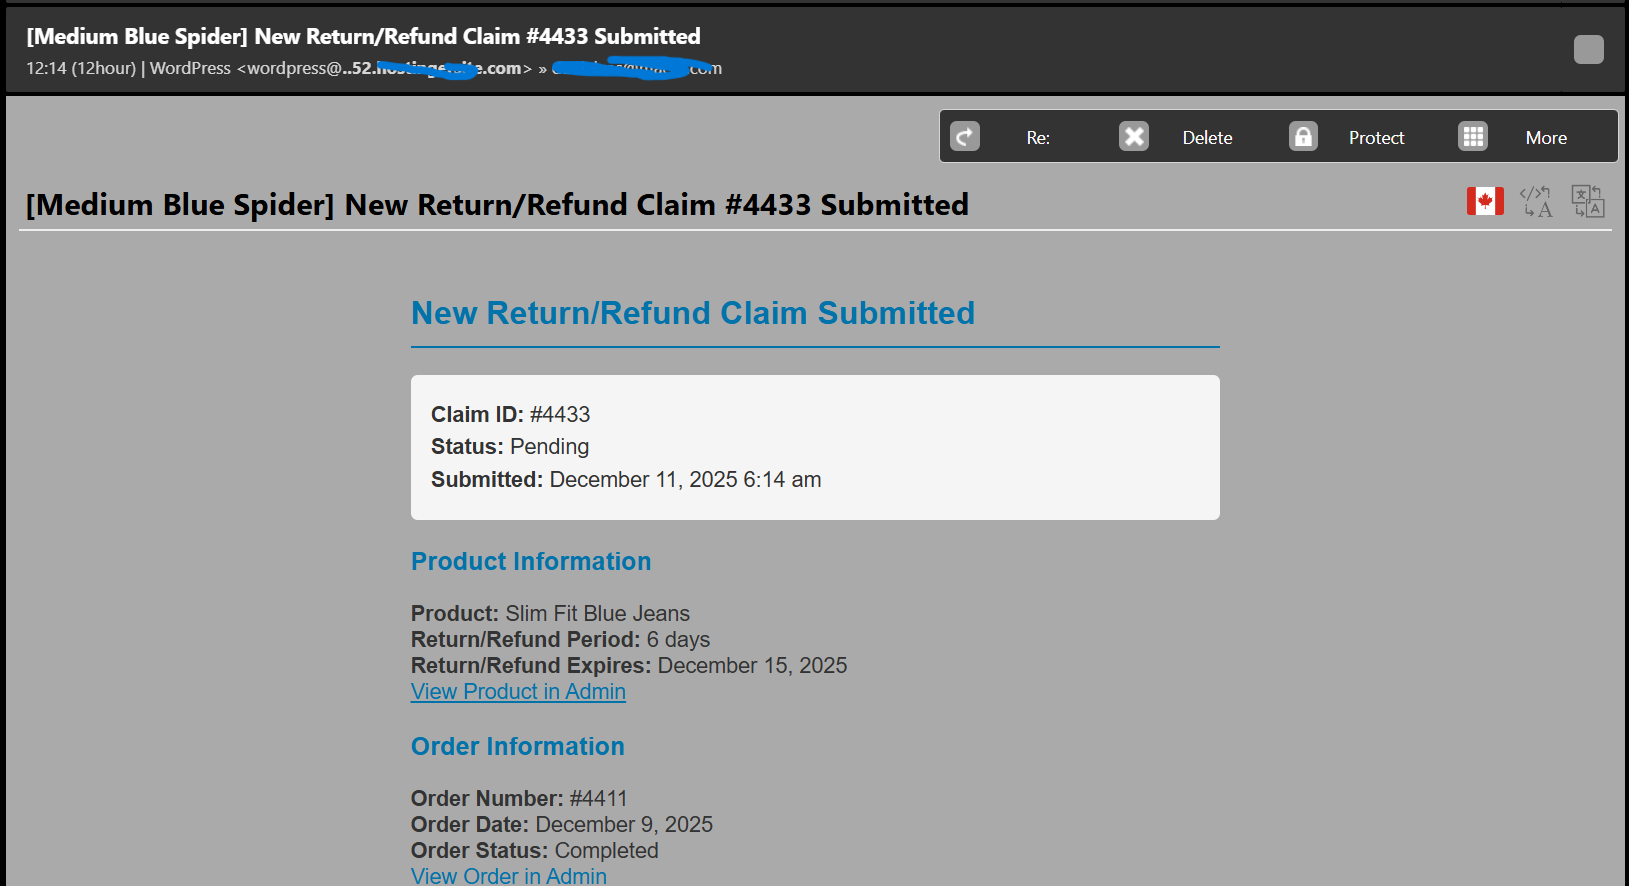
- Admin Notifications: Receive emails for new claims.
- Customer Communication: Reply to customers directly from the claim management screen.
- Fee Waivers: Allow customers to request fee waivers for exchanges/returns (e.g. if the wrong item was sent by the seller).
- Guest Claim Page Setup: Easy styling and step-by-step setup instructions for your guest returns portal.
- Bulk Setup Tool: Instantly apply warranty, exchange, or return policies to thousands of products by category.
- Pending Claims Notifications: Real-time badge in the admin sidebar showing the count of new claims requiring attention.
- Responsive Status Management: Redesigned status update interface with better mobile and zoom support.
- 💰 Unlimited Paid Warranty Tiers: Upsell customers at checkout! Offer a basic $5 "1-Year Coverage" right alongside a premium $20 "Lifetime Accidental Damage Protection" plan.
- 💳 Automated Exchange Fees: Does it cost you money to ship a size swap? Automatically charge an "Exchange Processing Fee" directly inside WooCommerce (e.g., $10) before you approve the exchange.
- 📦 Restocking Fees for Returns: Stop losing money on simple returns. Configure a native "Restocking Fee" (e.g., $15) to be automatically deducted from the customer's final refund calculation.
- 📸 Customer File Attachments: Stop the endless back-and-forth emails. Allow or force customers to upload photos of their broken or defective products directly inside the initial claim submission form.
- 🛡️ Mandatory Proof Setting: Globally enforce proof attachments for all claims, or let the system automatically require it only when customers request a Fee Waiver!
- ⚡ Fast-Action Admin Shortcuts: Review claims and instantly send "Decline Waiver & Payment Link" emails to customers with a single click straight from the claim dashboard.
- ✨ Custom Marketing Labels: Replace boring dropdowns like "12 Months" with high-converting marketing names like "Gold Protection Plan" or "No-Questions-Asked Guarantee."
安装:
- Upload the
claimpressfolder to the/wp-content/plugins/directory. - Activate the plugin through the 'Plugins' menu in WordPress.
- Go to WordPress Admin > Settings > Permalinks and click "Save Changes" to flush rewrite rules.
- Go to
ClaimPress > Settingsto configure your notification emails and guest claim page. - Edit a WooCommerce product, go to the "ClaimPress" tab, and enable your desired features (Warranty, Exchange, and/or Return)!
屏幕截图:


常见问题:
Getting Started - Quick Setup Guide
Step 1: Configure Email Settings
- Go to
ClaimPress > Settingsin WordPress admin - Enter your notification email address
- Optionally set up a guest claim page (see below)
- Click "Save Changes" Step 2: Enable ClaimPress Features on a Product
-
Go to
Productsand edit any product - Click the "ClaimPress" tab in the product data section
- Choose which features to enable:
- Warranty: Check "Enable" and set duration (e.g., "12 Months")
- Exchange: Check "Enable" and set the exchange period
- Return/Refund: Check "Enable" and set the return period
- You can enable one, two, or all three features
- Update the product Step 3: Test It
- Place a test order on your site
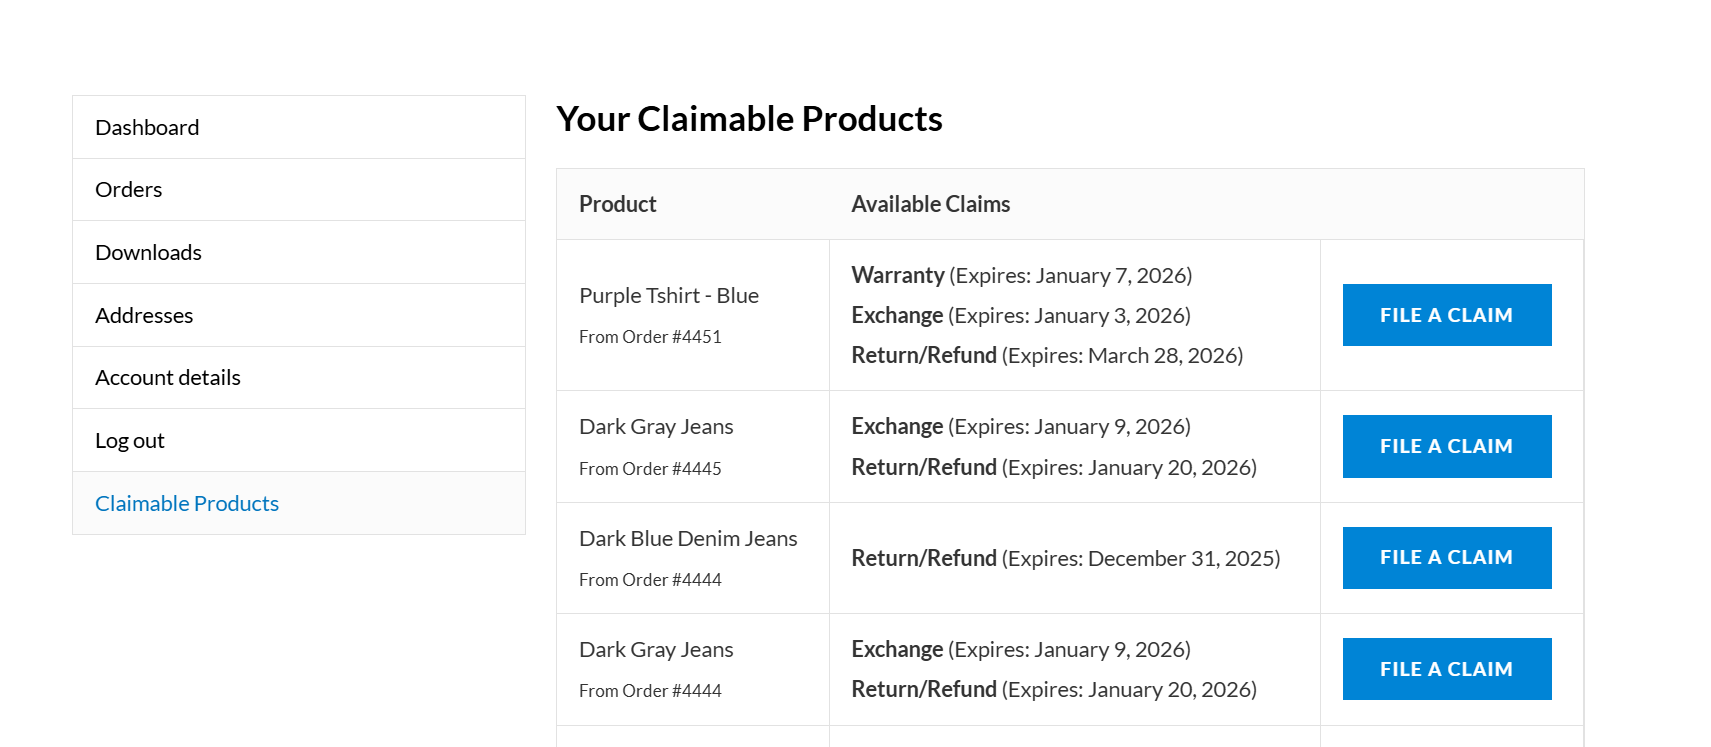
- Go to My Account > Claimable Products
- File a test claim to see the workflow
How do I add warranty, exchange, or return features to my products?
- Edit any WooCommerce product
- Scroll to the Product data section
- Click the "ClaimPress" tab
- You'll see three sections: Warranty, Exchange, and Return/Refund
- For Warranty:
- Check "Enable"
- Choose warranty type: Included (free) or Paid
- Set the warranty duration (number) and period (days/weeks/months/years)
- For paid warranties: Add warranty tiers with different prices
- For Exchange:
- Check "Enable"
- Set the exchange period (e.g., "30 Days")
- For Return/Refund:
- Check "Enable"
- Set the return period (e.g., "14 Days")
- Click Update to save
How do logged-in customers file claims?
Logged-in customers see a "Claimable Products" tab in their My Account page automatically. Customer Steps:
- Login to their account
- Go to My Account > Claimable Products
- Click "File Claim" on any eligible product
- Fill out the claim form (description, issue type)
- Submit the claim They can track claim status in the same "Claimable Products" section.
How do guest customers file claims?
Setup (one-time):
- Create a new WordPress Page (e.g., "File a Claim")
- Paste the
[claimpress_guest_form]shortcode inside the page editor - Publish the page
- Go to
ClaimPress > Settingsin your WordPress admin - Select this newly created page from the Guest Claim Page dropdown
- Click Save Changes at the bottom of the screen
- (Optional) Go to Appearance > Menus and add this page to your navigation menu! Guest Claim Process:
- Customer visits your claim page
- Enters Order ID and Email (must match order)
- Selects the product from their order
- Fills out claim description
- Submits claim Guests receive email notifications automatically about their claim status.
Scaling Your RMA Business: Enterprise Features in ClaimPress Pro
ClaimPress Pro is designed for high-volume stores needing a professional Returns Management Authorization (RMA) workflow. Advanced features include:
- Unlimited Paid Warranty Tiers: Create "Bronze", "Silver", and "Gold" plans with custom price points to drive additional revenue.
- Serialized Warranty Certificates: Automatically generate and deliver PDF certificates to customers for professional record-keeping.
- Automated Processing Fees: Stop chasing payments for shipping or restocking. The system forces payment through your WooCommerce checkout before a claim is reviewed.
- Related Protected Products: Upsell extended warranties by showing "Protected" versions of products as cross-sells in your shop.
How do automated restocking and exchange fees reduce my manual workload?
In traditional setups, you have to manually invoice customers for return shipping or restocking fees. ClaimPress Pro automates this.
- You set a default fee in the settings.
- When a customer files an Exchange or Return, the system creates a "Processing Fee" order.
- The claim is locked in "Pending Payment" status.
- Once the customer pays via your site's checkout, the claim instantly flips to "Paid" and notifies you it's ready for review. No more manual billing!
Can I generate professional Warranty Certificates for my customers?
Yes! ClaimPress Pro includes a specialized engine to generate serialized Warranty Certificates (PDF). Customers can download these directly from their "My Account" area as soon as their order is completed. This adds high perceived value to your protection plans and builds significant brand trust.
Reducing RMA Fraud: How does the mandatory proof system work?
Fraudulent claims are a major drain on resources. ClaimPress allows you to set Proof Attachments as Required. When enabled, the "File a Claim" form will block submission unless the customer uploads a photo (JPG/PNG) or document (PDF) showing the product issue. This simple step filters out lazy or fraudulent claims before they ever reach your dashboard.
What is the "Fee Waiver" request system?
Sometimes an exchange is necessary because you made a mistake (shipped the wrong color or a DOA unit). In these cases, it's unfair to charge the customer a fee. ClaimPress Pro allows customers to request a Fee Waiver. They must provide a description and mandatory proof of your error. You can then review the proof and:
- Approve the Waiver: The claim proceeds for free.
- Decline the Waiver: Use the admin shortcut to instantly send the customer a link to pay the standard processing fee.
Boosting Average Order Value: How do related protected products work?
You can link a "Protected" version of a product (one with a paid warranty included) to its standard counterpart. This allows you to show a "Warranty Upsell" widget on the product page or in cross-sell sections, encouraging customers to choose the safer, higher-priced option.
What's the difference between Warranty, Exchange, and Return?
These are three independent modules you can enable per product to create a custom policy:
- Warranty: Professional coverage for defective items (Included or Paid). Set custom timeframes like "1-Year Full Coverage".
- Exchange: Self-service variant swapping (e.g., "30-Day Size Exchange"). Supports automated shipping fees in Pro.
- Return/Refund: Modern money-back guarantees. Supports automated restocking fees in Pro.
How do I see all products with ClaimPress features active?
Go to ClaimPress > Products. This page gives you a bird's-eye view of your entire catalog. You can filter by feature (Warranty, Exchange, or Return) and see exactly which products have active policies, helping you audit your store's coverage in seconds.
Does ClaimPress collect any data? What about my privacy?
Your Privacy is Our Priority! 🔒 ClaimPress includes an optional, opt-in analytics system that helps us improve the plugin. Here's everything you need to know: How It Works:
- When you activate ClaimPress, you'll see a friendly notice asking if you'd like to help us improve the plugin
- You can choose "Sure, I'm Happy to Help!" or simply dismiss the notice
- No data is ever sent without your explicit consent What We Collect (Only If You Opt-In):
- Site URL (to identify unique installations)
- WordPress version
- Plugin version
- Admin email (for support purposes only)
- Site language
- Plugin activation/deactivation timestamps What We DON'T Collect:
- ❌ Customer data or claim information
- ❌ Order details or transaction data
- ❌ Personal information from your customers
- ❌ Product details or pricing
- ❌ Any sensitive or confidential business data Your Control:
- You can opt-out anytime by simply dismissing the tracking notice
- Choosing "No" does not affect plugin functionality in any way
- All plugin features work identically whether you opt-in or not Why We Ask: Understanding how ClaimPress is used helps us build features YOU actually need and prioritize updates that matter most to our users.
更新日志:
- Enhancement: Enhanced WooCommerce activation check to support Multisite network-active installations and a custom activation flag.
- Security: Use a more robust validation for core dependency checks.
- Fix: Corrected status banner in customer "My Claims" dashboard — rejected claims now show a clear "closed" message instead of the misleading "we are reviewing" text. Each status (Approved, In Progress, Rejected, Cancelled, Completed) now displays a unique, accurate message and color.
- Enhancement: Admin replies now automatically advance the claim status to "In Progress" (if the status exists), eliminating the need for a manual extra step.
- Fix: Guest claim form now correctly scrolls back to the form section after submission, instead of jumping to the top of the page.
- Fix: Corrected redirect logic bug that caused logged-in users' redirects to be incorrectly overridden by guest redirect logic.
- Feature: Added "Max Claims per Item" setting. When "Allow Multiple Claims" is enabled, admins can now configure a numeric limit for how many times a customer can file a claim for the same product (Order Item). Default is 1.
- Improvement: Updated claim eligibility logic so that products reappear in the customer's "Claimable Products" list after a claim is marked as Approved, Rejected, or Completed — allowing legitimate follow-up claims.
- Improvement: The "Max Claims per Item" input field is now conditionally revealed in Settings only when "Allow Multiple Claims per Item" is enabled, keeping the UI clean and context-aware.
- Fix: Added
wpautop()processing to both admin and customer email notification bodies to correctly preserve line breaks and paragraph formatting in plain-text templates sent as HTML. - Fix: Resolved an issue where customer email notifications created using plain-text templates lost their line breaks and formatting when sent as HTML emails.
- Fix: Added an automated database cleanup routine to resolve a bug from older versions where claims could incorrectly hold multiple status terms simultaneously, leading to inaccurate claim counts in dashboard tabs.
- Enhancement: Reordered the claim dashboard status tabs to always place 'Completed', 'Rejected', and 'Cancelled' logically at the very end of the list.
- Fix: Resolved an issue where duplicate emails were sent during initial claim submission.
- Fix: Corrected the
{admin_message}placeholder in automated status update emails. - Enhancement: Completely redesigned the email notification system with a modern, professional HTML master template.
- Enhancement: Improved the visual layout of the "New Claim Received" email for customers.
- Feature: Implemented "Fallback Lookup" mechanism for the guest claim form to ensure full compatibility with Sequential Order Number plugins (WebToffee, SkyVerge, etc).
- Feature: Redesigned the Guest Order Lookup UI with a modern, card-based layout and interactive notices for a more premium experience.
- Security: Enforced strict order status validation; claims can now only be filed for orders in "Completed" or other merchant-defined eligible statuses.
- Enhancement: Centralized allowed status logic to ensure consistency across My Account and Guest portals.
- Fix: Resolved issue where Claimable Products tab displayed raw database IDs instead of custom sequential WooCommerce order numbers.
- Fix: Enhanced claims search filter to support searching by custom sequential order numbers.
- Major Feature: New "Create Claim" feature. Setup manual claim on the behalf of customer.
- Enhancement: Rearranged Folder based file structure.
- Major Feature: New "Bulk Setup" tool. Configure thousands of products simultaneously using global category-based logic.
- Major Feature: Real-time Admin Notification Badge. View the count of pending claims directly in your WordPress sidebar.
- New: Advanced "Advanced Features" Pro showcase page with direct tool links.
- Enhancement: Fully responsive Status Management UI. Fixed overlapping issues when browser is zoomed or on small screens.
- Enhancement: Unified branding across Pro upgrade prompts ("Activate ClaimPress Pro Now").
- Enhancement: Improved AJAX status updates with instant visual feedback.
- Performance: Optimized metadata queries for claims filtering.
- Quality: Complete version synchronization (v3.0.0) across all components.
- Enhancement: Improved Welcome page experience by hiding the data consent popup.
- Enhancement: General improvements and version update.
- Enhancement: Refined the "Hide Warranty Info" Pro feature to act as a whitelist — it now hides informational policy badges (Included, Exchange, Return) but keeps interactive Paid Warranty tiers visible.
- Feature: Added native detection of custom Order Statuses (like Trackship's "Delivered" state) so merchants can select them as equivalent to "Completed" for warranty validations without relying on manual text inputs.
- Feature: Initial implementation of custom Order Status detection and product page policy hiding toggle.
- Enhancement: Completely redesigned the Custom Email Templates page with a modern, tabbed interface — featuring card panels per template, clickable merge-tag chips with one-click copy, a styled Pro lock banner, and a polished save bar.
- Enhancement: Improved Admin Notification, Customer Confirmation, and Customer Update templates are now organized into separate tabs for a cleaner workflow.
- Enhancement: Restructured Advanced Features promotional cards to display icon and heading side-by-side for better readability.
- Enhancement: Styled the "Advanced Features" sidebar menu label with a distinct amber/gold color for improved visibility.
- Fix: Updated claim submission success message from "confirmation" to "update" for more accurate customer communication.
- Enhancement: Added suppression of any externally injected "Pricing" submenus from the ClaimPress admin menu via both PHP and CSS.
- Fixed: Resolved dashboard statistics showing incorrect counts for "Total Products" and "Paid Warranty".
- Fixed: Improved plugin compatibility and naming consistency for the Pro addon.
- Enhancement: General code optimization and quality improvements.
- Setup: Introduced global configuration block parameter for multiple Return/Exchange claims.
- New: "Fee Waiver" Request System. Allow customers to request that exchange/return fees be waived (e.g. if the seller shipped the wrong product).
- New: Proof Attachments Setting. Globally force photo/document uploads for all claims from the Settings panel.
- New: Advanced Guest Claim Dashboard step-by-step instructions.
- Enhancement: Dynamically force file uploads for customers who specifically request fee waivers.
- Enhancement: One-click "Decline Waiver & Send Payment Link" button for store admins inside the Claim Dashboard.
- Enhancement: Dynamic "Success" notices for customers submitting waiver requests vs. standard paid claims.
- Enhancement: Improved Welcome page experience by hiding the data consent popup.
- Enhancement: General improvements and version update.
- Bug Fix: Fixed issue where the data consent notice would reappear after dismissal.
- Enhancement: Improved dismissal logic for admin notices.
- Feature: Enhanced cart price calculation to correctly display total product price (Base + Warranty) even in custom themes and mini-carts.
- Feature: Improved formatting of warranty labels in cart (removed redundant text).
- Fix: Implemented cleaner JS handling to remove unwanted theme-injected text from cart items.
- Enhancement: Optimized frontend CSS for better global theme compatibility.
- Feature: Added robust JS synchronization for warranty options to support custom cart layouts and page builders.
- Feature: New specialized frontend styles decoupled from WooCommerce core styles for better theme compatibility.
- Fix: Resolved layout issues where warranty options would "unstitch" or break alignment on certain themes.
- Enhancement: Removed unsafe "Display Only" hooks to prevent configuration errors.
- Enhancement: Improved cross-theme compatibility handling for styling.
- Enhancement: Version synchronization across all plugin components
- Enhancement: Tracking system now uses consistent version numbering (CLAIMPRESS_VERSION constant)
- Improvement: Ensured version is correctly sent in all user-data tracking API calls
- Quality: Complete version audit and standardization across codebase
- Note: Minor update to maintain version consistency after fixing critical file restoration issue
- Bug Fix: Fixed critical error caused by missing plugin class files after WordPress.org update
- Bug Fix: Restored all missing includes files (class-claimpress-admin.php, class-claimpress-frontend.php, class-claimpress-analytics.php, class-claimpress-upgrade.php)
- Improvement: Updated version numbering to prevent future version mismatches
- Enhancement: Ensured all core plugin functionality is properly restored
- Bug Fix: Fixed 404 error on My Account endpoint by adding proper endpoint registration during plugin activation
- Improvement: Changed "My Warranties" menu to "Claimable Products" for better clarity
- Improvement: Updated all documentation and UI text to reflect the three claim types (Warranty, Exchange, Return/Refund)
- Enhancement: Added permalink flush step in installation instructions
- Documentation: Comprehensive readme.txt update with accurate examples and clearer feature descriptions
- Documentation: Removed outdated references and added 10 screenshot placeholders
- Enhancement: Added "Get Pro" and "Leave a Review" action links on the Plugins page
- Improvement: Better visibility for upgrading to PRO version
- Improvement: Easier access to leave reviews on WordPress.org
- Major Update: Enhanced claim management interface with inline editing and filtering
- New Feature: Inline status editing - Update claim statuses directly from the claims list table
- New Feature: Status filter dropdown - Filter claims by status (Pending, In Progress, Approved, Rejected, Closed)
- New Feature: Return management - Added full return and refund capability alongside exchange
- Improvement: Replaced text "Update" button with a save icon for cleaner UI
- Improvement: Added tooltip to status update button showing "Update Status" on hover
- Improvement: Status changes now properly persist in database after AJAX updates
- Improvement: Better visual feedback during status updates (button state changes and success indicators)
- Improvement: Added blank status option ("— Select Status —") for claims without assigned status
- Fix: Corrected
wp_set_post_termsto use term ID instead of slug for reliable status updates - Fix: Improved JavaScript loading using proper
wp_register_scriptandwp_add_inline_script - Enhancement: All three features (Warranty, Exchange, Return) are now fully independent
- Enhancement: Updated plugin name to reflect all capabilities: Warranty, Return, Refund & Exchange
- Initial release.
- Implements a full-featured warranty system.
- Adds per-product warranty options (included and paid).
- Adds a dual claim-system for logged-in users and guests.
- Provides a full admin interface for managing claims, including statuses and email replies.
- Includes a settings page for notifications and guest form setup.
- Passes all WordPress.org plugin review checks.