CloudWok File-Upload
| 开发者 | markusklems |
|---|---|
| 更新时间 | 2016年12月15日 18:08 |
| 捐献地址: | 去捐款 |
| PHP版本: | 3.0.0 及以上 |
| WordPress版本: | 4.4.2 |
| 版权: | GPLv2 or later |
| 版权网址: | 版权信息 |
详情介绍:
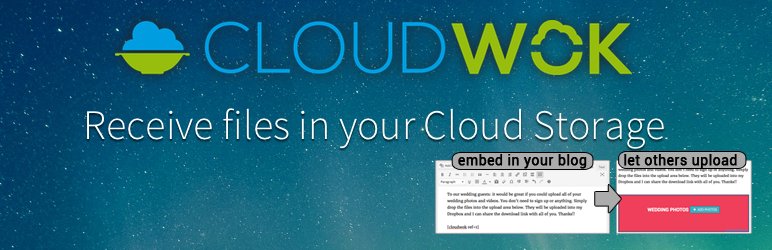
Receive files directly in your Dropbox folder, Google Drive folder, S3 bucket, Box.com folder, or Facebook photo album. With the CloudWok file-upload plugin you can let others upload files to your cloud storage.
There are two ways how you can add the CloudWok file-upload widget to your blog posts or pages:
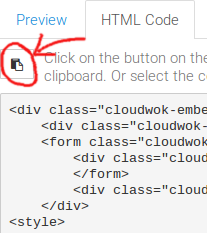
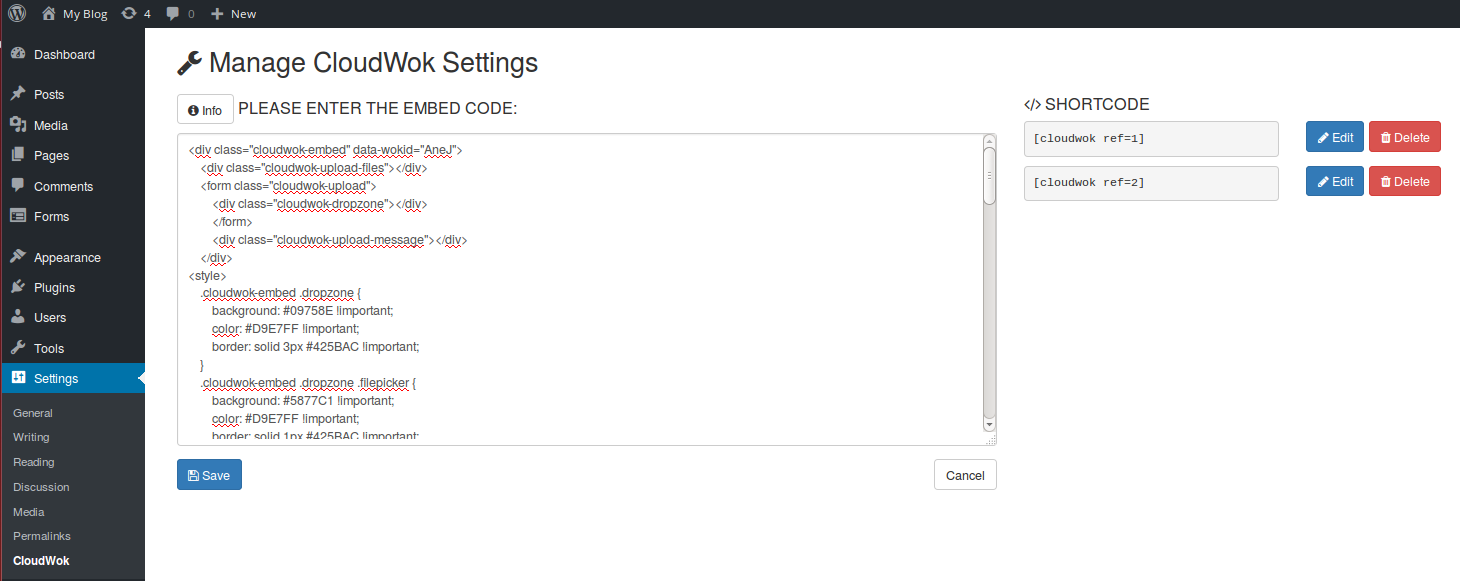
- New: Visit https://www.cloudwok.com/developers to generate a customized HTML embed code. Open the "Settings" menu in your sidebar and click on "CloudWok". Paste the copied HTML embed code into the text area and click "Save". This generates a shortcode, like this one:
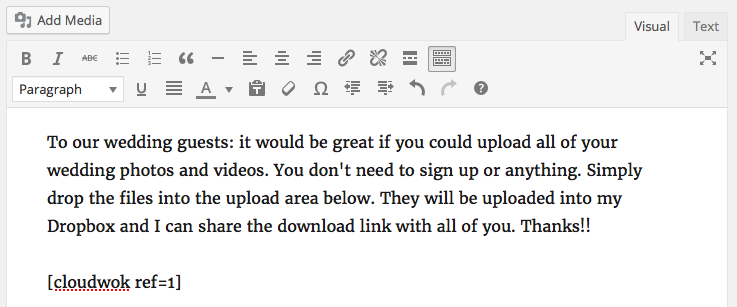
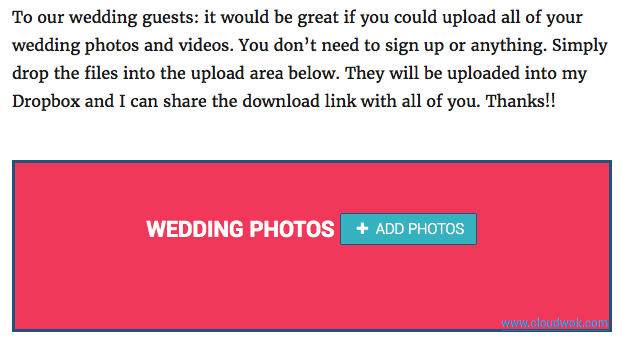
[cloudwok ref=1]. Simply copy and paste the shortcode into your blog post or page and the widget will appear at that place. - Old: Simply add the following shortcode in your blog post or page:
[cloudwok wok_id="YOUR_WOK_ID" show_powered_by_link="True"]. There are many options to customize the file-upload plugin. Please take a look at the "Installation" tab for more information how to customize the plugin.
- No traffic from the file-upload goes through your WordPress blog. You don't need to worry about WordPress file size limitations or the like.
- You don't need to download the uploaded files from your WordPress blog. They end up directly in your Dropbox, Google Drive, ...
- Create a wedding website where you let wedding guests upload photos directly into your Dropbox, Google Drive, ...
- Create a project website with password-protected file-upload form, through which you collect project deliverables and submissions from colleagues, collaborators, and business partners.
- Create a blog where you invite your audience to submit pictures and videos for a contest.
安装:
How to install the plugin and get it working in 5 minutes.
Create a CloudWok:
- Go to https://www.cloudwok.com and create an account.
- Create a CloudWok that is either connected to a folder in your Dropbox, Google Drive, Box.com account or other cloud storage accounts that are supported by CloudWok.
- After you have created a Wok, you get a URL to an upload website, such as this: https://www.cloudwok.com/u/AneJ. The last four letters are your "wok id" (in this example: AneJ).
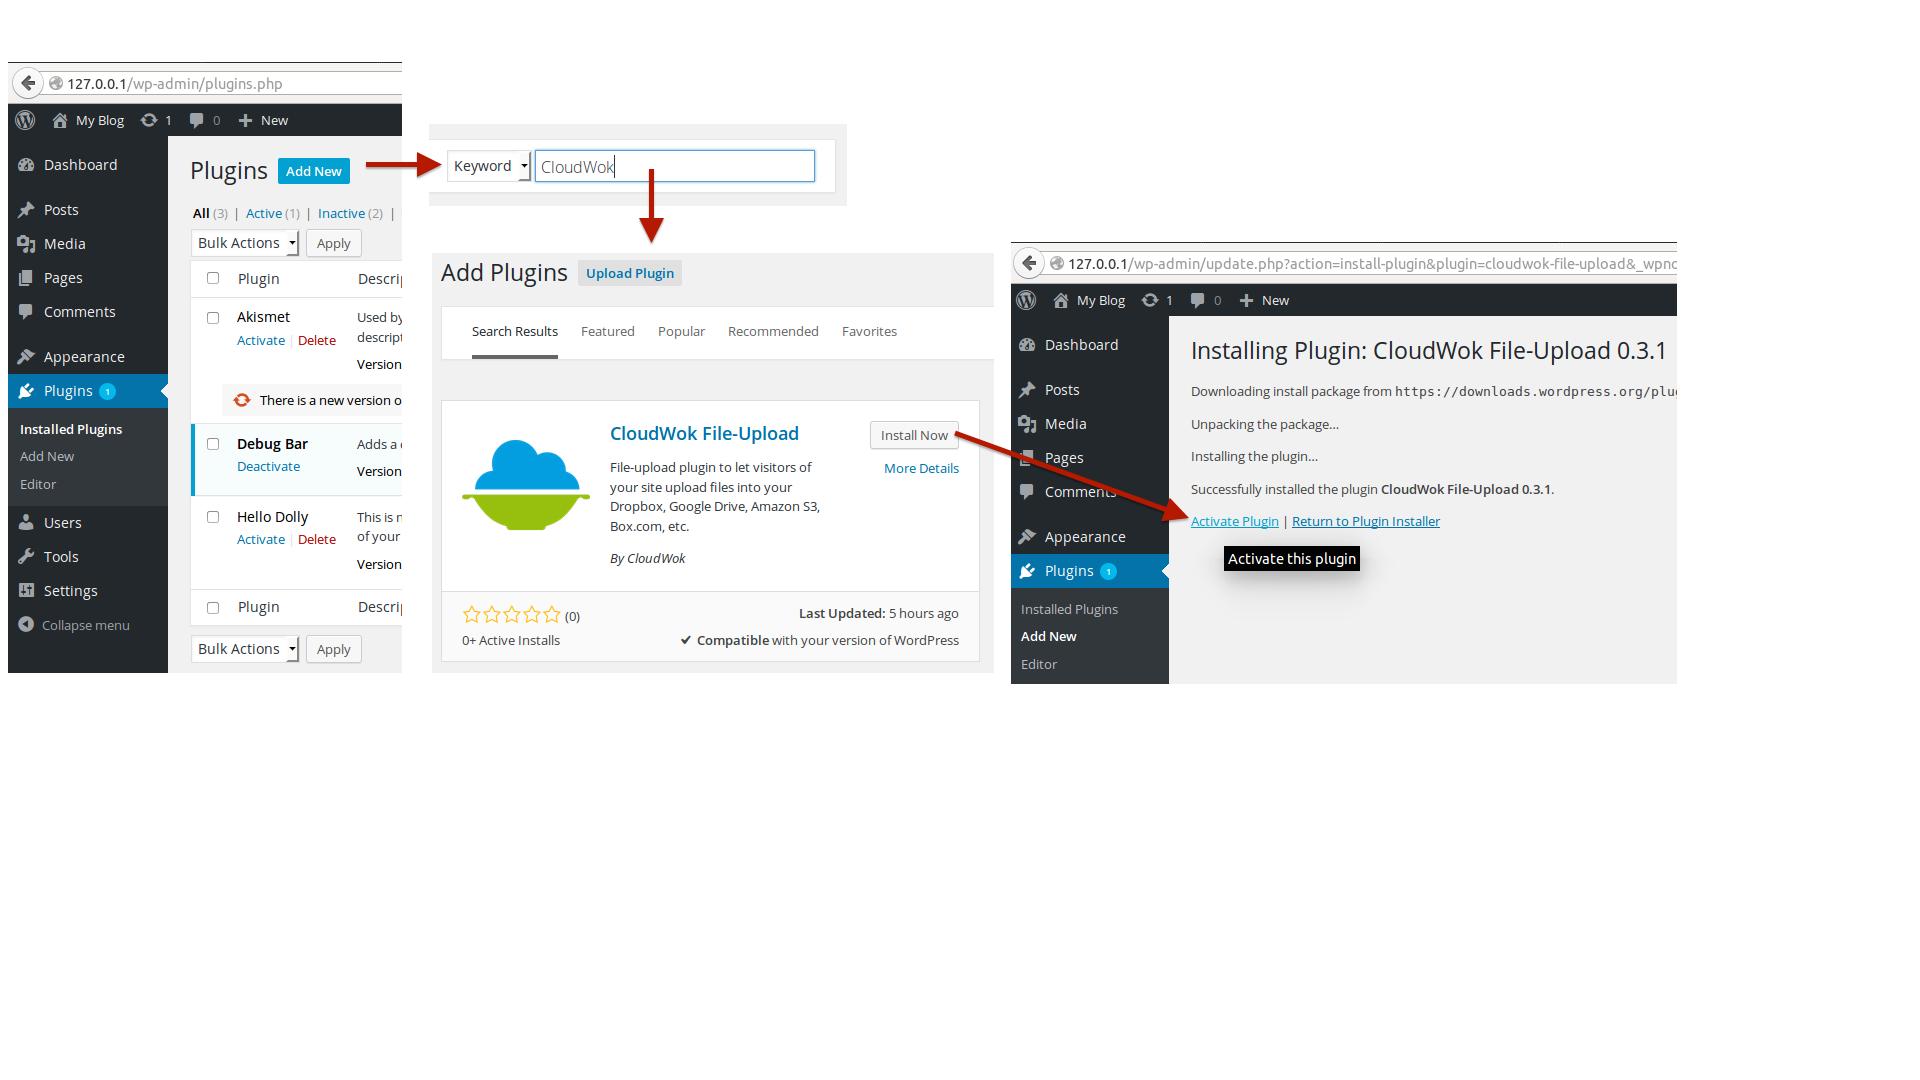
- Click on "Plugins"
- Click on "Add New"
- Search for the term "CloudWok"
- Select the CloudWok plugin and install it.
- Activate the plugin.
- Upload
cloudwok.phpto the/wp-content/plugins/directory - Activate the plugin through the 'Plugins' menu in WordPress
- New: Visit https://www.cloudwok.com/developers to generate a customized HTML embed code. Open the "Settings" menu in your sidebar and click on "CloudWok". Paste the copied HTML embed code into the text area and click "Save". This generates a shortcode, like this one:
[cloudwok ref=1]. Simply copy and paste the shortcode into your blog post or page and the widget will appear at that place. - Old: Simply add the following shortcode in your blog post or page:
[cloudwok wok_id="YOUR_WOK_ID" show_powered_by_link="True"]. There are many options to customize the file-upload plugin. Please take a look at the "Installation" tab for more information how to customize the plugin.
[cloudwok wok_id="YOUR_WOK_ID" show_powered_by_link="True"]
In the example, replace YOUR_WOK_ID your actual wok id (a four-letter id, such as "AneJ").
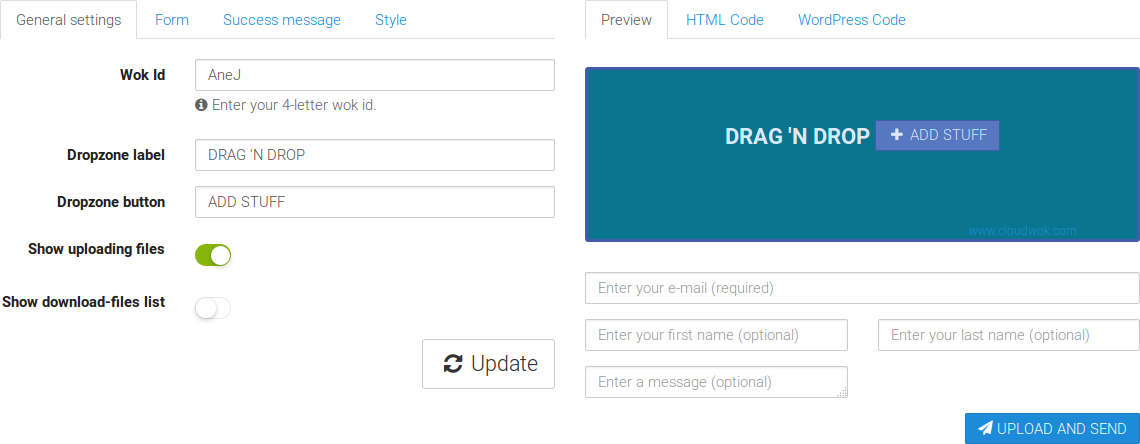
By default, the file-upload widget shows a file-upload button (and drag & drop area) and after file uploads shows the uploaded files in a list. You can configure the shortcode as follows:
[cloudwok wok_id="YOUR_WOK_ID" show_uploads="False" show_powered_by_link="True"]Don't show a list of uploaded files[cloudwok wok_id="YOUR_WOK_ID" show_downloads="True" show_powered_by_link="True"]List all files that have been uploaded so far[cloudwok wok_id="YOUR_WOK_ID" show_form="True" show_powered_by_link="True"]Show a form where uploaders can enter additional information along with their uploaded files, such as their e-mail and a message.
[cloudwok wok_id="YOUR_WOK_ID" show_uploads="False" show_downloads="True" show_form="True" show_powered_by_link="True"]
You can customize the message form as follows to let uploaders enter their e-mail and/or name:
[cloudwok wok_id="YOUR_WOK_ID" show_form="True" show_form_input_name="True" show_form_input_email="True"]Show a form with name and e-mail input fields in addition to the message field.[cloudwok wok_id="YOUR_WOK_ID" show_form="True" show_form_input_name="True"]Show a form with name field but without e-mail field in addition to the message field.[cloudwok wok_id="YOUR_WOK_ID" show_form="True" show_form_input_email="True"]Show a form without a name field but with an e-mail input fields in addition to the message field.
[cloudwok wok_id="YOUR_WOK_ID" simple_file_upload_button="True" show_powered_by_link="True"]
Since version 0.3.7 of this plugin, you can disallow file uploads, for example to only show the list of downloadable files in your Google Drive, Dropbox, ...:
[cloudwok wok_id="YOUR_WOK_ID" allow_upload="False" show_downloads="True"]
Since version 0.3.8 of this plugin, you can disable the success message that shows after a successful file upload:
[cloudwok wok_id="YOUR_WOK_ID" hide_upload_success_message="True" show_powered_by_link="True"]
Since version 0.4.0 of this plugin, you can pre-fill the e-mail and name fields with values from the current WordPress user:
[cloudwok wok_id="YOUR_WOK_ID" show_form="True" show_form_input_name="True" show_form_input_email="True" prefill_form_fields="True"]
Since version 0.4.1 of this plugin, you can make the first name and last name fields required:
[cloudwok wok_id="YOUR_WOK_ID" show_form="True" show_form_input_name="True" required_firstname="True" required_lastname="True"]
Since version 0.4.2 of this plugin, via invisible_form_input_name you can let the plugin submit the wordpress user name when a user uploads a file without showing the input fields to your user:
[cloudwok wok_id="YOUR_WOK_ID" show_uploads="True" show_form="True" show_form_input_name="True" prefill_form_fields="True" invisible_form_input_name="True"]
Since version 0.4.3 of this plugin, via hide_form_message_text="True", you can show user name and email input fields without the message text area:
[cloudwok wok_id="YOUR_WOK_ID" show_form="True" show_form_input_name="True" required_firstname="True" required_lastname="True" show_form_input_email="True" hide_form_message_text="True"]
Since version 0.4.4 of this plugin, via success_message_title="YOUR OWN TITLE", success_message_subtitle="YOUR OWN SUBTITLE", success_message_text="YOUR OWN TEXT", you can customize the message that is shown to your users after a successful file upload:
[cloudwok wok_id="YOUR_WOK_ID" success_message_title="YOUR OWN TITLE" success_message_subtitle="YOUR OWN SUBTITLE" success_message_text="YOUR OWN TEXT"]
By default, a small "powered by" text-link to www.cloudwok.com is disabled. If you like our plug-in, we would appreciate it if you would enable the link via [cloudwok wok_id="YOUR_WOK_ID" show_powered_by_link="True"].
Since version 0.5 of this plugin, we have added an admin panel to the left-hand sidebar (Settings > CloudWok) where you can customize the layout of the plugin with more flexibility. The old shortcodes still work, however, they will not be further extended with new customization features. The new approach (via Settings admin panel) will be updated in upcoming releases of this plugin.屏幕截图:

更新日志:
0.5.3
Fixed incompatibility with WP 4.5+.
0.5.2
Increase default column size to 65536 bytes (characters) so that even very long embed codes can be saved.
0.5.1
On some custom WordPress installations the settings page does not work if central php config files cannot be accessed. This update helps tracking down and reporting possible issues that occur in these cases.
0.5.0
New shortcode feature. Create a customized widget via the Settings > CloudWok menu in the admin sidebar. The old shortcode still works but will not be further developed. Please use the new shortcode to customize the CloudWok widget.
0.4.4
You can now use
success_message_title="YOUR OWN TITLE", success_message_subtitle="YOUR OWN SUBTITLE", success_message_text="YOUR OWN TEXT" to customize the message that is shown to your users after a successful file upload.
0.4.3
You can now use hide_form_message_text="True" to hide the message text area from the message form. For example, show user name and email input fields without the message text area: [cloudwok wok_id="YOUR_WOK_ID" show_form="True" show_form_input_name="True" required_firstname="True" required_lastname="True" show_form_input_email="True" hide_form_message_text="True"].
0.4.2
You can now use show_form_input_name="True" in combination with the new invisible_form_input_name="True" to let the plugin submit the wordpress user name when a user uploads a file without showing the input fields to your user. Thereby you know who uploaded the file without need to let your uploader enter her/his name.
0.4.1
Added ability to make first name / last name fields required: required_firstname="True" and required_lastname="True"
0.4.0
Minor change to make feature introduced in 0.3.9 work in all cases.
0.3.9
Minor feature improvement: pre-fill message form with e-mail, first name, and last name of a logged in WP user.
0.3.8
Bugfix to make this feature work: disable the success message after a successful file upload, via hide_upload_success_message="True".
0.3.7
You can now use the shortcode also to only allow downloads via allow_upload="False". Thereby, you can, for example, place one cloudwok shortcode on a page that only allows uploading and another shortocde on a page that only allows downloading. Both shortcodes can reference the same wok id (i.e., the same Dropbox or Google Drive folder).
0.3.6
You can now disable the success message after a successful file upload, via hide_upload_success_message="True".
0.3.5
Added option to show only simple file-upload button in lieu of dropzone via simple_file_upload_button="True" shortcode attribute.
0.3.4
Added feature to customize labels and texts (see here: https://wordpress.org/support/topic/custom-text-translation). This will likely be replaced in future versions by a central customization admin page.
0.3.3
Added new features to optionally show first name, last name, and e-mail address as input fields of the message form. Use it for example like this: [cloudwok wok_id="YOUR_WOK_ID" show_form="True" show_form_input_name="True"]
0.3.2
Minor code changes.
0.3.1
Minor bugfixes.