CodeCareBD - Payment Gateway for WooCommerce
| 开发者 |
devshakil
codecarebd shakvaro |
|---|---|
| 更新时间 | 2026年11月1日 18:52 |
| PHP版本: | 7.3 及以上 |
| WordPress版本: | 7.1 |
| 版权: | GPLv2 or later |
| 版权网址: | 版权信息 |
详情介绍:
- 100% free - no monthly fees, no per-transaction charges from the plugin.
- Eight payment methods in one plugin - bKash, Nagad, Rocket, Upay, CellFin, Bangla QR, bank transfer and Payoneer.
- Block Checkout ready - works natively with the WooCommerce Cart & Checkout Blocks (the default checkout for new stores) and the classic shortcode checkout.
- HPOS compatible - fully supports WooCommerce High-Performance Order Storage.
- No API or merchant account required - use your existing personal, agent or merchant number.
- Stops fake payment claims - a Transaction ID that was already used on another order is rejected at checkout.
- Lightweight and fast - no bloat, minimal impact on checkout speed.
- bKash, Nagad, Rocket, Upay - show your number (Personal, Agent or Merchant) with a one-click Copy button and your QR code.
- CellFin (Islami Bank) - show your Islami Bank account or CellFin number.
- Bangla QR - show your Bangla QR code; customers pay from any bank or mobile banking app.
- Bank transfer (BEFTN / NPSB / RTGS) - add as many bank accounts as you need. With several accounts, customers search and pick the account they paid into, and see that account's number and routing number with Copy buttons.
- Payoneer - customers pay to your Payoneer email.
- Duplicate Transaction ID protection for every method (classic and block checkout).
- Payment screenshot / PDF upload - off, optional or required per method. Files are stored privately on your server; only shop managers can view them.
- Send money charge per method - percentage (e.g. bKash 1.85%) or fixed amount, updated live as the customer switches method.
- Prepayment discount per method - percentage or fixed, to encourage prepaid orders over cash on delivery.
- Minimum / maximum order amount per method, e.g. to respect your wallet's send money limit.
- Advance / partial payment - customers pay the delivery charge, or a fixed amount for inside / outside Dhaka (you choose the districts), with an optional minimum order total. Orders get an "Advance Received" status. Great for reducing fake cash-on-delivery orders.
- Smart number input - accepts Bangla digits (০১৭...), +880 numbers, spaces and dashes, and 12-digit Rocket account numbers.
- Settings checks - wrong receiving numbers, routing numbers, QR links, percentages or limits are caught when you save, so customers never see a broken payment method.
- Number, Transaction ID and payment details on the admin order screen, the orders list and the customer's My Account > Orders.
- Custom thank-you page message and order email instructions per method.
- Translation ready.
- Bangladeshi WooCommerce stores and F-commerce (Facebook commerce) sellers.
- Shops that accept bKash, Nagad, Rocket, Upay, Bangla QR or bank payments without a payment gateway contract.
- Stores that want an advance delivery charge to cut down on fake orders.
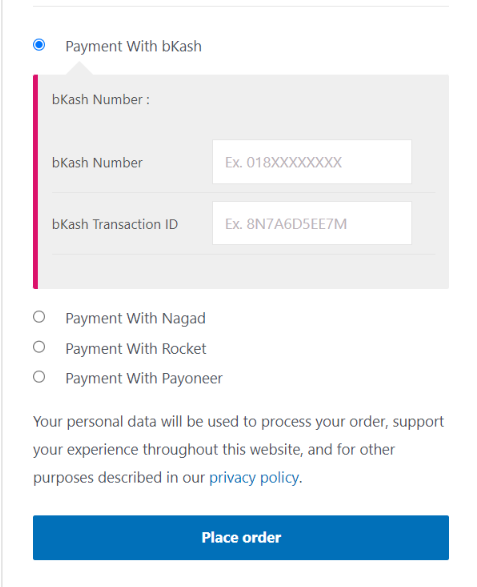
- The customer selects a payment method at checkout and sees your number, QR code or bank details.
- They pay from their own app or bank.
- They enter their number and Transaction ID (and, if you ask for it, upload a screenshot) and place the order.
- The order waits as "On hold" (or the status you choose) while you check the payment, then you process it.
安装:
- Install and activate WooCommerce.
- In WordPress, go to Plugins > Add New, search for "CodeCareBD", then install and activate. (Or upload the plugin folder to
/wp-content/plugins/and activate it.) - Go to WooCommerce > Settings > Payments and open the methods you want to offer:
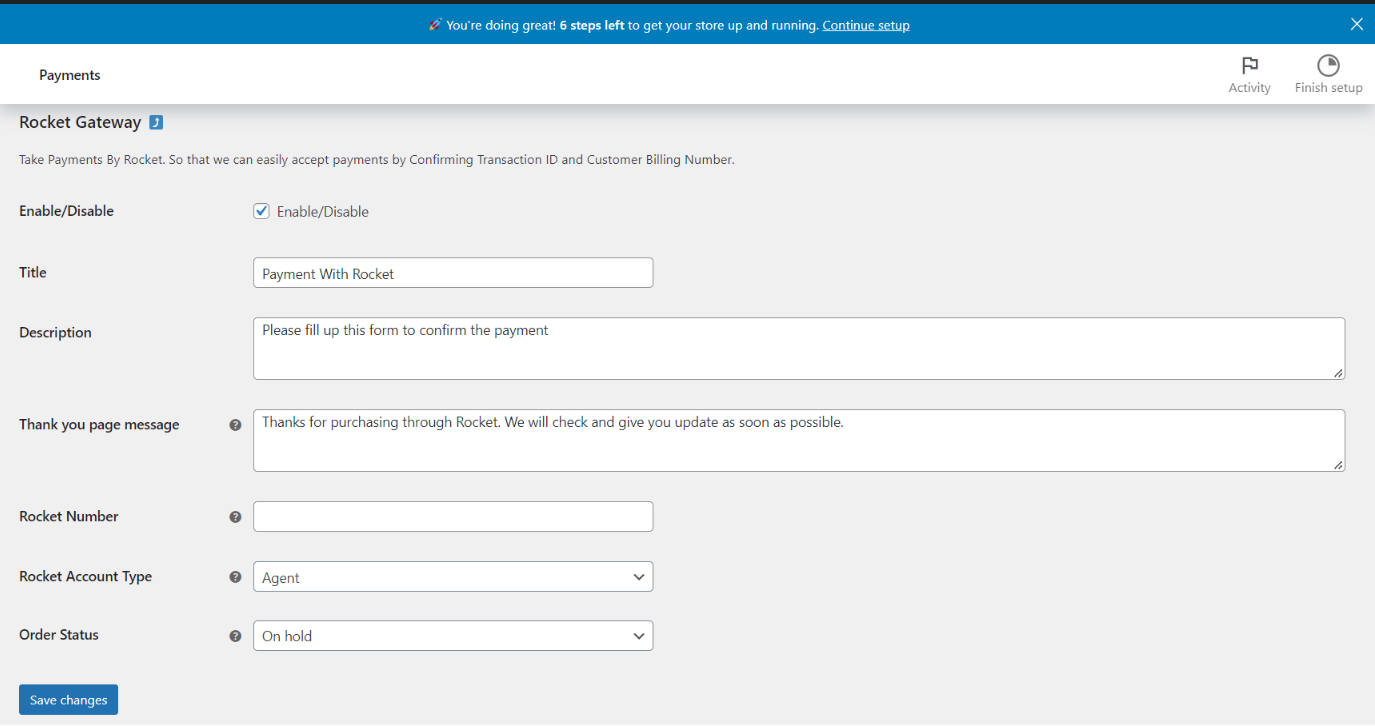
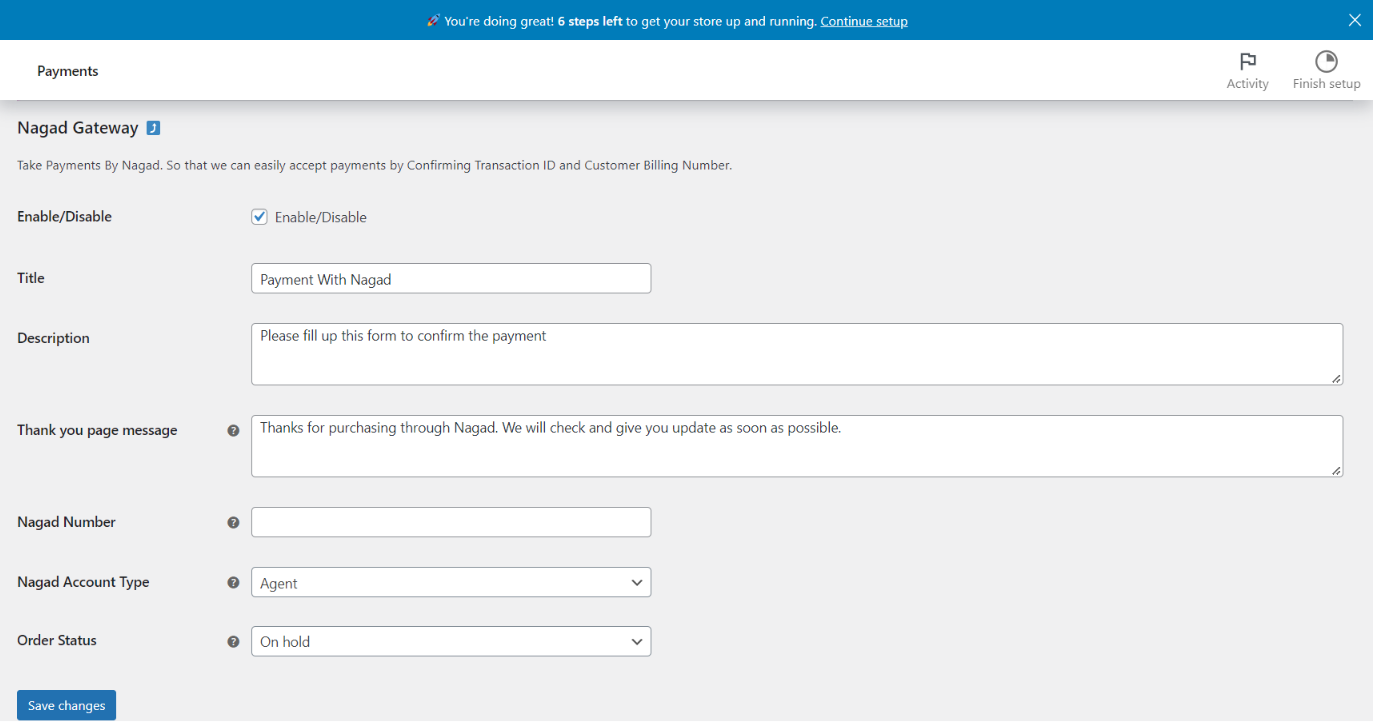
- bKash / Nagad / Rocket / Upay - tick Enable, enter your number and account type. Optionally add your QR code with "Select image".
- CellFin - enter your Islami Bank account number or CellFin number.
- Bank Transfer - add one or more accounts (account number required; 9-digit routing number recommended).
- Bangla QR - upload your Bangla QR image and enter your merchant name.
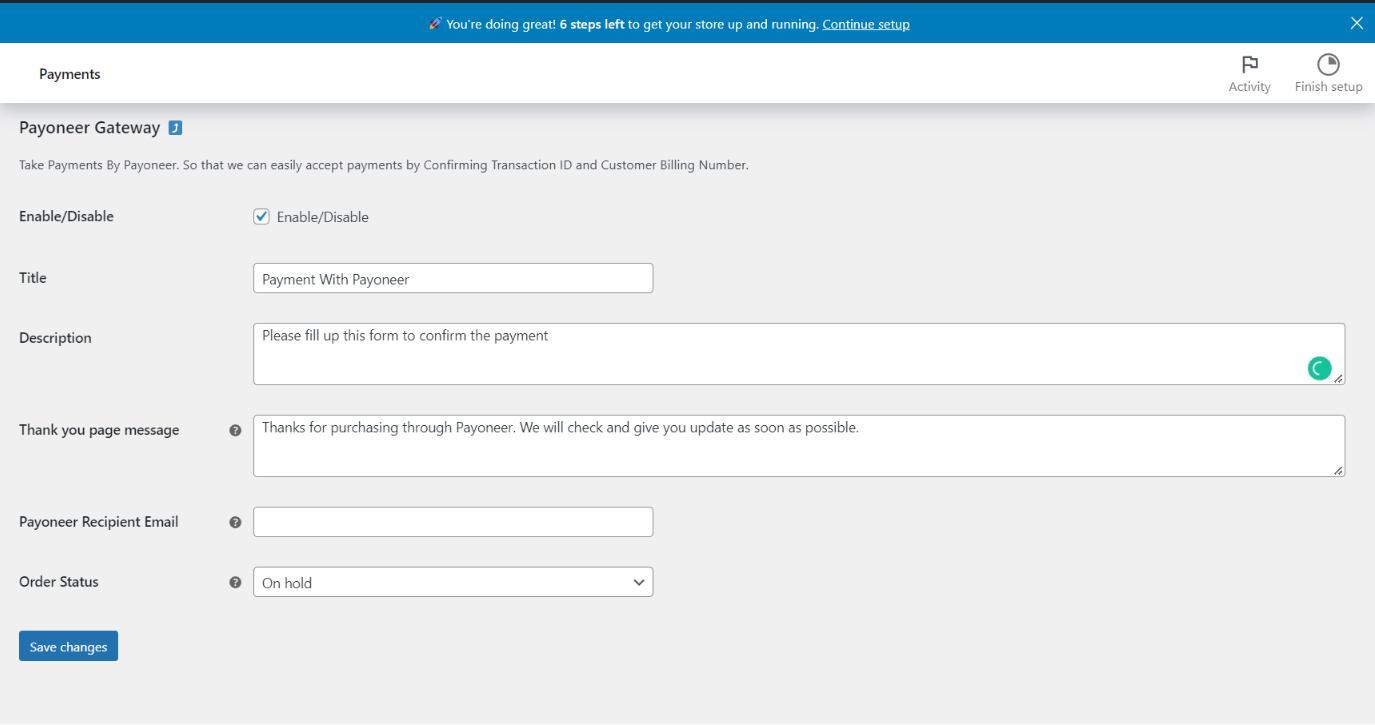
- Payoneer - enter your Payoneer email.
- Optional, per method: send money charge, prepayment discount, payment screenshot (off / optional / required), minimum and maximum order amount, and the order status after checkout.
- Optional: WooCommerce > Advance Payment to ask for the delivery charge or a fixed inside / outside Dhaka amount in advance.
- Place a test order to see the checkout as your customers will.
屏幕截图:


常见问题:
Is this plugin free?
Yes, completely. The plugin never charges a fee. The normal send money or cash out charges of bKash, Nagad, Rocket, Upay or your bank still apply to you as the account holder; you can pass them on with the optional charge setting.
Do I need a merchant account or payment API?
No. This is a manual payment gateway. You can use your existing personal, agent or merchant number or bank account. Customers pay and submit the Transaction ID, which you verify. No API keys or merchant onboarding required.
Does it work with the WooCommerce block checkout?
Yes. It supports the WooCommerce Cart & Checkout Blocks (the default checkout for new stores) and the classic shortcode checkout.
Is it compatible with HPOS (High-Performance Order Storage)?
Yes. It declares HPOS compatibility and stores all order data with the WooCommerce order CRUD API, so details display correctly with HPOS or the legacy storage.
Which number formats do customers have to use?
Any common format works: 01712345678, +8801712345678, 01712-345678 or Bangla digits (০১৭১২৩৪৫৬৭৮). Numbers are saved in the standard 11-digit format. For Rocket, both the 11-digit mobile number and the 12-digit Rocket account number (mobile number + check digit) are accepted.
What happens if a customer enters a Transaction ID that was already used?
The order is not placed and the customer is asked to check the Transaction ID. Failed and cancelled orders are ignored, so a customer can retry after a failed attempt. Developers can turn the check off with the ccd_block_duplicate_transaction_id filter (return false).
How do I add my QR code?
Go to WooCommerce > Settings > Payments, open the method and use the "Select image" button next to "QR Code Image". The QR code appears on the checkout page under your number.
What is Bangla QR?
Bangladesh Bank's national interoperable QR code. One QR code can be paid from any participating bank or mobile financial service app. Enable "Bangla QR", add your merchant name and upload your Bangla QR image. The method stays hidden at checkout until a QR image is added.
Can I add more than one bank account?
Yes, as many as you need. Under Bank Transfer, use "+ Add account". With more than one account, customers get a searchable list (5 at a time, with "Show more") and choose the account they paid into; the order shows which account it was.
Where are payment screenshots stored? Can anyone see them?
In a private folder inside your uploads directory, with random file names and direct access blocked. They never appear in the Media Library. Only users who can manage orders can open them, from the order screen. Uploads that never become an order are deleted after 24 hours. Accepted files: JPG, PNG, WebP and PDF, up to 5 MB (or your server's upload limit if lower).
Can customers pay only the delivery charge in advance?
Yes. In WooCommerce > Advance Payment choose either the delivery (shipping) charge or a fixed amount for inside / outside Dhaka, and optionally a minimum order total. The order is marked "Advance Received" and the remaining amount is shown to you and the customer.
Why does a payment method not show at checkout?
Check that it is enabled and has a receiving number or account (Bangla QR needs its QR image), and that the order amount is within the method's minimum / maximum. The Payments settings page warns you about enabled methods that customers cannot use.
Which currencies are supported?
The plugin works with your WooCommerce currency. It is designed primarily for BDT (Bangladeshi Taka) but does not restrict the store currency.
Is WooCommerce required?
Yes. WooCommerce must be installed and active.
更新日志:
- NEW: Upay, CellFin (Islami Bank), Bangla QR and Bank Transfer (BEFTN / NPSB / RTGS) payment methods.
- NEW: Bank Transfer supports any number of bank accounts, with a searchable "account you paid into" picker at checkout.
- NEW: Optional payment screenshot / PDF upload per gateway (off, optional or required), stored privately and viewable only by shop managers.
- NEW: Prepayment discount per gateway (percentage or fixed).
- NEW: Minimum / maximum order amount per gateway.
- NEW: Advance payment can be a fixed amount for inside / outside Dhaka (choose the districts) and can require a minimum order total.
- NEW: "Merchant" account type for bKash, Nagad, Rocket and Upay.
- NEW: Settings are checked on save: invalid receiving numbers, routing numbers, QR links, percentages over 100% and min/max conflicts are reported and not saved.
- IMPROVED: Customer numbers in Bangla digits, with +880, spaces or dashes are accepted and saved in a standard format.
- FIXED: Rocket now accepts the 12-digit Rocket account number (mobile number + check digit) as well as the 11-digit mobile number.
- FIXED: The custom thank you page message now shows for bKash, Nagad and Rocket orders (only Payoneer's was shown before).
- FIXED: On block checkout, the advance payment amounts now update when the address, shipping or payment method changes.
- FIXED: Orders no longer stay "Pending payment" when a gateway's order status setting is empty.
- NEW: Duplicate Transaction ID protection. A Transaction ID already used on another order is rejected at checkout (classic and block checkout). Failed and cancelled orders are ignored.
- NEW: One-click "Copy" button next to your receiving number/email at checkout.
- NEW: QR code image per gateway (bKash, Nagad, Rocket), shown at checkout. Pick it with the Media Library button in the gateway settings.
- NEW: Configurable send money charge per gateway: percentage or fixed amount. Existing settings keep their previous rate (bKash 1.85%, Nagad 1.45%, Rocket 1.8%).
- FIXED: On block checkout, the send money charge now updates as soon as the customer selects a payment method.
- FIXED: The Rocket charge note was shown twice on classic checkout.
- NEW: A one-time, dismissible request to rate the plugin after your store receives 10 orders through it.
- FIXED: Nagad and Payoneer payment instructions are now included in customer order emails (previously missing, and a PHP warning was logged).
- FIXED: Account No. and Transaction ID columns now appear in the admin Orders list when WooCommerce uses legacy (posts) order storage.
- IMPROVED: Replaced the deprecated WC_Order::reduce_order_stock() call with wc_reduce_stock_levels().
- IMPROVED: Tested with WordPress 7.1 and WooCommerce 11.2.
- FIXED: PHP warning "Undefined array key order_actions" on the My Account > Orders page. The plugin now uses WooCommerce's correct "order-actions" column key, so the Actions column stays in place.
- FIXED: Account No. and Transaction ID columns on the My Account > Orders page now show their values instead of empty cells.
- FIXED: Deleting then reinstalling the plugin no longer creates a duplicate record in usage analytics — the install identity is now derived from the site, so a reinstall reuses the same record. (Shakvaro WP Insights SDK 1.2.7.)
- FIXED: Plugin deletion no longer causes a critical error on sites that have another Shakvaro plugin installed (class redeclaration in uninstall.php).
- FIXED: Activation event now correctly reported to Shakvaro WP Insights on plugin (re)activation.
- NEW: Optional, privacy-first usage analytics (Shakvaro WP Insights) to help us fix bugs and prioritize features. Disabled by default; nothing is collected unless you opt in. See the "Privacy & Data Sharing" section and manage it any time under Settings -> Data Sharing.
- NEW: Deletion/erasure request sent and local data cleaned on uninstall.
- NEW: WooCommerce Cart & Checkout Blocks support - all four gateways (bKash, Nagad, Rocket, Payoneer) now appear and work on the block-based checkout (default for new WooCommerce stores).
- NEW: Declared High-Performance Order Storage (HPOS) compatibility.
- FIXED: Order number/Transaction ID are now stored and read via WooCommerce order CRUD, so they display correctly under HPOS.
- IMPROVED: Shared, single-source validation for both classic and block checkout.
- IMPROVED: Added Requires Plugins / WC requires/tested headers; refreshed "Tested up to" for the latest WordPress and WooCommerce.
- IMPROVED: Checkout assets are versioned by plugin version instead of a per-request timestamp.
- SECURITY: Fixed $_POST array access without isset() checks
- SECURITY: Fixed array offset warnings when payment gateway settings don't exist
- SECURITY: Added proper sanitization before validation in all payment methods
- SECURITY: Fixed variable naming issues (Payoneer email was incorrectly named)
- IMPROVED: Better input validation with defense in depth (isset + empty checks)
- IMPROVED: Code quality and WordPress coding standards compliance
- FIXED: PHP notices and warnings on checkout page
- NEW: Added optional Advance Payment feature
- NEW: Custom order status "Advance Received" for advance payments
- NEW: Customers can pay only delivery/shipping charge as advance payment
- NEW: Settings page for advance payment configuration
- NEW: Customizable advance payment text messages
- NEW: Admin order details show advance payment information
- IMPROVED: Better payment amount calculations
- IMPROVED: Enhanced admin order display with advance payment breakdown
- FIXED: Remaining payment amount calculation accuracy
- Updated tested up to WordPress 6.7.4
- Validation Error Fix.
- Fixed issues on Single Order Page.
- Updated for new WooCommerce version.
- Fixed validation issues.
- Bug Fixes.
- Small Fixes.
- First release.