CodePeople Post Map for Google Maps
| 开发者 | codepeople |
|---|---|
| 更新时间 | 2026年5月17日 05:29 |
| 捐献地址: | 去捐款 |
| PHP版本: | 3.0.5 及以上 |
| WordPress版本: | 7.0 |
| 版权: | GPLv2 or later |
| 版权网址: | 版权信息 |
详情介绍:
- Load points from specific posts, categories, tags, or all posts
- Use location info and descriptions in post search
- Associate multiple points per post/page
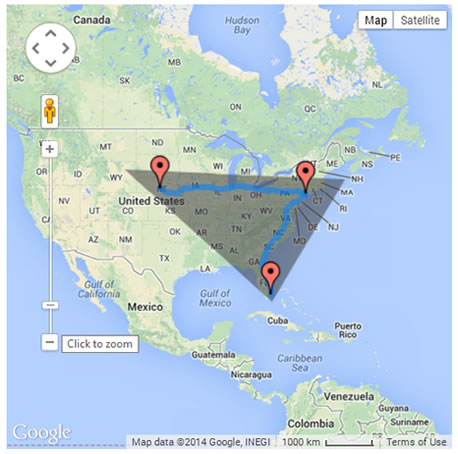
- Draw routes and shapes
- Add a search box for places
- Create legends with categories/tags/taxonomies to toggle visibility
- Add links for directions, opening in Google Maps, or Street View
- Display multiple maps per post/page (same points across maps)
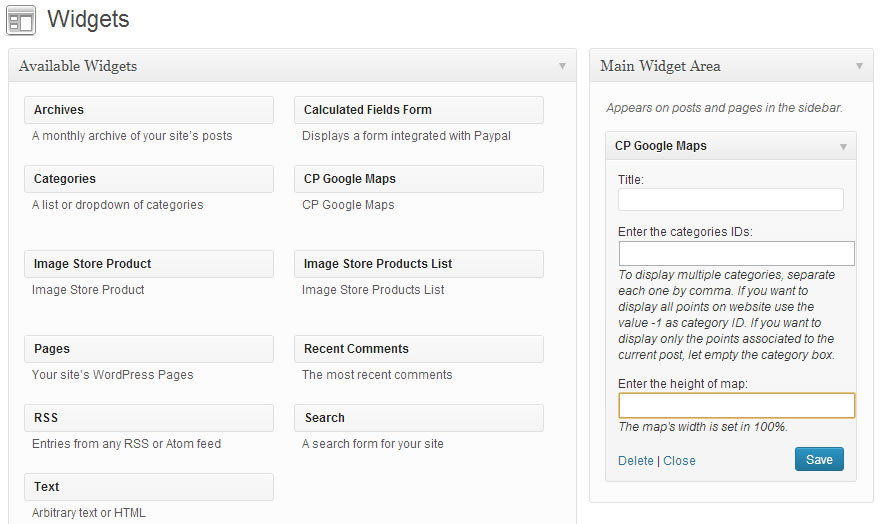
- Insert maps as sidebar widgets
- Group markers in clusters
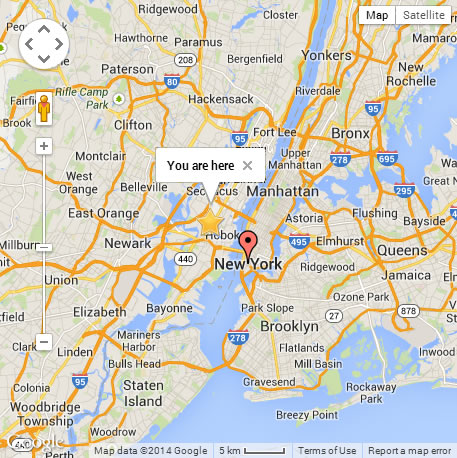
- Show and refresh user location at intervals
- Generate dynamic points from image metadata or WordPress App geolocation
- Associate maps with any public post_type
- In non-singular pages, show a map per post
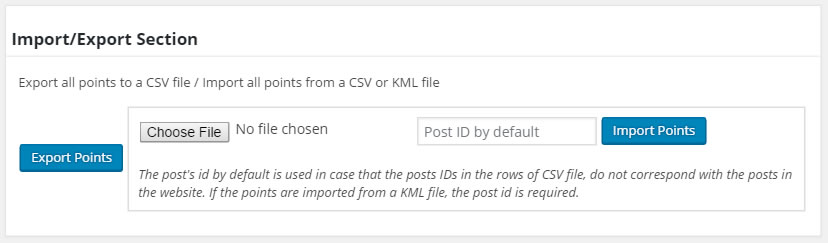
- Export/import points via CSV or KML
- Load KML layers from files
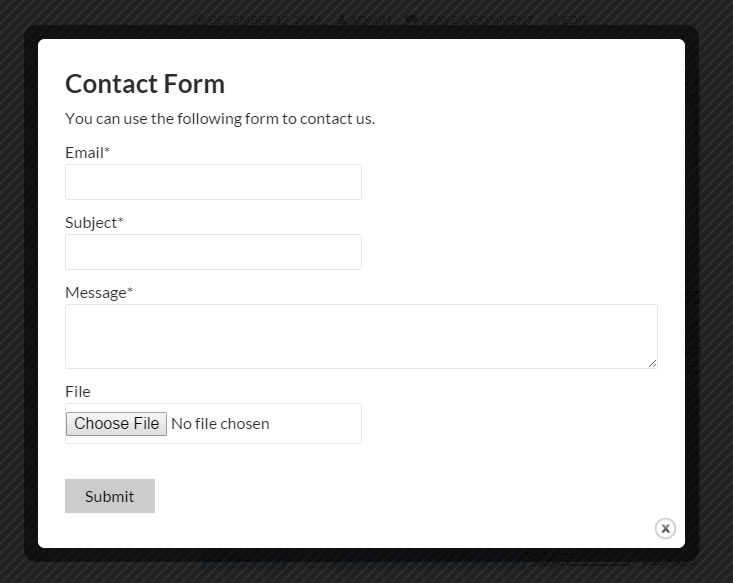
- Design contact forms linked to map points
- Send notification emails from form submissions
- Assign unique or global email addresses to points
- Support Contact Form 7 shortcodes in point descriptions
- Use point-associated images as map icons
安装:
- Download and unzip the plugin
- Upload the entire codepeople-post-map/ directory to the /wp-content/plugins/ directory
- Activate the plugin through the Plugins menu in WordPress
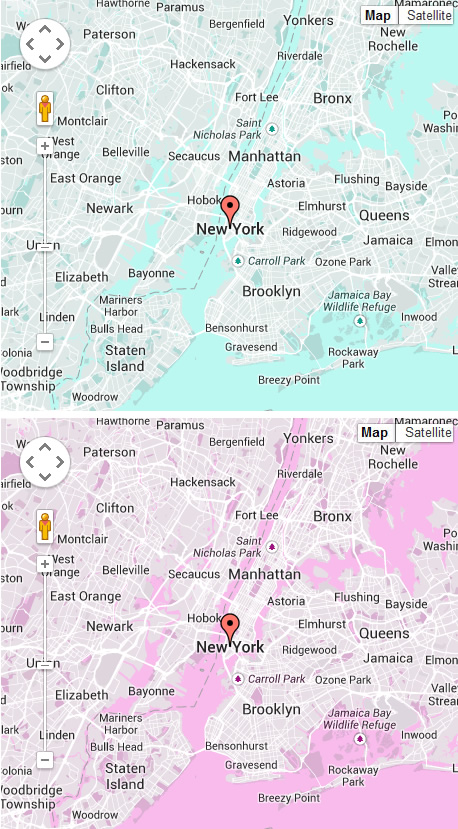
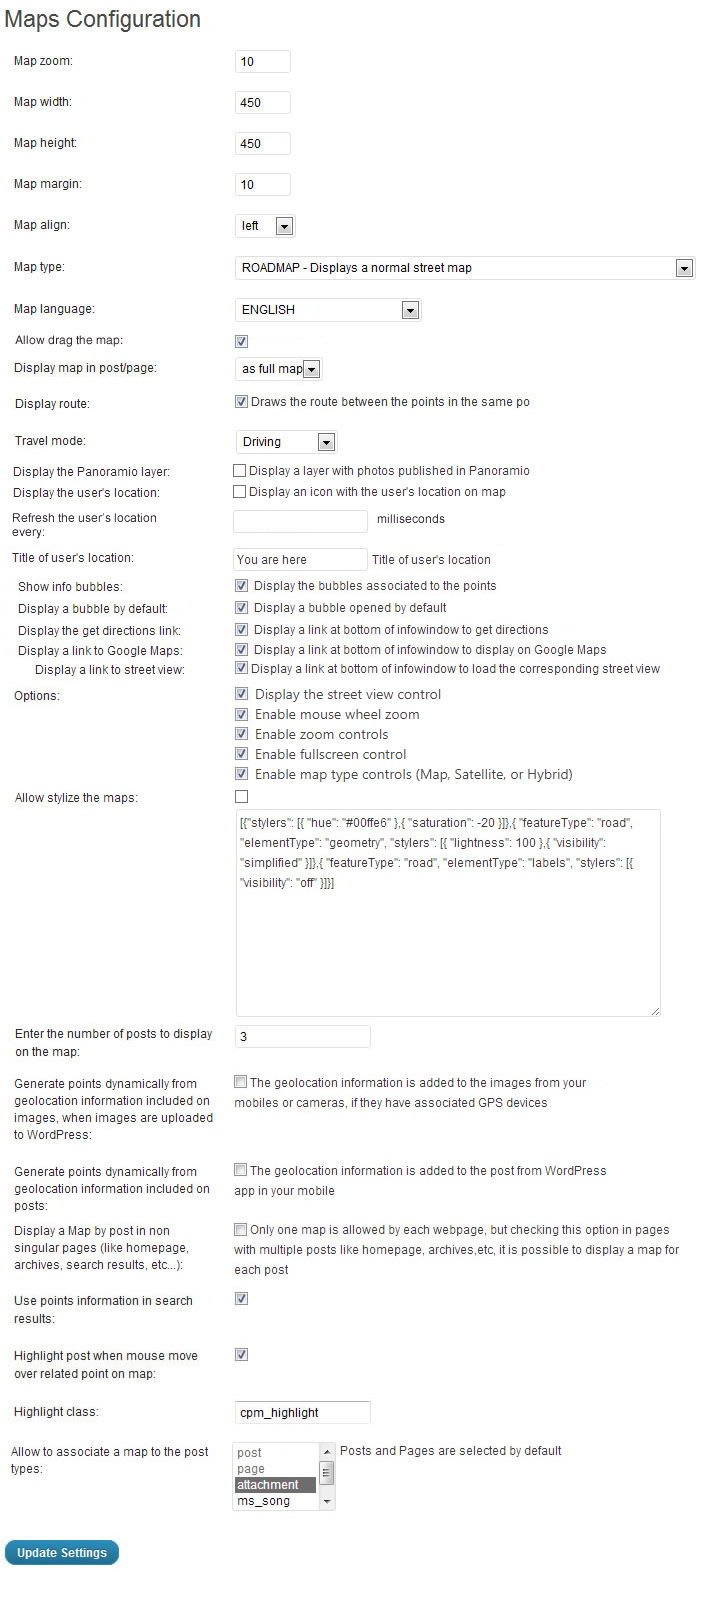
屏幕截图:
常见问题:
Q: Why the Google Map shortcode is not inserted on page content?
A: There are some content editors, available as WordPress plugins, that provoke some compatibility issues with WordPress, in this case you should type the shortcode manually: [codepeople-post-map]
Q: How many Google Maps I can insert into a post?
A: In the free version of plugin only one map with only one point associated in each post/page. In the premium version of plugin it is possible associate multiple points to the post and insert multiple shortcodes ( if there are multiple maps included in the same post/page, all of them will display the same points)
Q: How to insert Google Maps into a template?
A: Load the template in which you want to place the map in the text editor of your choice and place the following code in the position where you want to display the Google maps:
Q: Is possible to load all points that belong to the posts with a tag assigned in a same Google Map?
A: To display all points that belong to the posts with a specific tag assigned, for example the tag name "mytag", use the shortcode's attribute "tag", as follows: [codepeople-post-map tag="mytag"] To insert the code directly in a template, the snippet of code would be:
Q: How to know the ID of a category?
A: The explanation to determine the ID of a category is applied to other taxonomies. Access to the categories through the menu option: "Posts/Categories". After accessing to the categories page, click the "Edit" link corresponding to the category, and pays special attention to the parameter "tag_ID", in the URL on browser. The value in this parameter correspond to the ID of the category.
Q: Is possible to load all points in a category in a same Google Map?
A: To display all points that belong to a specific category, it is required to insert the following shortcode [codepeople-post-map cat="3"] The number 3 represent the category ID, replace this number by the corresponding category's ID. To insert the code directly in a template, the snippet of code would be:
Q: How to exclude the points in a category?
A: To exclude the points that belong to a specific category, or various categories, inserts the attribute excludecat in the shortcode: [codepeople-post-map excludecat="3,4"] The number 3 and 4 represent the categories IDs.
Q: How to exclude the points in a post?
A: To exclude the points that belong to a post, or various posts, inserts the attribute excludepos in the shortcode: [codepeople-post-map excludepost="3,4"] The number 3 and 4 represent the posts IDs.
Q: How to exclude the points in posts with tag?
A: To exclude the points that belong to the post with a specific tag, or various tags, inserts the attribute excludetag in the shortcode: [codepeople-post-map excludetag="3,4"] The number 3 and 4 represent the tags IDs.
Q: Is possible to load all points in more than one category in a same Google Map?
A: To display all points that belong to multiple categories, it is required separate the categories IDs with comma "," [codepeople-post-map cat="3,5"] The numbers 3 and 5 are the categories IDs, replace these numbers with the corresponding categories IDs. To insert the code directly in a template, the snippet of code would be:
Q: Is possible to load all points in the website in a same Google Map?
A: To display all points in the website use -1 as the category ID: [codepeople-post-map cat="-1"] or for template.
Q: If I link geolocation information to a post but do not insert a Google map in it, will the geolocation information be available?
A: If you have inserted a Google map into a template where multiple posts are displayed, then the geolocation information associated with posts is displayed on the map.
Q: How can I disable the information window of point opened by default?
A: Go to the settings of map (the settings page of plugin for settings of all maps, or the settings of a particular map), and uncheck the option "Display a bubble by default"
Q: How can I disable all information windows of points?
A: Go to the settings of map (the settings page of plugin for settings of all maps, or the settings of a particular map), and uncheck the option "Show info bubbles"
Q: How can I use different icons, in the points markers?
A: To use your own icons, you only should to upload the icons images to the following location: "/wp-content/plugins/codepeople-post-map/images/icons/", and then select the image from the list in the point's definition.
Q: How can I use particular settings in a map?
A: You may use a particular settings in a map, defining the options directly as attributes of shortcode: [codepeople-post-map width="100%"] If you are inserting the map in a particular page/post, you may check the field named "Use particular settings for this map", and then entering the particular values in the settings options.
Q: Is possible to display the map as responsive design?
A: Yes, that is possible, you only should to define the width of map with values in percent. For example: 100% Pay attention the height definition with percent is not recommended, because it is only possible if the map's container has a fixed height.
Q: How to get the directions to the point?
A: Go to the settings page of plugin and check the box to display the "Get directions" link in the infowindow. The "Get directions" link will be displayed in the infowindow.
Q: Is possible to include multiple taxonomies in the maps' legends?
A: In the shortcode can be defined the attribute "legend" for selecting the taxonomy to use in the legend of map: [codepeople-post-map legend="category"] but from the version 5.0.6 of the plugin it is possible to define in the legend multiple taxonomies separated by comma, to include all of them in the map's legend: [codepeople-post-map legend="category,post_tag"]
Q: How to open the point on Google Maps?
A: If you want to display a link to open the point directly on Google Maps, go to the settings page of plugin, and checks the box to display the link in the infowindow.
Q: Could I insert the map as widget?
A: Yes, you can. Go to the menu option: "Appearance / Widgets" and insert the "CodePeople Post Map for Google Maps" widget on side bar.
Q: My images include geolocation information. Is possible use the geolocaion information stored in the image to generate points on map?
A: Go to the settings page of plugin and select the corresponding option to allow processing the information stored on image's metadata, and then if an image uploaded to WordPress, includes geolocation information, will be generated a point with this information dynamically, that will be displayed on map.
Q: Why the maps are not showing on website?
A: Some plugins interfere with the shortcodes replacements, and provokes that maps don't be loaded correctly, in this case should be passed a new parameter through the shortcode print=1 Passing the parameter print=1, displays the map at beginning of page/post content.
Q: It is possible to draw routes for flights between countries?
A: By default Google draws routes between points connected by cars, bus, trains, etc, but not for flights. So, in this case should be used polylines. To connect points with polylines, tick the attribute: "Connect the points with polylines, even if there is not a route between points", in the settings page of maps.
Q: How can I change the route between address?
A: The route depends on the order of the points. If you want change the route, you should change the order of point. Takes the point by the handle's icon, and drag it to its correct position in the points list.
Q: What are the differences between routes and polylines?
A: The routes are drawn on maps, only if there are known routes between the locations, based in the travelling mode (driving, walking), but if Google unknown a way between both address, is not able to draw the route. The polylines are straight lines connecting two addresses, even if there is not a route. It is main difference between both concepts, and why the polylines are preferred for representing flights.
Q: Is possible create routes between points in different posts?
A: Yes, it's possible to draw a route including points belonging to different posts/pages, but in the current version of the plugin would be needed duplicate some points. Visit the following link to our technical blog with detailed instructions: http://blog.net-factor.com/how-connecting-multiple-posts-on-a-route/
Q: How can I centring the map in a point defined a specific post, and display its infowindow?
A: Use the "defaultpost" attribute, in the map's shortcode, as follows: [codepeople-post-map defaultpost="231"] The number is the post's ID
Q: I've configured the sizes of the map to be displayed with a responsive design, but the map is not showing
A: To display the maps with a responsive design, you should define the map's width with percentages (for example 100% if you want that the map width be the same that its container), but PAY ATTENTION, in web development the treatment of the width and height is different. The page width is limited by the browser's width, but with the height it is not apply. So, you should enter a fixed height(for example 320px). The only way to define the map's height in percentages, is if the element that contain the map has defined a fixed height.
Q: Can be inserted a link in the infowindow?
A: It is possible insert links, and any other HTML element in the infowindow. You only should insert HTML tags directly in the point description. For example, to insert a link to our web page: <a href="http://wordpress.dwbooster.com">Click Here</a>
Q: After entering an address, and to press the verify button, the address is modified, and the pin is displayed in a different location of the map
A: If after pressing the "verify" button, the address is modified dynamically, and the pin is displayed in another location, the cause is simple. If Google Maps does not recognize an address, it uses the nearest known address, and displays the pin on this location. To solve the issue, you simply should drag and drop the pin in the correct location, and type the address again, but this time "DON'T PRESS AGAIN THE VERIFY BUTTON".
Q: I've inserted an image in the page, but have not been generated a new point in the map
A: First, be sure you have checked the option "Generate points dynamically from geolocation information included on images, when images are uploaded to WordPress", from the settings page of the plugin. Second, be sure the image includes the Exif tags with the geolocation information (latitude and longitude) Finally, you should upload the image from the "Add Media" button of the page or post, and not from the media library.
Q: Can be generated a point from the page publication, with the location of the author?
A: Yes, that is possible but only from the WordPress App, available for iPhone, iPad and Android, with the option for sharing the location enabled in the application. Furthermore, from the settings page of the plugin, should be checked the option: "Generate points dynamically from geolocation information included on posts"
Q: How to display a map in the search results page, with the points defined in the resulting posts and pages?
A: To insert a map in the results page with the points defined in the resulting posts and pages, you simply should identify the template file, in the active theme on your WordPress, that is used in the search page (usually it is called search.php), and inserts the map's shortcode directly in the file's content:
Q: Can be searched in the website by the points information?
A: If was checked the option "Use points information in search results", from the settings page of the plugin. The searching process will consider the points information too, and the posts and pages resulting could be selected by its points. Pay attention, the results of search will be the posts and pages that include the points, not the point directly.
Q: What styles are used in the infowindows?
A: The design of infowindows is defined through styles in the cpm-styles.css file, located in "/wp-content/plugins/codepeople-post-map/styles/cpm-styles.css", specifically with the styles: .cpm-infowindow {margin:0; padding:0px; min-height:80px; font-size:11px; clear:both;} .cpm-infowindow .cpm-content {float:left;width:100%; color:black;} .cpm-infowindow .cpm-content .title {font-size:12px; line-height: 18px; font-weight:bold; color:black;} .cpm-infowindow .cpm-content .address {font-weight:bold; font-size:9px;} .cpm-infowindow .cpm-content .description {font-size:10px;}
Q: Can be highlighted the post or page related with the point on map?
A: From the settings page of the plugin, there are two options:
- Highlight post when mouse move over related point on map
- Highlight class
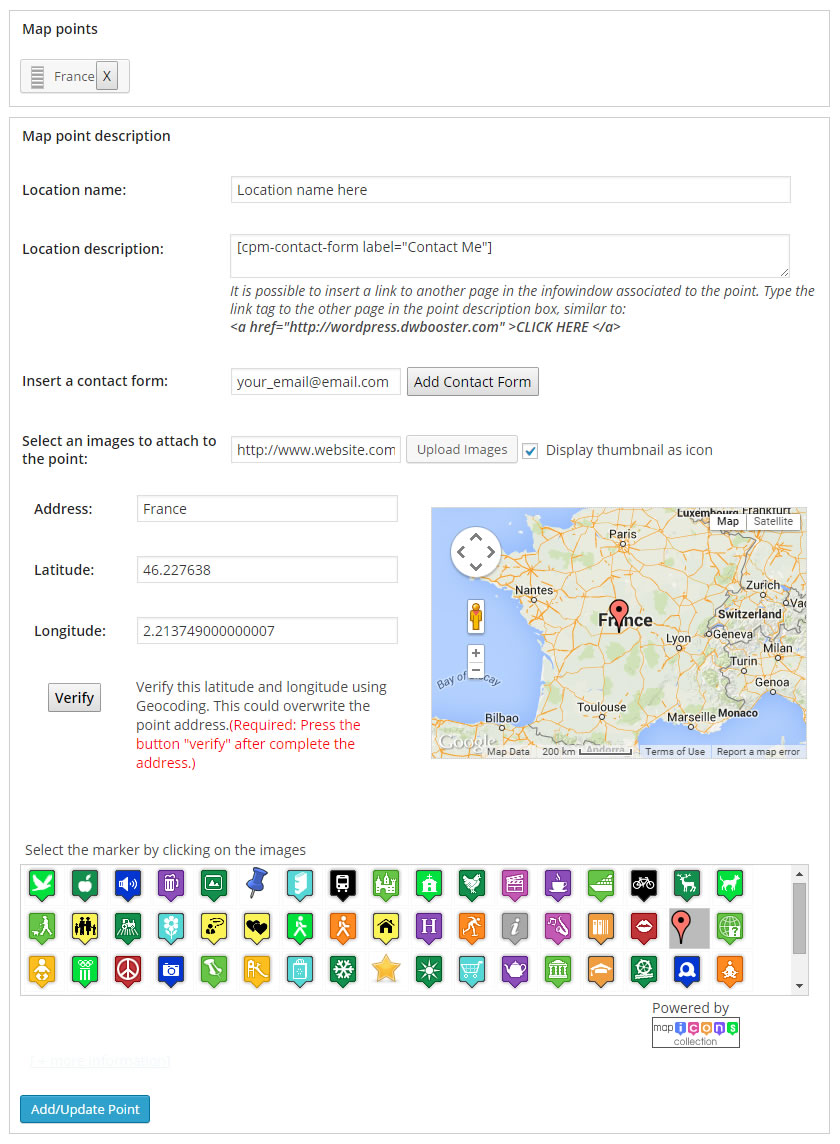
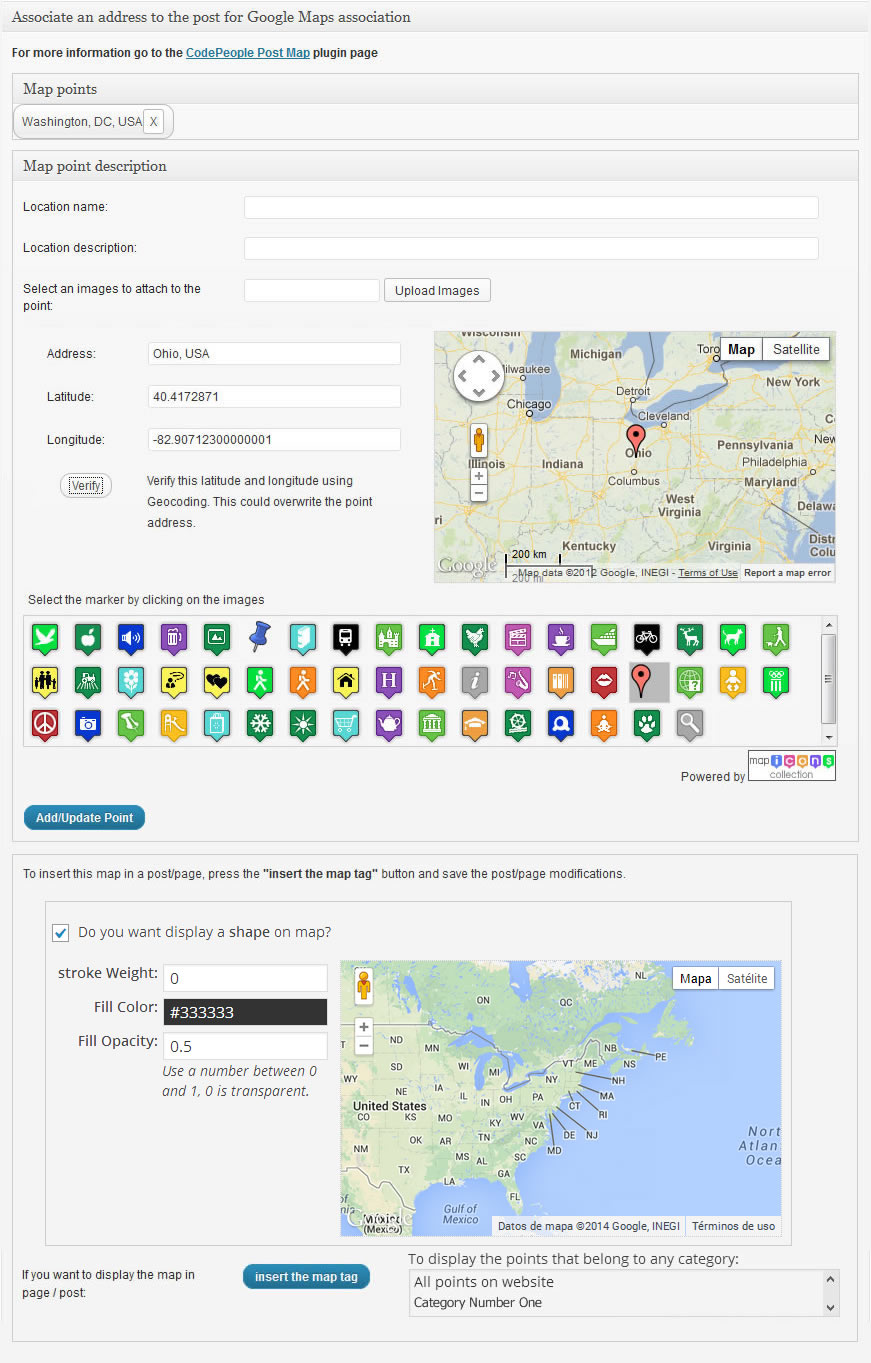
Q: How can be created shapes on map?
A: In the map's definition, directly in the page or post where the map is being inserted, there is the checkbox: "Do you want display a shape on map?", please, tick the checkbox to expand the shape's section. The shape's section includes some options like: the stroke weight (if you don't want to display an stroke around the shape, set its value to zero), the fill colour (the colour code with the format: #FFFFFF, to select the shape colour), and the opacity to be applied to the shape, take into consideration than zero is transparent and 1 is opaque. Remember, the shape is displayed over the map, if you set the opacity to 1, won't be possible to see the map's area. Now the most important part create the shape's area. To create the shape's area is sufficient with click in the map at right (Don't worry, the pins are not included in the final map, are inserted in the preview map to allow modify the shape's area). Through the pins at right map it is possible modify the shape's area, click on the pin to delete it, or drag the pin to another location to vary the shape.
更新日志:
- Modifies the plugin name and references to meet WordPress directory requirements.
- Ensures full compatibility with WordPress 6.8.
- Enhance the compatibility with latest Google Maps APIs.
- Improves the plugin interface.
- Resolves a compatibility issue with WordPress version previous to 5.5.
- Introduces the new Marker and Cluster libraries.
- Updates the Gutenberg block and metabox for enhanced functionality.
- Enhances the plugin settings page for a better user experience.
- Allows configuring the points to display when WPML is installed on the website.
- Load Google Maps APIs asynchronously so as not to affect website performance.
- Fixes a conflict in the activation process with WP6.5.
- Implements the integration with new Borlabs Cookie version.
- Improves the integration with third-party plugins.
- Removes deprecated JS code.
- Hides the map gray background color on zoom out.
- Fixes an issue in default variables.
- Improves the plugin interface.
- Implements the WCML integration to display points from active language.