
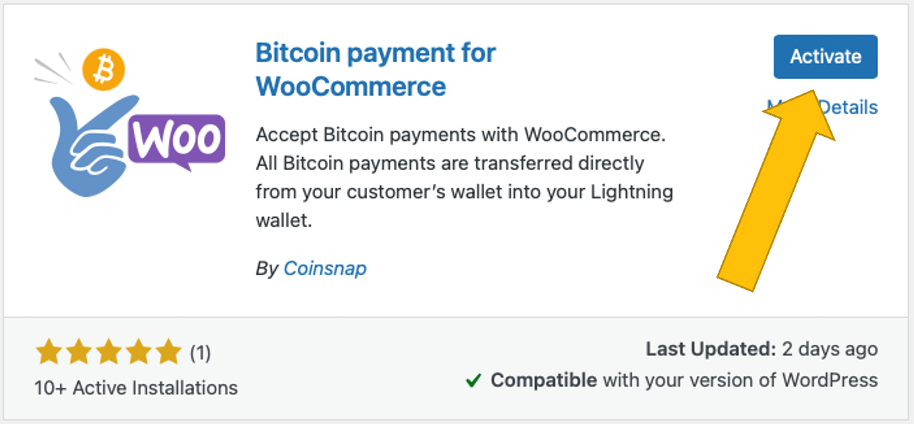
Bitcoin payment for WooCommerce
| 开发者 | coinsnap |
|---|---|
| 更新时间 | 2026年6月5日 15:25 |
| WordPress版本: | 7.0 |
| 版权: | GPLv2 |
| 版权网址: | 版权信息 |
标签
下载
详情介绍:
- Get your free Coinsnap account with just your email
- Install, activate and configure the plugin in your WordPress backend (see the installation guide)
- Activate Bitcoin payments in WooCommerce and accept Bitcoin payments from your customers
- Amazingly simple installation in just 3 steps and a few minutes
- Customizable checkout for optimized customer experience
- Multilingual merchant admin dashboard for easy administration and management of transactions.
- Quick and easy registration: Just enter your email address and your Lightning address – and you are ready to integrate the payment module and start selling for Bitcoin Lightning.
- Immediate crediting of all payments to your Lightning wallet.
- Payment transfer directly from your customer’s wallet to your wallet.
- Instant conversion and crediting in euro possible with Coinsnap and your Bringin Lightning address
- Low transaction fee of only 1% of the invoiced amount (with referrer code).
- The plugin is free of cost, including all future updates. Stay up-to-date at absolutely no cost today or in the future.
- Outstanding privacy: Direct, P2P payments into your Lightning wallet, no intermediaries and paperwork. Any transaction information is only shared between you and your customer.
- Detailed reporting and advanced filtering for all transactions, simple data export for your accounting.
- Sophisticated merchant’s admin dashboard in Coinsnap: See all your transactions at a glance, follow-up on individual payments or see issues with payments.
- No need for any technical infrastructure: Accept Bitcoin and Lightning payments in your online store without having to set up your own server or your own Lightning node.
- On-chain and Lightning transactions are supported: Let your customers choose their preferred payment method.
- BTCPay Server ready: connect your own BTCPay Server with WooCommerce in just a fes steps and a few minutes – no technical expertise needed!
- No chargebacks: All Bitcoin payments are irreversible.
- Lightning fast transactions: Receive your payment within seconds (with the Lightning payment method), in minutes with on-chain.
- Low fees (with Lightning)
- Global reach: Sell to any customer anywhere – all he needs to buy from you is a Lightning wallet.
- Demo Store: https://woocommerce.coinsnap.org/
- Product page: https://coinsnap.io/shop-systems/woocommerce/
- Installation Guide: https://coinsnap.io/user-guides/woocommerce-bitcoin-user-guide/
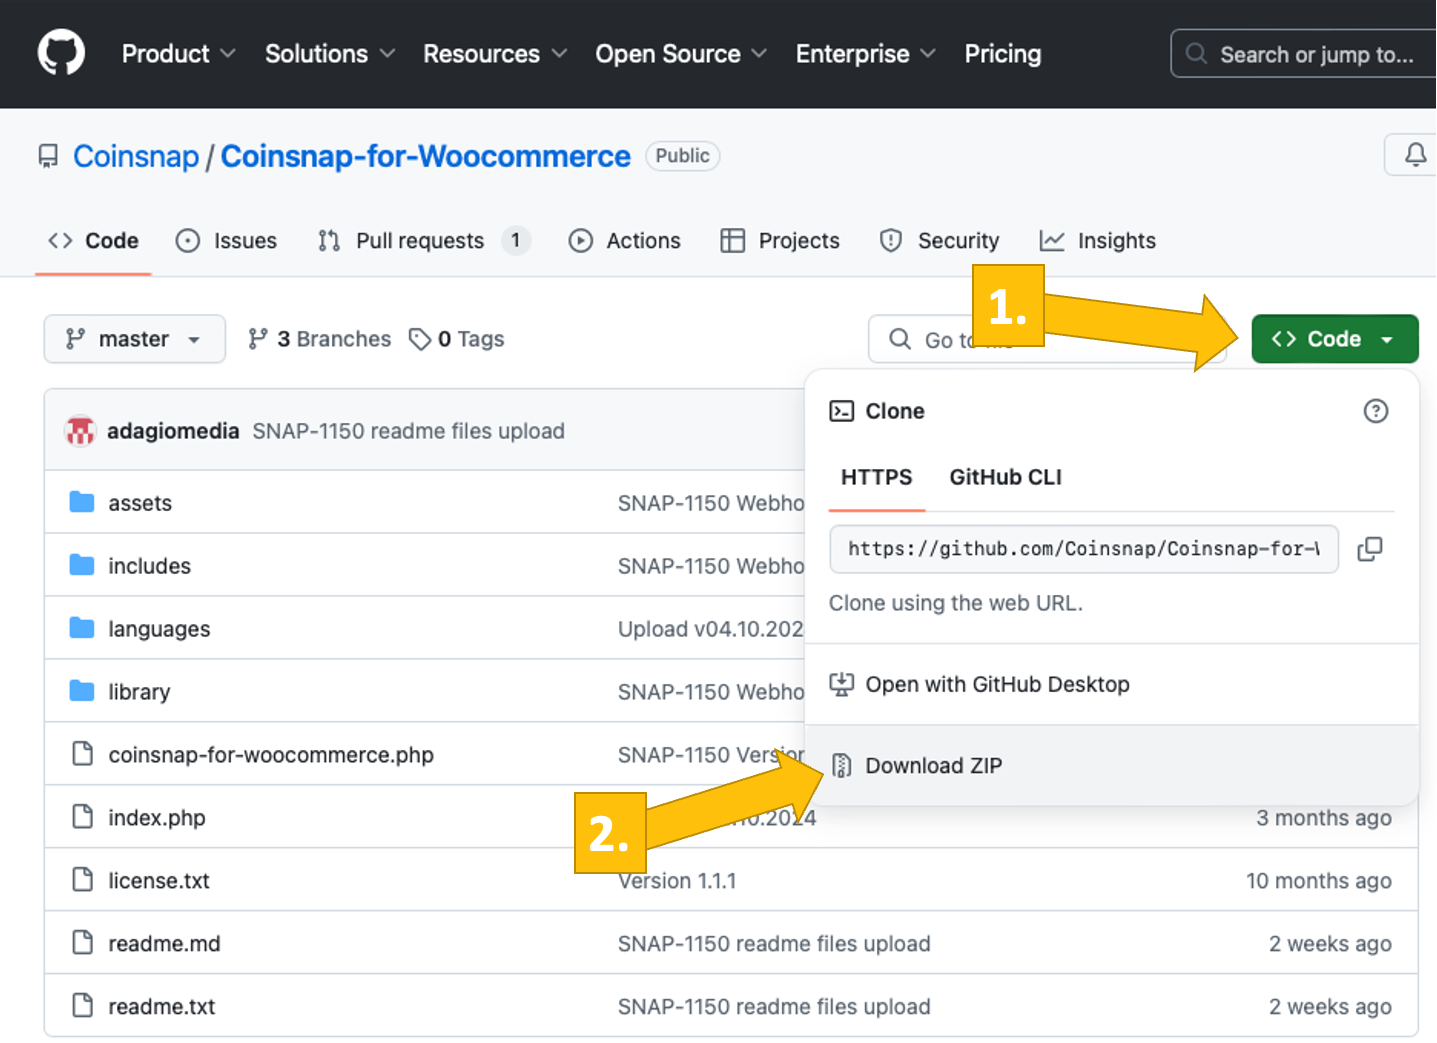
- Github plugin page: https://github.com/Coinsnap/Coinsnap-for-Woocommerce
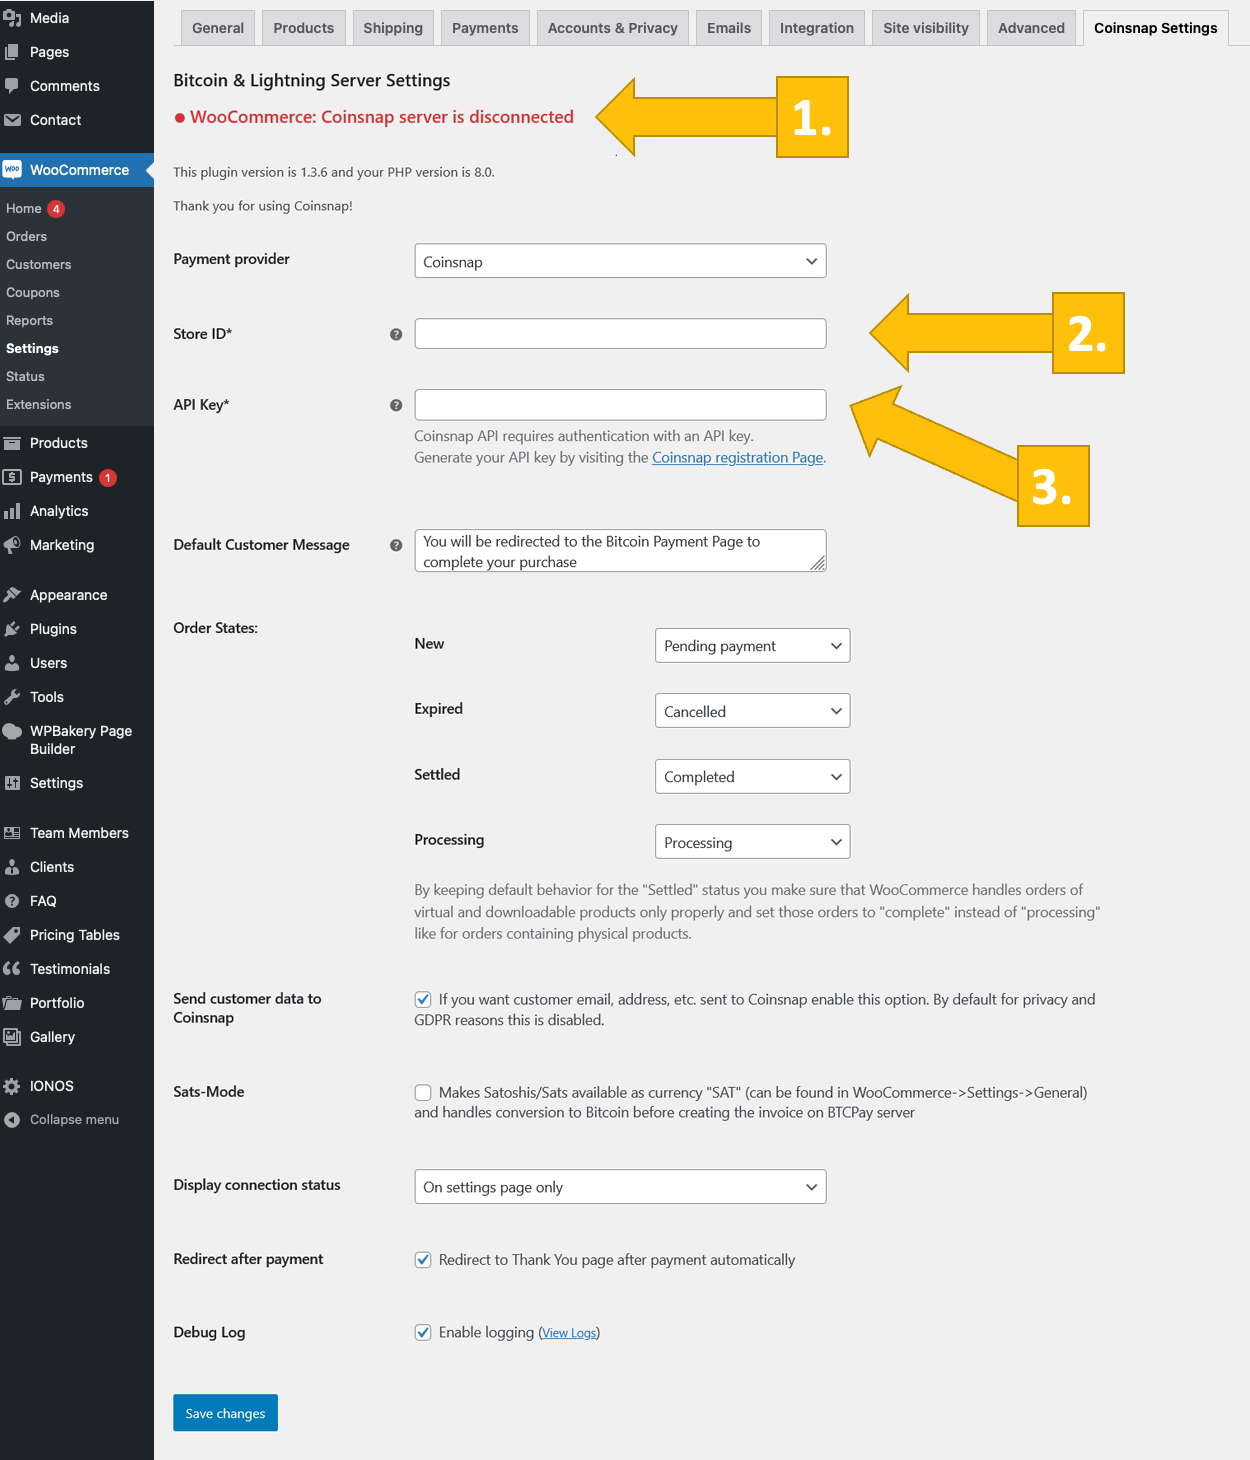
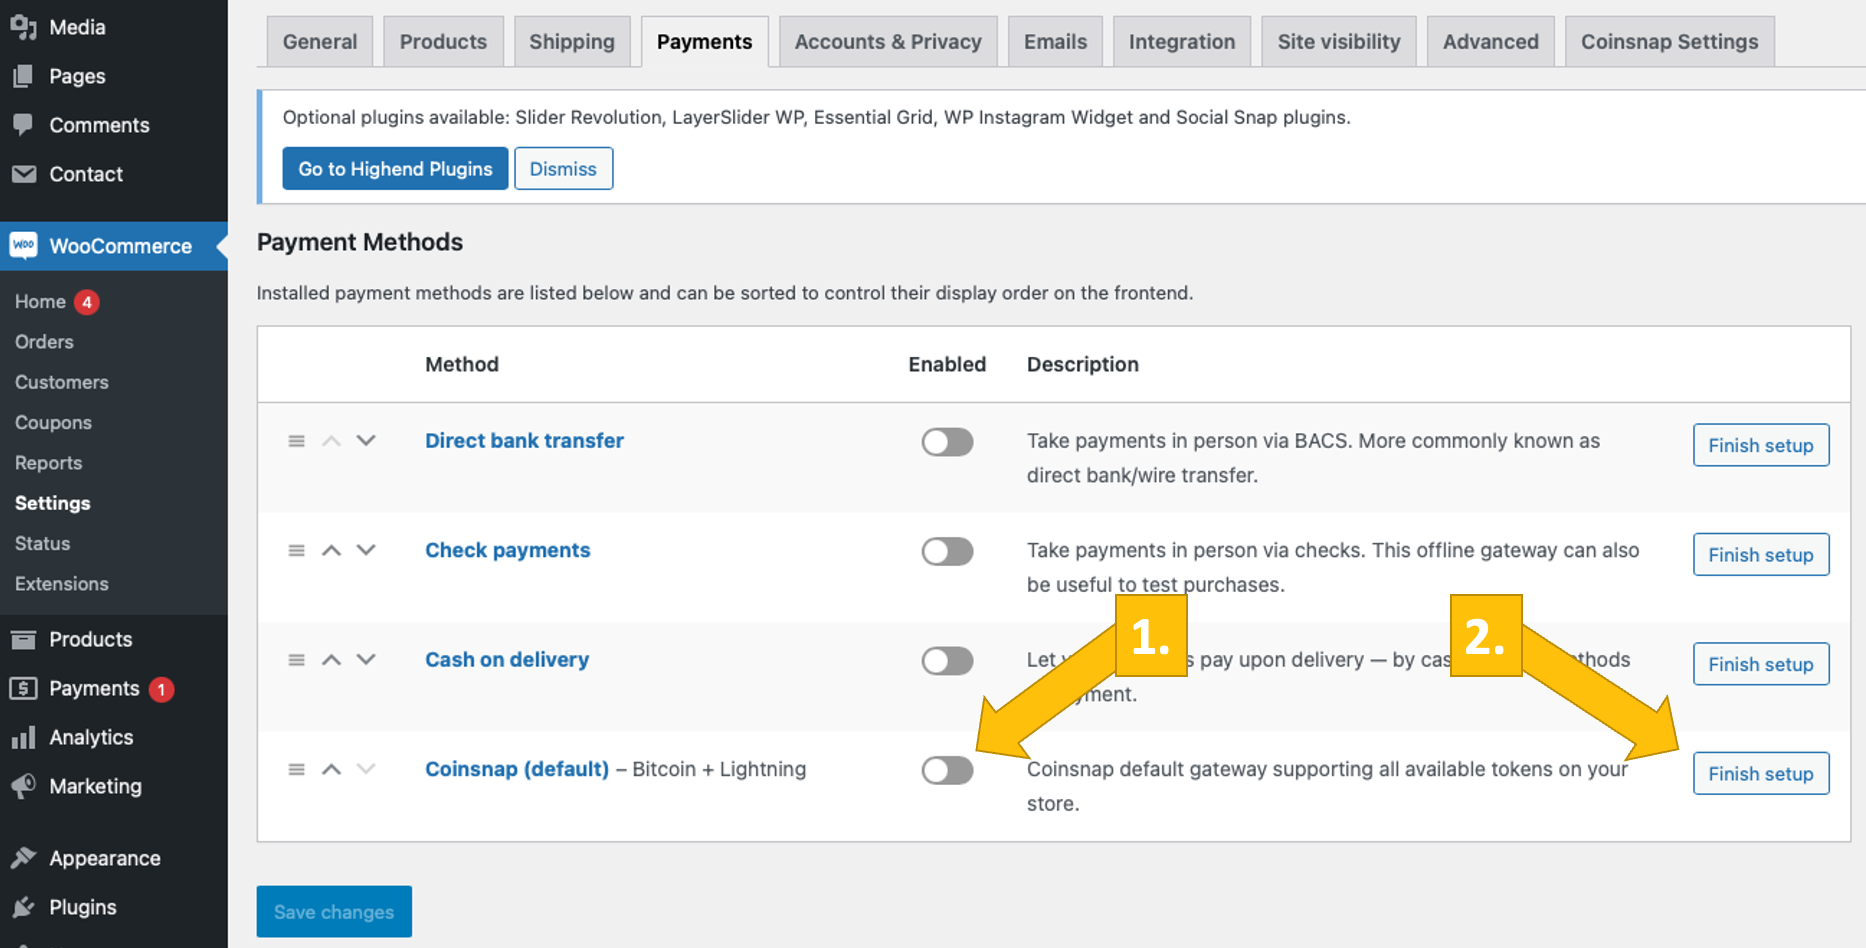
安装:
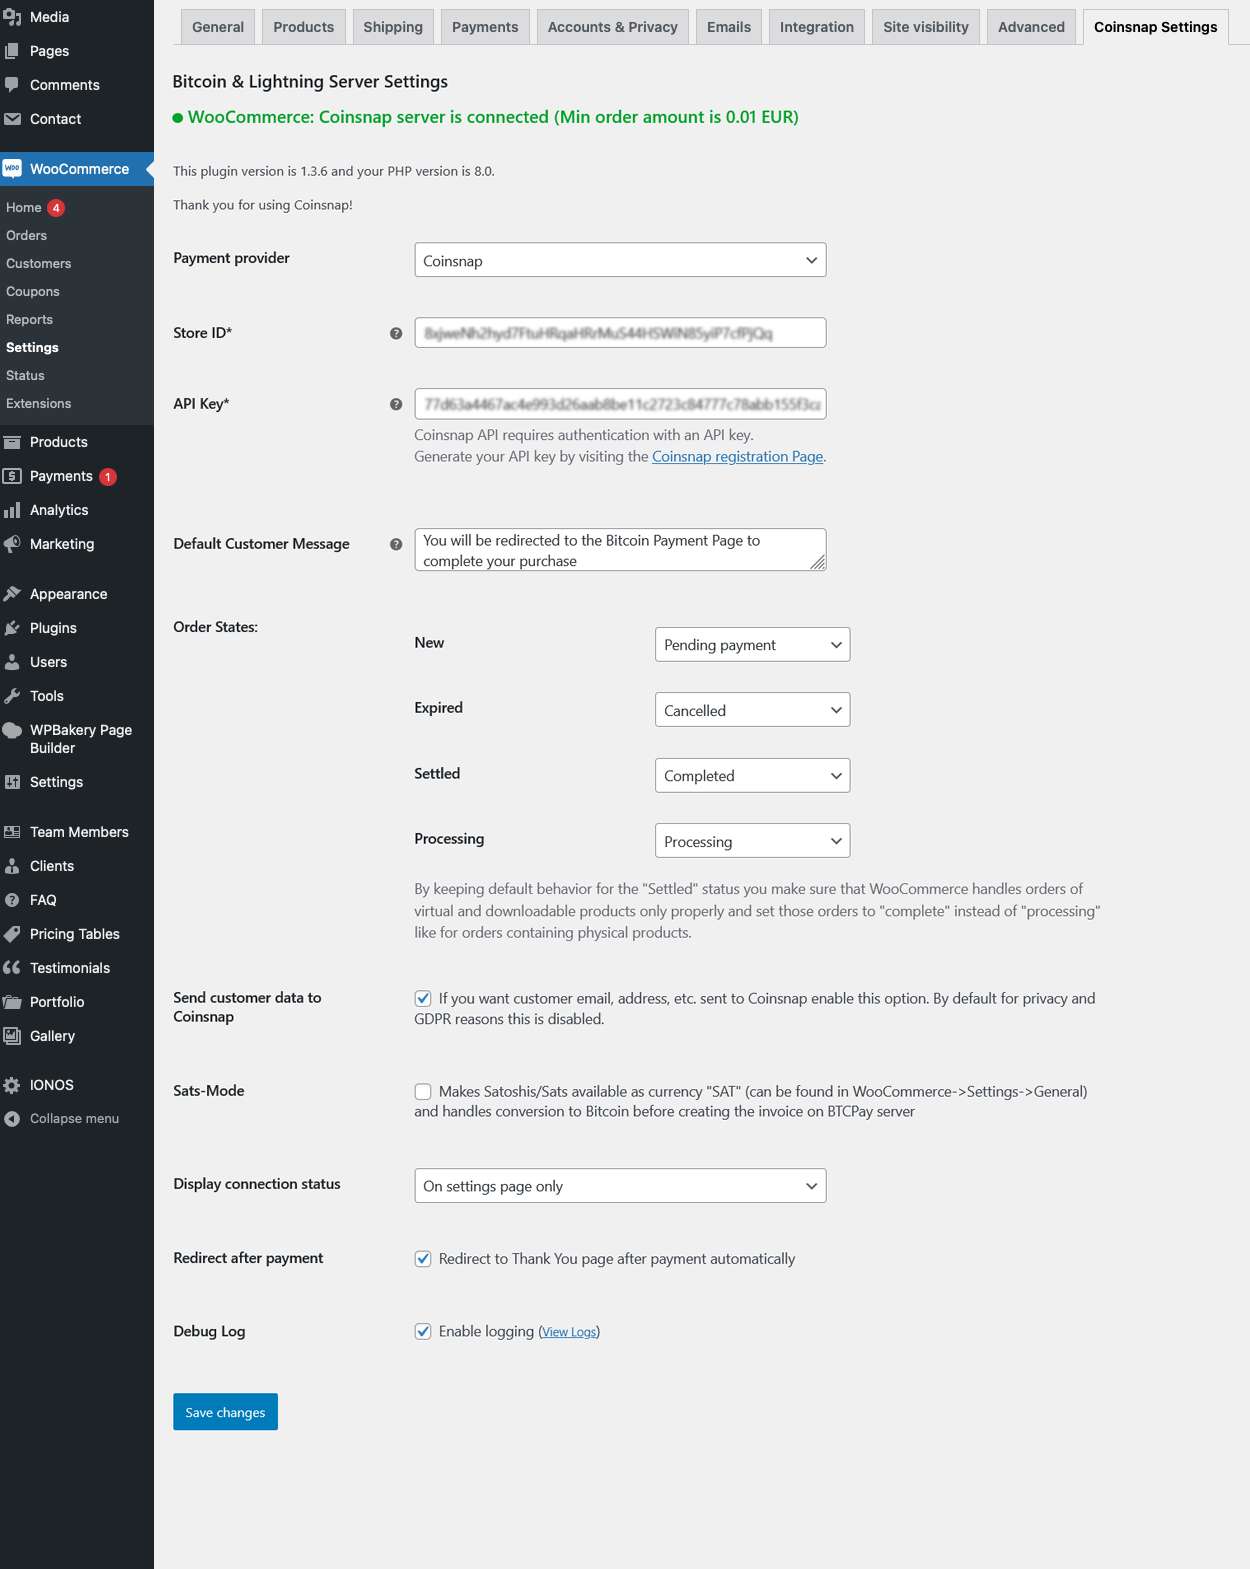
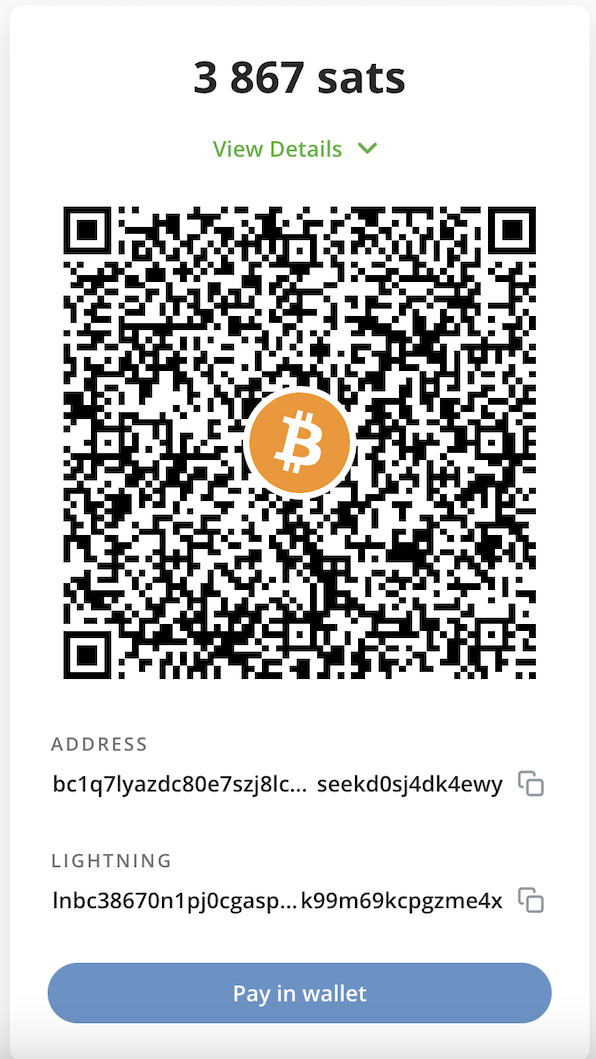
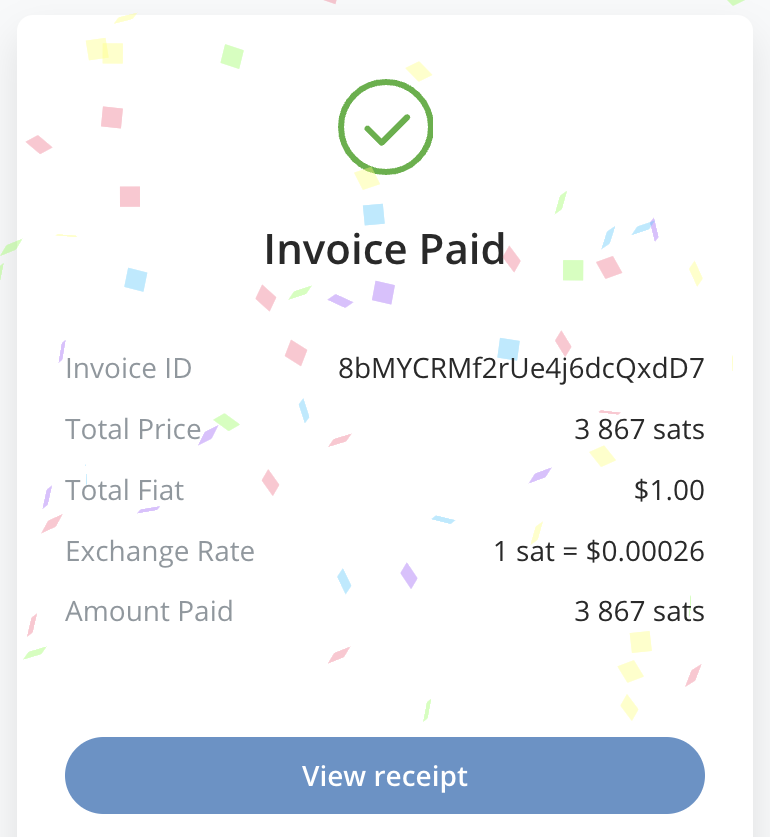
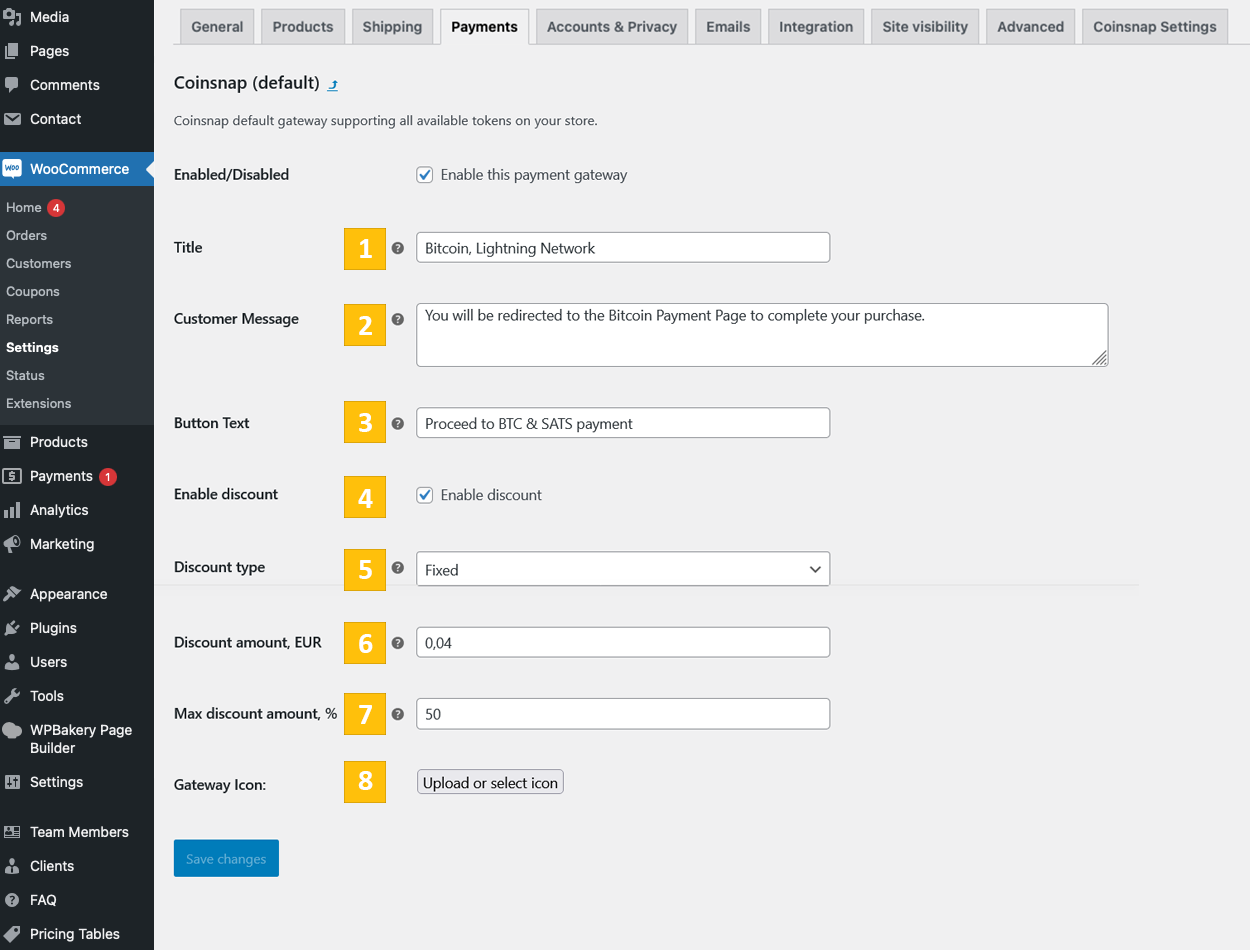
屏幕截图:


常见问题:
What are the requirements for accepting Bitcoin in my WooCommerce shop?
In addition to your WooCommerce shop, you need a Coinsnap account and a Bitcoin Lightning Wallet. There are no further requirements.
Can I customise my Bitcoin Lightning Checkout?
Yes, you can determine the name of the payment method yourself and upload your own icon/logo. You can also formulate the display texts during the individual steps of the checkout yourself. You can also determine the destination of the redirect upon successful payment yourself.
Do I need technical knowledge for the installation?
You can set up the plugin yourself in just a few steps using our installation instructions. If you have any difficulties with the installation, you can also contact our free installation service.
How quickly are Bitcoin payments credited?
Your customers can pay with both Bitcoin Lightning and Bitcoin on-chain. Bitcoin Lightning payments are immediately available on your wallet. Bitcoin on-chain payments are credited as soon as the first confirmation is received in the blockchain.
Are my customer transactions stored by Coinsnap?
Coinsnap does not store any of its merchants' Bitcoin. All of your customer’s Bitcoin payments are transferred directly from your customers’ wallet to the merchant wallet.
What fees are charged?
The transaction fee is only 1%, significantly less than with credit cards or PayPal ( with referrer code).
Can I receive Bitcoin payments to my bank account?
Yes, you can select the payout method ‘by bank transfer’ and our partner DFX when registering your Coinsnap account. Your incoming payment will then be forwarded to the Swiss Bitcoin broker, who will pay out the amount in EUR to your bank account. You can find more information here.
Can customers make a chargeback?
Chargebacks of customer payments are not possible with Bitcoin payments. This means that every Bitcoin payment is secure and guaranteed for you as a merchant.
Which wallets can I use?
You need a Bitcoin Lightning wallet to credit your Bitcoin transactions. Coinsnap recommends the Bitcoin Lightning Wallets from Wallet of Satoshi, Strike or the Blink Wallet. However, there are many other Bitcoin Lightning wallets that you can also use. You can find more information about Bitcoin Lightning wallets here!
Does the plugin only work in my region or language area?
The Coinsnap for WooCommerce plugin, as well as the Bitcoin blockchain and the Lightning network, are globally available and able to transfer payments worldwide, without interference from any banks. You can accept payments from any global customer who has a Lightning Wallet!
Are there regular updates for the Coinsnap for Woocommerce plugin?
Yes, our team is constantly working on improvements and new functions for the Coinsnap for WooCommerce plugin. If there is a new version, this will be automatically displayed in WordPress under Plugins and you can update the plugin with one click. This means you always have the latest version of the WooCommerce plugin installed!
Where can I get support if I have questions?
Our team is always there for you. If you need help installing the plugin, please refer to the WooCommerce installation guide. There is also an option there to request an installation service. If you have any other questions, please use our support area. After you have registered with Coinsnap, you will find the support area in your dashboard - here you can ask us your questions at any time!
更新日志:
- First public release for testing.
- Payment button text setting is added.
- Basic Wordpress Blocks support is added.
- Restructured loader.
- Payment status display update.
- Fix: Payment status changing.
- Order number and order ID separation.
- Full order metadata array transmission.
- Wordpress library update.
- Data output security update.
- Compatibility with WooCommerce 9.3.x. is tested
- Fix: order ID variable type is ?string.
- Wordpress library update.
- Fixed error on checkout.
- Coinsnap connection errors exception update.
- Update of Coinsnap gateway icon upload functionality.
- Update of payment method name by default (Bitcoin-Lightning)
- Fixed bug in ConnectException handler.
- Fixed mismatch variables types bug in ConnectException function call.
- Fixed webhook creation bug in processWebhook function call.
- Update of webhook payload response statuses.
- Added Coinsnap server connection check indication in backend.
- Update: Coinsnap server connection check indication in backend marks as "WooCommerce".
- Default WooCommerce status for "Settled" is "Completed".
- Compatibility with WooCommerce 9.6.x. is tested.
- Fixed Wordpress warning about non-used wp_get_attachment_image() method for Coinsnap payment gateway icon in WooCommerce payment settings.
- Compatibility with WooCommerce 9.7.x. is tested.
- Update: Woocommerce currencies list is limited by currencies, supported by Coinsnap.
- Update: After plugin activation or update non-supported currency switches to USD.
- Update: Added option "Redirect after payment automatically".
- Update: Prevented redirect to payment gateway if payment amount is less than 1 SAT or currency in not supported by Coinsnap.
- Update: Error message changed to "Coinsnap server is disconnected" if Coinsnap server is not connected or there is webhook error.
- Update: BTCPay server added as a Bitcoin payment gateway
- Update: Added discount for payment with Coinsnap functionality
- Compatibility with WooCommerce 9.8.x. is tested.
- Compatibility with Wordpress 6.8 is tested.
- Update: If BTCPay server is chosen as a Bitcoin payment gateway, we don't limit WooCommerce currencies list.
- Compatibility with Wordpress 6.8.1 is tested.
- Compatibility with WooCommerce 9.8.3. is tested.
- Update: Prevented redirect to BTCPay server if payment amount is less than 0.000005869 BTC (0.50 EUR) for onchain payments, 0.000001 BTC (1 SAT) for Lightning payment or currency is not supported.
- Update: BTCPay setup wizard is added in BTCPay server settings.
- Update: Minimum order amount is added to connection status notice.
- Update: Woocommerce store admin can choose where to show connection status notice and hide it from all the Admin pages.
- Compatibility with WooCommerce 9.8.4. is tested.
- Update: Coinsnap Wordpress library.
- Update: Permissions check is added to BTCPay server request handler on BTCPay server connection setup process.
- Compatibility with WooCommerce 9.8.5. is tested.
- Fixed bug in payment process when discount is disabled.
- Fixed bug with discount fields turning on on payment settings page.
- Updated connection check errors handler
- Fixed bug in payment process when payment provider wasn't chosen.
- Updated gateway connection status displaying conditions.
- Fixed bug in webhook payload process when payment provider wasn't chosen.
- Update: Checking and deleting all the inactive webhooks for the store.
- Compatibility with WooCommerce 9.9.3. is tested.
- Update: Unique name for BTCPay server setup Wizard return URL is set.
- Update: Added nonce check for BTCPay server request in Wizard setup flow.
- Updated Generate API Key button behavior.
- Compatibility with WooCommerce 10.0. is tested.
- Compatibility with Wordpress 6.8.2 is tested.
- Updated BTCPay server minimum payment amount calculation system
- Updated BTCPay server events and webhook payload handler
- Compatibility with WooCommerce 10.0.4 is tested.
- Added action ins in plugins list
- Compatibility with WooCommerce 10.1.0 is tested.
- Fixed error with webhook registration on BTCPay server
- Compatibility with WooCommerce 10.1.2 is tested.
- Updated webhook payload handler
- Update: Coinsnap is active payment method on checkout if no payment method is set.
- Update: Bitcoin discount is indicated in payment methods list on Checkout page.
- Update: Added non-supported by BTCPay server currencies handler on invoice request flow.
- Update: Added custom redirect after payment page in module settings.
- Compatibility with Wordpress 6.8.3 and WooCommerce 10.2.2 is tested.
- Fixed bug with order amount check method
- Fixed PHP 8.2+ warnings
- Compatibility with WooCommerce 10.3.0 is tested.
- Updated stored webhooks filtration
- Fixed redirection warnings
- Compatibility with WooCommerce 10.3.5 is tested.
- Fixed AbstractGateway::getDiscount() method return value
- Updated \Coinsnap\Client\Store class
- Updated \Coinsnap\Client\Store::getStore() method data usage
- Updated orders list page and order details page in backend - link to payment details page on the gateway's side is added
- Fixed backend warnings on PHP 8.3+
- Compatibility with WooCommerce 10.3.6 is tested.
- Compatibility with Wordpress 6.9 is tested.
- Update: Connection status message left on settings page only.
- Update: Bitcoin discount output logic.
- Updated PHP files protection.
- Compatibility with WooCommerce 10.4.3 is tested.
- Updated Coinsnap settings form.
- Compatibility with Wordpress 6.9.1 is tested.
- Compatibility with WooCommerce 10.5.0 - 10.5.3 is tested.
- Updated currency rates loading functionality.
- Compatibility with WooCommerce 10.6.1 is tested.
- Compatibility with WooCommerce 10.6.2 is tested.
- Compatibility with Wordpress 6.9.4 is tested.
- Update: Webhook option is separated for Coinsnap and BTCPay server.
- Update: Webhook check is deleted from connection check by default.
- Update: Added connection check button for Coinsnap gateway.
- Added German language translation.
- Compatibility with WooCommerce 10.7.0 is tested.
- Update: Webhook payload request is available for Coinsnap and BTCPay server simultaneously.
- Compatibility with WooCommerce 10.8.1 is tested.
- Compatibility with Wordpress 7.0 is tested.
- Compatibility with PHP 8.4 is tested.
- Update: gateway connection timeout is increased up to 10 seconds.