Countdown and CountUp, WooCommerce Sales Timer
| 开发者 | wpdevart |
|---|---|
| 更新时间 | 2026年2月3日 04:57 |
| 捐献地址: | 去捐款 |
| PHP版本: | 3.4.0 及以上 |
| WordPress版本: | 6.9 |
| 版权: | GPLv3 |
| 版权网址: | 版权信息 |
标签
下载
1.1.8
1.2.1
1.2.2
1.2.6
1.2.7
1.2.8
1.2.9
1.3.0
1.0.1
1.7.7
1.5.0
1.3.2
1.3.6
1.3.7
1.0.4
1.3.9
1.4.0
1.7.8
1.7.9
1.2.3
1.2.4
1.4.2
1.4.3
1.4.4
1.2.5
1.3.3
1.4.1
1.4.6
1.5.5
1.5.7
1.0.6
1.5.2
1.5.6
1.5.8
1.0.9
1.1.5
1.1.7
1.1.9
1.4.7
1.5.1
1.8.2
1.8.3
1.6.8
1.6.9
1.1.3
1.1.6
1.3.5
1.5.9
1.7.0
1.7.2
1.7.3
1.7.4
1.7.5
1.6.1
1.6.7
1.1.1
1.8.0
1.1.4
1.1.2
1.5.4
1.6.0
1.8.1
1.8.5
1.8.6
1.0.0
1.3.4
1.4.8
1.0.2
1.0.3
1.0.7
1.0.8
1.1.0
1.2.0
1.3.1
1.3.8
1.4.5
1.4.9
1.5.3
1.6.2
1.7.1
1.7.6
1.8.4
1.8.7
1.8.8
1.8.9
1.9.0
详情介绍:
https://www.youtube.com/watch?v=1zaWuLZaWCc
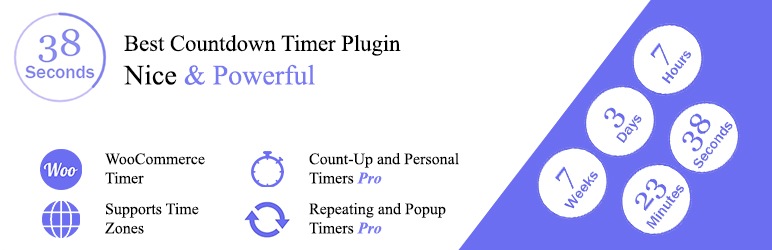
With WordPress Countdown and CountUp, WooCommerce Sales Timer plugin you can easily create any timer you need. There are a lot of new features that you will like. We added Popup and some other important things for our extended version.
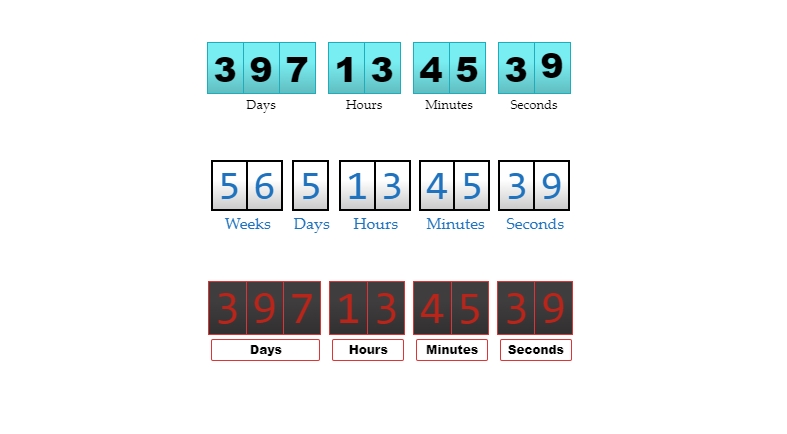
There are also nice and handy themes that you can use.
View our plugin Demo page:
The Extended version has a lot of useful features, here are some of those features.
Features of Free version
- Fully Responsive
- WooCommerce Ready
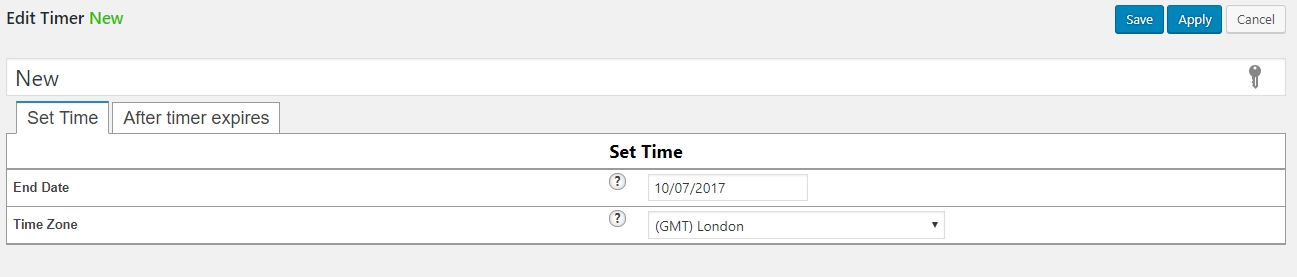
- Ability to use handy calendar with hours and minutes
- Ability to set Time Zone
- Ability to create unlimited Countdowns
- Ability to put unlimited Countdowns on the same page
- Ability to use on pages/posts and widgets
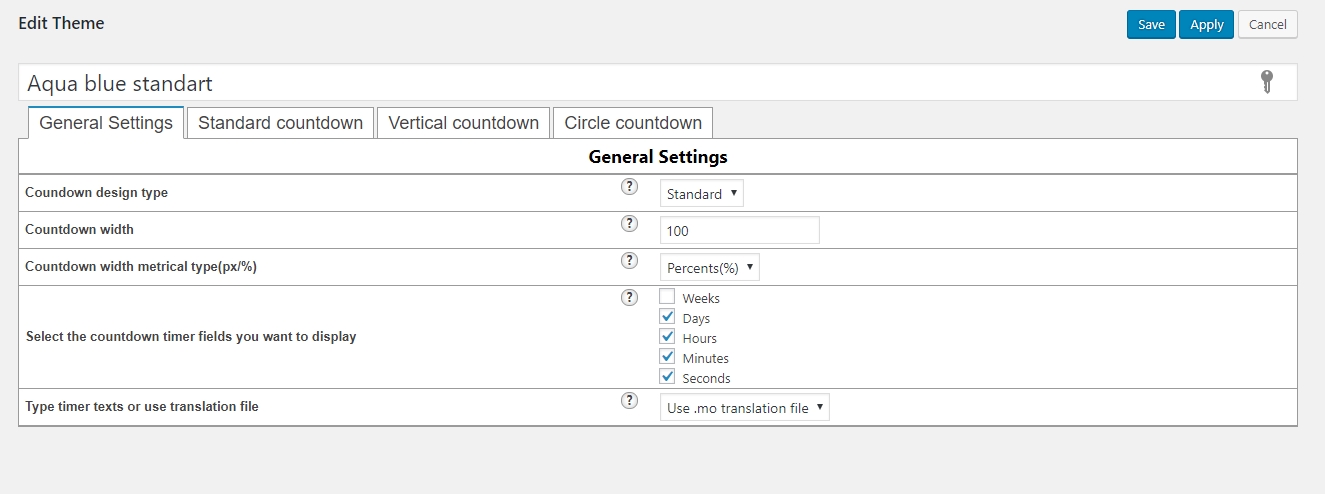
- Ability to set the width and metrical type of width(px or %)
- Ability to use a translation file
- Ability to type the text you prefer in the day, hour, minute and second fields
- Ability to select the action after time expired
- Ability to show message after the time expires
- Ability to set elements(fields) width and distance between each other
- Ability to set the font size
- Ability to type the distance from top/bottom
- Ability to set Time(numbers) fields border width and radius
- Ability to set Time text fields border width and radius
- User-friendly back-end
- Tested on popular WordPress themes
- Ability to use Repeating (Loop) feature
- Ability to use Redirect feature
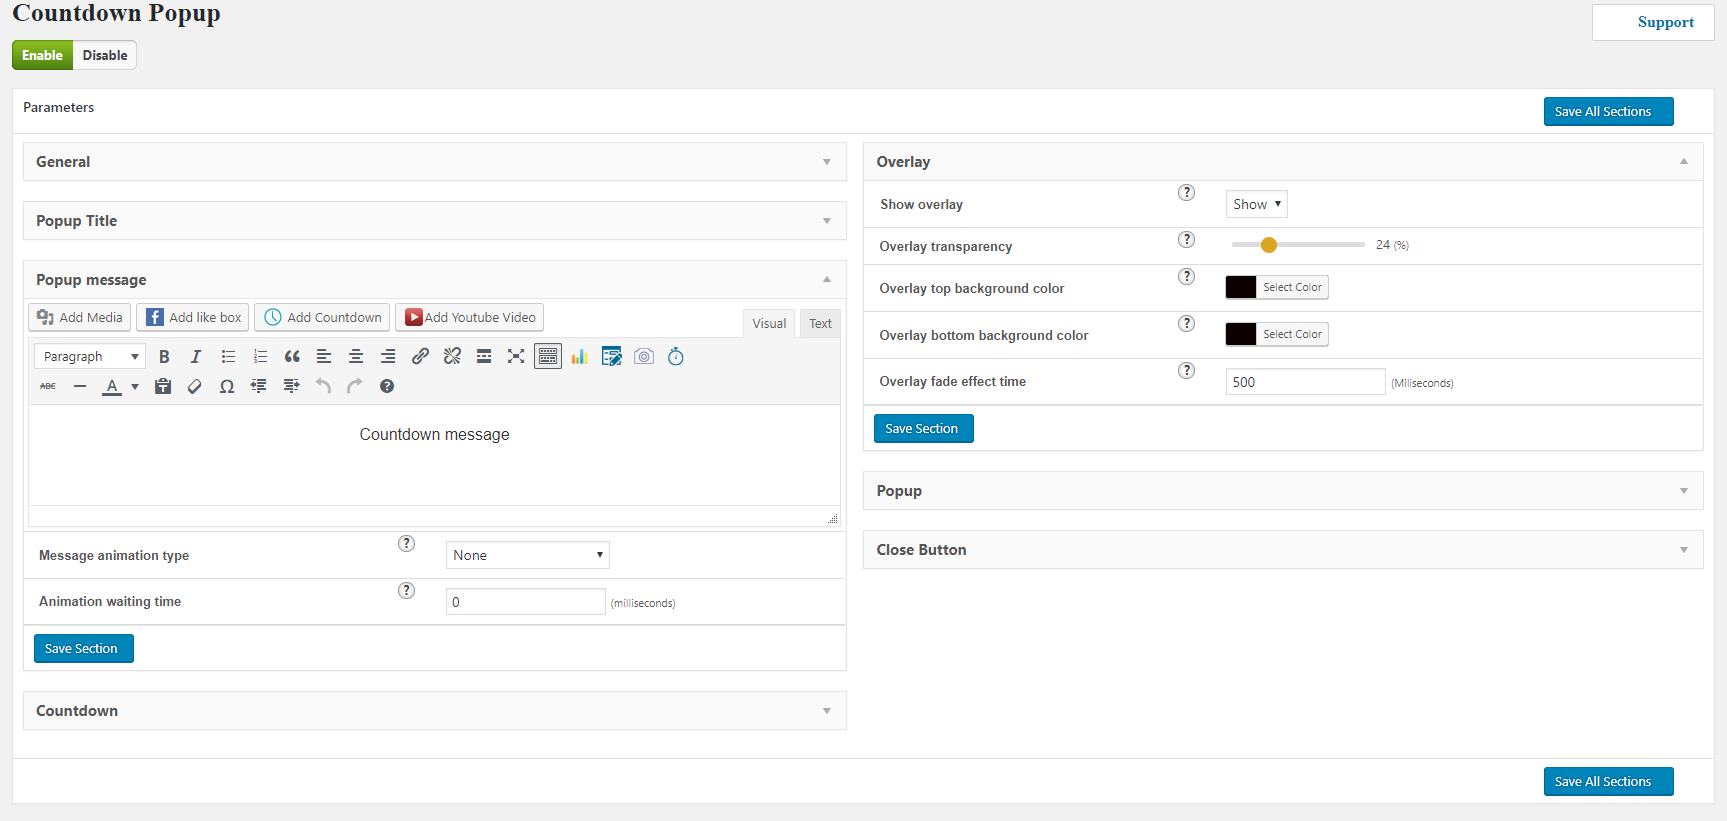
- Ability to use it in Popup
- Ability to use 6+ Nice Themes
- Ability to remove or add any of available time fields(Weeks, Days, Hours, Minutes, Seconds)
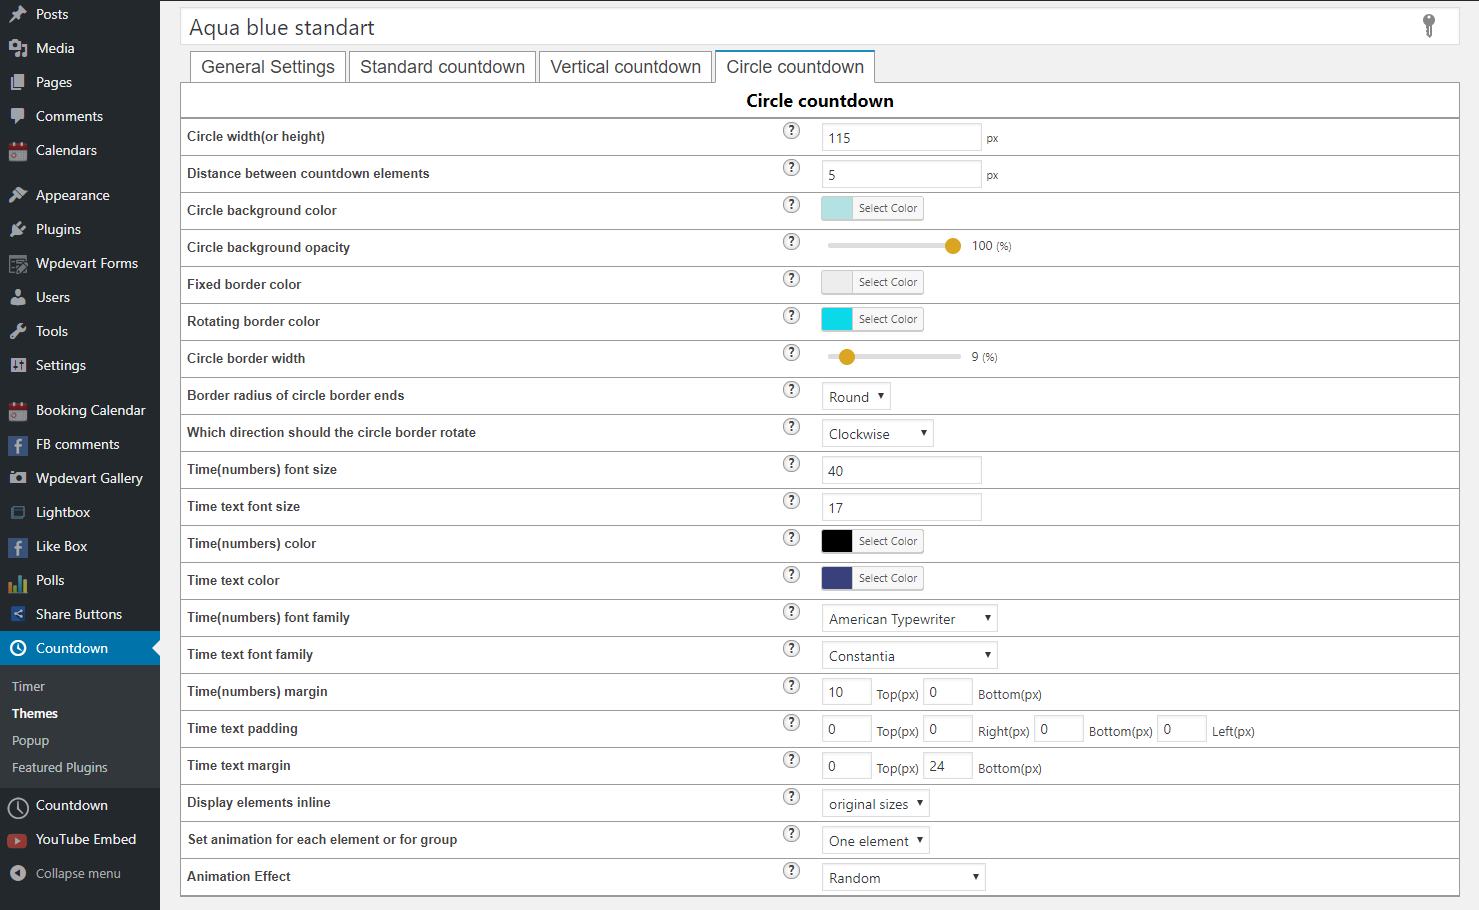
- Ability to use with "Circle" buttons
- Ability to use with "Vertical Slider" buttons
- Ability to choose the text color and background color
- Ability to type the size
- Ability to type the border width and radius
- Ability to type the text font-size and select the Font family
- Ability to display elements inline
- 37 awesome animation effects
- Ability to set animation for each element or for group
- Ability to add Count-Up
- Premium Support
- Elements(fields) width
- Distance between elements
- Numbers fields background color
- Text fields background color
- Numbers font size
- Text font size
- Numbers color
- Text color
- Numbers font family
- Text font family
- Numbers padding
- Text padding
- Numbers margin
- Text margin
- Numbers fields border width
- Text fields border width
- Numbers fields border radius
- Text fields border radius
- Numbers fields border color
- Text fields border color
- Display elements in-line
- Set animation for each element or for group
- Animation Effect
- Numbers font size
- Distance between elements
- Numbers font family
- Numbers color
- Numbers fields background color
- Numbers fields border width
- Numbers fields border color
- Text fields background color
- Text font size
- Text color
- Text font family
- Text padding
- Text margin
- Text fields border width
- Text fields border radius
- Text fields border color
- Display elements in-line
- Animation type(elements or group)
- Animation Effect
- Circle width(or height)
- Distance between elements
- Circle background color
- Circle background opacity
- Fixed border color
- Rotating border color
- Circle border width
- Border radius of circle border ends
- Which direction should the circle border rotate
- Numbers font size
- Text font size
- Numbers color
- Text color
- Numbers font family
- Text font family
- Numbers margin
- Text padding
- Text margin
- Elements display type
- Set animation for each element or for group
- Animation Effects
安装:
First you need to download the plugin ZIP file.
- Log in to your admin panel.
- Go to Plugins page, click on Add New, then click "Upload Plugin" .
- Then click "Choose file" then select the plugin .zip file.
- Then install and activate the plugin.
屏幕截图:
常见问题:
What files I need to upload for installing the plugin
Our plugin is user friendly, but here you can view some frequently asked questions that can help you. You need to select the .zip file, there is no need to extract the zip file, just upload it.
更新日志:
1.0.0
- Initial version.
- Added new features
- Added new functionality.
- Added CountUp feature.
- Fixed some notices.
- Added comments for developers.
- Integrated the new Gutenberg editing experience
- Added translation file
- Added comments for developers.
- Fixed issue with classic editor.
- Changed featured plugin icon and title.
- Fixed widget notice.
- Changed plugin admin panel style.
- Added new plugin in the featured plugins list.
- Integrated with WooCommerce.
- Added position option(left, center, right).
- Added Support button on admin pages.
- Added new translation language.
- Fixed language file bug.
- Added new features for recurring countdown.
- Added support URL in admin panel.
- Changed redirect option status.
- Added new feature.
- Added new translation language.
- Added new language files.
- Added new languages.
- Added new languages.
- Added new language - cs_CZ.
- Added plugin icon.
- Added plugins new icons.
- Added Irish translation.
- Added Belorussian translation.
- Added Danish translation.
- New plugin added to the list from the admin menu.
- Vertical menu added to the featured plugins list.
- Added new language code.
- Added new translation files.
- Added new featured plugin in admin menu.
- Added Romanian translation files.
- Changed the icons for the following featured plugins - lightbox, gallery.
- Added new design for the featured plugins page.
- New language added.
- Added new language - Macedonian.
- Added new language - Chinese.
- Added new language - Bulgarian.
- Added new language - Catalan.
- Added new language - Finnish.
- Added new language - Welsh.
- Added new language - Hawaiian.
- Changed the title style of the admin page.
- Added new language - Bengali.
- Added new language - Latvian.
- Added a new design for an icon.
- Added a new language.
- Added a new language - Korean.
- Changed styles of admin pages.
- Added a new language - Greek.
- Security bug fixed.
- Security bug fixed.
- New language added.
- New language added.
- New language added - Basque.
- New language added.
- New language added.
- New language added - Frisian.
- New language added - Afrikaans.
- New language added.
- New language added - Amharic.
- New language added.
- New language added.
- New language added - Khmer.
- New language added.
- New language added - Javanese.
- New language added.
- New language added - Yoruba.
- A new language added.
- New language added - Xhosa.
- Issue fixed.
- Edited list of recommended plugins.
- Bug fixed.
- Short description changed.
- Fixed issues with escaping.
- Fixed issues with escaping.
- bug fixed.
- tested
- code improved
- bugs fixed