
WP Crontrol Hours
详情介绍:
Take control of your CRON jobs by restricting them to your website's low traffic hours. From the admin screen, you can:
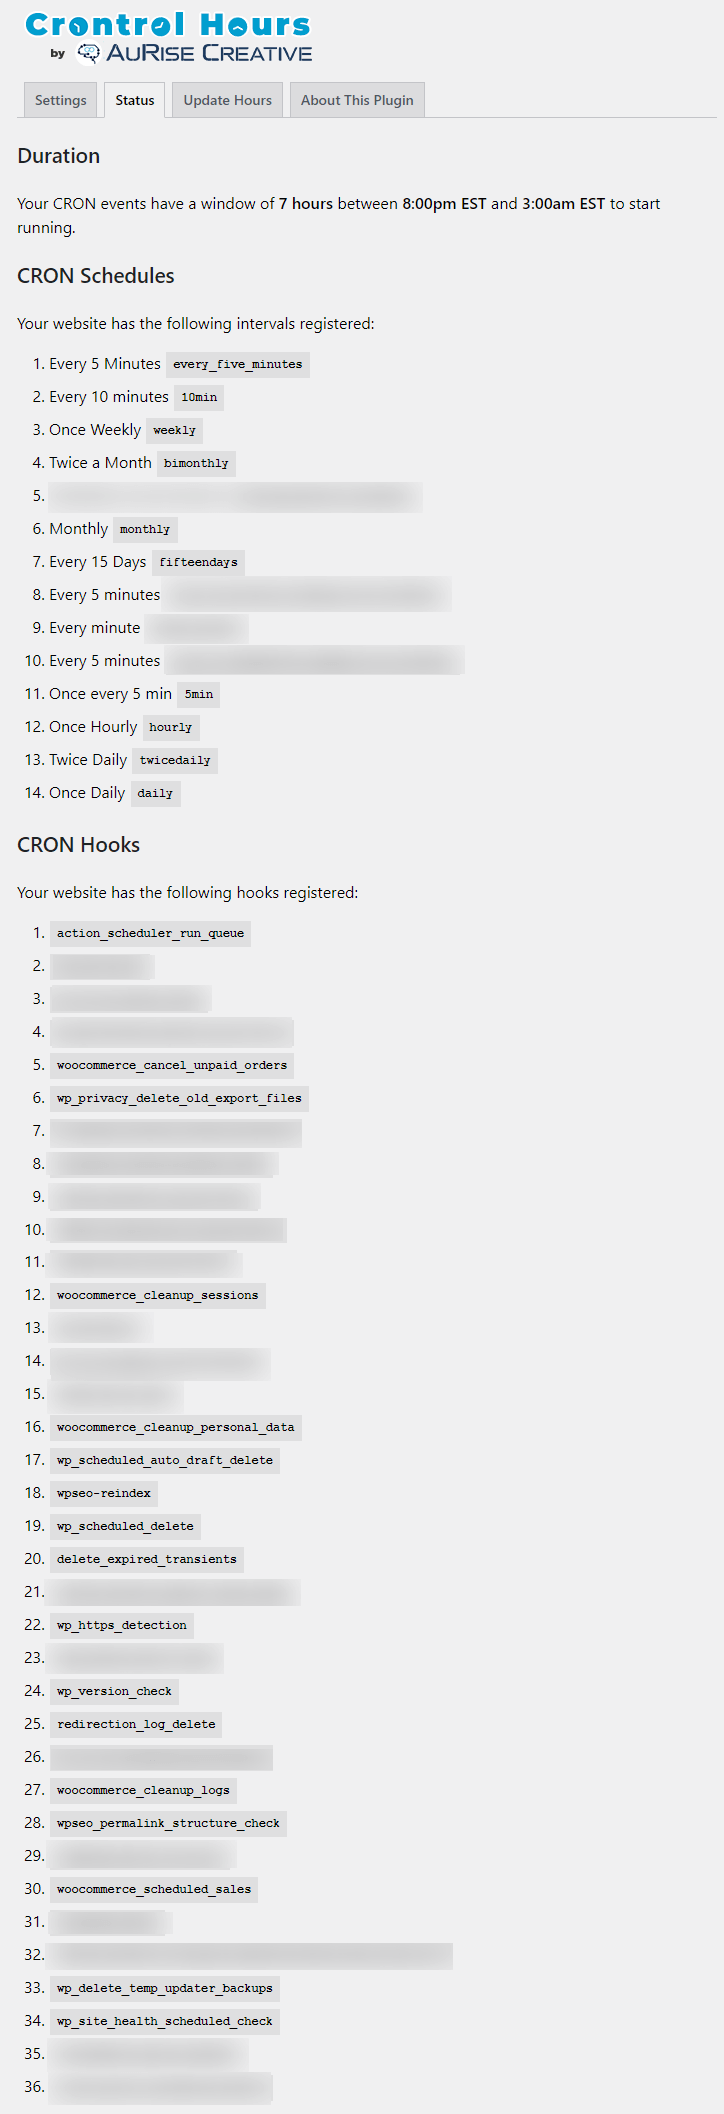
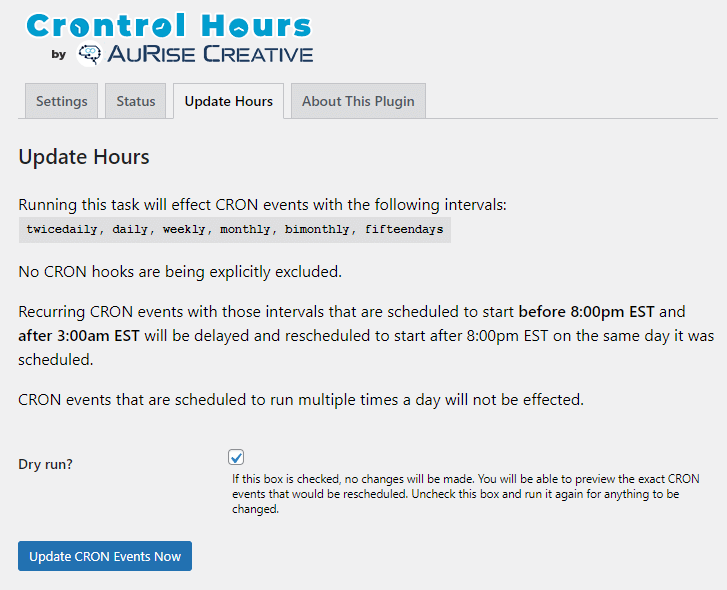
- Specify a daily window of when recurring CRON events should be triggered.
- Optionally limit events that run multiple times a day to only once a day.
- Optionally restrict events that run multiple times a day to only during your off-hours.
- Target specific schedules, including custom ones created by other plugins.
- Exclude specific CRON hooks from being affected
- Automatic updates for WordPress core, plugins, and themes are prevented from running during your highest-traffic times so users aren't shown a maintenance page when it's the most visible.
- Less stress is placed on your server when automatic maintenance occurs during low traffic times.
- Use Server CRON. It is recommended in the WordPress developer resources to set up your system's task scheduler to run on the desired intervals and to use that to make a web request to
wp-cron.php. View WordPress Documentation. - Use Cron-Job.org. If you can't set up your system's task scheduler, I recommend outsourcing that job to cron-job.org to automatically ping your website's
wp-cron.phpfile. It is a free service from the German-based developers. Go to Cron-Job.org.
安装:
There are three (3) ways to install my plugin: automatically, upload, or manually.
Install Method 1: Automatic Installation
Automatic installation is the easiest option as WordPress handles the file transfers itself and you don't need to leave your web browser.
- Log in to your WordPress dashboard.
- Navigate to Plugins > Add New.
- Where it says "Keyword" in a dropdown, change it to "Author"
- In the search form, type
TessaWatkinsLLC(results may begin populating as you type but my plugins will only show when the full name is there) - Once you've found my plugin in the search results that appear, click the Install Now button and wait for the installation process to complete.
- Once the installation process is completed, click the Activate button to activate my plugin.
- Download my plugin from WordPress.org; it will be in the form of a zip file.
- Log in to your WordPress dashboard.
- Navigate to Plugins > Add New.
- Click the Upload Plugin button at the top of the screen.
- Select the zip file from your local file system that was downloaded in step 1.
- Click the Install Now button and wait for the installation process to complete.
- Once the installation process is completed, click the Activate button to activate it.
- Download my plugin from WordPress.org; it will be in the form of a zip file.
- Unzip the contents; you should have a single folder named
crontrol-hours. - Connect to your WordPress server with your favorite SFTP client.
- Copy the folder from step 2 to the
/wp-content/plugins/folder in your WordPress directory. Once the folder and all of its files are there, installation is complete. - Now log in to your WordPress dashboard.
- Navigate to Plugins > Installed Plugins. You should now see my plugin in your list.
- Click the Activate button under my plugin to activate it.
屏幕截图:


更新日志:
2.1.0 - November 9, 2023
- Update: updated configuration to match other AuRise Creative plugins
- Update: confirmed functionality for WordPress Core version 6.4
- Feature: added additional resources in Plugin Support block on admin page (developer documentation, FAQ, and emergency website service)
- Update: updated backend scripts to utilize defer strategy loading
- Update: updated backend script to use
wp_add_inline_scriptinstead ofwp_localize_scriptfor AJAX URL. - Update: updated backend assets to use minified files when not debugging
- Minor: updated JS files to use
letandconstinstead ofvar - Minor: updated styles for admin page
- Language: removed the
languagesfolder andDomain Pathin plugin to rely on Translating WordPress
- Feature: Added a "Restrict Frequent" setting that, when enabled, will restrict events that run multiple times a day to only run between the daily start and end times while maintaining their specified intervals.
- UI: Updated the appearance of the settings page
- UI: Added more information to the "Update Hours" tab and outputted information
- Assets: Compressed the PNG images loaded on the backend
- Feature: Added a plugin setting to explicitly exclude hooks from being automatically updated
- Feature: Added a status and fix link to the list of links on the plugin page between "Settings" and "Deactivate" to quickly navigate to those tabs from the plugins page
- Fix: Updated the CRON event that is added when the plugin is activated to take place around midnight respective to the WordPress site's timezone
- Language: Added the
/languages/directory with the POT file to allow translations.
- Major: Submitted to WordPress.org repository!