
Custom User Contact Form Builder
| 开发者 | CMSHelpLive |
|---|---|
| 更新时间 | 2019年9月26日 17:07 |
| 捐献地址: | 去捐款 |
| PHP版本: | 3.5 及以上 |
| WordPress版本: | 5.1.1 |
| 版权: | GPLv2 or later |
| 版权网址: | 版权信息 |
标签
simple contact form
wordpress contact form
contact form manager
easy contact form
multiple contact forms
wordpress custom fields
custom contact
custom form fields
custom contact fields
customize wordpress contact form
advance contact form for wordpress
wordpress custom contact
form autoresponder
terms and conditions checkbox
form terms and conditions
form required fields
auto generate password
wordpress form save
save form submissions
wordpress simple contact form
form success message
wordpress form redirect
wordpress form success message
wordpress form manager
create wordpress forms
wordpress user contact plugin
wordpress new user contact
new user contact wordpress
contact form wordpress
wordpress user contact captcha
user contact plugin for wordpress
wordpress plugin for contact form
custom contact form fields
form IP capture
form browser capture
form submit user location
contct form
contact frm
cntact form
contact for
下载
详情介绍:
Looking for a reliable Wordpress contact form? Here’s your answer - Custom User Contact Form Builder is an easy to use form creating system that allows you to create any type of forms with few simple clicks. We have put focus squarely on ease of use, since we thought almost all other form plugins throws loads of features right on users’ screens when all they need is a quick and intuitive form creation and management process. Custom User Contact Form Builder is a reliable Wordpress contact form plugin that takes care of all your contact form needs.
As soon as you activate the plugin and go to “Custom Contact Form Builder” link in the left menu, you see our elegant forms manager to manager all your WordPress forms. When you fist visit the page, forms area will be empty and you will see “Add New” button on top bar to start creating WordPress forms. When you click it, you will be taken to a new page with following fields:
= Unique Name: = This is the name of your form. It will help you identify the form on forms manager page. Unique Name is not visible on the front end of your website.
= Form Description: = Administrative field to describe the form. Not visible on the front end.
= Redirection: = Option to redirect visitors to a specific page already created on your website or to a specific URL. Handy to show information related to contact once the form is submitted.
= Header Text: = This is the text you want to show above your form to your site visitors.
= Auto-Responder Toggle: = Allows you to create and send an automatic message to form submitter. You can decide message subject and text. If it is off, no message will be sent.
= Success Message: = Message displayed to the user after successfully submitting the Wordpress contact form. This is different from redirection. Success message stays for 5 seconds before redirecting the visiter.
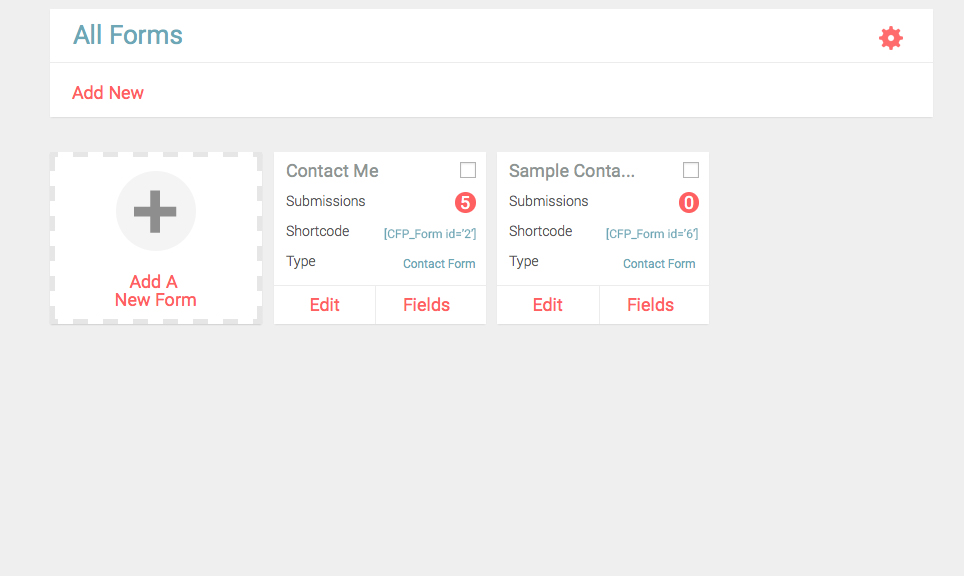
Once created, each Wordpress contact form is represented by a square card that displays important information about the form at a glance and quick editing buttons. Multi-select boxes allow you to clone or delete forms with single click.
Next important step is creating custom fields for your Wordpress contact form. Click “Fields” button on the form card you want to edit. This will take you to a new page. Available fields are displayed as red pills on the top bar. Clicking any field will take you to field parameters page.
Once saved, the fields will appear as white horizontal bars with drag and drop handle on left, which can be used for rearranging order. You can quickly change the form using drop down menu on top right.
On Forms Manager page, submission counter is visible on each form card, clicking which takes you to submission entries for that particular form in a tabular format. Each entry holds all the information about the submission., including fields captured during the submission.
A small gear icon takes you to Global Settings.
Each form card also displays “shortcode” required to display the forms on your site. Copy the short code and paste it inside a page, post or custom widget to display the form on your WordPress website.
Here’s quick overview of features:
- Forms Manager to create, edit and manage your WordPress forms with few simple clicks.
- Fully customizable forms.
- Elegant user interface focussed on ease of use
- Forms displayed as cards with at a glance information.
- Cards display form Name, Submissions Counter, Shortcode, Type and Editing buttons.
- Individual submission tracker for each form with all form submission details.
- Each submission entry displays captured data from the form.
- Multi-select duplicate and delete option for forms.
- Option to set redirection for each form to a page or URL.
- Option to set auto-responder with custom subject and message
- Set success message on form submission.
- Add reCaptcha to block out pesky SPAM.
- Multiple custom field types including text, headings, paragraphs, select box, radio buttons, check boxes, date picker with calendar etc.
- Mark any field as required
- Set default value for any field
- Set visibility for any field
- Show Terms and Conditions checkbox
- Advance field options like CSS and character length.
- View and Delete individual submission entries
- Option to capture IP location of the form submitter
- Option to capture Browser and OS information of the form submitter
- View Geo Location through Submission details
安装:
- Download Custom User Contact Form Builder
- Go to your Dashboard and locate Plugins tab. Click on Upload Plugin and specify the path of downloaded plugin in the text box.
- Click on Activate Plugin
屏幕截图:


常见问题:
Is there a limit to the number of forms I can create?
No, there is no limit. You can create as many forms as you like.
How can I show forms on my website or blog?
Just copy the shortcode for a form on it’s card in forms manager and paste it inside the page or post you want to show the form on.
How can I add custom fields to my form?
Click “Fields” button on a form card to go to fields manager for that form. Here you can add, edit and sort the fields.
Where can I access form submissions?
Either click the number counter on a form’s card or go to “Custom Contact Form Builder -> Submission” on the left menu.
Can I set autoresponder for a form?
Yes, you can set autoresponder for a form by clicking “Edit” button on a form card and turning the autoresponder toggle on. 2 New fields will appear below it to set Subject and Message.
Can I rearrange fields in my forms?
Yes, you can change field order of custom fields by drag and drop method in dashboard
更新日志:
3.0.4
- Renamed and Rebranded as Custom User Contact Form Builder
- Bug fixes and improvements.
- Updated translation template.
- Other minor bug-fixes and improvements.
- CSS Fixes
- Completely rebuilt the plugin from scratch with tons of new features.
- Renamed and Rebranded as GorillaForms
- New look
- Added personality
- Improved HTML Structure
- Fixed a bug where the form was always appearing on top, despite pasting the shortcode within content.
- Fixed a bug that did not allowed showing multiple forms on a page.
- Added new banner
- Major security update
- Fixed a minor bug
- Upgrade option changed
- Multiple Bug Fixes
- Usability Improvements
- Added option for setting default value for text fields
- Bug Fixes
- Added new field type
- First Release