Gnaritas Amazon SES
| 开发者 | dsantucci |
|---|---|
| 更新时间 | 2019年10月23日 00:09 |
| PHP版本: | 5.5 及以上 |
| WordPress版本: | 5.2.3 |
| 版权: | GPLv3 |
| 版权网址: | 版权信息 |
详情介绍:
安装:
- PHP >= 5.5
- OpenSSL PHP extension
- Amazon Web Services account
- Upload files to the WordPress plugins directory.
- Activate in the plugins admin page.
- Set up configuration as described in the "Configuration" section. Note: This plugin includes Amazon Web Services SNS Validator v1.4.0 and AWS SDK for PHP 3.36.19. If you are using other plugins that use these AWS libraries, these may conflict with the versions in use with those plugins. It is not recommended to use this plugin with other plugins using the AWS PHP SDK, SNS Validator or any of their dependencies.
屏幕截图:
常见问题:
Why would I want to use Amazon SES to send email?
Email sent directly from the web server using sendmail or a local SMTP server is more likely to be flagged as spam. If your website does things like send out alerts to users when new content is posted, you may run also into restrictions on email limits imposed by your hosting provider. Using a reputable provider like Amazon ensures prompt, reliable delivery of your site's email.
There are other plugins that work with Amazon SES. Why should I use this one?
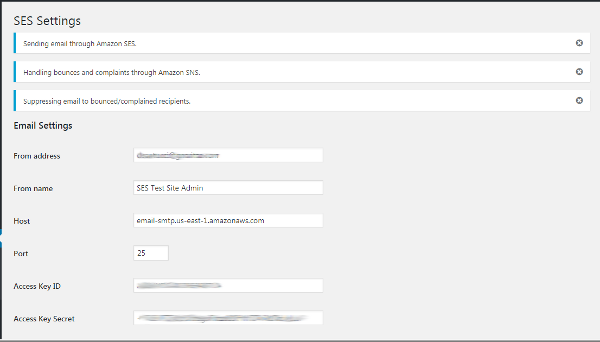
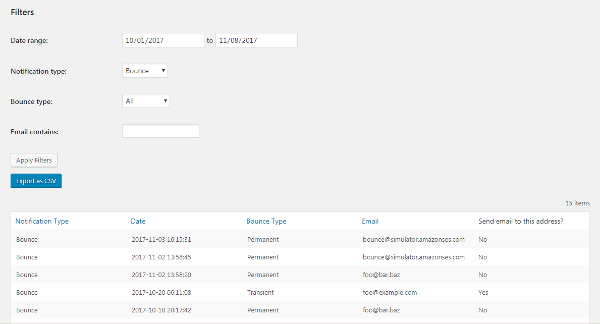
Gnaritas Amazon SES not only sends email through SES, but can also track bounce and complaint notifications and suppress email to which delivery has failed. This helps to protect your reputation on Amazon by avoiding sending repeated emails to bad addresses. You can also export bounce and complaint notifications in CSV format.
How do I set up an IAM user in AWS with the necessary permissions to send email and register bounce and complaint handlers?
If you're unfamiliar with IAM, you can use the following recommended procedure to create a user with the necessary permissions:
- Create an IAM policy with the required permissions:
- From the IAM dashboard, click "Policies" in the left-hand navigation
- Click "Create Policy", and then "Select" under "Create Your Own Policy"
- Enter a name for the policy (e.g. "SesSendAndSetNotifications") and an optional description
- Enter the following JSON policy definition under "Policy Document":
{
"Version": "2012-10-17",
"Statement": [
{
"Effect": "Allow",
"Action": [
"ses:SendRawEmail",
"ses:SetIdentityNotificationTopic",
"ses:SetIdentityFeedbackForwardingEnabled",
"ses:GetIdentityVerificationAttributes"
],
"Resource": [
"*"
]
},
{
"Effect": "Allow",
"Action": [
"sns:CreateTopic",
"sns:DeleteTopic",
"sns:Subscribe",
"sns:Unsubscribe"
],
"Resource": [
"*"
]
}
]
}
- Click "Create Policy"
- Attach the policy created in step 1 to a new group:
- From the IAM dashboard, click "Groups" in the left-hand navigation, and then "Create New Group"
- Enter a name for the new group (e.g. "ses-managers") and click "Next Step"
- Find and select the policy you created in step 1 and click "Next Step"
- Tip: Choose "Customer Managed" under "Filter" to more easily find your policy.
- Click "Create Group"
- Create a new user and assign it to the group created in step 2:
- From the IAM dashboard, click "User" in the left-hand navigation, and then "Add User"
- Enter a username for the new user
- Check "Programmatic access" under "Access type"
- Note: We recommend you do not check "AWS Management Console access"
- Click "Next: Permissions"
- Select "Add user to group" (selected by default) and check the group you created in step 2
- Click "Next: Review"
- Confirm the username, AWS access type and group membership, and click "Create user"
- Important: Make a note of the new user's "Secret access key". You will need to enter it into the WordPress configuration page, along with the "Access key ID". You can download the user's credentials in a CSV file and/or display them on the page. This is your only opportunity to view the user's secret access key.
- (If you forget to save the user's credentials, you can create a new access key for that user under "Security credentials" on the user admin page.)