Infopopup
| 开发者 | Chris Williams & Simon Barrass |
|---|---|
| 更新时间 | 2015年12月15日 18:46 |
| 捐献地址: | 去捐款 |
| PHP版本: | 4.1 及以上 |
| WordPress版本: | 4.4 |
| 版权: | GPLv3 or later |
| 版权网址: | 版权信息 |
详情介绍:
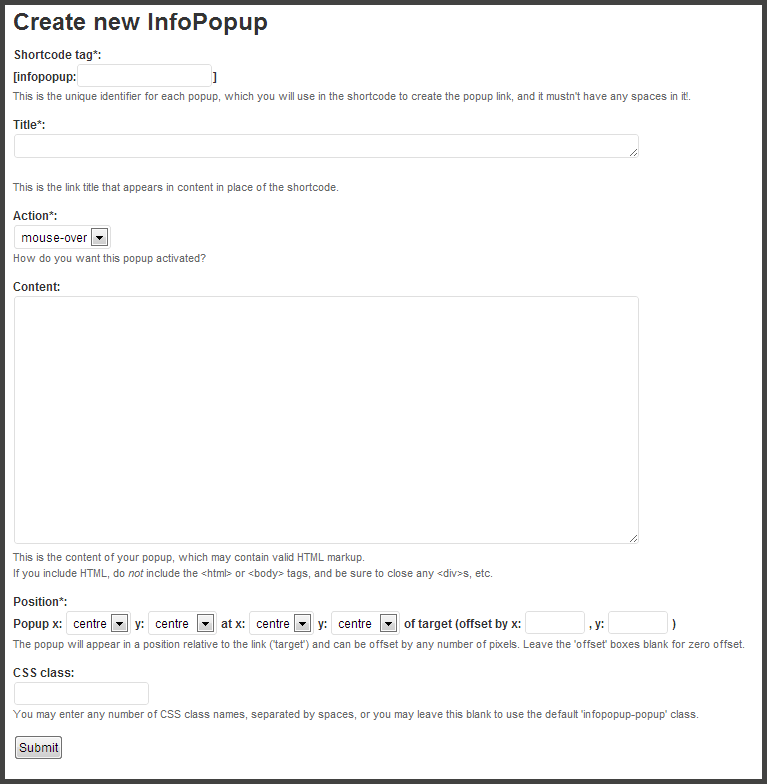
- Shortcode tag: This is how your popup is uniquely identified, and as the field label suggests, it will be the 'tag' attribute for the shortcode 'infopopup' within your page. This allows you to have more than one popup in any page, each with its own unique tag.
- Title: This is how the link (or 'target') will appear. The plugin will handle markup here so may be an image; see comments under 'Position' below if you do want to use an image instead of plain text for the title.
- Action: Choose whether the popup should appear when a user moves the mouse over the target or, alternatively, whether the link has to be clicked. If you choose 'mouse-over', the popup will disappear when the mouse is moved away from the target (rather like a standard tooltip); if you choose 'click', then the popup will disappear when it is clicked.
- Content: Whatever you want to appear in the popup should be typed or pasted here. You are free to use HTML, but take care that any opening tags (especially 'block' tags like 'p' and 'div') are closed. Also, because this content will be appearing within an HTML page, you do not need to include the ... or ... tags that you would use if creating an entire page.
- Position: This is how you specify where the popup will appear relative to the target. If, for example, you want your popup to appear to the top-right of the target, you might choose Popup x 'left', y 'bottom' at x 'right' y 'top'.
- CSS class: If you leave this blank, the popup will be basically styled, but if you want to provide your own styling, add all of the necessary attributes to one or your site stylesheets (we don't recommend editing the popup's own stylesheet directly in case future updates wipe out all your hard work!), and enter the class name in this box.
.blue-background {
background-color: #3333ff;
}
You could then turn this popup blue by entering 'blue-background' as the class.
- Submit the form when you have finished. Any entries that the plugin can't accept (e.g. empty or duplicate tag, missing title, etc.) will be highlighted and you will be asked to correct those entries before submitting again.
[infopopup tag=firstpopup]
When viewed, the word 'Information' would take the shortcode's place.
Because the popup is created as a separate element from the target, you are free to include the target inside lists, tables, etc. without upsetting the document hierarchy.
If you misspell the tag when entering an InfoPopup shortcode, the tag will be displayed with question marks either side. For example, if you accidentally entered:
[infopopup tag=1stpopup]
Then you would see '?1stpopup?' appear in its place.
STYLING THE SHORTCODE
By default, the title will appear in the same colour as the text surrounding it but will switch the mouse pointer to a pointing finger when it moves over it. If you want to change the colour, font style, mouse pointer or other attributes of the title, you can do so using the 'infopopup-link' class, which is automatically applied.
For example, to make the link text appear in bold blue text, add the following to your site stylesheet:
.infopopup-link { font-weight: bold; color: #3333ff; }
LAST WORDS
- If you're putting web pages together, you'll know that just because it looks fantastic on your desktop monitor in your favourite browser, it may not look so hot on a smaller laptop screen or any one of the fine and varied selection of browsers that your audience call their favourite.
- The plugin was tested on several platforms and several browsers in several configurations, but that doesn't mean we guarantee it's going to be perfect first time for you. You are quite at liberty to view and alter (and possibly tidy!) the plugin code, and whilst we welcome reports of problems and requests for improvements, we cannot promise to attend to each such request immediately.
- The plugin makes use of jQuery Core and the jQuery UI plugin (v1.9.1). Eternal thanks to the jQuery team, without whom many web developers would have packed up and gone home a long time ago ;-)
安装:
- From the
Pluginsmenu in WordPress, selectAdd New - Use the search box to search for
InfoPopup. - Click
Install Now, thenActivate - Lastly, from the
Settingsmenu, selectInfoPopupto create your first popup.
屏幕截图:
常见问题:
The plugin stopped working when I updated to WordPress 4.4.
Please update to version 1.2 of the plugin, which changes the way the tag is specified; for example, [infopopup:mytag] becomes [infopopup tag=mytag]. After this, your popups should work once again.
Is there any way to make this popup work in the sidebar?
Go to Appearance > Widgets and drag a new Text widget from the left panel into a widget area (on the right). Then, paste the infopopup shortcode into this text widget and click save. Check the result on the appropriate page.
How do I add a specific width to the popup?
To specify the width of the info box popup, edit the stylesheet (go to the infopopup plugin folder, and open infopopup.css in the css folder). After line 24, add width:200px (or whatever width you need) to the class .infopopup-popup.
Why do the original styles disappear when I add styles of my own?
Version 1.1 of the plugin should address most styling issues, but we plan to improve the simplicity of custom styling in a future version.
The links appear but don't work, or work on click but not on mouse-over
We have taken steps to reduce the likelihood of jQuery conflicts with other plugins, but you can check for conflicts by disabling other plugins in turn.
更新日志:
- Updated to support WordPress 4.4.
- Security fix to prevent unauthorised users from viewing popup
editanddeletepages out of admin context. - Fix for the majority of jQuery conflicts.
- Stylesheet fix.
- Popup delete function works properly now!
- First release.