
Predax Security (formerly IPSentry)
| 开发者 | ipsentry |
|---|---|
| 更新时间 | 2026年7月14日 00:33 |
| PHP版本: | 7.4 及以上 |
| WordPress版本: | 7.0 |
| 版权: | GPLv2 or later |
| 版权网址: | 版权信息 |
详情介绍:
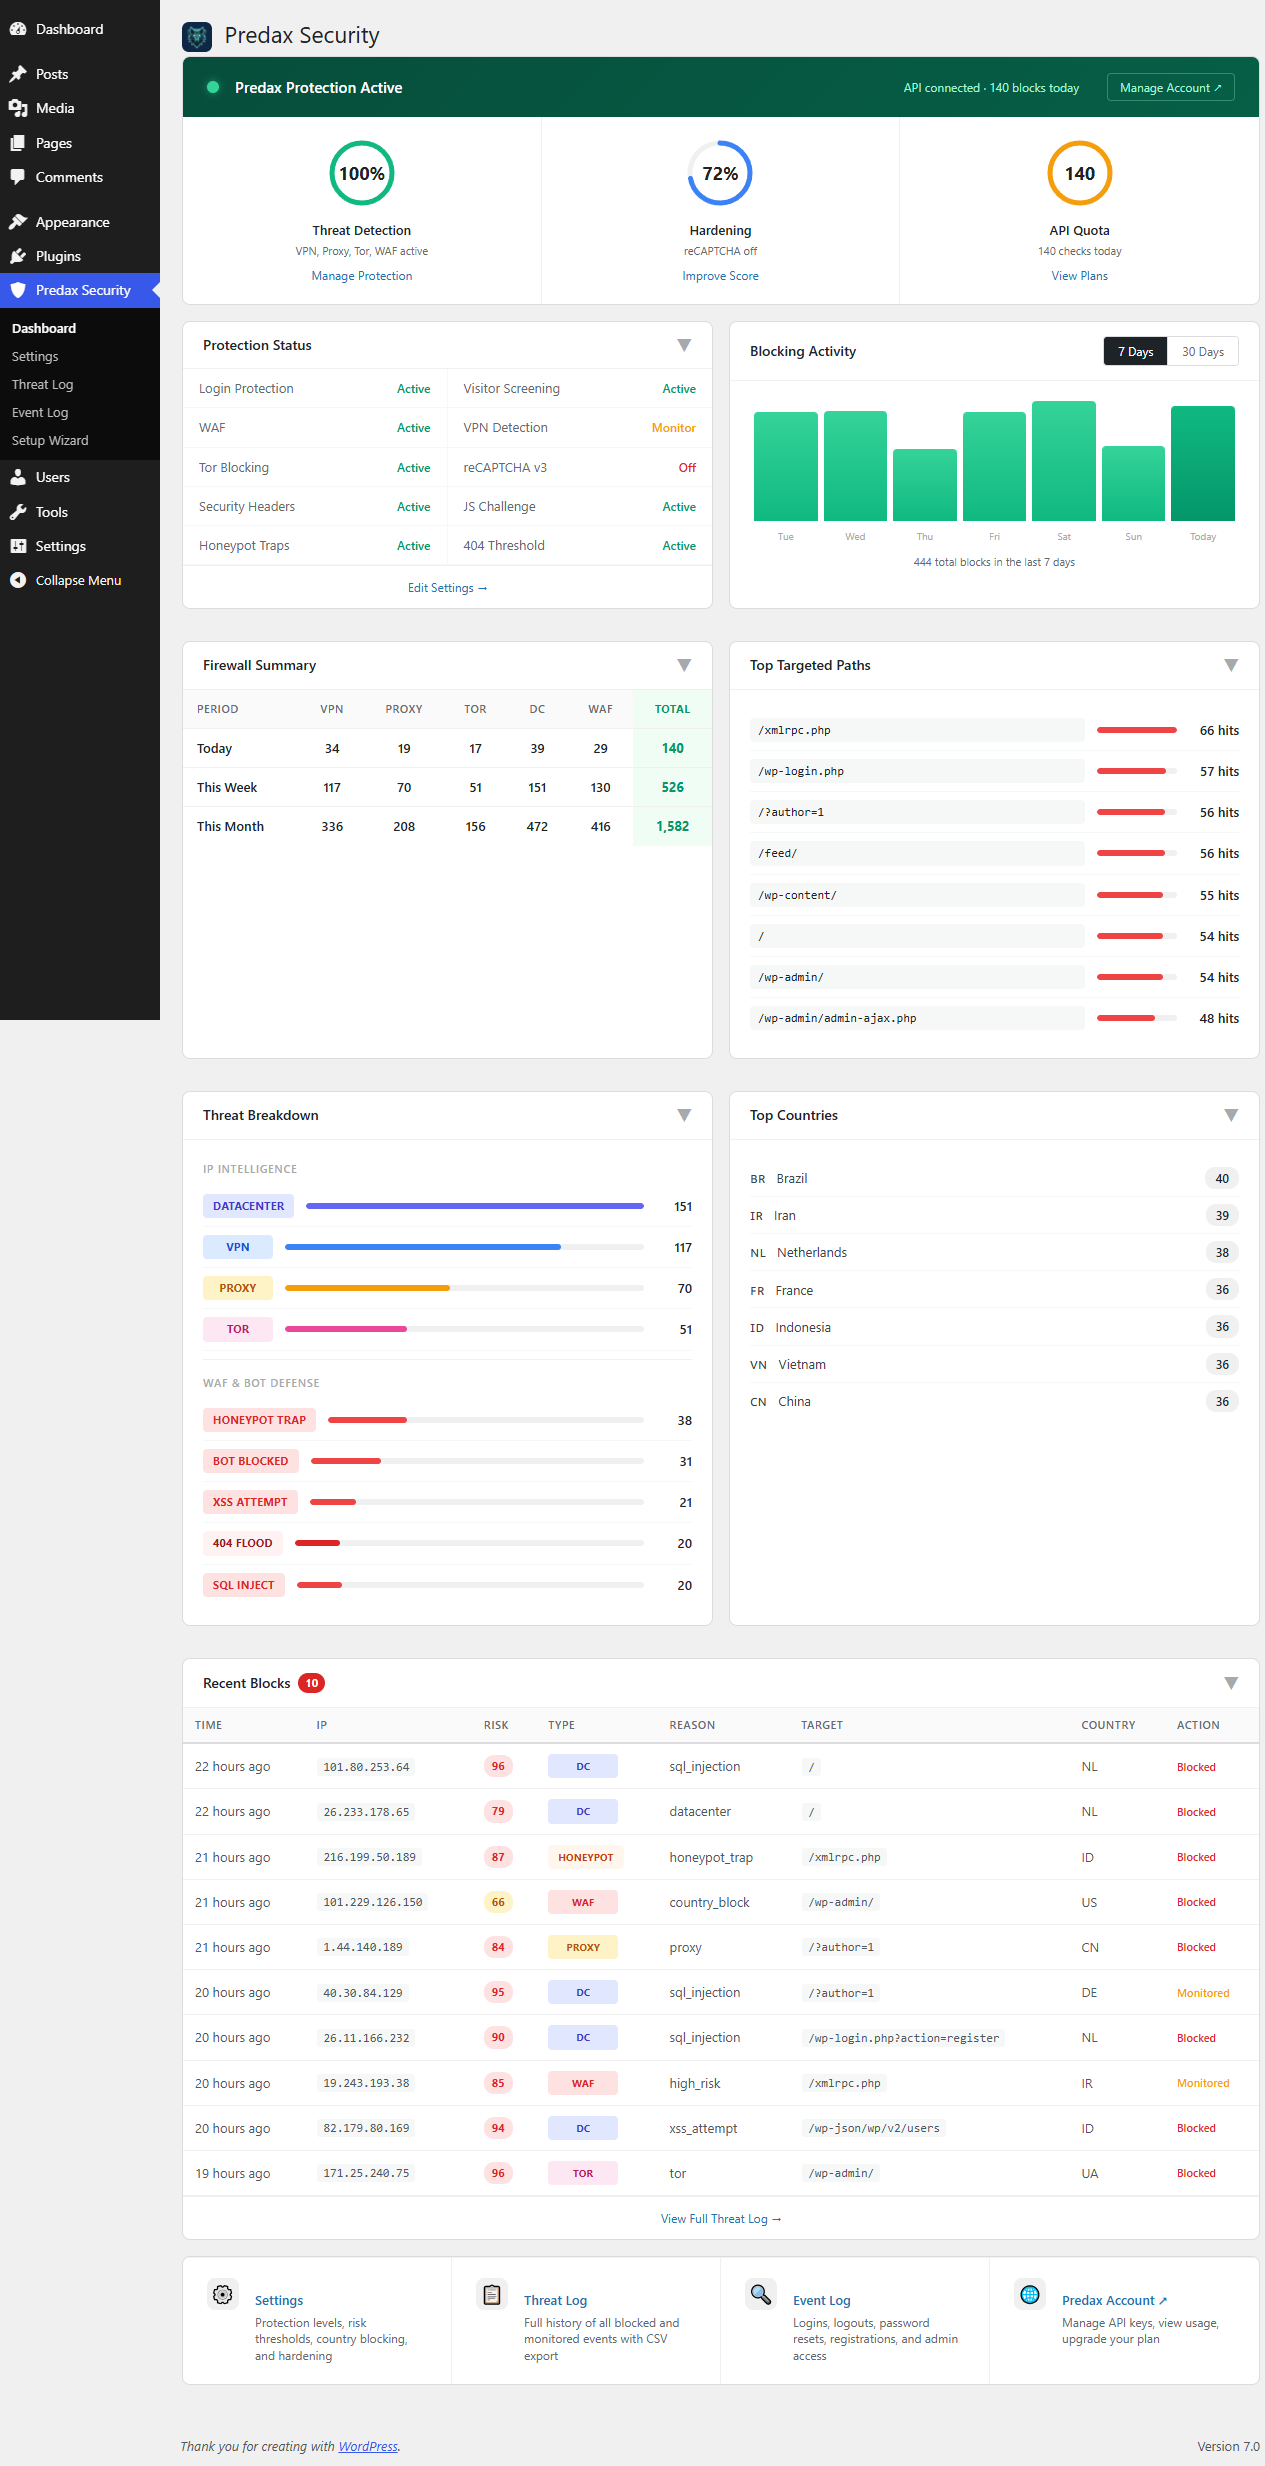
- Security Dashboard — real-time overview with blocking activity chart, threat breakdown, top targeted paths, protection status, and country analysis
- Real-time VPN/Proxy/Tor/Datacenter detection — checks every visitor against live threat intelligence
- Risk score thresholds — block IPs above a configurable risk score (0–100)
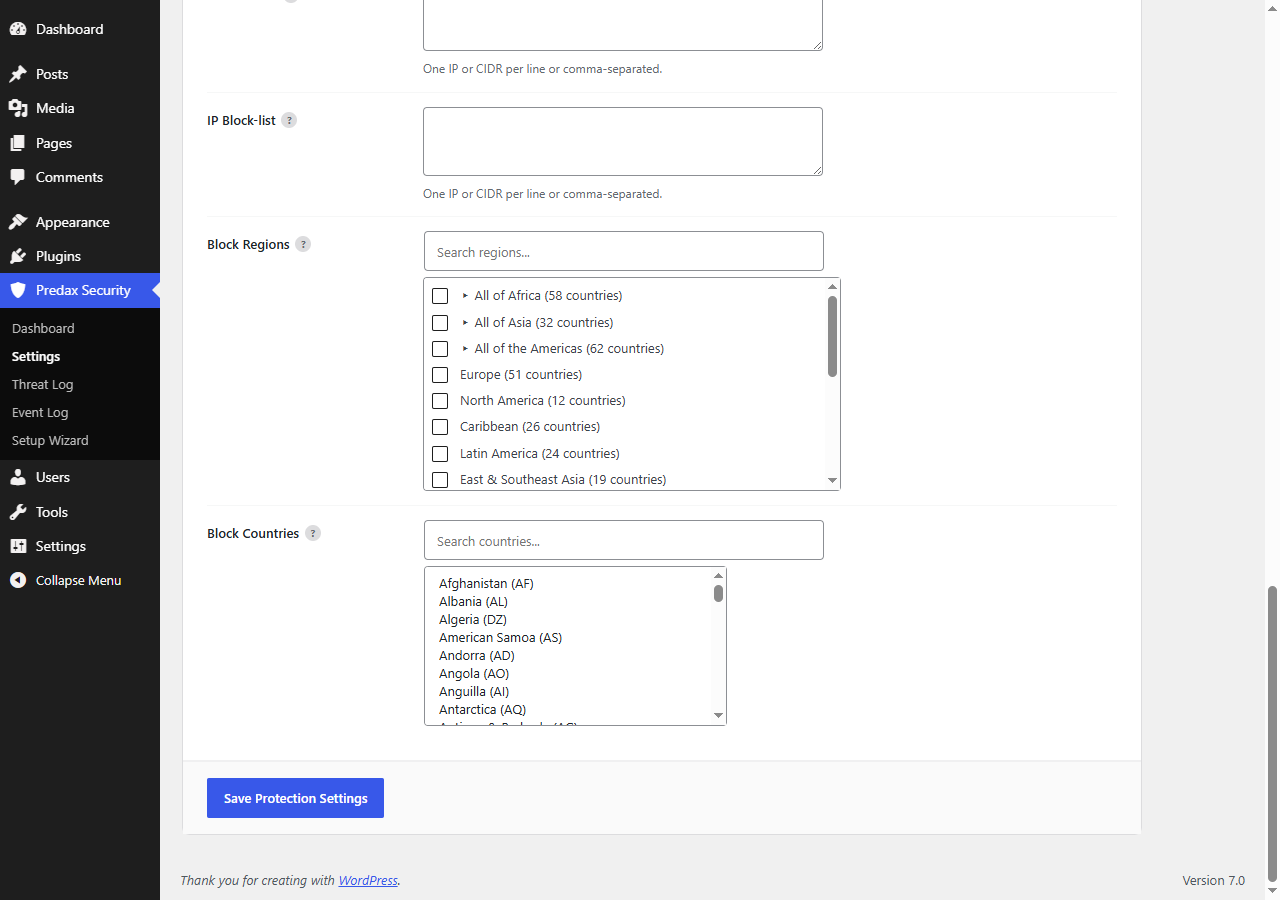
- Country geo-blocking — block or allow specific countries and regions
- Login protection — block high-risk IPs from attempting to log in
- Registration protection — stop fraudulent account creation
- Comment protection — block spam and bot comments at source
- Visitor protection — optionally check all page visitors (with 1-hour caching to minimise API calls)
- XML-RPC & REST API protection — extend blocking to XML-RPC calls and REST API requests
- Disposable email blocking — reject registrations using throwaway email services
- Custom block page — show a branded 403 page instead of the default WordPress error
- Whitelist/blacklist — override decisions for individual IPs or CIDR ranges
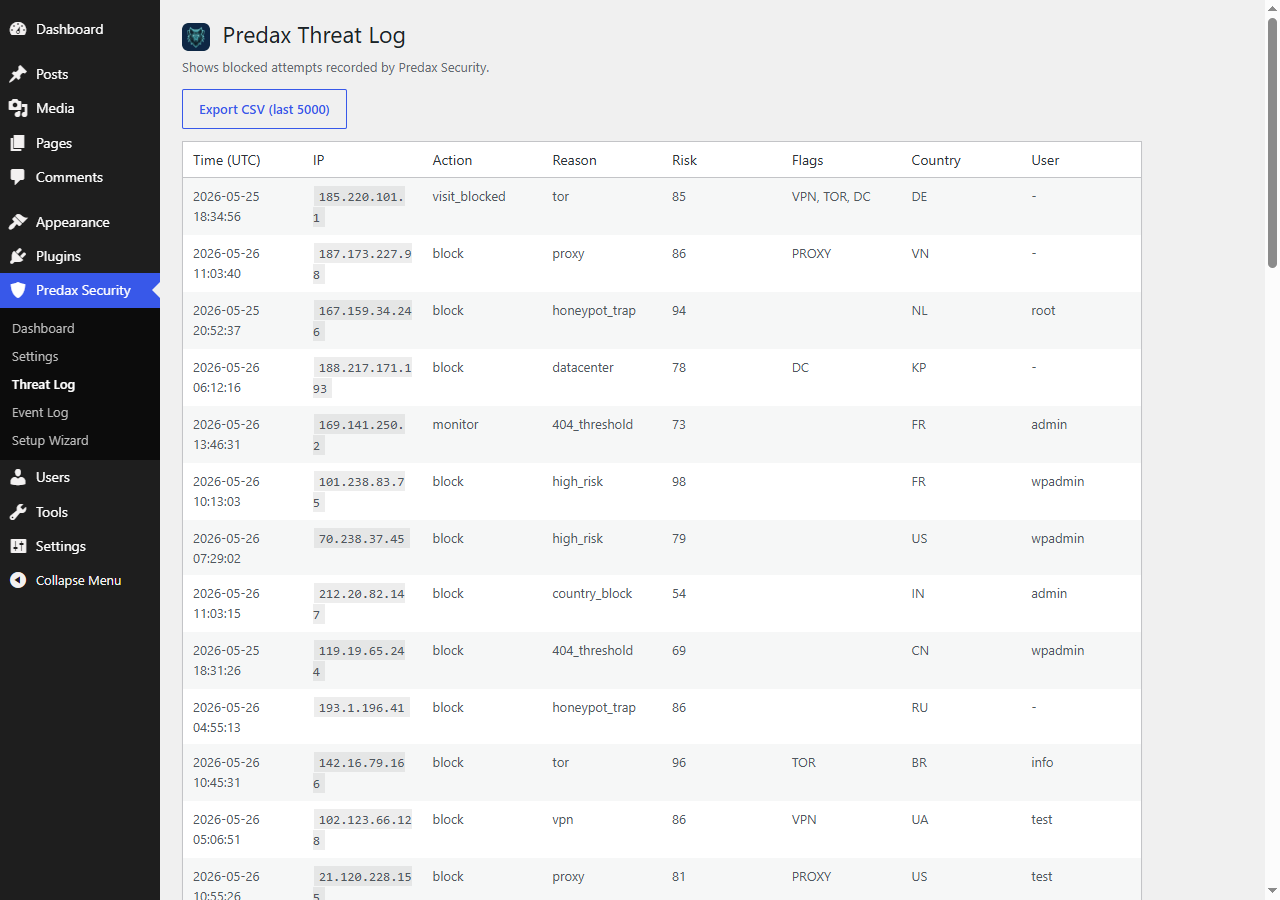
- Threat log — view and export all blocked events with IP, reason, and timestamp
- Event tracking — log successful checks for audit and analytics
- Settings import/export — back up and restore your configuration as a JSON file
- WP-CLI commands — manage whitelists, blacklists, and run IP tests from the command line
- 1,000 IP checks per day
- 5,000 IP checks per month
- VPN, proxy, Tor, and datacenter detection
- Country and region data
- You install the plugin, enter an API key, and pick a protection preset during the Setup Wizard (or enable individual protections from Settings → Protection). This is the explicit opt-in — no data leaves the site until you do this.
- A visitor makes a request to your site.
- Predax checks their IP against the threat intelligence API (results cached for 1 hour per IP).
- If the risk score exceeds your threshold, the visitor is blocked with a configurable message.
- All block events are logged in the WordPress database for review.
wp ipsentry status — show current configuration and threat counts
wp ipsentry test-ip <ip> — run a live API check on any IP
wp ipsentry whitelist add <ip> — add an IP or CIDR to the whitelist
wp ipsentry whitelist remove <ip> — remove from whitelist
wp ipsentry blacklist add <ip> — add an IP or CIDR to the blacklist
wp ipsentry log --limit=20 — view recent threat log entries
安装:
- Go to Plugins → Add New Plugin in your WordPress admin
- Search for "Predax Security"
- Click Install Now, then Activate
- The setup wizard launches automatically and guides you through connecting your free Predax API key and choosing a protection level
- Go to Predax Security in the admin sidebar to view the security dashboard, and Settings to fine-tune protection types, risk thresholds, and advanced features
- Download the plugin ZIP from this page and upload it via Plugins → Add New Plugin → Upload Plugin (or extract the
ipsentry-securityfolder to/wp-content/plugins/) - Activate the plugin through the Plugins menu and follow the setup wizard
屏幕截图:
常见问题:
How is this different from Wordfence or other security plugins?
It solves a different problem — and runs happily alongside them. Scanner-based plugins like Wordfence or Solid Security focus on malware scanning and firewall rules: they look at what a request does once it reaches your site. Predax Security looks at who is connecting: it identifies anonymised and high-risk IPs (VPNs, proxies, Tor, datacenter ranges) in real time using a commercial IP intelligence database, and blocks them before they attempt anything. Many sites run Predax Security alongside a scanner-based plugin — Predax filters out the anonymous, high-risk traffic; the scanner watches what gets through.
Will this slow down my site?
No. API results are cached in the WordPress database for 1 hour per IP. After the first check, returning visitors are served from cache with no API call. The cache TTL is configurable.
Does this block all VPN users?
Only if you enable VPN blocking. By default the plugin is set to monitor VPN traffic (log it but not block it). You control exactly which threat types trigger a block.
What happens to blocked visitors?
By default they see a standard WordPress error page with a 403 status code. You can enable the Custom Block Page option to show a branded page with your own message and a support link.
Does it work with Cloudflare?
Yes. The plugin reads the CF-Connecting-IP header automatically when Cloudflare is detected, so the real visitor IP is used rather than the Cloudflare proxy IP.
Is the free plan enough for a small site?
For most small sites, yes. The free plan provides 1,000 checks per day. With 1-hour caching, this covers approximately 1,000 unique visitors per day. Returning visitors within the hour use cached results and don't count against your quota.
Can I whitelist my own IP?
Yes. Go to Settings → Predax Security → Whitelist / Blacklist and add your IP or CIDR range. Whitelisted IPs bypass all checks.
Does it protect the WooCommerce checkout?
The base security plugin protects logins and registrations. For WooCommerce checkout protection (fraud scoring, country mismatch, order velocity, auto hold), use the companion Predax Fraud Guard for WooCommerce plugin (also on WordPress.org).
What data is sent to the API?
The visitor's IP address, and optionally their timezone when timezone mismatch detection is enabled. A temporary cookie is used to pass the timezone from the browser to the server. No page content or personal user data is transmitted. See the Third Party Services section below for full details.
更新日志:
- New: User/author enumeration blocking — stops
?author=Nprobes and the REST users endpoint from leaking usernames to logged-out visitors (Settings → Advanced → WordPress Hardening). On by default in the Recommended and Strict presets. - New: XML-RPC hardening modes — choose "Block amplification" (neutralises pingback DDoS reflection and
system.multicallbrute-force amplification while keeping normal XML-RPC working, e.g. the WordPress mobile app) or "Disable all". Replaces the old on/off "Disable XML-RPC" toggle; your existing choice is migrated automatically. - New: Firewall auto-ban escalation — an IP that trips the Web Application Firewall repeatedly within a short window is temporarily banned outright, instead of being filtered one request at a time.
- New: API circuit-breaker — if the Predax API becomes slow or unreachable, the plugin now fails open instantly after a few consecutive failures instead of making every request wait on the timeout, and shows an "API degraded" notice on the dashboard. The API request timeout was lowered from 8s to 3.5s.
- New: real API usage meter — the dashboard's "API Usage" ring now shows your actual monthly IP-check usage against your plan's quota (fetched hourly), with an upgrade link when you're above 80%.
- New: quota notice — if your plan's monthly IP checks run out (screening pauses and traffic is allowed through until the quota resets), the plugin now tells you on its admin pages instead of failing silently. Dismissible per month.
- Docs: installation instructions rewritten for installing from the WordPress.org plugin directory; added a section on free vs paid plan limits.
- New: "Learn more" links throughout Settings pointing to the step-by-step guides in the Predax Help Center.
- Improved: the dashboard now tells you when protection is only partially active — if an API key is connected but Visitor Screening is off, the status reads "Partially Active" with a one-click "Enable visitor screening" button (your VPN/proxy/Tor/country rules only apply to logins until it's on). The Detection Modes and Country & Region settings sections show the same hint inline.
- Performance: the whitelist, blacklist, honeypot-URL, blocked-user-agent, and country/region list options no longer autoload on every request. A one-time migration updates existing installs.
- Fix: WP-CLI and WP-Cron requests are never subject to visitor temp-blocks.
- Compatibility: tested with WordPress 7.0 and PHP 8.2. No deprecations or warnings under
WP_DEBUG. - Branding: setup wizard logo and wordmark refreshed to Predax (the "(formerly IPSentry)" suffix remains in the plugin name for clarity). API key field now shows the current
prdx_live_…placeholder. Existingipsent_*keys continue to authenticate normally. - Fix: setup wizard OAuth flow no longer fails with a blank "0" page on the redirect back from predax.io. The callback action is now passed explicitly so the flow is robust against future predax.io frontend changes.
- Internal: removed an unused legacy settings template that was shipping in the zip without being loaded anywhere.
- Branding: IPSentry has been rebranded to Predax. The plugin name, description, and admin labels now use the Predax name. The plugin slug, internal class names, text domain, settings, and your existing API key all remain unchanged — the upgrade is purely cosmetic and 100% backwards compatible.
- Branding: external links from the admin pages now point to
predax.ioinstead ofipsentry.io. The legacyipsentry.ioURL still redirects, so older bookmarks continue to work. - Compatibility: legacy
ipsent_*API keys created before the rebrand continue to authenticate normally. New keys generated athttps://predax.io/dashboard/api-keysstart withprdx_. Both work. - No data changes. No setting resets. Nothing to reconfigure after the update.
- Privacy & compliance: Community Threat Network now has an explicit opt-in toggle in Settings → Advanced (disabled by default). Clarified documentation: no data is shared with the community network unless the site admin explicitly enables it.
- Privacy & compliance: visitor protection and login protection are now off by default on fresh installs. They are enabled the moment a user completes the Setup Wizard and picks a protection preset (that click is the explicit opt-in). Existing sites upgrading from 1.9.0 are not affected —
add_option()respects existing values, so if you already had these on, they stay on. - Security: reordered nonce verification before capability check on the test-connection AJAX endpoint.
- Security: added IP/CIDR validation on the blacklist and whitelist inputs — invalid entries are now silently dropped rather than stored.
- Security: added
uninstall.phpthat cleans up all plugin options and drops both custom tables when the plugin is deleted. - Privacy: added
wp_add_privacy_policy_contentintegration so administrators can pull suggested Privacy Policy text from Tools → Privacy. - Code quality: extracted inline styles from the OAuth callback page, front-end footer badge, and comment honeypot into external stylesheets. Removed an inline
onclickhandler from the[ipsentry_lookup]shortcode. - Code quality: internationalised hard-coded English error messages in admin endpoints. Localised number formatting in event counts and threat badges.
- New: Security Dashboard — a dedicated dashboard page with real-time threat statistics, blocking activity chart, protection status overview, firewall summary table, top targeted paths, threat type breakdown, and country analysis.
- Improved: Settings page redesigned with cleaner layout and better visual hierarchy.
- Improved: Setup wizard redesigned with modern dark theme and clearer protection preset cards.
- New: HTTP Security Headers — enable HSTS, X-Frame-Options, X-Content-Type-Options, Referrer-Policy, and Permissions-Policy from the plugin settings. One toggle to harden your site's browser security.
- New: Google reCAPTCHA v3 — invisible bot protection for login and registration forms. No puzzles for visitors.
- New: Honeypot URL Traps — hidden decoy URLs that catch automated scanners instantly. Pre-configured with 8 common trap paths.
- New: User-Agent Blocking — block known malicious bots, scanners, and scrapers by their User-Agent string. Ships with 20 pre-configured patterns.
- New: 404 Threshold Blocking — automatically block IPs that trigger excessive 404 errors (scanner behavior). Configurable threshold and temporary or permanent blocking.
- New: Known Bot Verification — verify that visitors claiming to be Googlebot, Bingbot, and other search engines are legitimate using reverse DNS + forward DNS confirmation. Catches fake bot impersonators.
- New: JavaScript Challenge — invisible browser verification that blocks bots unable to execute JavaScript. Clean dark-themed challenge page.
- New: Comment Spam Honeypot — hidden form field that catches spam bots filling in invisible fields. Zero false positives.
- New: Browser Fingerprint Scoring — detects inconsistencies between User-Agent claims and actual browser capabilities on the login page. Logs suspicious fingerprints.
- New: Request Pattern Analysis — identifies bot-like request timing patterns (machine-precise intervals vs human browsing).
- New: WordPress Hardening — one-click toggles to disable XML-RPC, hide WordPress version, and disable file editing.
- New: IP Lookup Shortcode [ipsentry_lookup] — embed an IP threat check widget on any page. Dark and light themes available.
- New: Protected Badge Shortcode [ipsentry_badge] — display "Protected by Predax — X threats blocked" on your site.
- New: One-Click Connect — click "Connect with Predax" in the setup wizard to link your site instantly. No API key to copy or paste. Just log in (or create a free account), approve, and you're protected.
- New: OAuth2 Authorization Code flow with PKCE for secure, industry-standard site authentication.
- Improved: Setup wizard now defaults to one-click connect with manual API key entry as a fallback option.
- New: Setup Wizard — guided 3-step setup on first activation. Connect your API key, choose a protection level (Recommended, Strict, or Monitor Only), and you're done in under a minute.
- New: Protection presets — one-click configuration for common security profiles. Re-run anytime from Settings > Developer > Run Setup Wizard.
- Improvement: All block messages now clearly state "Predax has blocked your access" — visitors always know who blocked them and why.
- Improvement: VPN detection now uses ASN-based matching for major VPN providers (NordVPN, Mullvad, ProtonVPN, Surfshark, ExpressVPN, and more). Previously, some VPN IPs were only flagged as "datacenter" if not in the feed list.
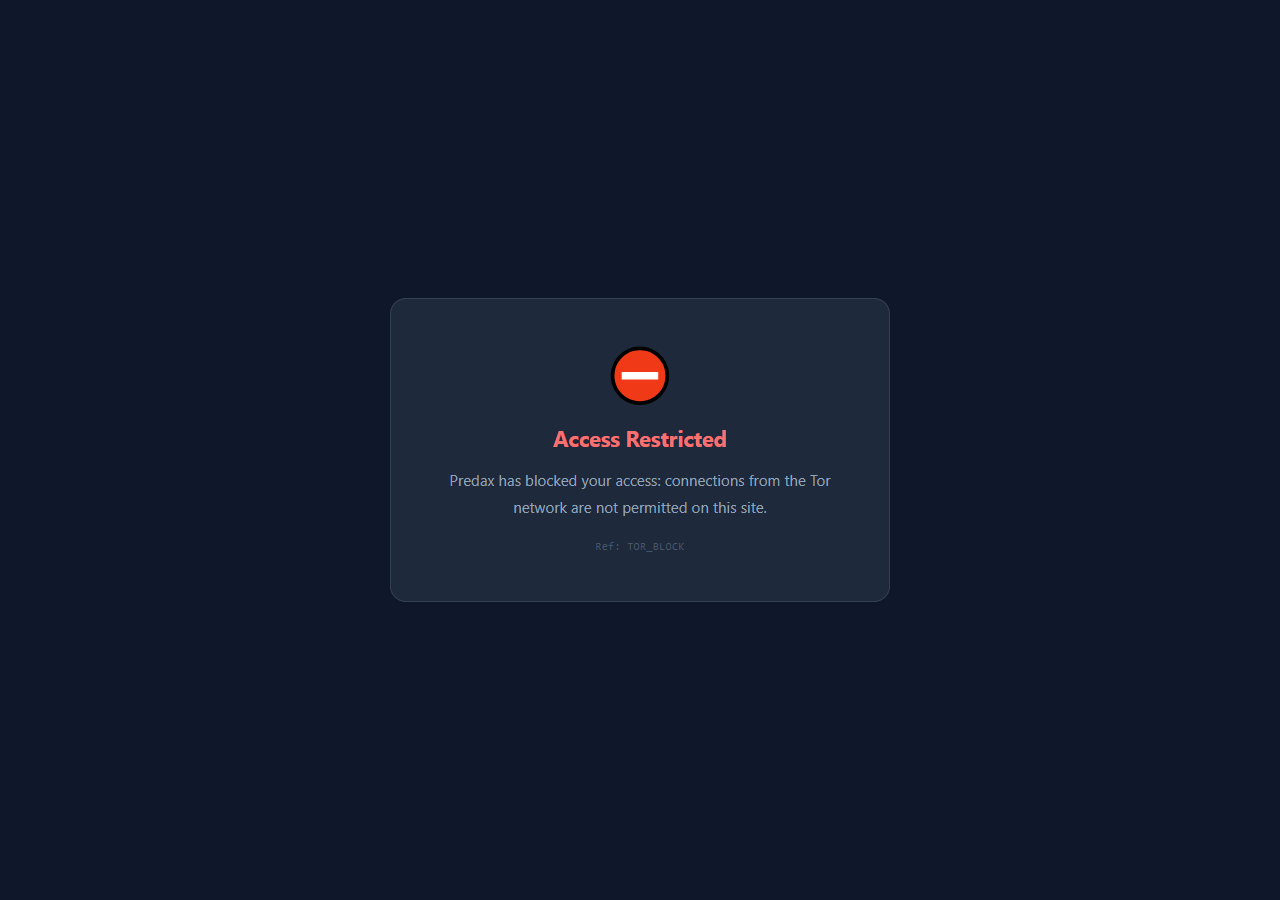
- New: Reason-specific block pages — blocked visitors now see a clear, context-aware message explaining exactly why they were blocked (VPN detected, high-risk IP, Tor network, temporary lockout with countdown, etc.) instead of a generic error.
- New: Custom block page is now ON by default for all new installs. No configuration needed — blocked visitors immediately see a branded, professional page.
- New: Temporary lockout block message now shows the exact remaining wait time (e.g. "Please wait 2 hours and 30 minutes before trying again").
- New: All login, registration, and comment blocks now show reason-specific messages appropriate to the context.
- Improvement: Exponential backoff for clean IP lockouts — each repeated lockout doubles in duration (30min → 60min → 120min → ... → 24hr max). Resets on successful login.
- Improvement: Residential proxy and timezone mismatch signals now treated as risky (trigger permanent blacklist path, not temporary lockout).
- New: Risk-aware failed login protection — VPN/proxy/datacenter/high-risk IPs are permanently blocked after 3 failed attempts. Clean/residential IPs get a temporary lockout only (default 30 min), protecting legitimate users who forget their password. (If the Community Threat Network is enabled — it is off by default — these block events are also shared with the network.)
- Improvement: Lockout thresholds and duration are configurable in Settings → Protection.
- Fix: Test Connection button in Developer tab no longer submits the settings form, and now works reliably on slow/local dev environments (LocalWP, etc.).
- Fix: VPN/proxy users set to "Monitor" mode were incorrectly blocked by the risk threshold. The risk score on VPN/proxy IPs is elevated by the VPN/proxy flag itself — so if you've chosen to monitor (not block) those users, the threshold no longer overrides that decision.
- Improvement: Settings page redesigned with tabbed interface (Protection, Notifications, Advanced, Developer)
- Improvement: Save and Test Connection buttons now shown inline next to the API key field
- Improvement: Help tooltips added to every setting explaining what each option does
- Improvement: Visitor screening enabled by default for new installs
- Improvement: Custom block page now shows "Protected by Predax" footer branding
- Improvement: Developer tools (Test IP, Import/Export) moved to dedicated Developer tab
- New: Web Application Firewall — detects and blocks SQL injection, XSS, path traversal, file probes, known scanner tools, and command injection attempts
- New: Community Threat Network (opt-in, off by default) — when you enable it, IP blocks propagate to other opted-in sites in the network via the Predax community score
- New: WAF toggle in plugin settings (default on); independent of the risk score threshold
- New: Custom block page — show a branded 403 page with configurable title, message, and support link
- New: XML-RPC protection — block high-risk IPs from XML-RPC calls
- New: REST API protection — block high-risk IPs from WP REST API requests
- New: Disposable email blocking — reject registrations using throwaway email services (30+ providers)
- New: Settings import/export — back up and restore configuration as a JSON file
- New: WP-CLI commands — manage lists and run IP tests from the command line (
wp ipsentry) - New: Test IP override — set a fixed IP in settings for local/staging testing
- Fix: Registration protection now correctly flags disposable email domains
- New: General visitor protection — optionally check all site visitors (with transient caching)
- New: Country and region blocking with full ISO 3166-1 alpha-2 support (249 countries)
- New: Custom risk scoring weights — adjust how much each threat type contributes to the risk score
- New: Telemetry pipeline — anonymised threat signals can feed community intelligence when the Community Threat Network is enabled (off by default)
- Improvement: VPN/proxy/Tor options now have Off/Monitor/Block modes for finer control
- Fix: Transient cache key collisions on multisite installs
- New: Event tracking log — view all API check events (not just blocks) for audit purposes
- New: Admin dashboard widget with 7-day threat chart
- New: CIDR range support for whitelist and blacklist entries
- Improvement: API client now retries once on timeout before failing open
- New: Registration protection — block high-risk IPs from creating accounts
- New: Comment protection — block high-risk IPs from posting comments
- New: Configurable risk threshold (default 50)
- New: CSV export for the threat log
- Fix: Login protection now respects whitelist entries correctly
- Initial release
- Login protection with VPN, proxy, and Tor detection
- Whitelist/blacklist management
- Threat log
- Dashboard widget