NexlifyDesk
| 开发者 |
nexlifylabs
teejay tssaini nexlifycreater |
|---|---|
| 更新时间 | 2025年7月25日 20:22 |
| PHP版本: | 7.4 及以上 |
| WordPress版本: | 6.8 |
| 版权: | GPLv2 or later |
| 版权网址: | 版权信息 |
详情介绍:
- Advanced Ticket Management - Complete lifecycle management with intelligent routing and automation
- Multi-Channel Email Integration - Convert emails to tickets with IMAP/POP3, AWS WorkMail, and Google Workspace support
- Intelligent Duplicate Detection - AI-powered semantic analysis prevents ticket fragmentation
- WooCommerce Integration - Deep integration with order history and customer context
- Enterprise Security - Built-in spam protection, rate limiting, and secure file handling
安装:
- Plugin Installation: Upload the
nexlifydeskfolder to/wp-content/plugins/via FTP, or upload the ZIP file directly through WordPress admin dashboard - Activation: Activate the plugin through the 'Plugins' menu in WordPress administration
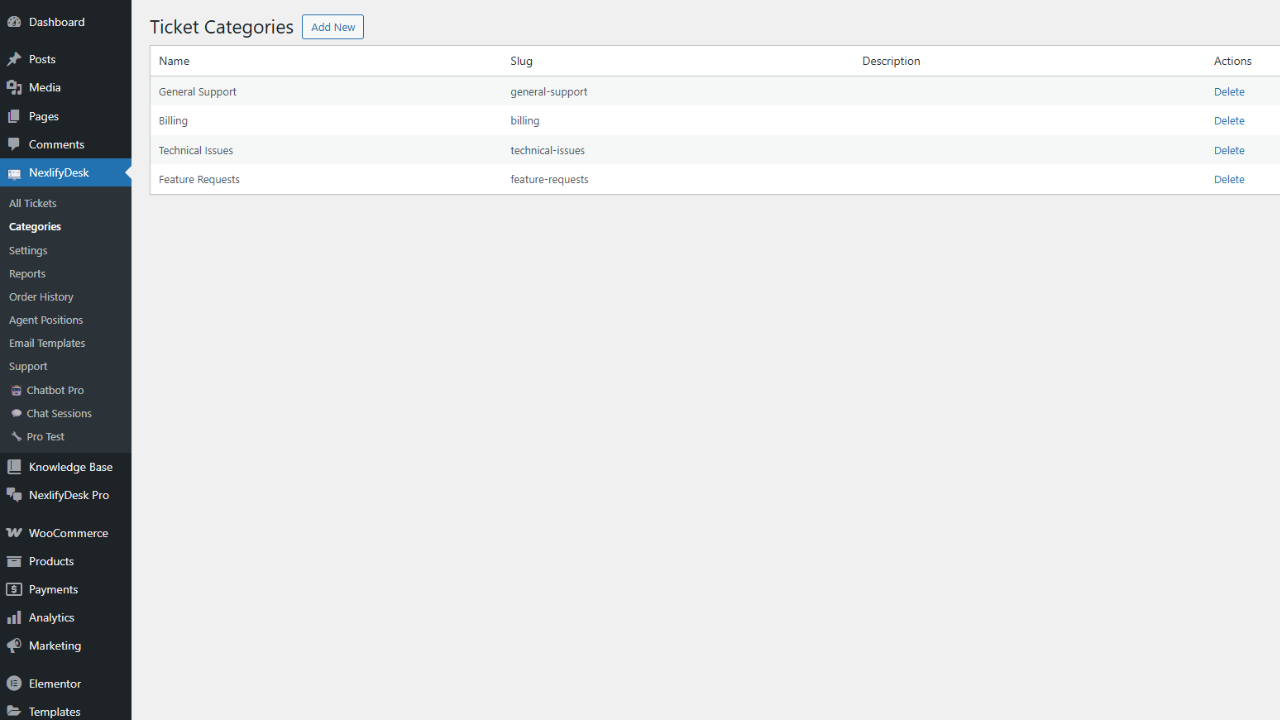
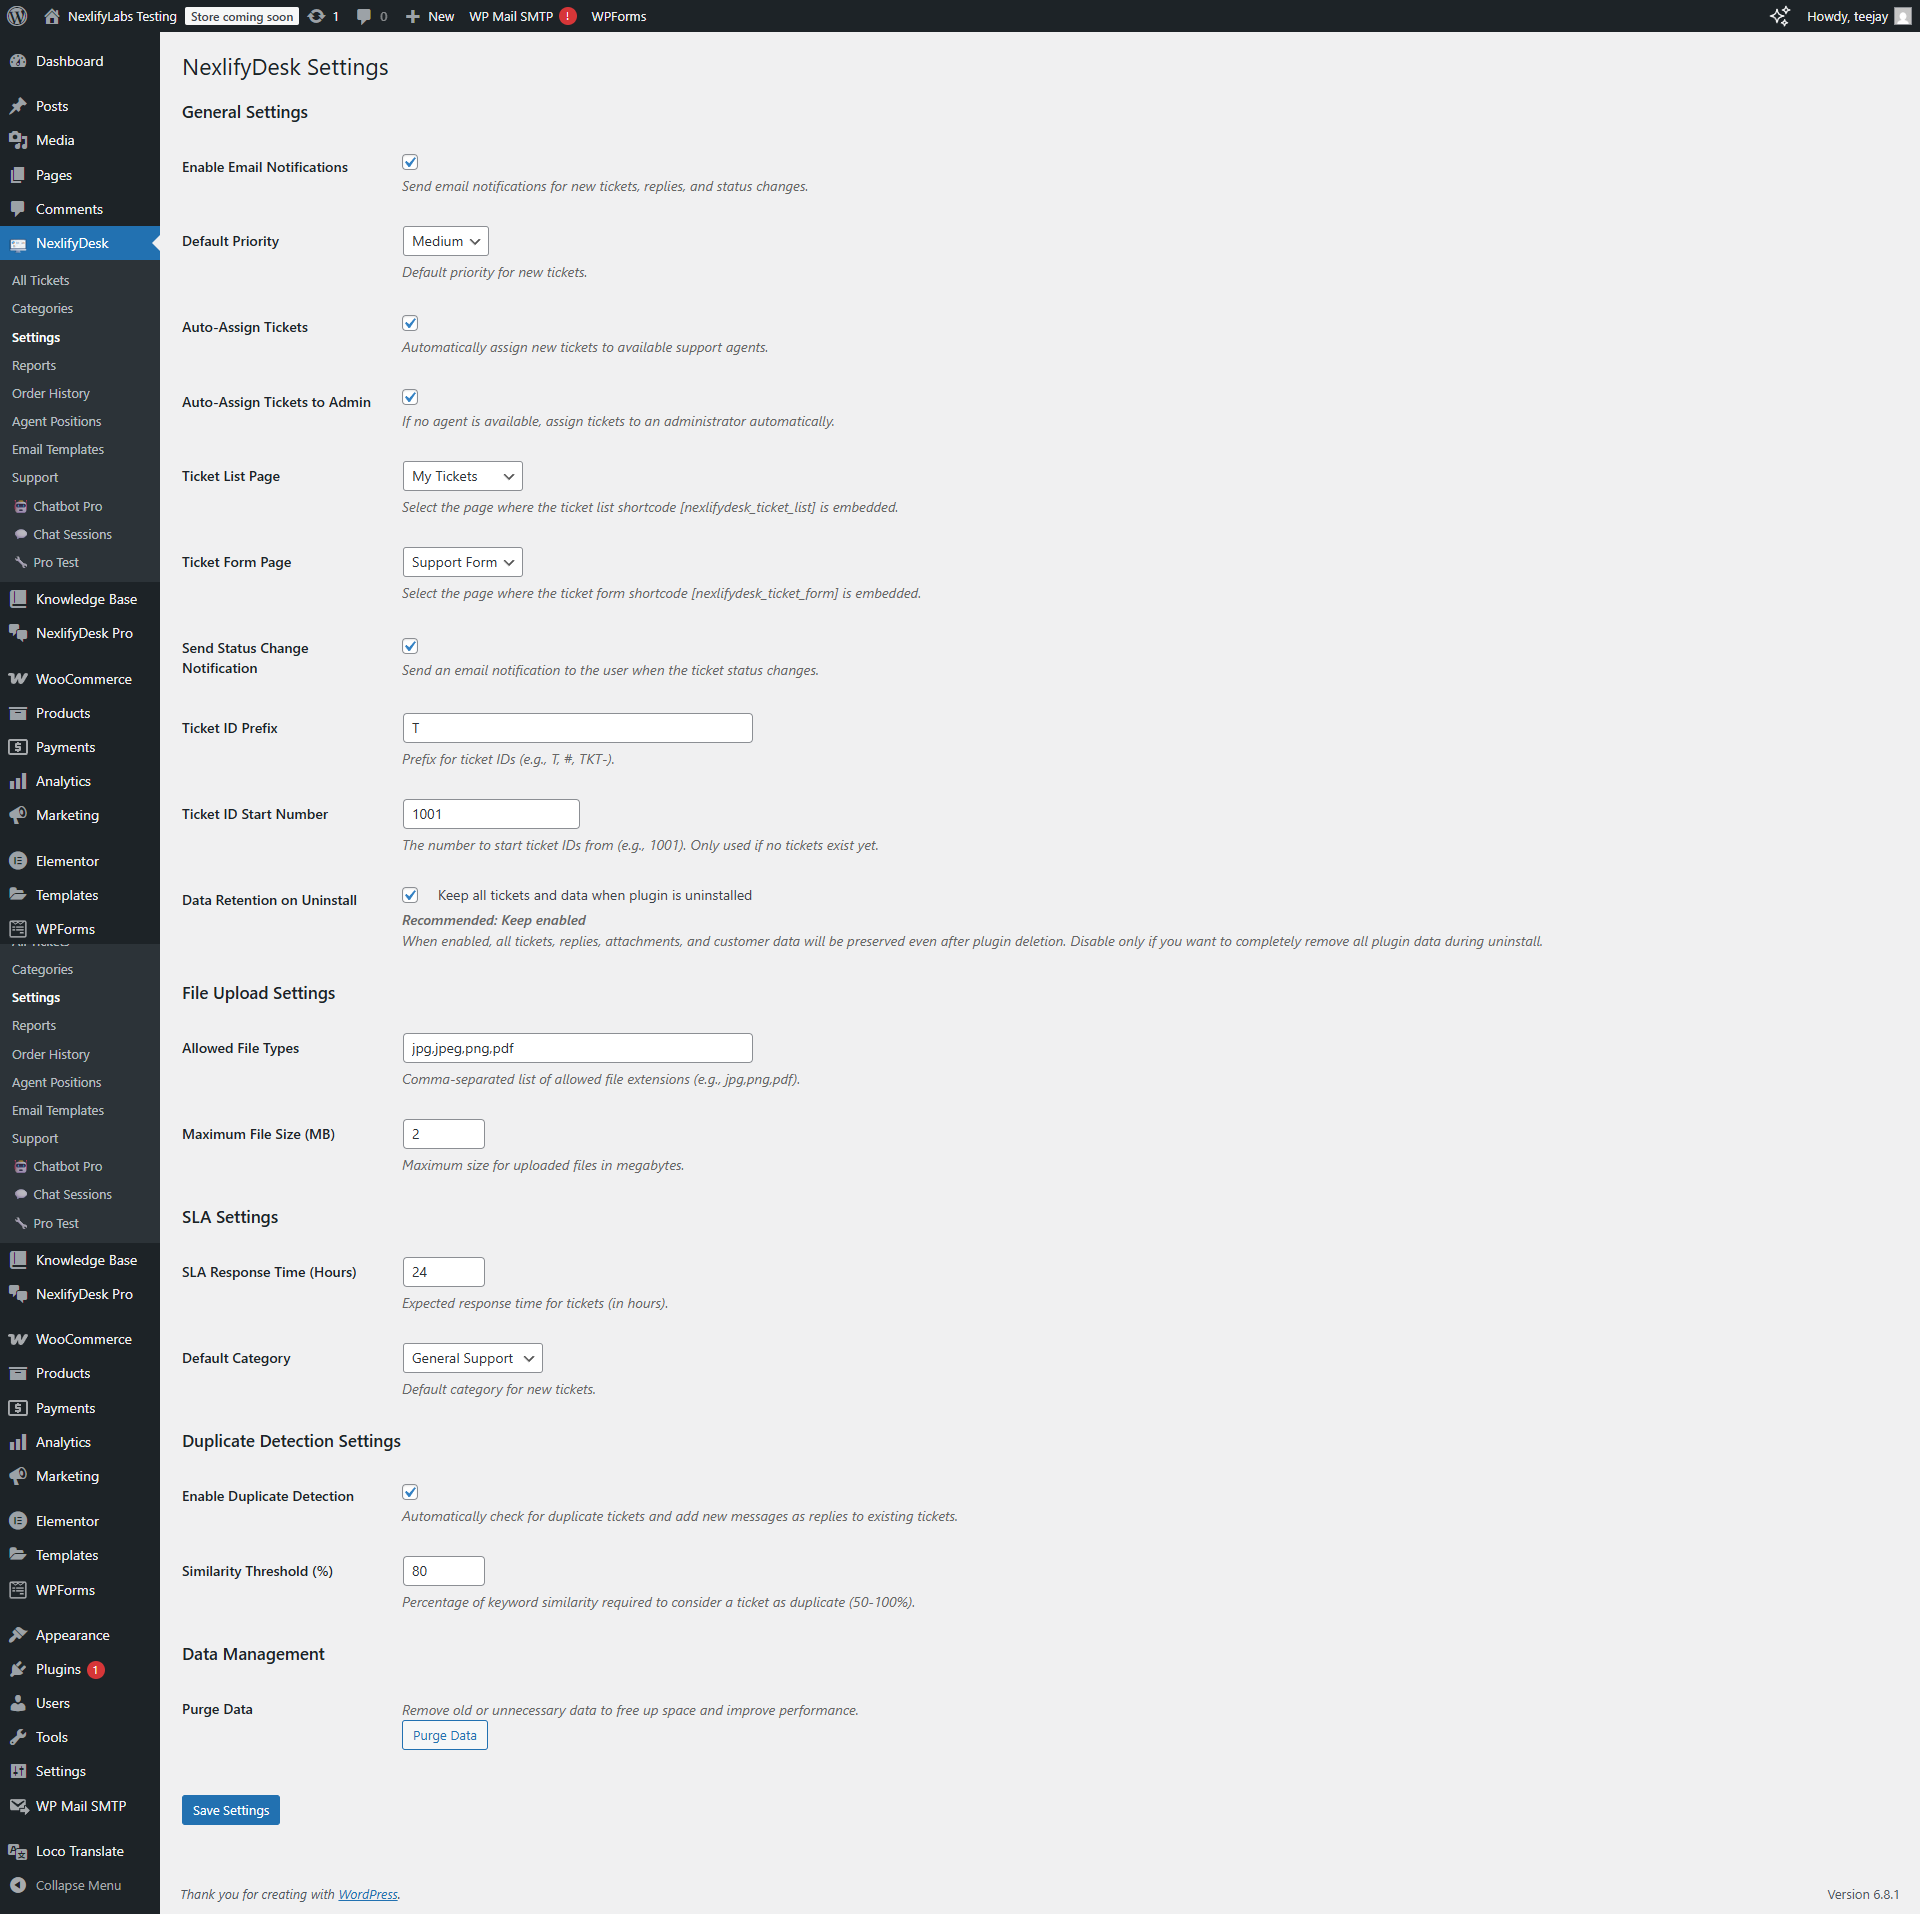
- Initial Configuration: Navigate to NexlifyDesk > Settings to configure:
- Email notification preferences and delivery settings
- File upload limits, allowed types, and security validation
- Default ticket priority and category assignments
- SLA response time targets and breach notifications
- Auto-assignment rules and agent load balancing
- Frontend Page Setup: Create user-facing pages for ticket management:
- Ticket Submission Page: Create a new page and add the shortcode
[nexlifydesk_ticket_form] - Ticket History Page: Create another page and add the shortcode
[nexlifydesk_ticket_list] - Configure page links in NexlifyDesk > Settings for seamless navigation
- Email Piping Setup (Optional): Configure email-to-ticket conversion:
- Select your email provider (Custom IMAP/POP3, AWS WorkMail, or Google Workspace)
- Enter connection details and authentication credentials
- Configure spam protection rules and filtering criteria
- Set email retention preferences (keep or delete after processing)
- Agent Team Setup (Optional): Prepare your support team:
- Create WordPress user accounts for support agents
- Assign the "NexlifyDesk Agent" role to team members
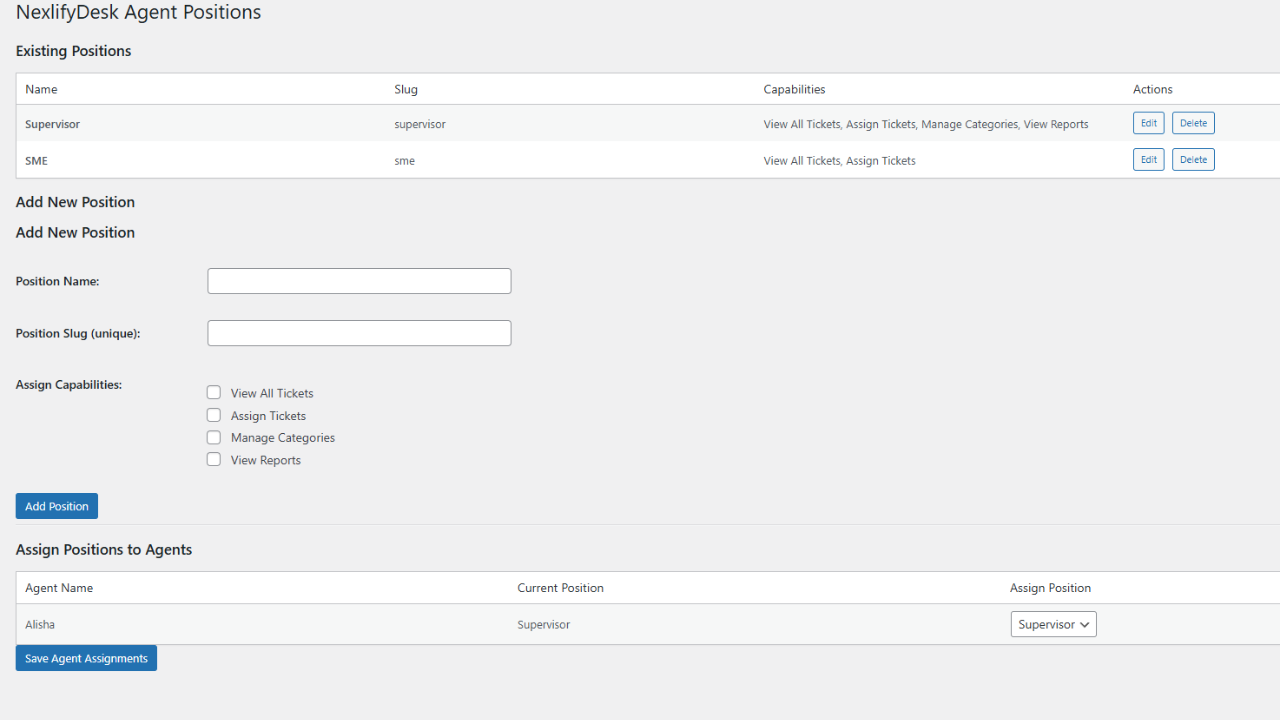
- Define custom agent positions with specific capabilities
- Configure automatic assignment rules for optimal workload distribution
屏幕截图:
常见问题:
How do I create a support ticket submission form?
Create a new WordPress page and add the shortcode [nexlifydesk_ticket_form]. You can customize the form with additional attributes:
show_title="no"to hide the page title- The form includes fields for subject, message, category selection, priority level, and file attachments
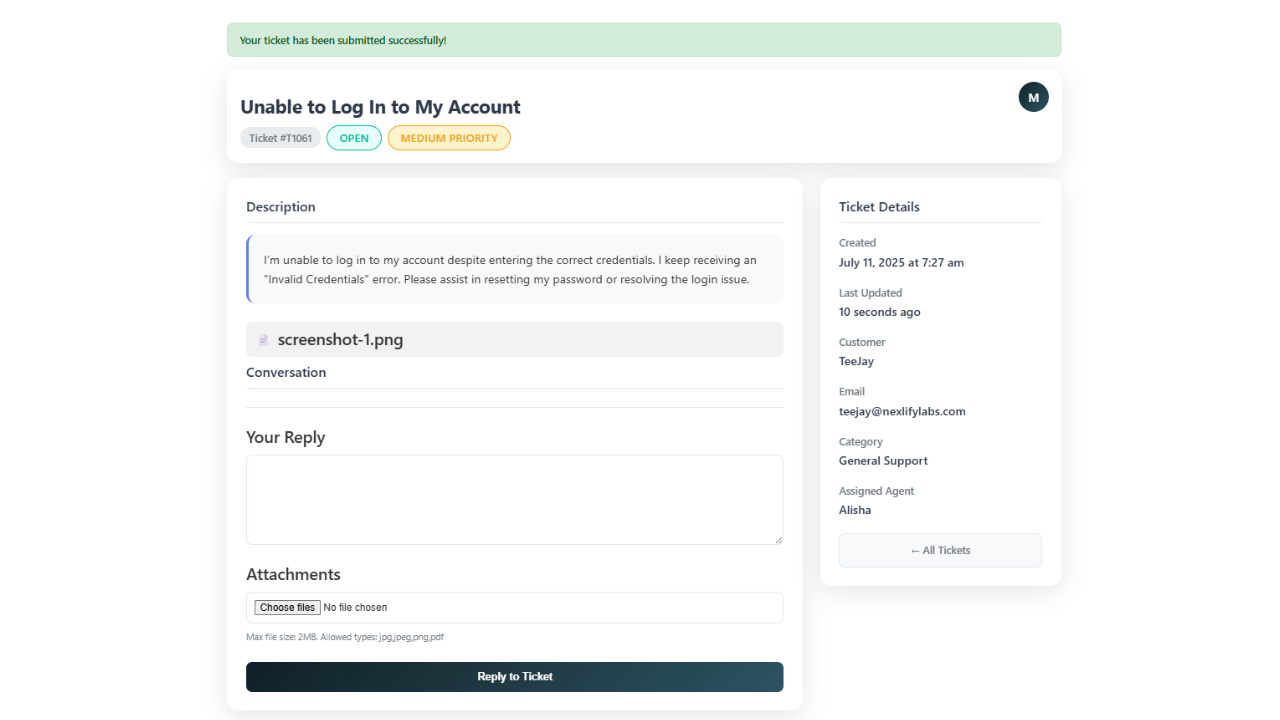
How can customers view their submitted tickets?
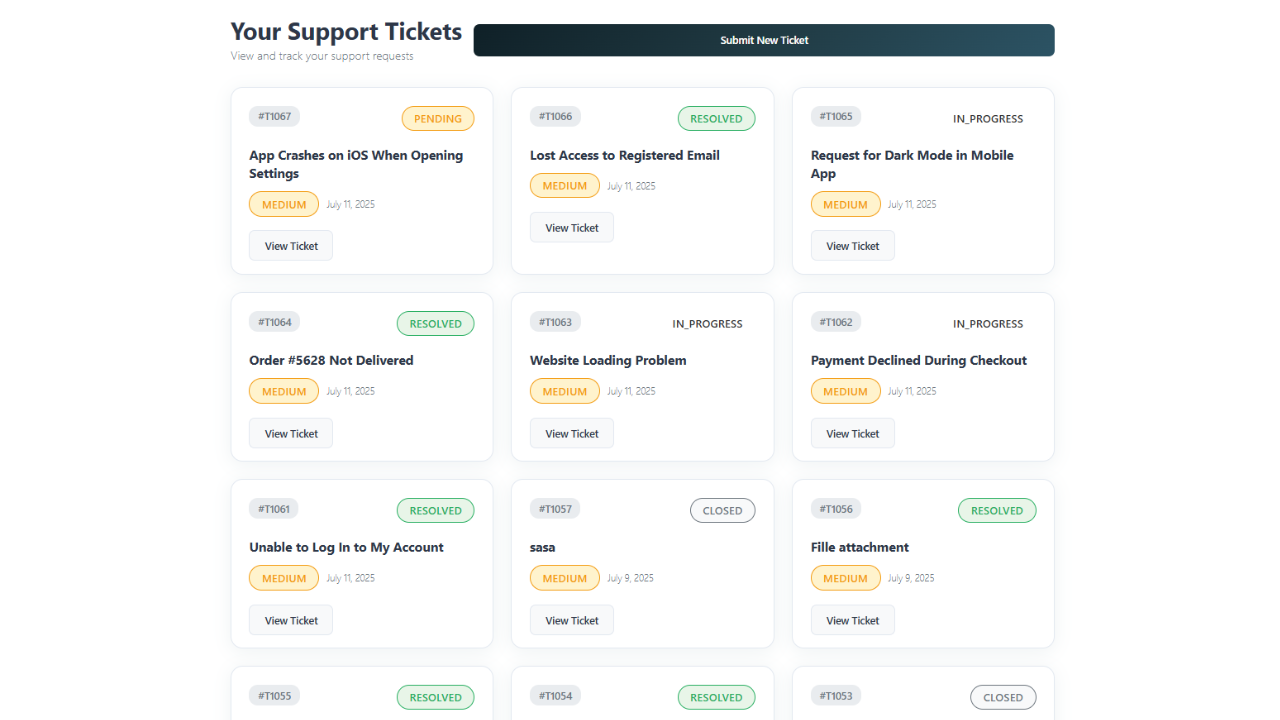
Create a page with the shortcode [nexlifydesk_ticket_list]. Logged-in customers will see their own tickets, while agents will see their assigned tickets. Customization options include:
show_title="no"to hide the page titlestatus="open"to filter tickets by specific status
Can I customize the email notifications?
Yes! Navigate to NexlifyDesk > Email Templates to customize all notification emails:
- New Ticket notifications, New Reply alerts, Status Change notifications, and SLA Breach warnings
- Use dynamic placeholders like
{ticket_id},{user_name},{subject},{ticket_content}, and many more for personalized communications
How do I set up support agents?
Basic Agent Setup:
- Go to Users > Add New to create agent accounts
- Assign the "NexlifyDesk Agent" role to new users Advanced Agent Configuration:
- Visit NexlifyDesk > Agent Positions to create custom roles
- Define specific capabilities (e.g., "Level 1 Support", "Senior Agent")
- Assign agents to positions through their user profiles
- Configure automatic assignment rules in Settings
What file types can be attached to tickets?
Default supported formats include JPG, PNG, PDF, and common document types. You can customize file handling in NexlifyDesk > Settings:
- Configure allowed file extensions
- Set maximum file size limits
- Enable security validation and virus scanning integration
How does the SLA monitoring work?
Configure response time targets in NexlifyDesk > Settings (specified in hours). The system will:
- Track response times against SLA targets
- Send breach notification alerts to administrators and assigned agents
- Display SLA status indicators in the dashboard interface
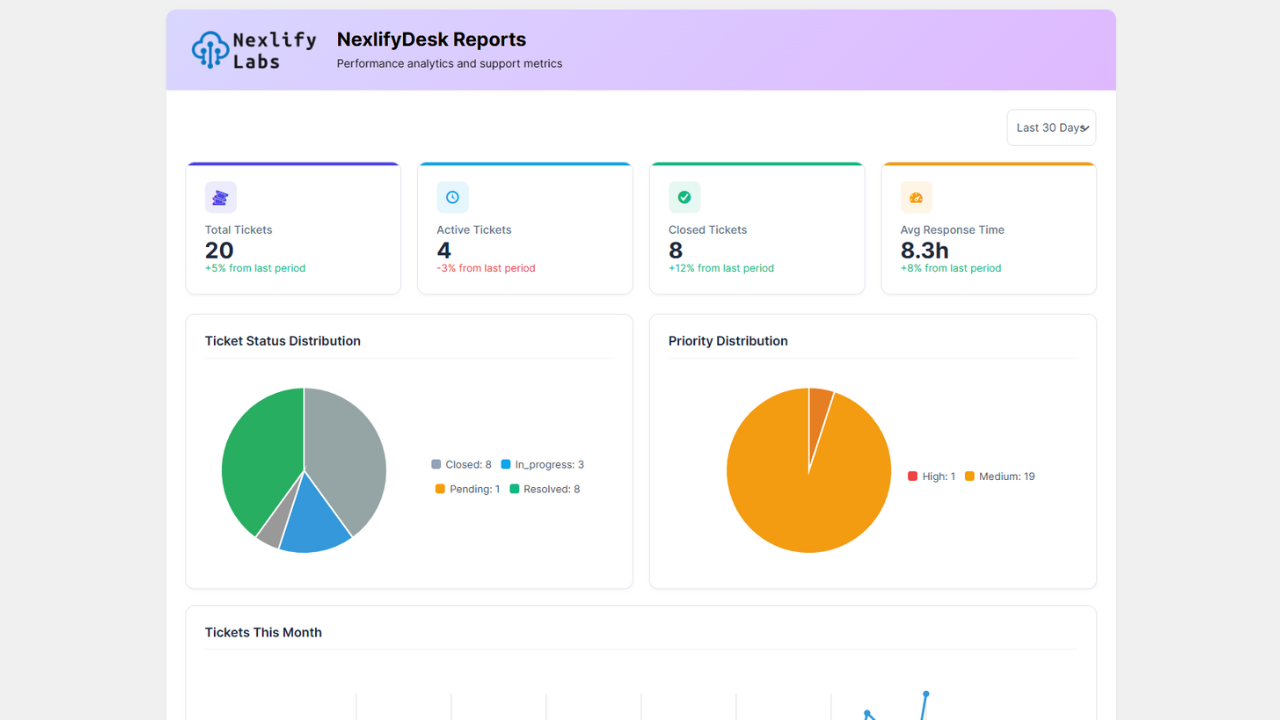
- Include SLA performance metrics in comprehensive reports
Can I integrate with WooCommerce?
Absolutely! NexlifyDesk includes native WooCommerce integration features:
- Built-in Order History lookup page for comprehensive order details
- Automatic order-based duplicate detection for context preservation
- Direct customer context access within tickets for enhanced support quality
How do I set up email piping?
Email piping converts incoming emails into support tickets. Setup varies by provider: Custom IMAP/POP3 Configuration:
- Navigate to NexlifyDesk > Settings > Email Piping
- Select "Custom IMAP/POP3" as your provider
- Enter mail server details (host, port, username, password, encryption)
- Configure spam filtering and processing rules
- Choose email retention preferences (delete or keep emails after processing) AWS WorkMail Integration:
- Ensure SSL is enabled on your WordPress site
- Select "AWS WorkMail" as your provider
- Enter AWS region, organization ID, and authentication credentials
- Optionally configure SES for enhanced email delivery Google Workspace/Gmail Setup:
- Create OAuth credentials in Google Cloud Console
- Select "Google Workspace" as your provider
- Complete OAuth authentication flow
- Configure email processing preferences and filters
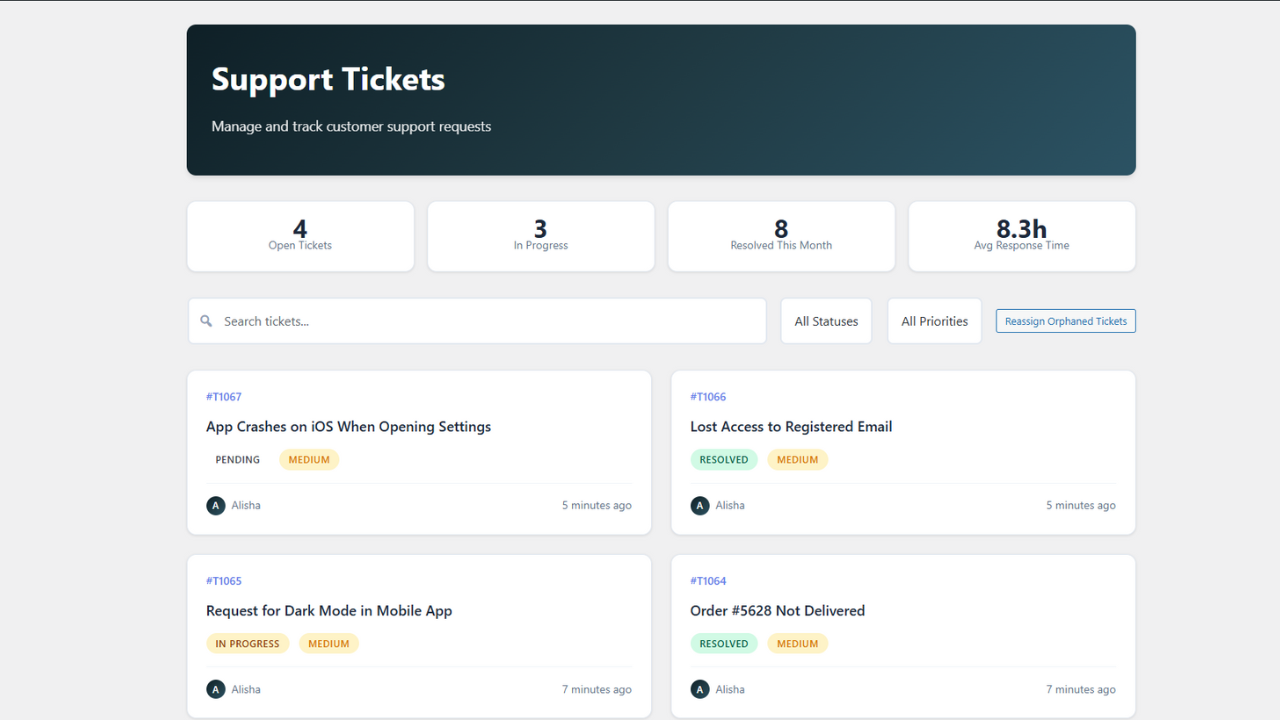
How does automatic ticket assignment work?
The intelligent assignment system operates through multiple algorithms:
- Identifies available agents based on online status and workload
- Balances ticket distribution by assigning to agents with fewest open tickets
- Falls back to administrator assignment if no agents are available
- Automatically reassigns orphaned tickets when agents are deactivated
What happens to closed tickets?
Ticket closure follows a structured workflow:
- Agents can manually close tickets at any time
- Resolved tickets automatically close after 48 hours of customer inactivity
- Administrators can reopen closed tickets when necessary
- Customers cannot reply to closed tickets and are prompted to create new ones
Is my data safe when uninstalling the plugin?
By default, YES! All plugin data (tickets, attachments, categories, etc.) is preserved during uninstallation for data safety. You can modify this behavior in Settings to enable complete data removal. Always create a backup before uninstalling any plugin.
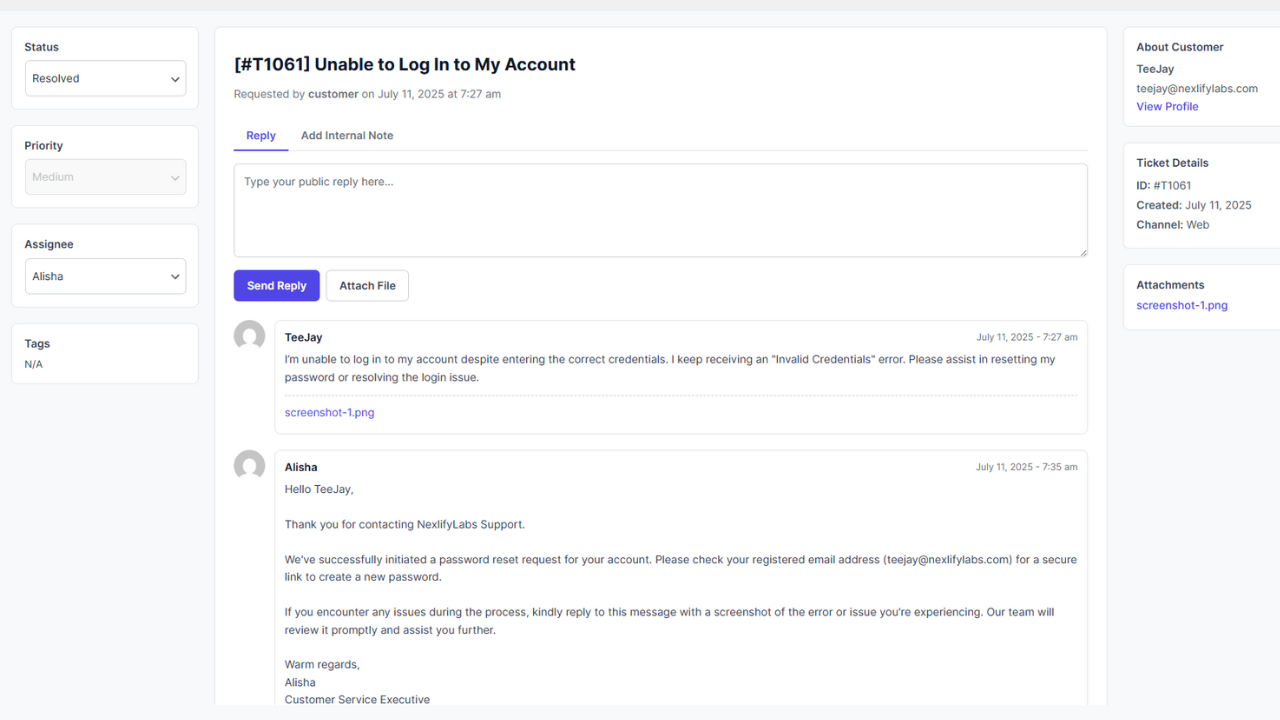
How do internal notes work?
Internal notes provide private agent-to-agent communication:
- Notes are completely invisible to customers
- Ideal for sharing context, escalation information, or troubleshooting details
- Add notes through the "Add Internal Note" tab in the admin ticket interface
- All internal notes are logged with timestamps and agent attribution
Can I customize the plugin's appearance?
Multiple customization options are available:
- Add custom CSS styling through your theme's stylesheet
- Override plugin templates by copying them to your active theme directory
- Customize colors, labels, and visual elements through Settings
- Full control over email template design and content
- Responsive design elements for mobile optimization
更新日志:
- SECURITY FIX: Resolved critical agent permission vulnerability where agents could view and reply to tickets not assigned to them
- NEW: Implemented smart role-based read status system - when agents handle tickets, they're automatically marked as read for supervisors/admins to eliminate review backlog
- NEW: Added professional dual-date columns (Created + Last Updated) to ticket list with accurate timestamp display based on actual reply activity, not system background processes
- Enhanced agent role-based access control to properly restrict agents to only their assigned tickets
- Fixed agent position capabilities to correctly respect "View All Tickets" permission for supervisor roles
- Improved ticket filtering in admin dashboard to enforce proper agent-specific ticket visibility
- Enhanced frontend ticket access control with better customer email verification for unregistered users
- Fixed agent reply permissions to prevent unauthorized responses to unassigned tickets
- Improved agent dashboard statistics to show only relevant metrics for assigned tickets
- Enhanced bulk action permissions to restrict agents from performing actions on unassigned tickets
- Fixed ticket form redirect issues that caused incorrect URL redirection after submission
- Improved frontend shortcode logic to properly handle customer vs agent access permissions
- Enhanced duplicate detection with better customer detail extraction for unregistered users
- Fixed JavaScript form submission to use proper server-provided redirect URLs
- Improved success message handling with proper ticket number display and view links
- Fixed category deletion and reactivation bug that caused misleading error messages
- Resolved AJAX response issues where HTML was returned instead of JSON during category operations
- Enhanced category management with comprehensive output buffering and proper exit handling
- Improved JavaScript error handling with automatic page reload for better user experience
- Enhanced database query optimization with proper phpcs ignore comments for intentional non-caching
- Fixed category existence checks to prevent race conditions and stale cache data issues
- Enhanced admin category form processing with consistent non-caching approach for real-time accuracy
- Optimized category cache management to prevent deletion/recreation conflicts
- Implemented comprehensive cache clearing system for consistent ticket list updates across all user roles
- Enhanced email provider validation to prevent false success messages when credentials are not configured
- Fixed "Test Email Fetch" buttons now properly validate credentials before showing success/error status
- Improved AWS WorkMail connectivity across multiple server configurations and hosting environments
- Enhanced Google Workspace email integration with better error handling and credential validation
- Strengthened custom IMAP/POP3 email processing with comprehensive credential validation
- Improved JavaScript coding standards compliance by moving inline code to external files
- Enhanced AJAX handlers to check actual email fetch results instead of returning false positives
- Added proper return value validation for all email provider test functions
- Improved email piping reliability across different server setups and hosting providers
- Enhanced error messaging for better troubleshooting and configuration guidance
- Fixed AWS Test Connection functionality for WorkMail and SES integration
- Added comprehensive AWS System Diagnostic tools for enhanced troubleshooting capabilities
- Improved frontend ticket page UI with mobile-friendly design and cleaner interface elements
- Enhanced duplicate detection with advanced semantic text analysis using cosine similarity algorithms
- Implemented intelligent keyword mapping and stopword filtering for more accurate duplicate ticket identification
- Optimized TextAnalysis library for improved performance and security compliance
- Added comprehensive caching system for duplicate detection queries to improve response times
- Enhanced uninstall function to properly remove email credentials and IMAP settings
- Added comprehensive cleanup of email provider settings, OAuth data, and cached entries on uninstall
- Improved data security by ensuring complete removal of sensitive credentials when "keep data on uninstall" is unchecked
- Added donation button with heart emoji on WordPress plugins page
- Minor improvements in core ticketing functionality and email piping reliability
- Fixed critical email delivery issues with SMTP plugins (RFC 5322 compliance)
- Improved compatibility with popular SMTP plugins and mail delivery services
- Enhanced email header formatting for better deliverability and spam prevention
- Added comprehensive email piping support (IMAP/POP3, AWS WorkMail, Google Workspace)
- Enhanced duplicate detection algorithms with improved accuracy and performance
- Implemented real-time ticket list updates with live status indicators
- Added advanced spam protection and rate limiting for email processing
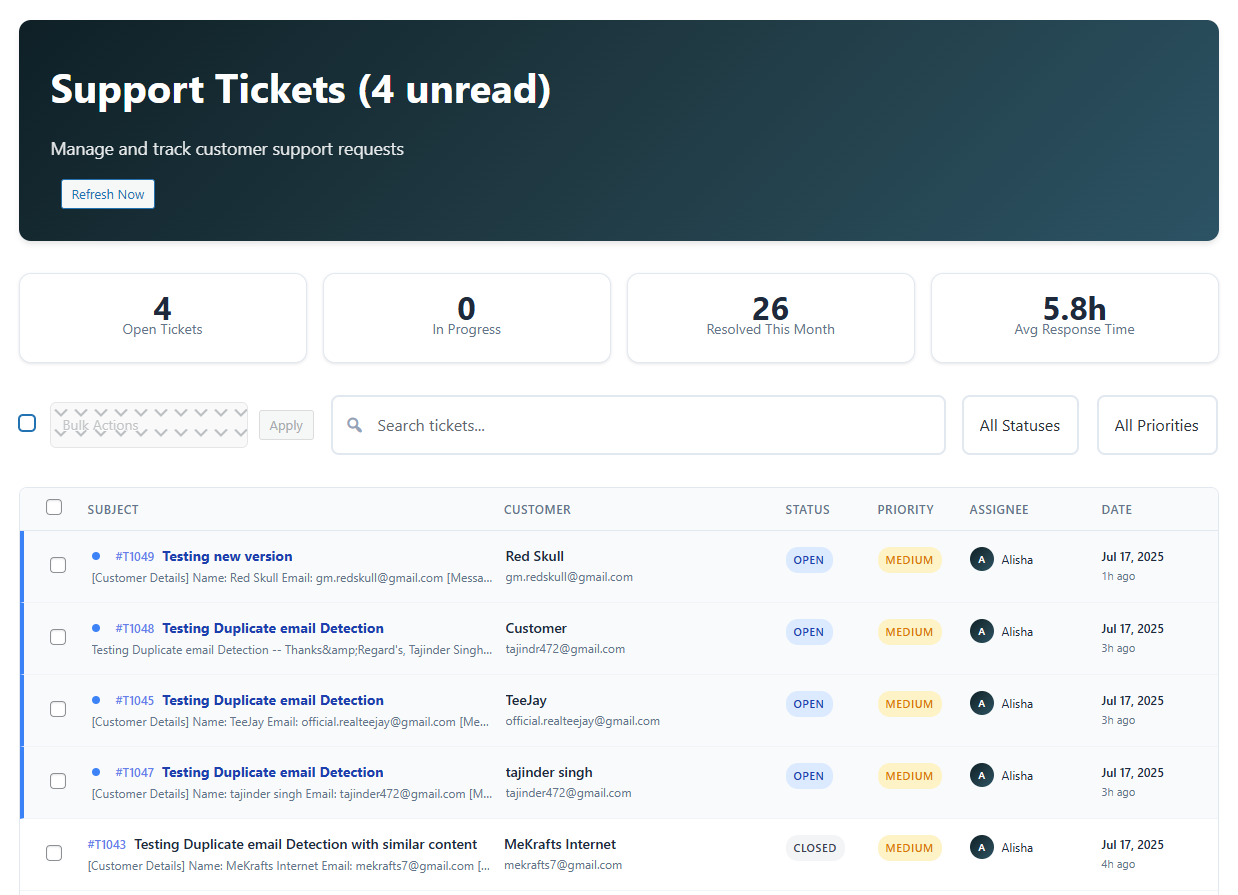
- Improved admin interface with better filtering and search capabilities
- Initial release with complete ticketing system functionality
- Full agent management with roles and permissions
- Internal notes system for private agent communication
- Native WooCommerce integration with order lookup
- SLA monitoring and breach notifications
- Advanced duplicate detection algorithms
- Customizable email templates and notifications
- Granular user roles and capability management
- Custom categories and priority levels
- File attachment support with security validation
- Comprehensive shortcode system for frontend integration