Notification for Telegram
| 开发者 | rainafarai |
|---|---|
| 更新时间 | 2026年5月21日 20:12 |
| 捐献地址: | 去捐款 |
| PHP版本: | 7.4 及以上 |
| WordPress版本: | 7 |
| 版权: | GPLv2 or later |
| 版权网址: | 版权信息 |
详情介绍:
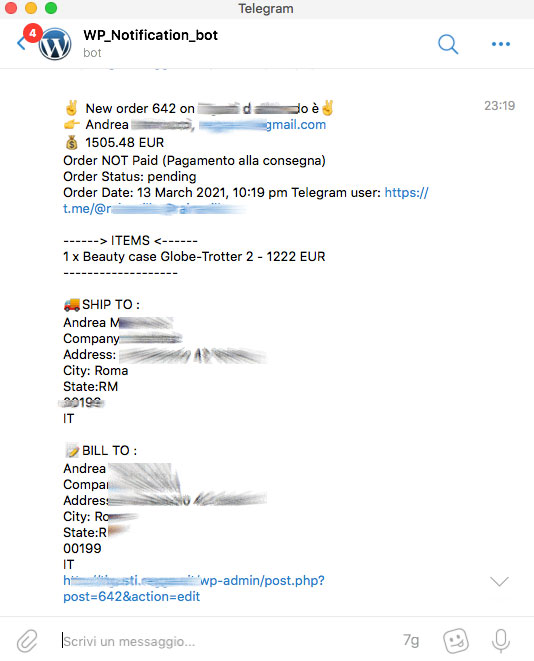
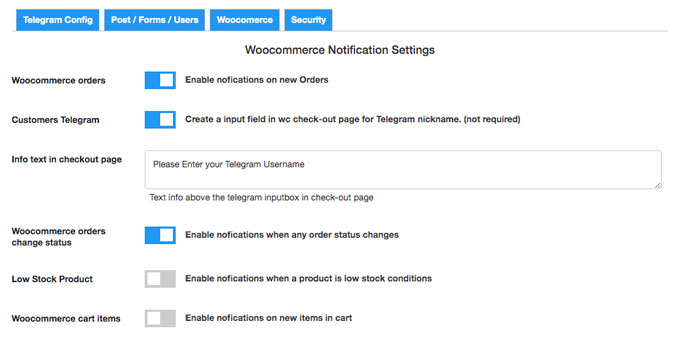
- When receive a new order in Woocommerce.
- When a Woocommerce order change status.
- When receive a new order in Surecart.
- Every event captured by WP Activity Log plugin
- New field in Woocommerce checkout page let customers add the own telegram nickname
- Low Stock Product notifications when a product is low stock conditions.
- Shows Telegram Nick link in admin order details page when present
- When receive new forms (supports Elementor Pro Form, WPForm , CF7 and Ninjaform)
- When new user subscribes or unsubscribes to mailchimp. MC4WP integration
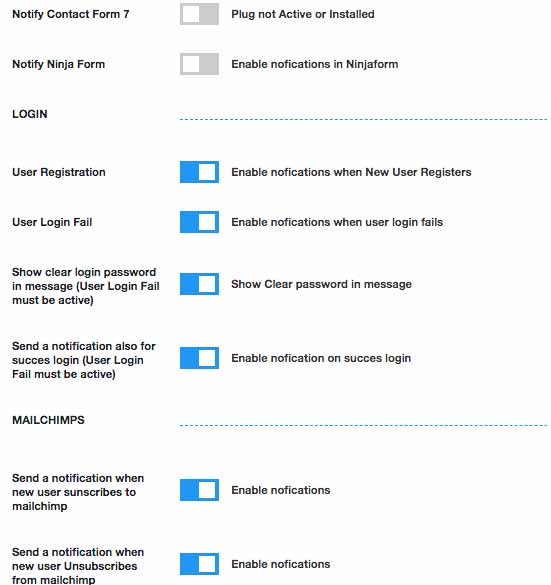
- When new user registers. Helps identify unauthorized or suspicious registrations.
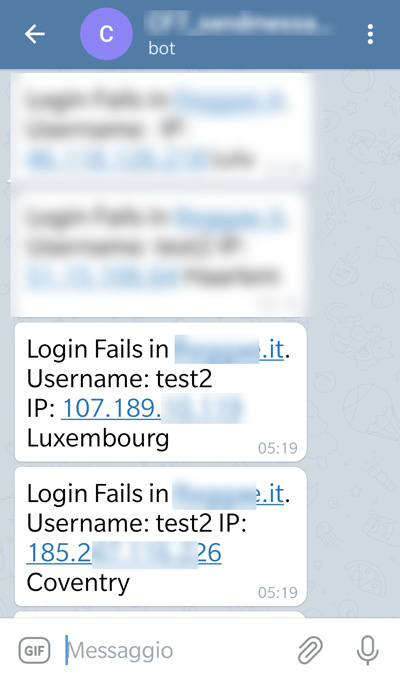
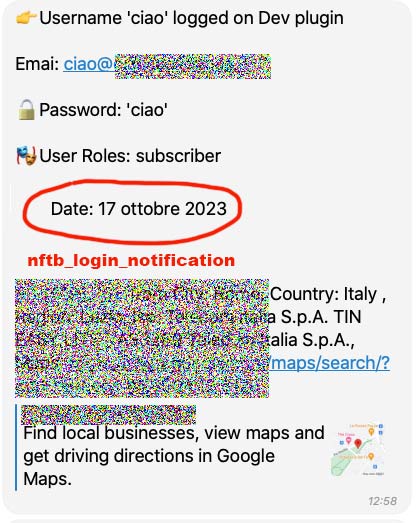
- When users login or fail login.
- When new comment is posted.
- When someone adds or remove a product in the Woocommerce cart.
- When a new Pending posts is received. (works with any post type)
- Say function to speak to make the bot say Something to the people
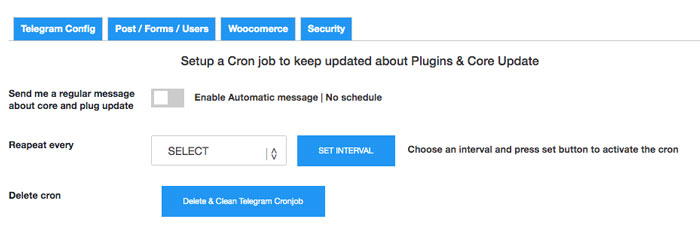
- Cron job detect and notify when Plugins & Core need to update.
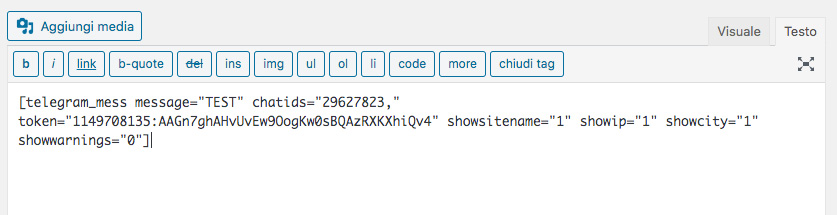
- Send custom message with Shortcode anywhere in your WP.
- Should Work on Multisite
- @get_id_bot — send /start and it will reply with your personal Chat ID
- @RawDataBot — send any message and it will return your full account info including your ID
安装:
- Upload the plugin files to the
/wp-content/plugins/plugin-namedirectory, or install the plugin through the WordPress plugins screen directly. - Activate the plugin through the 'Plugins' screen in WordPress
- Use the Settings->Plugin Name screen to configure the plugin
- (Make your instructions match the desired user flow for activating and installing your plugin. Include any steps that might be needed for explanatory purposes)
屏幕截图:
常见问题:
How do I obtain a Telegram Bot Token?
When you create a Telegram bot, BotFather generates a unique token for you. BotFather (@botfather) is the official Telegram bot for creating and managing bots — search for it directly inside Telegram. Creating a new bot
- Open Telegram and search for @botfather.
- Send the command /newbot.
- BotFather will ask you for two things:
- Name — the display name shown in contact details and conversations (e.g. "My Awesome Bot").
- Username — a short unique handle used in mentions and t.me links (e.g. @my_awesome_bot). Usernames must be 5–32 characters long, can only contain Latin letters, numbers and underscores, and must end in "bot".
- Once created, BotFather will provide your authorization token.
How do I find my personal Telegram Chat ID?
There are two quick ways:
- Search for @userinfobot or @get_id_bot on Telegram, send /start and the bot will instantly reply with your numeric user ID (e.g. 29627823).
- Search for @RawDataBot (https://t.me/RawDataBot), send any message, and it will reply with your full account info including your ID.
How do I find the Chat ID of a group?
- Add your bot to the group as a member.
- Send any message in the group (or type /start@yourbotname).
- Open the following URL in your browser, replacing with your bot token: https://api.telegram.org/bot/getUpdates
- Look for the "chat" object in the JSON response — the "id" field is your group Chat ID. Group IDs are always negative numbers (e.g. -1001234567890).
How do I find the Chat ID of a channel?
- Add your bot to the channel and assign it Administrator privileges.
- Post any message in the channel.
- Open the following URL in your browser: https://api.telegram.org/bot/getUpdates
- Find the "chat" object in the JSON — the "id" is your channel Chat ID. Channel IDs always start with -100 (e.g. -1009876543210).
Is there a universal method that works for users, groups and channels?
Yes. Add @RawDataBot (https://t.me/RawDataBot) to your group or channel (as admin), or simply message it privately. Send any message and it will reply with a full JSON breakdown of the chat, including the exact Chat ID you need.
My getUpdates response is empty — what should I do?
This usually means no messages have been sent to the bot recently. Try the following:
- Make sure the bot has been added to the chat.
- Send a new message in the chat (or write directly to the bot in a private conversation).
- Reload the getUpdates URL in your browser. If the response is still empty, check that no other application is consuming the bot updates (e.g. a webhook that is already set — in that case you need to delete it first via /deleteWebhook).
Can i insert more than one recipient chatid?
Yes you can add more than one chattid separated by a comma (,) both in option page and in the shortcode.
Does this plugin support AI agents and MCP?
Yes! Starting from version 3.5, this plugin supports the WordPress Abilities API and is compatible with MCP (Model Context Protocol), the open standard that allows AI agents like Claude, ChatGPT, and others to interact with WordPress autonomously.
What do I need to enable MCP support?
You need to install two additional free plugins:
- Abilities API — github.com/WordPress/abilities-api/releases
- MCP Adapter — github.com/WordPress/mcp-adapter/releases Once both are active, the "Send Telegram Message" ability is automatically available to any authorized AI agent. No extra configuration needed.
How does an AI agent authenticate?
Via WordPress Application Passwords — go to Users → Your Profile → Application Passwords, create one, and use it in your MCP client configuration. Your main password is never exposed.
What can an AI agent do with this plugin?
An authorized AI agent can:
- Send a Telegram message with custom text
- Include an optional inline button with label and URL
- Target a specific Telegram chat ID, overriding the default
How can I test the MCP integration without an AI?
You can test everything for free using curl from your terminal. First, make sure the plugin is configured and the built-in "Send Test Message" button works correctly in the plugin settings. Then run these commands in order: Step 1 — Initialize the session and get the Session ID: curl -X POST "https://YOURSITE.com/wp-json/nftb-telegram/mcp" \ -H "Content-Type: application/json" \ -u "ADMIN:APP_PASSWORD" \ -D - \ -d '{"jsonrpc":"2.0","id":1,"method":"initialize","params":{"protocolVersion":"2024-11-05","capabilities":{},"clientInfo":{"name":"test","version":"1.0"}}}' Look for the Mcp-Session-Id value in the response headers and copy it. Step 2 — Verify the tool is available: curl -X POST "https://YOURSITE.com/wp-json/nftb-telegram/mcp" \ -H "Content-Type: application/json" \ -H "Mcp-Session-Id: YOUR-SESSION-ID" \ -u "ADMIN:APP_PASSWORD" \ -d '{"jsonrpc":"2.0","id":2,"method":"tools/list","params":{}}' You should see "notification-for-telegram-send-message" in the response. Step 3 — Send a real Telegram message via MCP: curl -X POST "https://YOURSITE.com/wp-json/nftb-telegram/mcp" \ -H "Content-Type: application/json" \ -H "Mcp-Session-Id: YOUR-SESSION-ID" \ -u "ADMIN:APP_PASSWORD" \ -d '{"jsonrpc":"2.0","id":3,"method":"tools/call","params":{"name":"notification-for-telegram-send-message","arguments":{"message":"🤖 MCP is working!"}}}' If the message arrives in your Telegram chat — everything is working correctly. APP_PASSWORD = a WordPress Application Password (Users → Your Profile → Application Passwords).
Is MCP support stable?
This feature is currently experimental. We welcome feedback and bug reports — if you test it, please leave a review or open an issue on the plugin's GitHub page.
Where can I find the MCP endpoint?
Once the required plugins are installed, your MCP endpoint will be available at: https://yoursite.com/wp-json/nftb-telegram/mcp
Can I send Telegram messages from my own plugin?
Yes! Notification for Telegram exposes a dedicated action hook so any third-party plugin can send messages without calling internal functions directly.
Basic usage:
do_action( 'nftb_send_message', 'Your message here' );
With an inline button link:
do_action( 'nftb_send_message', 'New order received!', 'View Order', 'https://yoursite.com/order/123' );
With a custom Chat ID:
do_action( 'nftb_send_message', 'Your message', '', '', '123456789' );
Parameters:
$message— (string) required — the text to send$urlname— (string) optional — label of the inline button$urllink— (string) optional — URL of the inline button$chatid— (string) optional — override the default Chat ID from settings Always check the plugin is active before using the hook:if ( is_plugin_active( 'notification-for-telegram/index.php' ) ) { do_action( 'nftb_send_message', 'Hello from my plugin!' ); }
更新日志:
- Security: Removed unused file nftncron.php which contained potential authorization bypass vulnerability (file was not loaded by the plugin)
- WPForms Pro/Elite compatibility — notifications now should work with both Lite and Pro/Elite versions.
- Security fix: Resolved a stored XSS vulnerability affecting the admin order page by properly escaping Telegram username output and improving input validation.
- Security fix: Resolved CSRF vulnerability and insufficient authorization on AJAX handlers nftb_cron_action and nftb_cron_action_set.
- Security fix: Thanx to Nguyen Ba Khanh, Ahmad and Nguyen Xuan Chien.
- Security fix: Resolved CSRF vulnerability in admin notice dismiss handler by adding nonce verification.
- Added nftb_send_message action hook to allow third-party plugins to send Telegram messages.
- Correct Small typos errors in options page thx @daymobrew
- Removed: Cron scheduler UI and automatic update notification feature - other plugins do it better!
- Code Cleaning
- Fixed CF7 now hides empty fields
- Added: MCP (Model Context Protocol) compatibility
- Added: WordPress Abilities API integration
- AI agents can now send Telegram notifications autonomously
- Fixed PHP 8.2+ deprecation warning on Plugin Option Page. Deprecated: Creation of dynamic property nftb_TelegramNotify::$telegram_notify_options_tab
- We've integrated real-time Telegram notifications with the WP Activity Log plugin, allowing you to receive instant alerts for all WordPress activity directly in your Telegram messenger. Notifications display complete, expanded event objects with all available metadata. Ensure WP Activity Log plugin is active and remember to enable notification for WP Activity Log in option page "Post / Forms / User"
- Added a new feature Backtrace that captures the origin of every new user registration. The system now includes the file name and line number from which the registration was triggered, providing full traceability for debugging and security audits. This information is sent when a new user registers.
- Added Option in "Post/Form/User" Tab, "Disable Backtrace for User Registration" , to disable the Backtrace info in the new user registers notification.
- Added product sku in the notification when a product is added to the cart (maxivillus request)
- Added product sku in the notification when a product is removed fromn the cart (maxivillus request)
- Added option to hide the product list in notification messages and display only the item count. (mouring request)
- Removed ver stripping from asset URLs for better cache handling and plugin compatibility.
- Better logic to add the minimal CSS when main CSS is disable
- Added a minimal CSS when main CSS is disabled
- Added support for Surecart Webhook Endpoint and some events [Beta]: refund.created, refund.succeeded, order.cancelled, order.voided , variant.stock_adjusted , order.fulfilled. order.unfulfilled
- added function to hide Surecart Tab if the plugin in is not Active o installed
- Updated CSS to use
.telegram-notify-pageprefix for all styles to prevent conflicts with other plugins and themes (e.g., Elementor). - Added: New button in the "Telegram Config" tab to disable plugin CSS loading, preventing conflicts with other themes or plugins (e.g., Elementor).
- Removed Bootstrap dependency to reduce plugin footprint and avoid potential conflicts in the WordPress admin area.
- Added order support for Surecart
- Support for translating Telegram messages using WPML and Loco Translate. Now all notification messages can be fully localized
- Fix nftb_new_order_id_for_notification_ ( flag to understand if the order notification is already sent) in wp_options autoload to "Off" to save memory on sites with many orders.
- Added a check to modify the existing options in wp_options to "off".
- Fix Uncaught TypeError: array_merge(): Ninja Forms (3.8.17 and 3.8.23 ) PHP > 8 thx @scratchycat
- Added option to hide the "EDIT ORDER" link in the WooCommerce order confirmation message.
- Added the ability to exclude some CF7 forms by ID from notifications
- Fixed Warning: Undefined array key “nftb_ignore_notyyy”
- Restrict admin Notice ONLY for Admin
- Fix unauthorized test message sending due to a missing capability (thx Wordfence)
- Added html_entity_decode to clean HTML entity
- fix check if user is set before apply_filters('nftb_login_notification')
- Fix in user login sometimes the userdata was empty
- Fix Warning: Undefined array key "notify_update" "notify_update_time" php > 8
- Fix on apply_filters('nftb_existing_user_* return empty if not set
- Added User Role info in the message when a registered user fails to login
- Added Spam Filter on comment. If enabled you will not receive notification if comment is marked as spam
- Fix: "Wc order change status" was triggering the comment notification remove order_shop post type.
- Small fixes on user message formatting CR
- Removed all the calls to Extarnal plugin activator & link to webpage
- Added notification for new comment
- Added Succes User Login notification
- Added donation link to block the random message "Im really happy you are using my plugin !!".
- Added a notification for removed products from cart.
- Added Customer Order Note from Wc checkout page.
- Added Option "Do not Remove from the telegram messages".
- Added IP address for any User Login Notification not just the map
- Fix Enable notifications when user login fails.
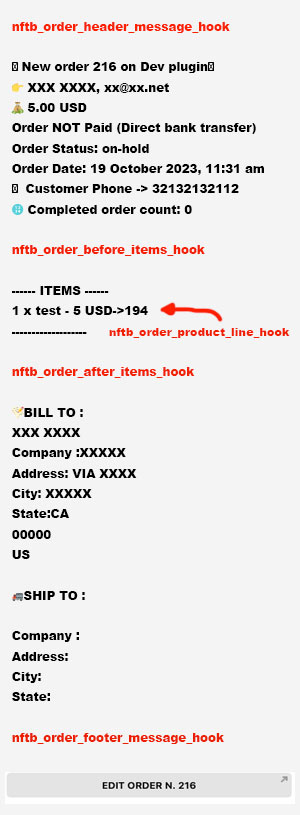
- Added 4 REAL WOOCOMERCE notification HOOKS : nftb_order_product_line_hook, nftb_order_header_message_hook, nftb_order_before_items_hook, nftb_order_after_items_hook, nftb_order_footer_message_hook .
- Added 4 REAL USER LOGIN notification HOOKS nftb_login_notification, nftb_user_registered_notification , nftb_existing_user_fails_login_notification, nftb_unknown_user_fails_login_notification
- Added $item to the function -> nftb_order_product_line($product_id,$item); (wsjrcatarri request)
- Added Support for Elementor Form
- User Login notification new Layout more clear
- Fix Function get_userdatabylogin (deprecated) on User login
- Better Jquery validations ( token and chatids ) on config page
- Fixed Shortcode
- Fixed Many Notice on woocommerce order confirmation Thankyou page.
- Added customer total orders number in order confirmation message.
- Added Customer Phone Number in order message (Everybody Asking :=) )
- Formatted fields for CF7 Contact Form no more Var_dump()
- Added 3 Hooks in Order notification to add your custom code without modify plugin code
- Updated instructions to get your telegram chat_id number
- Added Support for WPFORM : all fields in you telegram notification
- New Option in Woocommerce Tab : Hide/view Billing Information
- New Option in Woocommerce Tab : Hide/view Shipping Information
- Small UI fix
- Fix warning on PHP 8
- New option to select the woocommerce trigger for the notification with 3 different actions: woocommerce_checkout_order_processed / woocommerce_payment_complete / woocommerce_thankyou
- Show items price with tax or not
- Fixed activation notice error
- New Backend UserGUI Tab division for better User Experience
- Full fields Order Notification (Items shipment, billing, is paid?, and many order details)
- Low Stock Product Enable notifications when a product is low stock conditions.
- Create a input field in wc check-out page for Telegram nickname.
- Say function to speak to make the bot say Something to the people
- MC4WP Mailchimp for WordPress plugin integration send a notification when new user subscribes to mailchimp or unsubscribes
- Cron message Setup a Cron job to keep updated about Plugins & Core Update
- Added Emoji to messages
- now you can enable a new field in Woocommerce checkout page let customers add his telegram nickname
- Fix new order received and Order status change No duplication now !!
- Fix message text in shortcode was blank before
- Add new option on woocommerce notification : only on new orders or on any order status change
- add icons
- Initial release