Thanks to this plugin you can add to your website the following features:
- Live Chat
- Contact Form
- Click to Call
- Ticket System
- Feedback
- Guestbook
The secret to success in a business are satisfied customers. With our tools integrated into one platform you will be able to manage your Customer Service easily and efficiently. With this plugin you can login to the Support Panel directly from the WordPress admin panel. It also lets you publish features such as Live Chat, Click to Call, Ticket System, Feedback, Contact Form and Guestbook on your website in a more convenient way.
You can contact us at any time to get support, leave feedback, request feature or functionality:
- On our website: www.ofeatures.com
- Via Skype: ofeatures.support
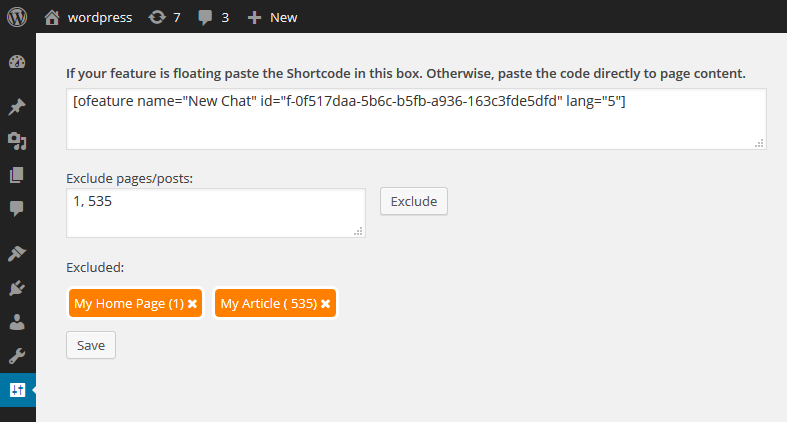
After installing this plugin, a Support Panel button will be added to the left side menu. When you click on it you can log into your oFeatures account and manage requests. In plugin configuration you can make the selected feature appear on every page of your website. If you would like a feature to be only on one of your pages, all you need to do is paste the Shortcode directly to page content.
How to enhance and manage your customer service easily and efficiently with oFeatures
[youtube
http://www.youtube.com/watch?v=j71_3yxS1Fg&rel=0&showinfo=0]
Chat in less than 5 minutes with oFeatures
[youtube
http://www.youtube.com/watch?v=CBszdc1pHs0&rel=0&showinfo=0]
How to use oFeatures WordPress plugin
[youtube
http://www.youtube.com/watch?v=8uGVVhcfioM&rel=0&showinfo=0]
Features
- Multi-language support - You can create translations for your features to many languages. For example you may have the Chat feature (or Click to Call, Ticket System, Feedback, Contact Form and Guestbook) on your website in English, French, Japanese and others.
- Mobile friendly - You and your customer service team members are able to support your customers using mobile devices such as smartphones or tablets from anywhere in the world. Respond to chat messages as well as support tickets, Guestbook comments, feedback messages and any other requests quickly and easily, even if you are not at your computer.
- Access rights control - You can decide whether users of your account have access to the whole system (as you do) or just to the Support Panel, so that they can help your customers.
- Automatically assigned requests based on availability and language skills - If you have customers for example from Germany and USA, but only one of your Support Team members knows the German language, you can put this information into the system. Your customers from Germany will be automatically assigned to the German-speaking employee after sending a chat request for example.
- Time zone support - You and your employees may work from any place in the world and use your local time
- Style customization - There is an option of changing the skin, color scheme, shape, size and many others. This style customization helps in matching your features such as chat, guestbook, feedback or call me back to your website.
- Statistics - Thanks to statistics you have control on your Support System. Among others, in Statistics you can find the load of your Customer Support Team members which can help you decide on employment. You can see which Support Team member responded to the most requests related to features such as live chat, issue tracking system or call me back.
- Animations - Thanks to animations, user experience can be improved significantly. Animations are used to modify the way your feature appears on your webpage. Choose from many different options that can fade-in or fly-in your feature. There are many other fun animations such as bounce or back. They can be applied to all features: chat, contact form, call me back, support ticket system, guestbook and feedback.
- Canned responses - Canned responses are ready to use messages. While writing in Chat for example, you can click on a canned response and send it to your visitor/customer without having to type anything. Examples: Hello, how can I help you?, Thank you for contacting our Customer Support., Have a great day! You can also use them in features such as contact form and support ticket system.
- Sound notifications - Whenever you get a chat message, a support ticket, call me back request, feedback message or any other request, you will receive a sound notification from the support panel. Even if you aren’t in front of your computer, but somewhere near, you will hear the chat, call me back and feedback message requests.
- Requests history - In the support panel you can browse all past requests from features such as feedback, guestbook, and contact form from your customers and the history of the selected request. If you’d like to review an old chat conversation or a past support ticket for example, simply check the history where everything is stored.
- Branding - You can adjust the mailing content and set your company logo for selected features. Some of the places where branding will be shown is an offline chat message and support ticket request.
- Advanced style CSS customization - If you want to have a customized style for a feature you can do that by using the convenient CSS editor with syntax highlighting and live (instant) preview. The basic way of adjusting the feature appearance allows you to customize it in many ways, but if you would like to fully change the look of call me back or feedback for example, you can do this by using the CSS editor. If your website color scheme is orange for example, you can adjust any feature such as chat to exactly match your website.
- Built-in video tutorials - Once you login to the system you will have access to video tutorials on how to use oFeatures so the usage and learning process is very easy. There are video tutorials of how to add chat in 5 mins, how to improve your customer service with oFeatures, How to use the Support Panel, How to edit translations of your features (such as Live Chat, Click to Call, Ticket System, Feedback, Contact Form and Guestbook, and many more).
Live chat
Chatting is a very popular form of communication. By adding live chat to your website you will be able to chat with your customers in real-time. Chat with any customers around the world. Even if you are offline, visitors/customers can contact you through offline chat contact form. Customers may also send the chat conversation transcript to their e-mail. Once the chat is finished, they can send a rating and message with their opinion of how they liked the chat conversation. Our chat is one of the best chats available.
* How To Use
Once you are logged into the Support Panel, on the left hand side there is a tab with Chat requests, in which you will see all chats. When you open the Support Panel, the chat dialogue box will appear with all active chats. You can talk with your visitors in the dialogue box or assign the chat to another user. In the first column you can see the chat conversation by clicking the chat icon. In case the chat is offline, you can reply to the chat request and see more details. Among others, details include when the chat conversation started and ended, customer e-mail, feedback satisfaction and comment, whether the chat is offline or not, language and assigned user. In the next column you will see the user assigned to the chosen chat request. The third column shows when the chat conversation started. There is an option to mark the chat conversation as ended by clicking "Mark as ended". Lastly, you can check the duration of the chat conversation and easily view the history of the request by clicking the "Request History" button.
In "Basic Settings" of the live chat, enabled responsiveness makes sure that the live chat looks good on mobile as well as on desktop devices. You can decide whether the chat is active or not. If your live chat is inactive more than 3 days in a month, your account will not be charged for the given month. Display mode gives you the possibility of changing the way your Real-time Chat will be shown on your website - it can be in a button or form mode. On the bottom right hand corner, there is a preview of your chat. In "Chat Settings" you can establish your working hours in which users can send you chat requests. If someone tries to chat with you out of the working hours, they will be shown the offline chat contact form. There is an option to upload a company logo, which will be viewed by your customer during the chat conversation. Branding will be shown in the further conversation on the offline chat form. Style setting are available in the "Theme" tab. Choose from a list of 13 predefined themes to match the Real-time Chat to your website style. More customizing of the live chat feature is available through the CSS editor. For customers that live internationally, changing language settings is possible. You can add an unlimited amount of language version for live chat. Go to the "Team" tab to determine which employee has the option of answering chat requests from customers/visitors. In the "About" tab you can check your monthly cost of live chat.
Support Ticket System
The Support Ticket System allows you to create, update and resolve reported customer issues.The ticket may be created by a customer or for a customer by one of the Support Team members.
Once you are logged into the Support Panel on the left hand side you will see a tab with Support Ticket System requests, in which you will see all issues. In the first column there will be your customer e-mail. Right next to it is the issue that your customer has sent to you through the support ticket system feature. There are three buttons labeled "Customer", "Subject" and "Phone". After mousing over them you will have a preview of the details. In the next section you can reply to the issue, see more details or change the status of the support ticket to "opened", "resolved" or "not resolved". You also have the possibility of creating a Ticket for a customer by clicking "Create Ticket". To do this, you fill out a form with a subject, the customer’s name, phone number and e-mail (but only e-mail address is required). You will also add a message visible to the customer and choose their language from a drop down menu. You can assign the ticket to yourself, but there is also an option to leave the checkbox empty. In this case, the system will assign the ticket to the Support Team Member with the lowest load.
You can decide whether the incident tracking feature is active or not by checking a checkbox in the "Basic Settings" tab. You can also turn the responsiveness of the support ticket on or off. It’s job is to make sure that Support Ticket labels and notifications look in order on every device. If your Ticketing System System is inactive for less than 3 days in a month, your account will not be charged for the given month. Display mode gives you the possibility of changing the way your Ticketing System will be shown on your website-it can be in a button or form mode. In Support Ticket System Settings there is an option to upload a company logo, which will be viewed by your customer. Branding will be shown in the further support ticket conversation. You can also decide if you would like to ask customers for name, phone number and subject. In the "Themes" tab, there is a list of 13 predefined styles that you can modify by using the CSS editor, by which matching the Ticketing System to your website layout and color is easier. You can add an unlimited amount of language version for the issue tracking system. Go to the "Team" tab to determine which employee has the option of answering support ticket requests of customers/visitors. In the "About" tab you can check your monthly cost of Ticketing System.
Feedback Button
The feedback feature allows website visitors/viewers to leave you a rating and message/comment. This feature includes a 5 star rating in which you can modify the labels. Customers have a contribution on what they like in your website/services as well as what is negative or what they don’t enjoy. By receiving this kind of information in Feedback, you will know what your customers expect. This way you can modify your website to be the best it can be due to customer input through the feedback feature. Feedback opinions are always valued.
Once you are logged into the support panel you will see all your alerts - also ones related to Feedback. On the left hand side there will be a tab with Feedback requests, in which you will see all messages and ratings. Your 1-5 star score will be shown in the 1st column. In the next section you can see more details and change the status of the Feedback to "reviewed" or "not reviewed". In details you can find Score, Feedback comment, Customer language, Date, Request id, Feedback ID and Visitor IP. A feedback request is automatically assigned to a user, but the assignment can be changed by clicking on the pencil icon. The time and date of when the feedback request was sent will be shown in the time of your time zone. You can easily view the history of the feedback request by clicking the "Request History" button.
Call Me Back
When website visitors prefer to speak than write, call me back is an excellent solution. All they need to do is enter their phone number and optionally a name and time in which they would like to be contacted into the call me back form. Your client/website visitor can use this click to call feature to request a phone call from you. You know exactly when to get in touch with them and what they want to speak about. They have an option to leave a message and a time in which is best to contact them. Call me back helps improve communication. Call me back requests are automatically assigned to users based on their availability and whether they are assigned to the call me back or not.
With this plugin you can login to the Support Panel directly from the WordPress admin panel.
After installing this plugin, a Support Panel button will be added to the left side menu. When you click on it you can log into your oFeatures account and manage requests. Once you are logged into the Support Panel you will see all your alerts. On the left hand side there will be a tab with Call Me Back requests. By clicking on it you will be taken to the call me back requests. There you will see all actions concerning call me back. There is a column with the customers phone number and name. You can add internal notes and view more details about the click to call request. There’s a possibility to change the status of the call me back feature as well from "new", "called" and "not called". A call me back request is automatically assigned to a user, but this can be easily changed by clicking the pencil icon. The time and date of when the call me back request was sent is shown in the "Date" column. You have an option of viewing the whole click to call request history from when it was sent up to now. You can change a request status of a single call me back request or many chosen ones with the help of checkboxes. You can mark all call me back requests as called, new or not called by checking them. To search for a call me back request, there is a filter drop down menu. You can filter call me back requests by new, called, not called, date and id.
Guestbook
The visitor will be able to leave a guestbook comment or entry on the given website. Viewers will be able to see what others wrote about your website products or services. Thanks to the guestbook future potential clients can rate your services as well by reading the comments of others.
Once you are logged into the support panel you will see all your alerts. On the left hand side there will be a tab with Guestbook requests, in which you will see comments. There is a column with a nickname and another one with the comment content. By clicking the details button you will see specifics of the guestbook comment. You will have the option of changing the status of the guestbook comment from approved or not approved. If it is not approved, the guest log comment will not appear on your website. A request is automatically assigned to a user based on language skills and current request load, but this can be easily changed by clicking on the pencil icon. The time and date of when the guest log request was sent will be shown in the time of your time zone. You can easily view the history of the guestbook request by clicking the guestbook’s "Request History" button.
Contact Form
Contact Form is a valuable way for customers to get in touch with you. Visitors can contact you via contact form with a question, suggestion or any other subject. After the customer sends you a contact request, they will also be sent a link that enables further conversing about an issue or topic. Contact form includes: subject, e-mail, name, phone number and message, some of them, for example phone number, can be modified or removed.
Once you are logged into the Support Panel you will see all your alerts. Here you can click on the "Go to" button to go the request. On the left hand side there will also be a tab with Contact Form requests, in which you will see all inquiries and contact form requests. In the first column will be your customer’s e-mail. Right next to it is the message that your customer has sent to you. There are two buttons labeled "subject and customer". After mousing over them you will have a preview of the details. In the next section you can reply to the contact form request, see more details or change the status of the contact form request to "new", "answered" or "not answered".
In Contact Form settings there is an option to upload a company logo, which will be viewed by your customer in the further contact form conversations. You can also decide if you would like to ask customers for their name, phone number and/or subject.
In "Basic Settings" tab, among others, you can enable responsiveness to make sure that the contact form labels and notifications look in order regardless of the device type. If your Contact Form is inactive for less than 3 days in a month, your account will not be charged for the given month. You can decide whether the contact form feature is active or not by using an "Active" checkbox.
In the "Theme" tab you can choose from a list of predefined themes, from light to dark colors. Adjust the theme of the contact form to match your website style. You can further edit it using the CSS editor, but this is not required. Fully edit labels and notifications in "Languages" tab. You can add an unlimited amount of language version for Contact Form. Go to the "Team" tab to determine which employee has the option of answering contact form requests of visitors. In the "About" tab you can check your monthly cost of Contact Form and change the pricing plan from standard, if the current one is little.
Examples of usage
Below you can find example sets of features that can be used in your company.
For Online stores we offer the following features: Chat - which is a “must have” for every e-shop, Call Me Back, Feedback as well as Contact Form
A necessary tool with managing service reports is the Support Ticket System (issue tracking system). Additionally, Click to Call, Chat and Contact Form will also be helpful.
- Restaurant/bar/pub/pizzeria
To make use of customer’s opinions to promote a restaurant in an easy and simple way, the Guestbook feature is a necessary tool. Additionally, we suggest Click To Call, Chat, Feedback and Contact Form.
In this case, the basics will be Click To Call, Support Ticket System, Feedback and Contact Form.
An ideal option for a flower shop would be features such as Feedback, Call Me Back and Guestbook. This would be helpful in answering all inquiries and getting a rating on your flower shop.
The most important features for a hair salon would be the Guestbook and Feedback features. Opinions and ratings on these services would encourage other customers to visit your salon.