
Official Easymailing
| 开发者 | easymailing |
|---|---|
| 更新时间 | 2026年6月1日 15:54 |
| 捐献地址: | 去捐款 |
| PHP版本: | 7.1 及以上 |
| WordPress版本: | 7.0 |
| 版权: | GPL 2+ |
| 版权网址: | 版权信息 |
详情介绍:
This plugin allows you to add subscription forms created in Easymailing within your WordPress website. You can grow your audience in a simple way, and now with Elementor integration, it's even easier to create beautiful subscription forms.
Email and SMS contacts
Easymailing contacts can now be synchronized with email, phone, first name, and last name when the connected form or WooCommerce checkout provides those fields. Phone-only contacts are supported where the Easymailing API allows them.
New WooCommerce Integration!
With the latest version, you can now synchronize your WooCommerce store with Easymailing. This includes:
- Syncing your orders, products, categories, and customers with Easymailing.
- Tracking orders made on your WordPress site when sending email marketing campaigns.
- Syncing customer phone numbers when they can be normalized with country information.
- Optional country-aware phone validation in the WooCommerce checkout for stores using SMS.
- Automatically syncing customers as contacts in Easymailing when they:
- Place an order
- Register on your site
- Update their details in their WooCommerce account area New Fluent Forms Integration! Easymailing now integrates directly with Fluent Forms. You can easily add Easymailing as an action after submit in your Fluent Forms forms. With this integration you can:
- Select the Easymailing audience in the feed settings.
- Map groups and custom fields from Easymailing to your form fields.
- Automatically send subscribers to Easymailing when sending forms. To configure the plugin, you need an API key, which you can get from the Easymailing control panel under "Configuration" > "API key."
安装:
Method 1
- Login to your WordPress admin panel.
- Open Plugins in the left sidebar, click Add New, and search for the Easymailing plugin.
- Install the plugin and activate it.
- Download the Easymailing plugin.
- Unzip the downloaded file and upload it to your /wp-content/plugins/ folder.
- Activate the plugin in the WordPress admin panel.
- After successful installation, you will see the Easymailing icon on the left sidebar. Click it.
- Enter your Easymailing API key.
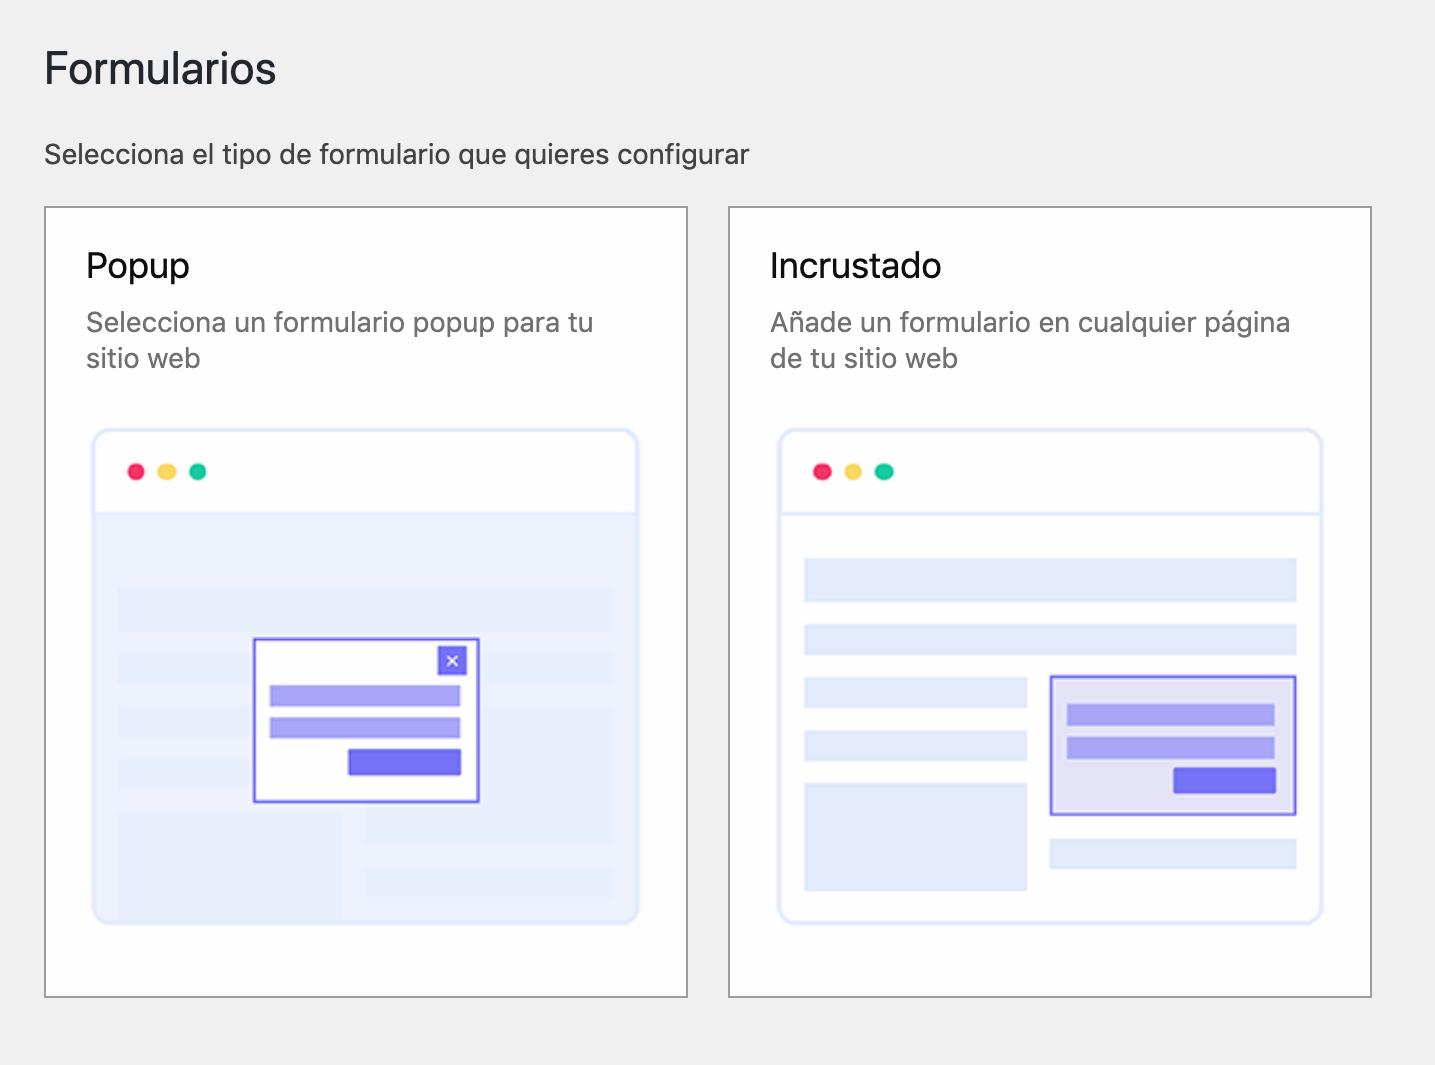
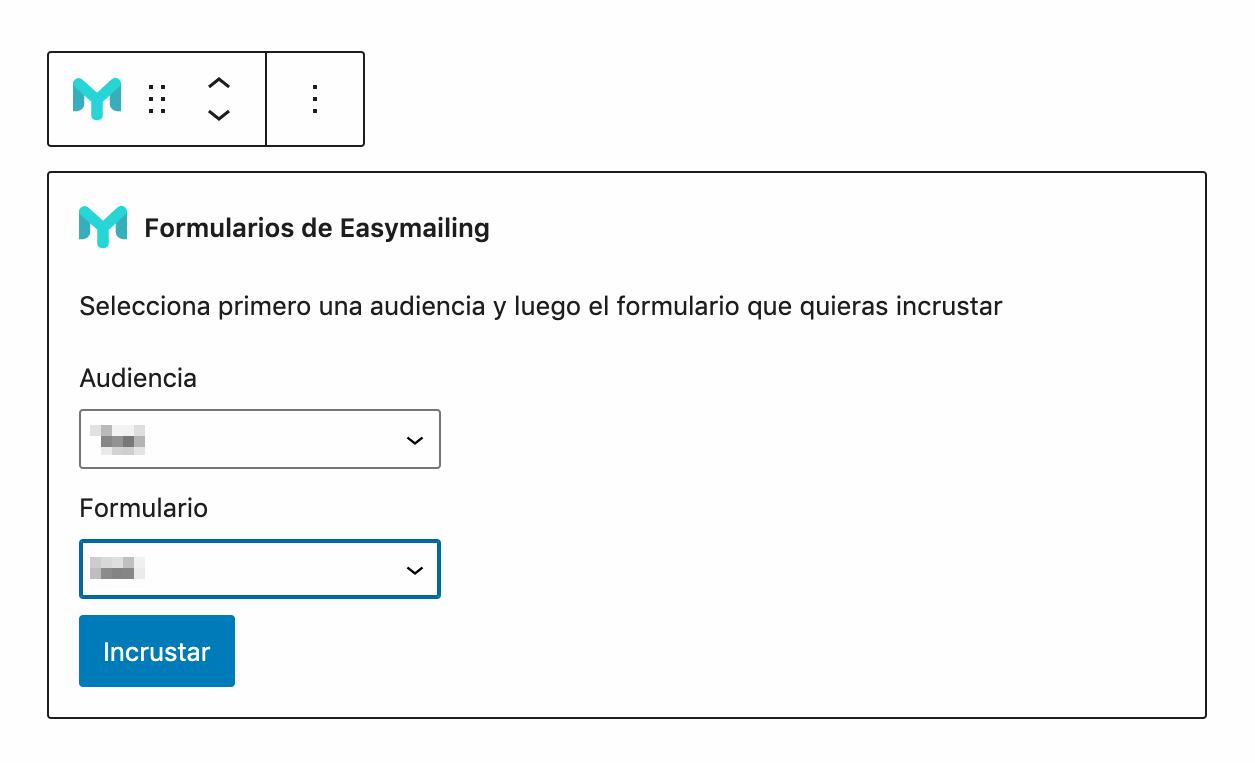
- Click "Forms" on the left sidebar to start adding your subscription forms to posts and pages. You can also choose the popup form for your site .
- After successful installation, you will see the Easymailing icon on the left sidebar. Click it.
- Enter your Easymailing API key.
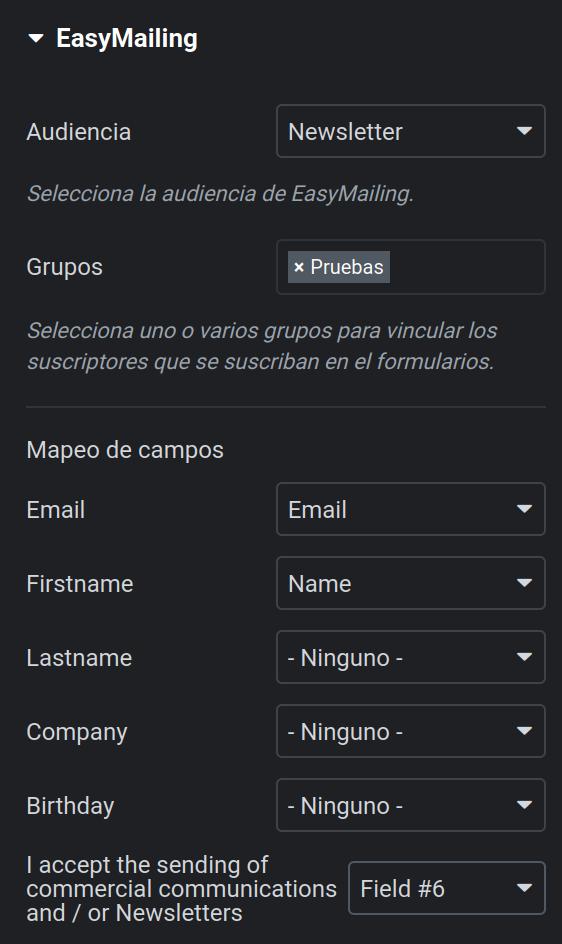
- Build your form in elementor adding a form widget
- Add action "EasyMailing" in "Action After Submit" section
- Choose "EasyMailing" section and setup audience, groups and map custom fields
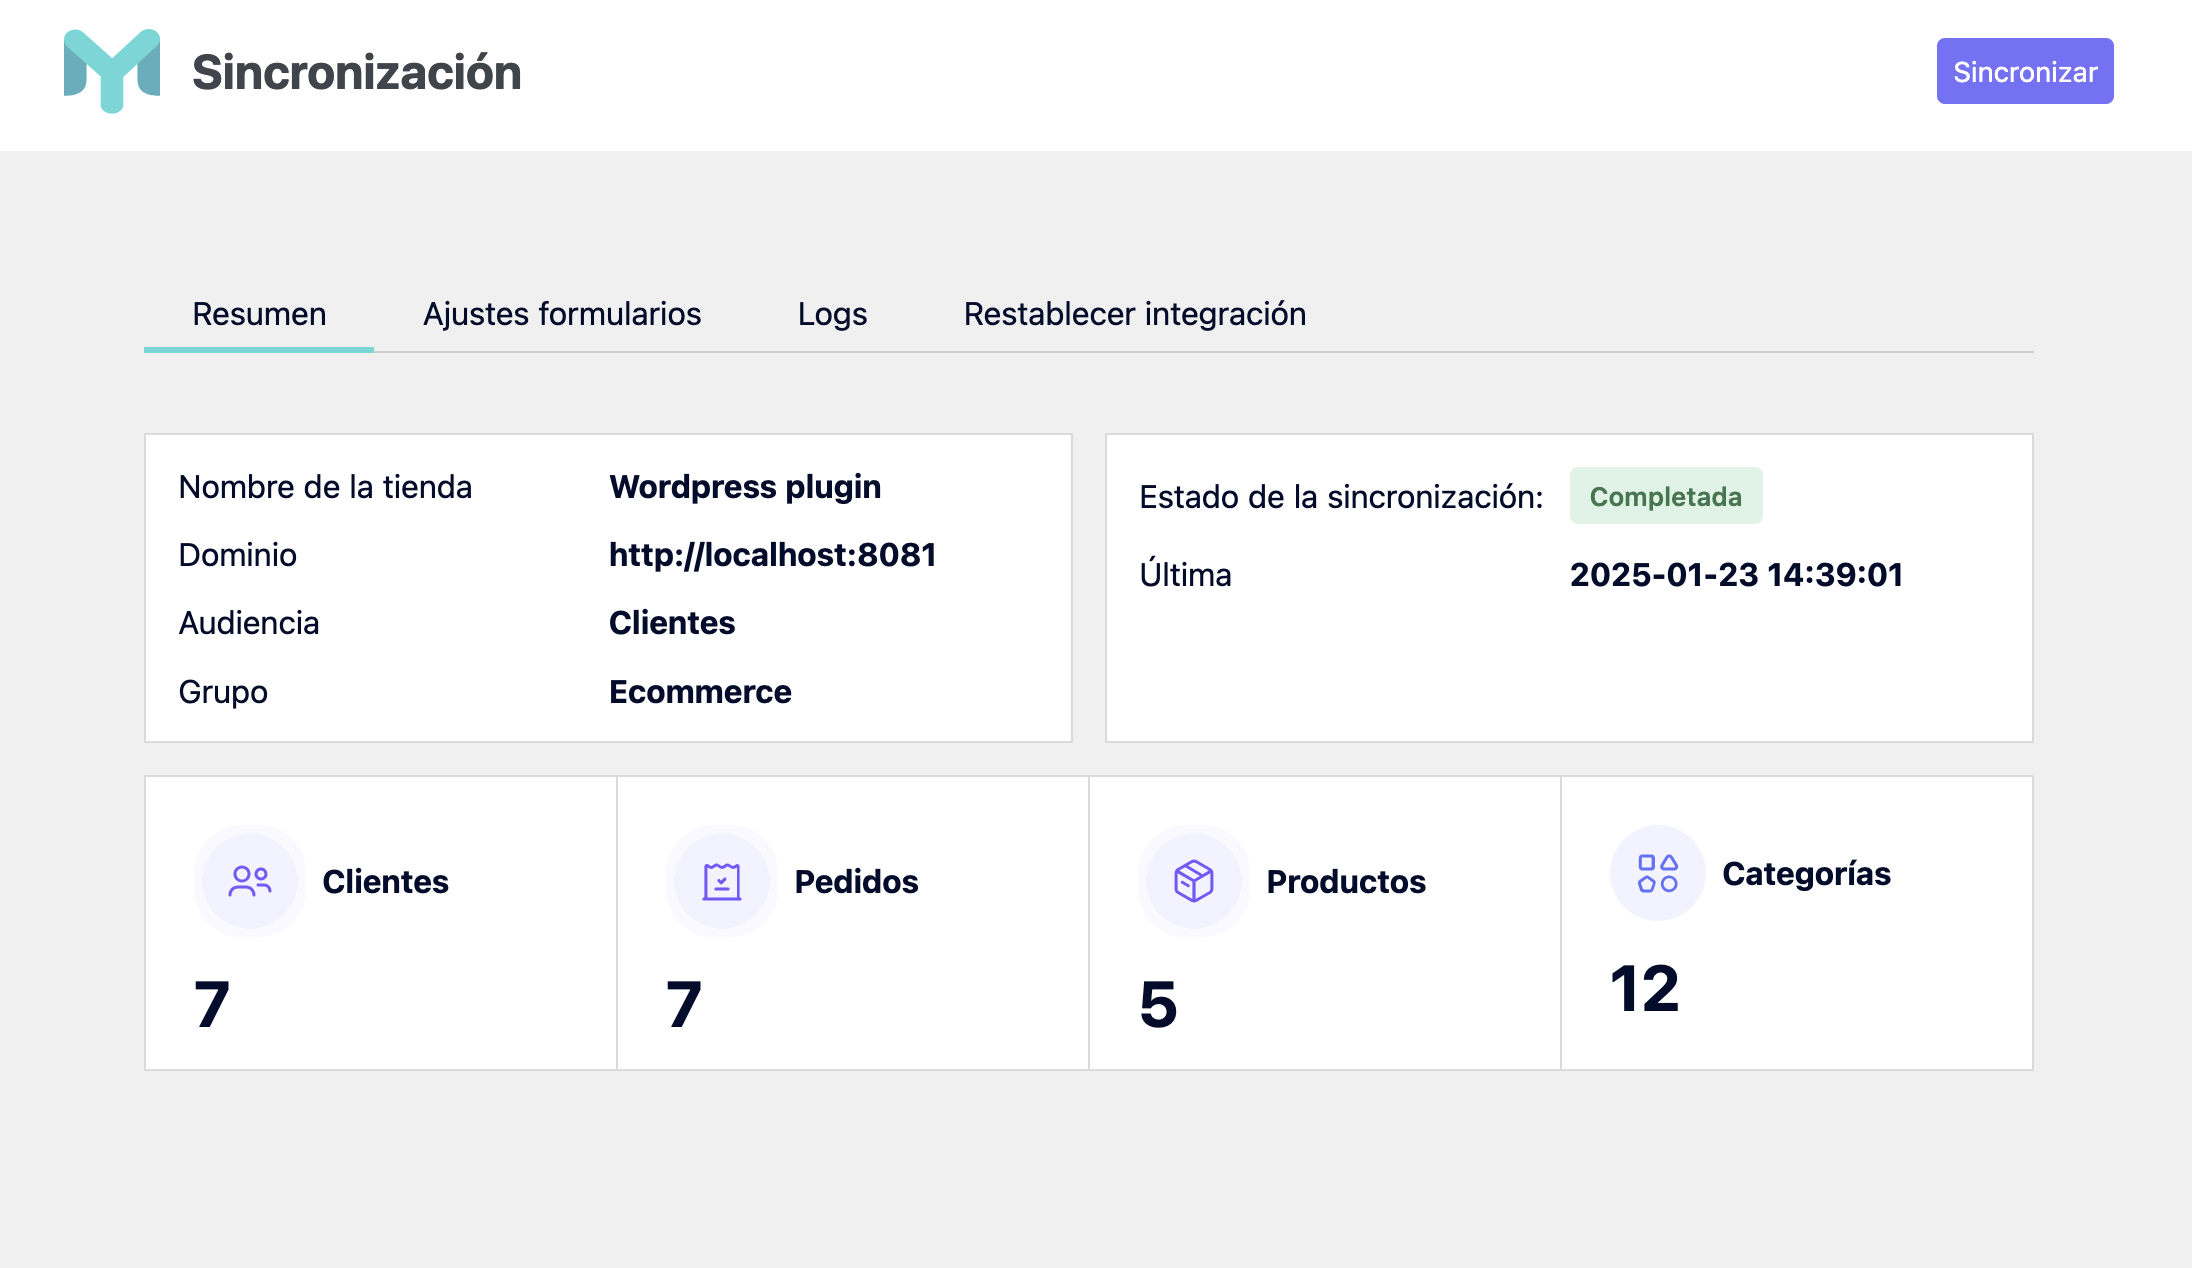
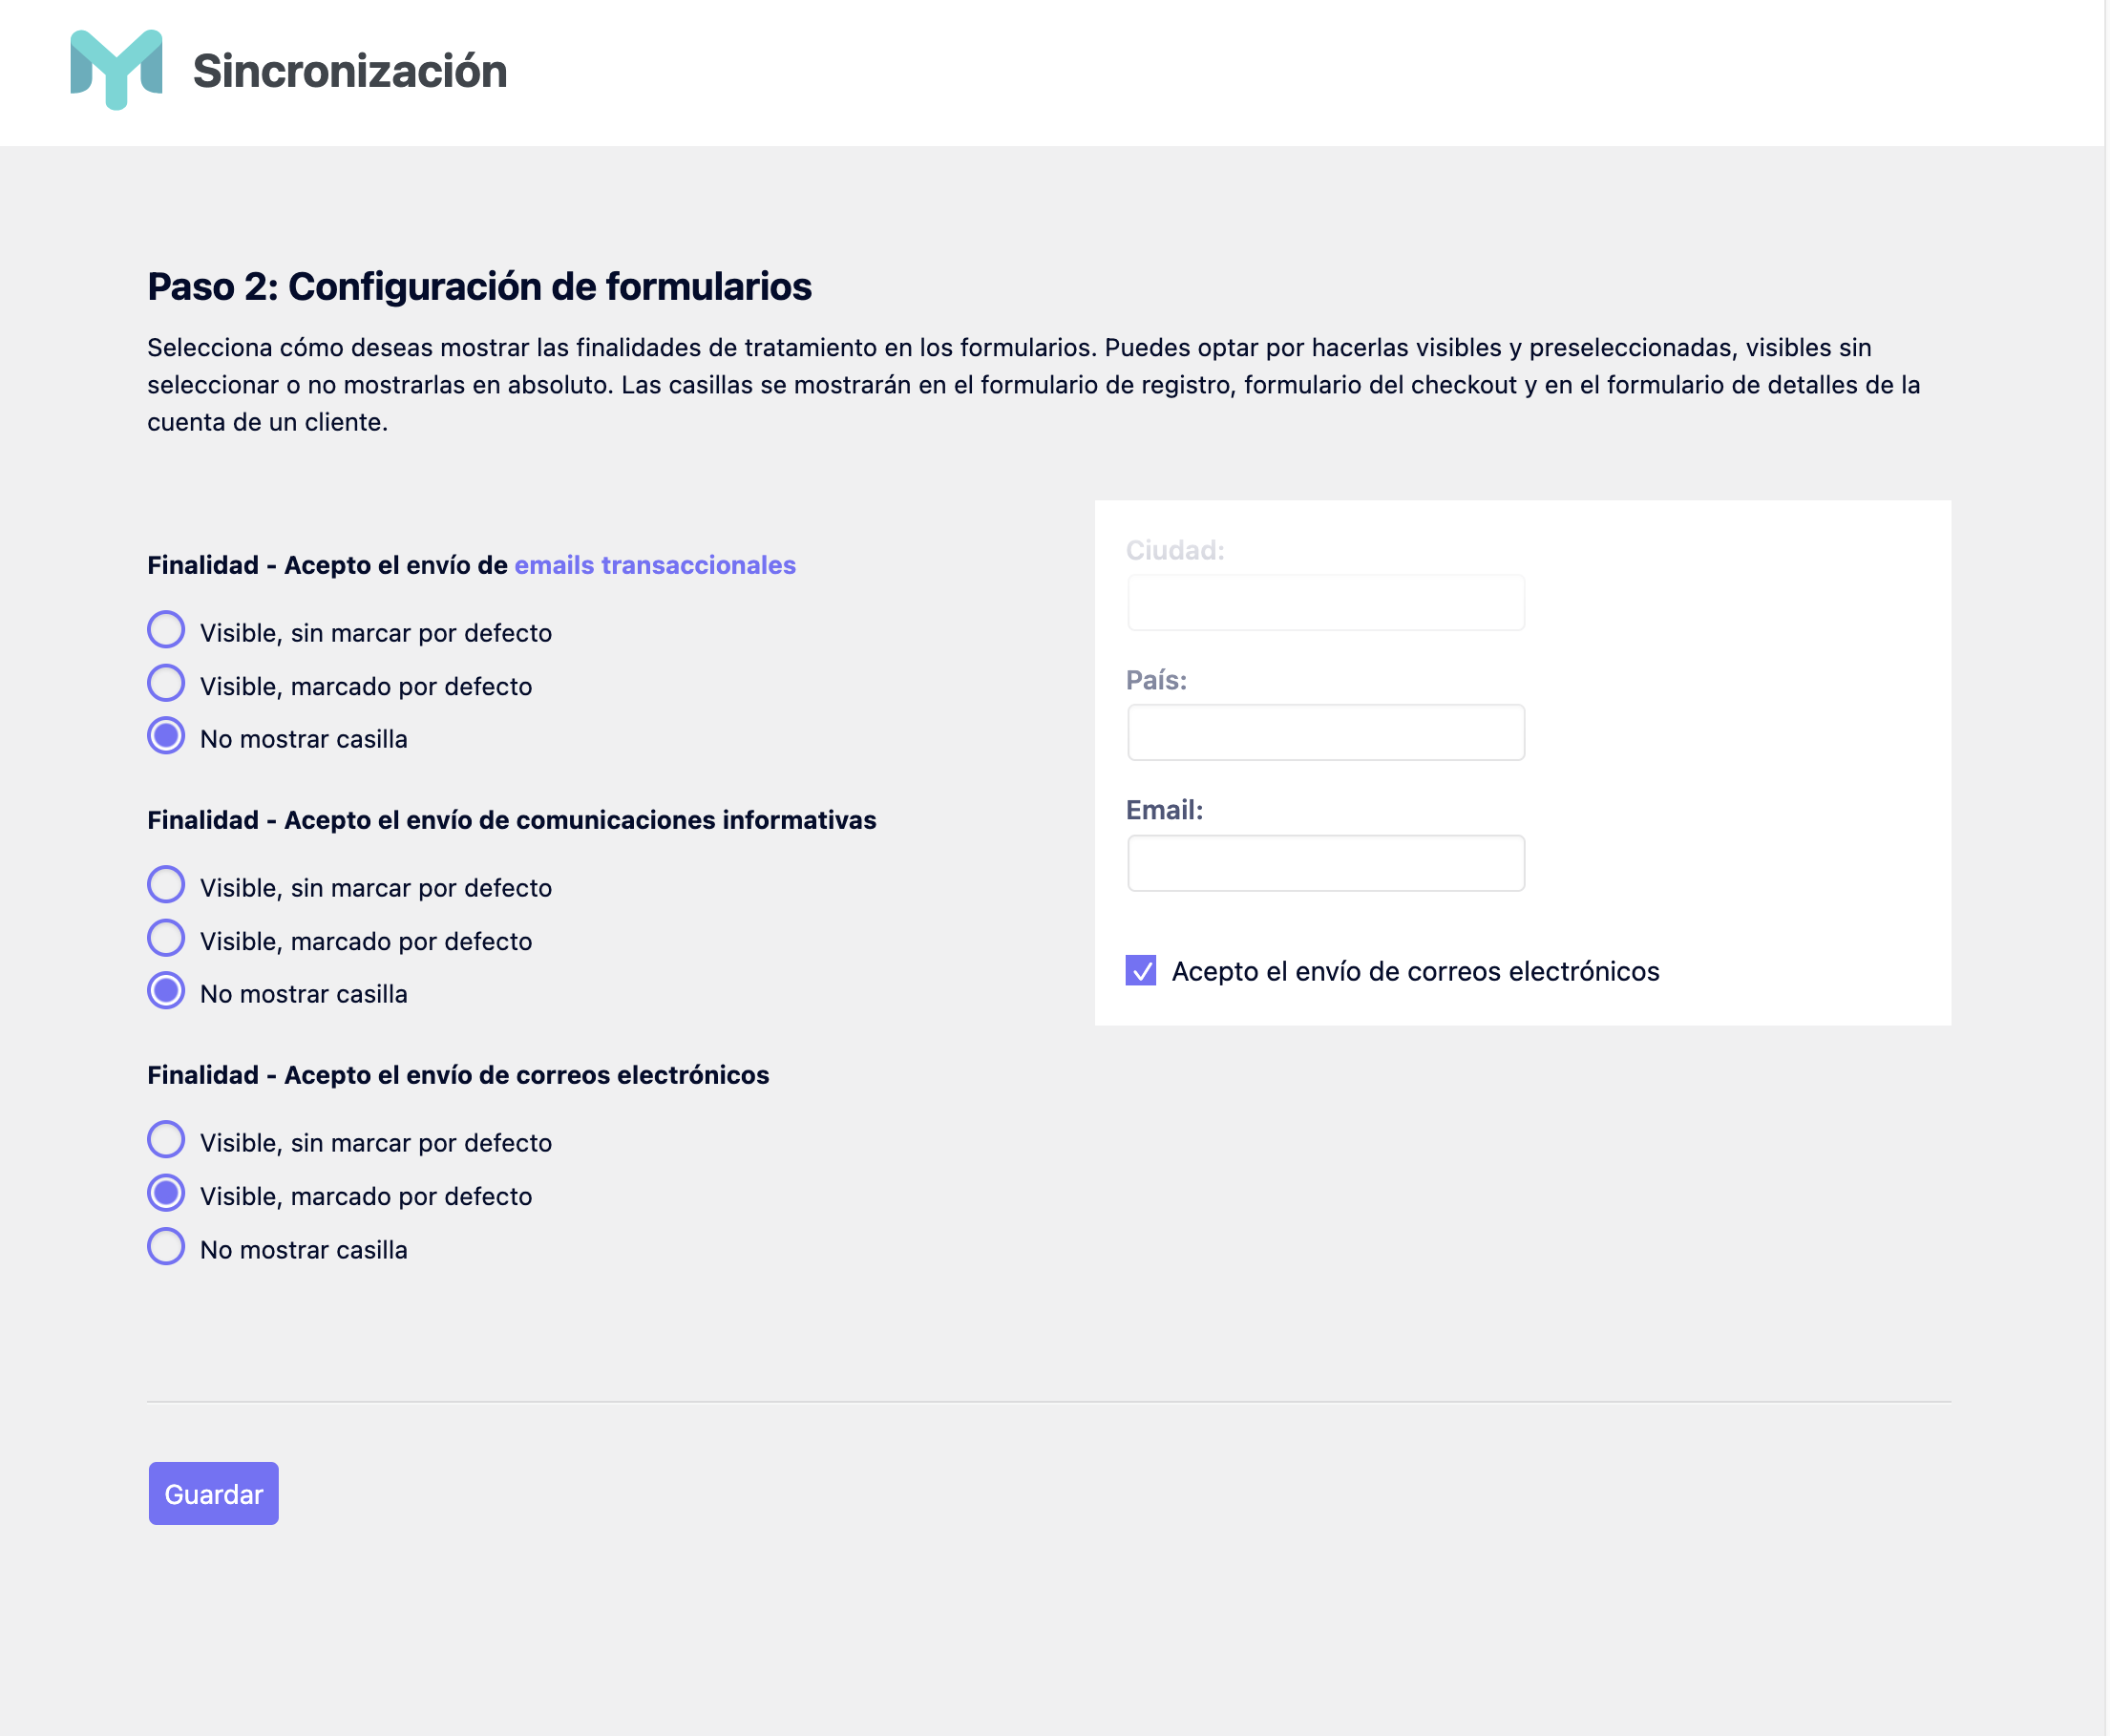
- Go to the Synchronization tab in the Easymailing plugin settings within the WordPress admin panel.
- Complete all the required fields for the initial synchronization setup.
- Configure the synchronization settings for WooCommerce, such as:
- Orders
- Products
- Categories
- Customers
- Save your configuration.
- The plugin will perform an initial synchronization to ensure all existing WooCommerce data is synced to Easymailing.
- After configuration, the plugin will automatically keep the data updated by:
- Syncing customers who register, place orders, or update their details in the WooCommerce account area.
- Syncing orders placed in WooCommerce, enabling you to track purchases from Easymailing email campaigns.
屏幕截图:


常见问题:
Requirements
- Requires PHP7.1
What is the plugin license?
- This plugin is released under a GPL license.
What is Easymailing?
Easymailing is an email marketing platform. You can create and send email newsletters, manage subscribers, and track and analyze results.
Where can I see more information?
You can get help at https://ayuda.easymailing.com.
更新日志:
1.5.0
- New: SMS-ready contact synchronization. Elementor Forms, Fluent Forms, and Gravity Forms can now map
phone,first_name, andlast_namein addition toemail, and contacts can be created when at least an email or phone is available. - New: Fluent Forms and Gravity Forms feeds can disable SMS double opt-in when the form already collects valid SMS consent.
- New: WooCommerce customers now include
billing_phonewhen it can be normalized to E.164 using the billing country or a single-country store fallback. - New: WooCommerce customer lookup now resolves existing Easymailing customers by email first and phone as fallback, reducing duplicates for SMS-capable customers.
- New: Optional WooCommerce checkout phone validation with country selector for stores that want to collect SMS-ready phone numbers.
- Fix: Invalid or ambiguous WooCommerce phone numbers are omitted before calling the Easymailing API, so email-first customer synchronization continues to work.
- Fix: WooCommerce orders marked as completed now register the order as paid before marking it shipped when Easymailing has not yet received the payment action. This restores the "new order" activity and ecommerce revenue tracking for manual completed transitions.
- Fix: WooCommerce customer create/update requests now consistently disable welcome email, email double opt-in, and SMS double opt-in for synchronization flows where the customer already exists in WooCommerce.
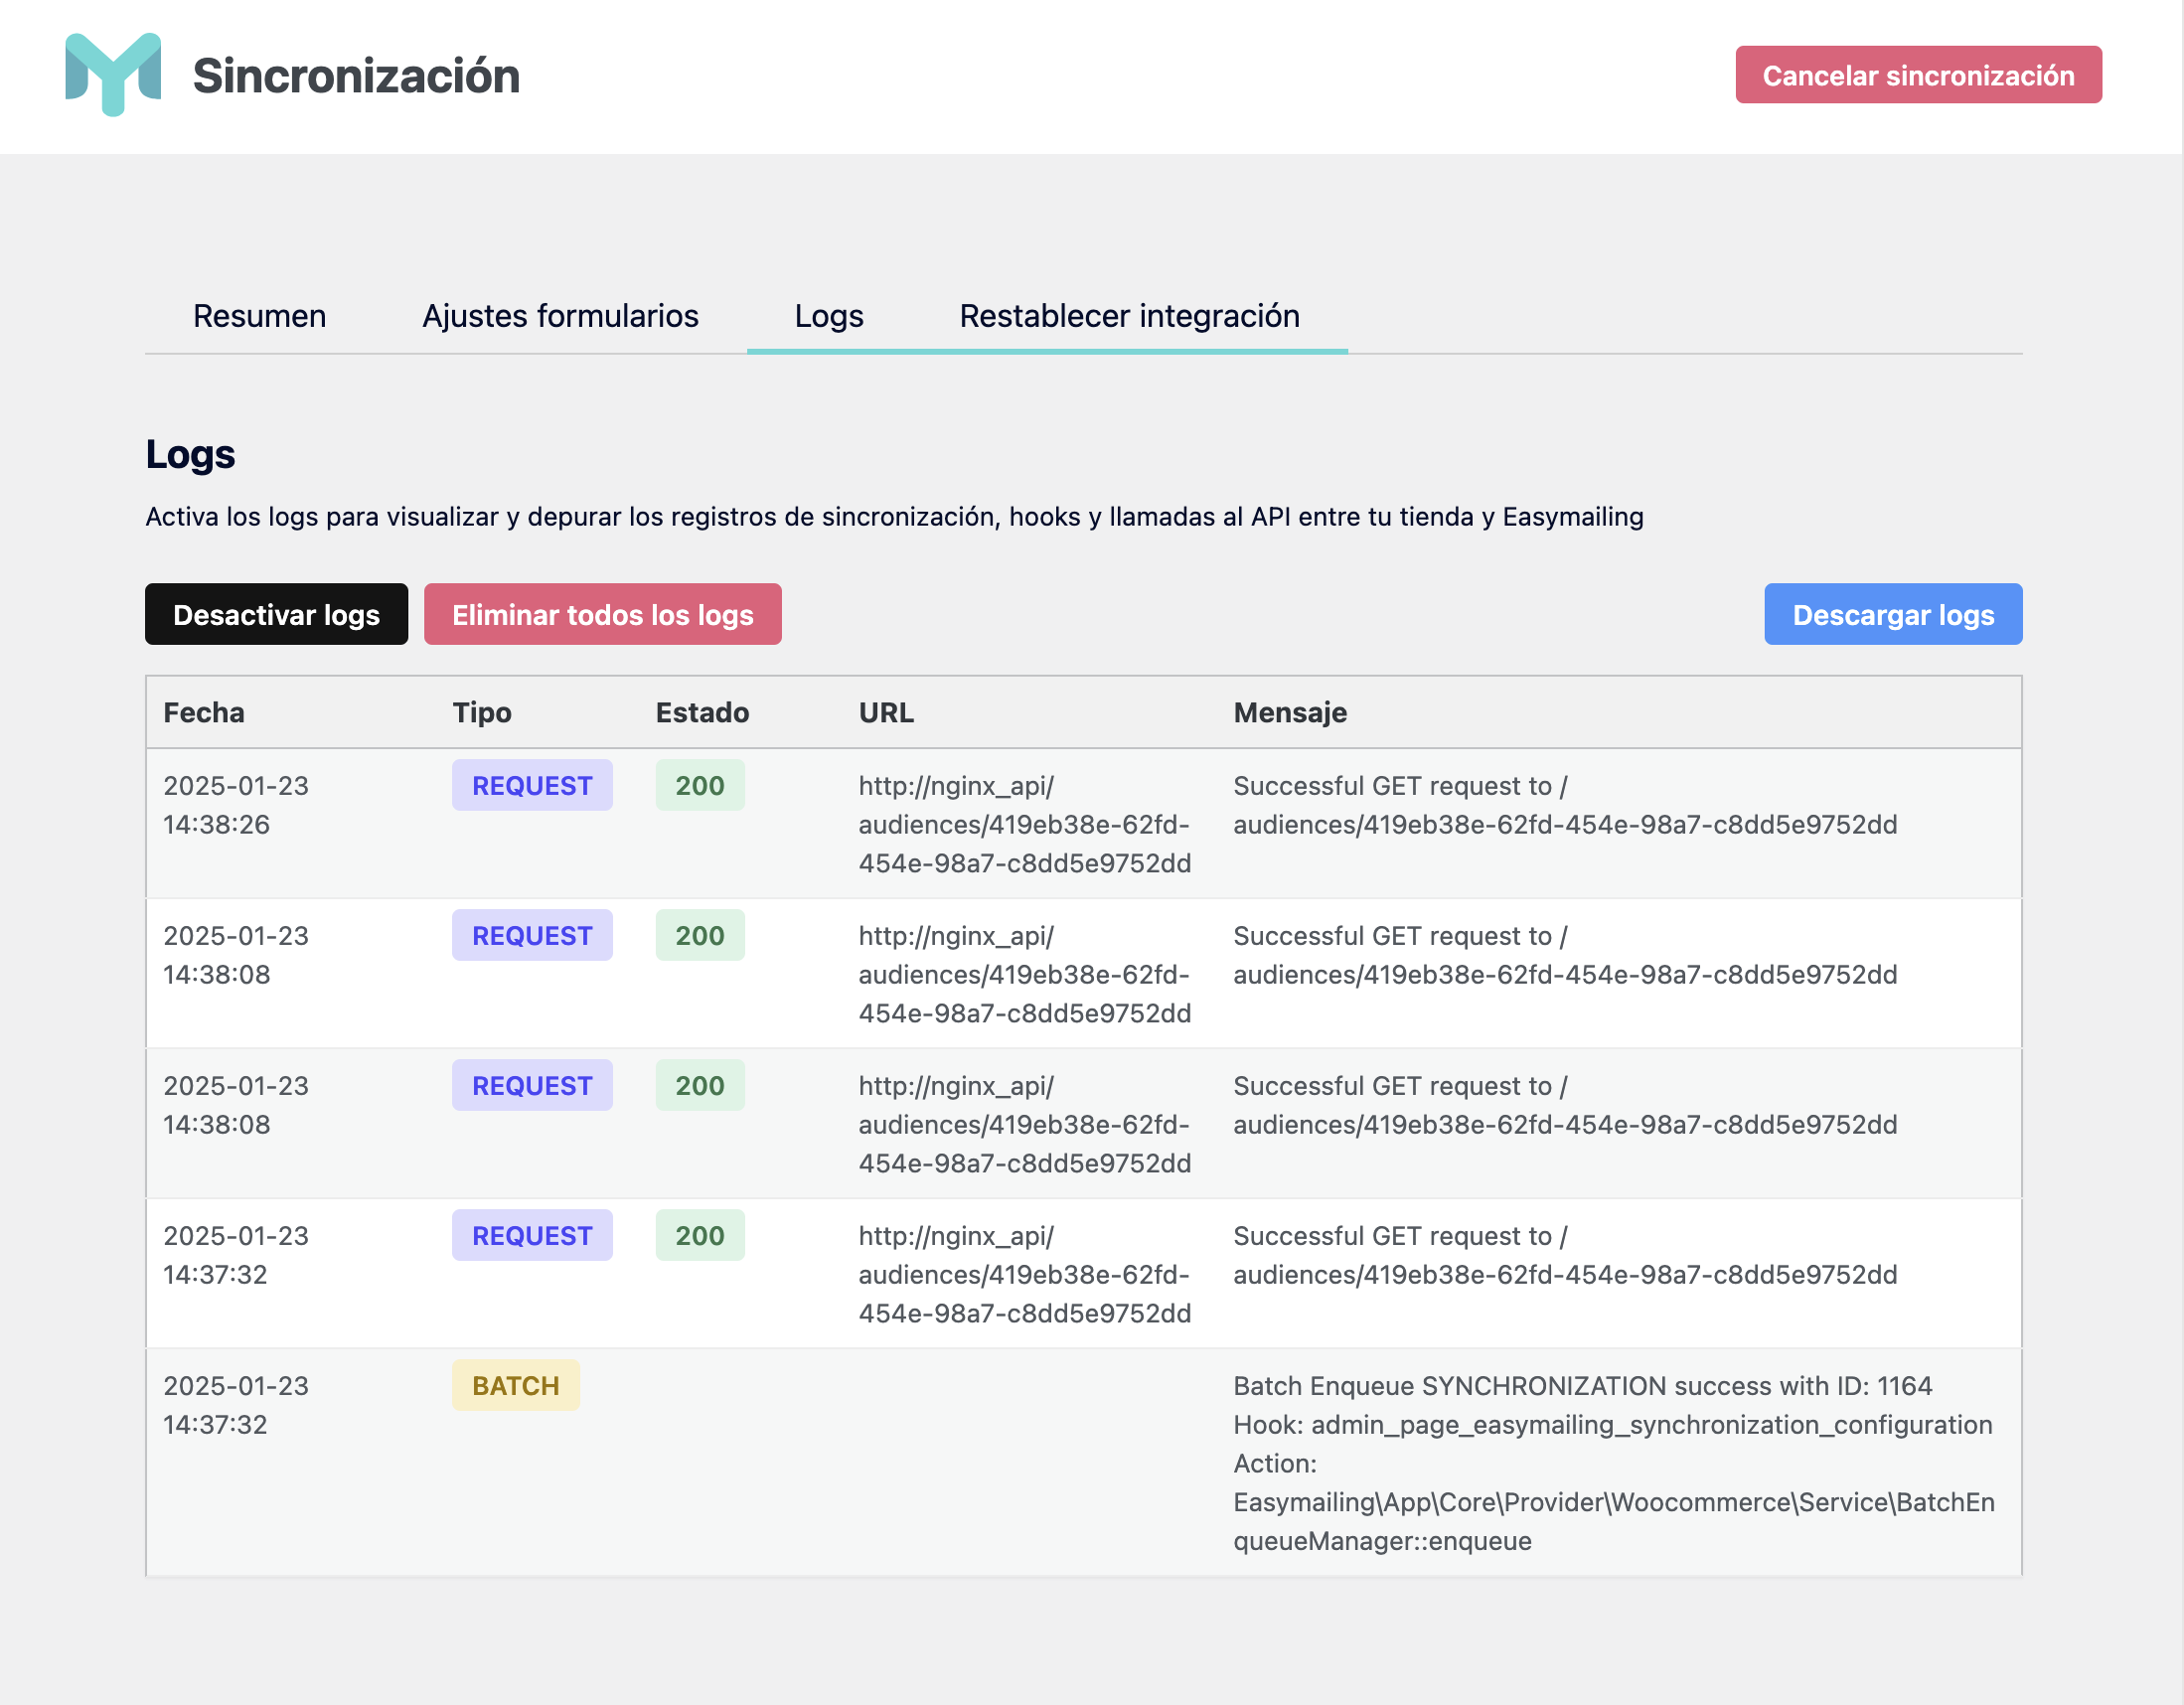
- Improvement: Failed WooCommerce synchronization items can now be dismissed from the synchronization dashboard, clearing their retry state without deleting WooCommerce data.
- Internal: API query parameters are now built through structured query arrays, and JSON-LD hydration handles associative arrays without treating them as collections.
- Fix: fatal
TypeErrorinApi::convertEurToCents()when a product or variation reaches the helper with an empty/non-numeric price (e.g. a simple product withoutregular_priceon save). Under PHP 8+ the previous$eur * 100raisedUnsupported operand types: string * intand put the site into recovery mode. The helper now guards withis_numeric()and casts tofloat, returning0for invalid inputs. - Fix: hardened
CartHooks::getCartItems()to cast$product->get_price()tofloatbefore multiplying by the cart item quantity, so an empty price string no longer triggers the sameTypeErrorbefore reachingconvertEurToCents(). Removed the redundant outerintval()since the helper already returnsint. - Fix: abandoned cart was reassigned to a new customer when the shopper changed the email at checkout. The cart created for email A was updated in place to point to the customer resolved from email B, leaving A without a recovery email and Javier (B) receiving an email for a cart he never started. The plugin now persists the customer associated to the cart in session (
SESSION_CART_CUSTOMER_RESOURCE_ID_NAME); on customer mismatch (typical email-change scenario) the previousorder_resource_idis discarded so a brand-new cart is created instead of mutating the previous one.
- Fix: abandoned cart duplicates. The checkout tracker JS no longer fires on every keystroke (
inputevent with debounce removed); it now only fires onchangeandblur, so a single typed email produces a single AJAX call instead of one per substring (a@b.c,a@b.co,a@b.com...). - Fix: race condition in
CartHooks::ajaxTrackCheckoutEmail. Concurrent requests with the same email could read an empty session simultaneously and each create a new cart in Easymailing, leading to duplicated automation entries. A transient-based lock (10s TTL, keyed by email) now serializes parallel requests; only the first creates/updates the cart, the rest returnskipped=lock_held.
- New: Abandoned cart tracking now works with the WooCommerce Block Checkout (Gutenberg blocks). Previously the plugin only captured carts for logged-in users on the classic checkout; now carts are captured as soon as the shopper enters an email, both in Block Checkout and Classic Checkout, for guest and registered users alike.
- New: Guest cart tracking. The
!is_user_logged_in()guard in CartHooks has been removed. Carts are now associated to the Easymailing customer resolved by email (looked up or created on the fly) as soon as an email is available. - New: Hook
woocommerce_store_api_cart_update_customer_from_requestis now listened to. Block Checkout fires this on every billing field change (including email) after a ~1s debounce, so the Easymailing cart is created as soon as the shopper enters a valid email, without having to wait for country/postcode to be filled in. - New: Hook
woocommerce_store_api_checkout_update_order_from_requestis also listened to as a secondary trigger, firing on every update of the draft order (wc-checkout-draft) once country/postcode are known, so later address edits keep the Easymailing cart in sync. - New: Hook
woocommerce_checkout_update_order_reviewis now listened to for guest tracking on the Classic Checkout, so entering an email in the form creates the Easymailing cart even before the shopper places the order. - Internal: New method
CustomerService::resolveByEmail()that looks up a customer in Easymailing by email and creates one if it doesn't exist, used by both the new Block and Classic guest flows. - New: Cross-device cart recovery URL. The
checkout_urlsent to Easymailing now embeds the cart contents as a base64 query parameter. When the shopper clicks the recovery link from the abandoned cart email, the newCartRebuildHookdecodes the products and re-adds them to the WooCommerce cart, redirecting to the checkout — even from a different device or after the session expired. Preservesem_chfor campaign attribution. - New: Early email detection via lightweight JS. A new
easymailing_checkout_script.js(loaded only on checkout pages) observes the email input in both Classic and Block Checkout with a single selector (input[name="billing_email"], #billing_email, .wc-block-components-text-input > #email) and hitsadmin-ajax.php?action=easymailing_track_checkout_emailon change/blur. This captures the email on the firsttab-outof the field, without waiting for the Block Checkout internal debounce. Complements the PHP Store API hooks, doesn't replace them. - New: Treatment purposes / custom fields in the Block Checkout via the WooCommerce Additional Checkout Fields API (
woocommerce_register_additional_checkout_field, available since WC 8.9). The same checkboxes that were rendered on the Classic Checkout via thewoocommerce_checkout_fieldsfilter now also appear on the Block Checkout in the "Contact" group, and are persisted into the order/user meta using the existing format so the rest of the plugin (OrderHooks, CustomerService) reads them unchanged.
- Fix: Order metadata consistency with HPOS (WooCommerce Custom Orders Table). The plugin was writing order metas via update_post_meta (wp_postmeta) but reading them via $order->get_meta (HPOS table). With HPOS active this caused every subsequent sync to regenerate guest customer UUIDs and fail with 422 "email already used" in an endless loop. All plugin-owned meta reads now use get_post_meta consistently.
- New: Automatic recovery when a POST /customers fails with 422 "email already used". The plugin now looks up the existing customer by email via GET /customers?email=X and adopts its resource_id, both for registered users (type CUSTOMER) and for guest customers generated from orders (type GUEST_CUSTOMER). Prevents orphan UUIDs that broke order synchronization.
- Change: "Retry failed items" now only re-queues items in error state instead of re-synchronizing the entire store. A retry_only_mode flag filters each phase (customers, products, variants, orders) to skip items already synchronized, drastically reducing retry time and API load.
- Fix: "Retry failed items" no longer deletes order metadata on retry. Previously it wiped customer_resource_id together with resource_id, destroying any recovery made by the automatic lookup and forcing another 422 on the next sync.
- New: Incidents panel on the Dashboard listing items that cannot be synchronized (empty email, duplicated email across WordPress users, or orders whose customer was skipped) with a breakdown by reason and an expandable list linking to each affected user or order.
- New: Error and skipped counters on the Dashboard cards are now shown as compact colored chips (red for API errors, amber for skipped items) next to each resource total.
- New: Failed items in the Dashboard retry panel now display the actual API error message (e.g. "The email X is already used") instead of generic validation errors, so users can diagnose issues at a glance.
- New: Guest orders whose billing_email matches a registered user that has been synchronized are now imputed to that user's customer instead of creating a duplicate guest customer that would fail with 422 "email already used".
- Improvement: Batch status check delay reduced from 60 seconds to 10 seconds. When the API completes a batch quickly, the plugin now reacts in seconds instead of waiting a full minute between checks.
- Fix: Customer email collision detection now prioritizes the "owner" of the email — the WordPress user whose user_email matches — so registered accounts never lose their canonical email to another user's billing_email copy.
- Fix: Email collision detection also covers mixed cases (one user's billing_email matching another user's user_email). When the effective email is not unique across WordPress users, the second user falls back to its user_email, or is skipped if both would collide.
- Fix: Users with empty billing_email and empty user_email are now skipped locally with a warning log instead of being sent to the API as empty-email POSTs that always 422.
- Fix: Orders whose customer has no resource_id (because the customer was skipped or its POST failed) are now skipped locally instead of being sent to the API with an empty customer IRI that always 422.
- Fix: Order updates for guest orders now read the customer resource_id from the correct meta slot (previously fell back to the order's own resource_id, sending a malformed customer reference on every PUT).
- Fix: Stopped writing the customer UUID into the order's own resource_id meta slot during guest-order processing (cosmetic only, was overwritten right after).
- Fix: The "retry failed items" card and the "incidents" panel on the Dashboard are now hidden while a synchronization is in progress, to avoid triggering retries on incomplete data.
- Change: Updated description of the advanced option "Use WordPress account email" — now presented as a semantic preference between billing email and account email, since email collisions are handled automatically by the plugin in this version.
- i18n: Added English translations for all new dashboard strings (incidents panel, retry card, badges, skip reasons, phase labels) and kept the Spanish source in sync.
- Fix: WooCommerce batch synchronization now runs in ordered phases (stores/categories/customers → products → variants → orders) to prevent cross-resource race conditions. Previously, parallel batch processing in the API could cause products to fail with "category not found" or variants with "product not found" when their dependencies were still being created in another batch.
- New: Live progress indicator on the Dashboard. The sync status now shows the current phase (e.g. "Phase 2 of 4 · Syncing products") with a progress bar and percentage that updates in real time as batches are processed.
- Fix: On the Configuración tab, all initial setup fields (store name, domain, language, timezone, audience, group, debug logs) are now visually disabled when the store is already created. Only the advanced email option can be modified. Changing the initial fields still requires resetting the integration.
- Fix: The synchronization navigation now includes a "Configuración" tab once the store is created, so the advanced options can be changed without having to reset the integration.
- New: Retry failed items button moved to the Dashboard, where per-type error counters (customers, orders, products, categories) are now displayed next to the success counters. The button only appears when there are items in error.
- New: Advanced option "Use WordPress account email" on the Dashboard. When enabled, the plugin synchronizes customers with the WordPress user_email (unique and stable) instead of the WooCommerce billing_email. Recommended for installations with duplicated or irregular billing data.
- Change: Reset page is now limited to the destructive reset action. Retry failed items moved to the Dashboard.
- New: Added a "Retry failed items" button on the reset page. It clears orphan resource IDs only for items in error state and re-queues synchronization for them, preserving items already synchronized successfully.
- Fix: When multiple WooCommerce users share the same billing_email, the plugin now falls back to the WordPress user_email to avoid cascading collisions that blocked customer creation in Easymailing.
- Fix: Auto-recovery of orphan resource IDs in batch synchronization. When a POST fails or a PUT returns 404, the stored resource ID is cleared so the next synchronization recreates the resource. This prevents cascading 404 errors after a store reset or a failed initial sync, and avoids the need to reset the integration (preserving manual synchronization progress).
- Fix: WooCommerce batch product synchronization now filters out categories with empty resource IDs to avoid sending broken category IRIs that caused 422 validation errors on orders and products.
- Fix: WooCommerce batch synchronization was sending variant/product prices as float, causing validation errors on stores with decimal prices. Prices are now converted to integer cents, matching the real-time sync behavior.
- Improvement: Batch product synchronization now includes url, vendor (brand) and image_url fields, matching real-time product hooks.
- Fix: Normalized image_url to null when empty or not a string in batch variant synchronization.
- Fix: Fixed fatal error when using Fluent Forms 6.x (updated IntegrationManager class namespace and fixed Application initialization).
- Fix: Added compatibility with both new and legacy Fluent Forms hooks.
- Fix: Fluent Forms integration errors no longer crash the entire site.
- Fix: Fixed compatibility with latest Fluent Forms version (updated IntegrationManager class namespace).
- Fix: Fixed WooCommerce synchronization configuration error when selecting audience and group.
- Fix: Fixed API resource hydration to correctly preserve IRI references.
- New: Disable welcome email when batch importing contacts from WooCommerce to Easymailing.
- New: Added an option to disable double opt-in in Fluent Forms feeds.
- New: Integration with Fluent Forms. You can now easily connect your Fluent Forms with Easymailing to sync contacts and map custom fields.
- Fix: Changed plugin description to comply with WordPress guidelines.
- Fix: Changed plugin description and tags to comply with WordPress guidelines.
- New: Added WooCommerce synchronization to Easymailing:
- Sync orders, products, categories, and customers from WooCommerce to Easymailing.
- Automatically sync customers when they register, place orders, or update their details in WooCommerce.
- Track orders in Easymailing campaigns to measure ROI.
- New: Added detailed configuration options for WooCommerce synchronization.
- Improvement: Enhanced API key validation process for better error handling.
- New: Add Elementor form action integration. Now you can easily integrate your Easymailing forms with Elementor.
- Fix: Various bug fixes and improvements.
- Fix: An error when plugin configuration saved in wp_options is not correct
- Add: Delete plugin configuration saved in wp_options when the plugin is uninstalled
- Fix: set form in Gutemberg block
- Fix: Refactor some Core classes
- Add: Environment production and development
- Fix: session_start warning in site health
- Fix: Prevent error when not saved APikey and try to add a form
- Fix: Embedded forms not filtering correctly by audience
- Fix: Fix version Requires at least
- Fix: Fix some typos
- Added: English translations
- Fix: Javascript not included when not selecting a popup form
- Added: Wordpress.org assets
- First release