Oliver POS – WooCommerce POS for iPhone, iPad & Android
| 开发者 | oliverpos |
|---|---|
| 更新时间 | 2026年6月23日 21:45 |
| PHP版本: | 8.1 及以上 |
| WordPress版本: | 7.0 |
| 版权: | GPLv2 or later |
| 版权网址: | 版权信息 |
详情介绍:
consumer_key / consumer_secret for that station — the same API contract every other WooCommerce integration uses. Orders, refunds, products, inventory, customers and taxes all flow through wp-json/wc/v3/*. Your data stays portable, auditable and 100% inside your own WordPress install.
Full compatibility with WooCommerce HPOS (High-Performance Order Storage), the new Product Block Editor, and Cart & Checkout Blocks is declared and tested.
Offline-First Sales
When the internet drops, the line at your counter doesn't. Oliver POS keeps selling — every order, every line item, every payment captured by your cashier is queued locally on the device. The moment connectivity returns, the queue drains into WooCommerce in the exact order it was rung up. No lost sales, no manual reconciliation, no panic.
Refunds, customer lookups and live stock checks still require an online connection (because they touch live WooCommerce data), but the core "make the sale" flow is fully offline-capable.
Multi-Outlet & Multi-Station Stock
Run one store or fifty. Oliver POS gives each outlet its own stock level — synced back to WooCommerce as the global truth — and lets each station ring up sales independently with its own register number, receipt sequence and shift. Move stock between outlets, audit movements per location, and see live inventory across every store from your WooCommerce admin.
Real-Time Sync Across Every Device
Every sale, stock movement, refund and customer update fans out across every Oliver POS device — iPhone, iPad, Android tablet, countertop terminal and web dashboard — in real time, and lands as a standard WooCommerce record on your WordPress store within the same second. Your WooCommerce shop stays the single source of truth: there are no proprietary tables, no exported CSVs and no scheduled syncs to babysit. When the internet drops, every station keeps selling locally and the queue drains into WooCommerce in order the moment connectivity returns.
Every WooCommerce Payment Gateway, In-Store
If WooCommerce supports it, Oliver POS supports it. Cash, card, store credit, gift cards, integrated terminals — plus any WooCommerce payment gateway you've already configured: WooPayments, Stripe, PayPal, Klarna, Square, Mollie, Amazon Pay, Authorize.net and hundreds more. The cashier picks a gateway, the gateway's own checkout opens in a WebView on the POS device, and the customer pays through the exact same flow they'd use online. Apple Pay, Google Pay and other wallets work automatically through whichever wallet-enabled gateway you've already turned on.
For card-present payments, Oliver POS integrates directly with Stripe Terminal: pair a reader to an outlet and the amount due is pushed to the terminal at checkout, processed by Stripe, and recorded on the WooCommerce order — no double entry, no reconciliation drift.
Tips, Receipts & Kitchen Display
Built for counters, cafés and quick service as much as retail. A customer-facing tip screen suggests percentages (or takes a custom amount) before payment, and every tip lands on the WooCommerce order. Receipts print, email or both — with templates you control. And the built-in fulfilment view doubles as a kitchen display system (KDS): orders rung up at the counter or placed online appear instantly for kitchen and bar staff, with prep status from new to ready to complete.
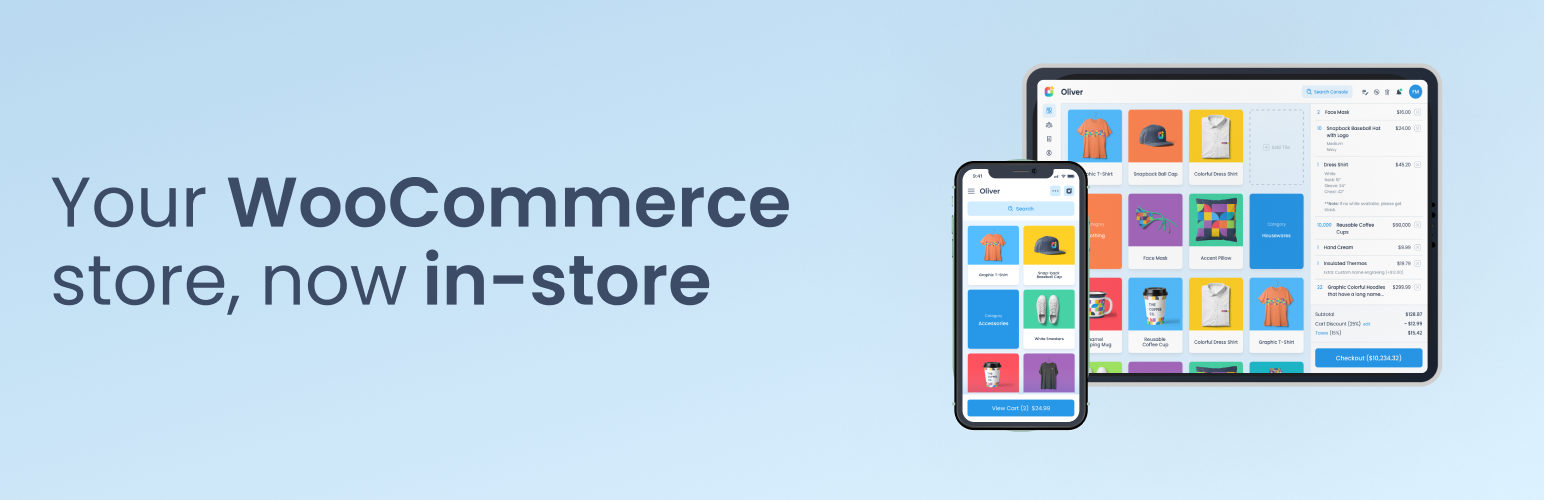
WooCommerce POS for iPhone, iPad, Android, Mac & PC
Oliver POS ships native apps for iPhone, iPad and Android, plus a web register that runs in any modern browser on Mac, PC and Chromebook. Tap to Pay works on every modern iPhone (iOS 16.4+) and on supported Android phones — no extra card reader required. Touch, mouse, keyboard, camera and Bluetooth/USB barcode scanners are all first-class inputs. Use a Mac as your back-office register, an iPad on the counter, an iPhone for pop-ups and street markets, and the Oliver POS countertop terminal for high-volume lanes — all selling from the same WooCommerce shop.
Works With the WooCommerce Plugins You Already Run
Because Oliver POS reads and writes through the official WooCommerce REST API, your existing WooCommerce extensions keep working at the counter — including WooCommerce Subscriptions, Memberships, Bookings, Product Bundles, Points & Rewards, Gift Cards and WooPayments. No bespoke integration per plugin, no broken add-ons, no workflow change for your online customers. The themes, taxes, shipping rules, coupons and product types you already use on your WooCommerce shop apply in-store too.
Real-Time Inventory, Reports & Staff Insights
Sales, stock movements, payment summaries, tax reports and staff performance — all live, all sliced by outlet, register and shift. Oliver POS includes 15+ unique reports out of the box in Oliver Hub, plus staff permissions backed by real WordPress capabilities so each user only sees what they're entitled to.
Free to Start, Paid to Scale
Oliver POS offers a genuine Free plan — no credit card, no trial timer — so you can install, pair a device and ring up a real sale before you ever pay us. Paid tiers unlock multi-outlet, advanced reporting, integrated payments and priority support. Current pricing lives at oliverpos.com/pricing.
Hardware Built for Retail
Bring your own iPad, Mac or PC, or buy the purpose-built Oliver POS terminals — integrated receipt printer, barcode scanner, cash drawer and card terminal in one box, running the Oliver POS Android app. Third-party thermal printers, barcode scanners and cash drawers also work out of the box.
Support You Can Reach
Email support@oliverpos.com and a human responds within one business day. We also run live chat from inside Oliver Hub and maintain a public help centre at help.oliverpos.com. Bug reports, feature requests and security disclosures are all welcome — see the Privacy & Security section below for how to reach our security team.
安装:
- Install Oliver POS from the WordPress plugin directory and activate it.
- From the WordPress admin sidebar, open Oliver POS and click Connect.
- Sign in or create your free Oliver POS account at app.oliverpos.com.
- Your products, customers, orders and tax settings sync automatically.
- Open the web register at sell.oliverpos.com, or pair the Oliver POS iPad / Android app using the on-screen pairing code. You're ready to sell.
屏幕截图:


常见问题:
What do I need to run a WooCommerce POS in my store?
A WordPress site with WooCommerce installed and configured — that's it. Your WooCommerce products, prices, inventory, customers, tax rates and currency are the single source of truth for Oliver POS, so set those up in WooCommerce before pairing your first device. For hardware, any modern browser will run the Oliver POS web register. We recommend Chrome on Mac, PC or Android, and Safari on iPad. Receipt printing uses the device's default printer.
Can a WooCommerce POS keep selling when the internet goes down?
Yes. The "Allow offline orders" setting is enabled by default. When your device loses internet connectivity, Oliver POS keeps accepting sales — every order is queued on the device and syncs into WooCommerce in order the moment the connection comes back. Refunds, live stock checks and customer lookups require an online connection because they touch live WooCommerce data.
Which payment gateways does Oliver POS support in-store?
All of them. Any payment gateway you've enabled in WooCommerce → Settings → Payments can be turned on for in-store use in Oliver POS → Payment Methods. When the cashier picks that gateway at checkout, the gateway's own payment form opens in a WebView on the POS device. We've tested with WooPayments, Stripe, PayPal, Klarna, Square, Mollie, Amazon Pay and Authorize.net, but any properly-built WooCommerce gateway will work. Oliver POS also has a first-class integration with Stripe Terminal for card-present payments — pair a reader to an outlet and the amount due is pushed automatically at checkout.
Does Oliver POS support Apple Pay, Google Pay and Tap to Pay?
Yes — through whichever wallet-enabled gateway you've already configured in WooCommerce. If your WooPayments or Stripe gateway has Apple Pay and Google Pay turned on, those wallets will appear on the POS WebView checkout exactly as they do on your online store.
Can I run Oliver POS on iPhone, iPad and Android?
Yes. Oliver POS ships native apps for iPhone, iPad and Android phones / tablets, and the web register also runs in Safari on iPad and in Chrome on Android. Tap to Pay on iPhone (iOS 16.4+) and Tap to Pay on supported Android phones let any modern phone accept contactless cards and wallets with no extra hardware. We also support iPad / iPhone-friendly Bluetooth barcode scanners, AirPrint receipt printers and the Stripe Terminal BBPOS WisePad 3.
Does Oliver POS work for multi-outlet retailers and chains?
Yes. Oliver POS is built around outlets — each physical store or pop-up gets its own stock levels, register sequence, payment methods, tax setup and timezone, while all rolling up to the same WooCommerce shop. Stock can be transferred between outlets, and reports can be filtered per outlet, per register or globally.
How long does it take to get up and running?
We've shipped Oliver POS to over 45,000 retailers, and the median setup is under three minutes:
- Install and activate the plugin.
- Click Connect and create your free Oliver POS account.
- Open the web register or pair an iPad / Android device, and ring up your first sale.
How much does a WooCommerce POS cost? Is there a free plan?
Oliver POS offers a free plan with no credit card required. Paid tiers add multi-outlet, advanced reporting, integrated payments and priority support. See current pricing on oliverpos.com.
Does Oliver POS use the official WooCommerce REST API (no vendor lock-in)?
Yes. When you pair a device, Oliver POS mints a real WooCommerce REST API key for that station and the device speaks wp-json/wc/v3/* directly. Your orders, products, refunds and customers are stored as standard WooCommerce records — no proprietary tables, no vendor lock-in. If you ever stop using Oliver POS, your data stays exactly where it is.
Is Oliver POS GDPR and PCI compliant?
Card data never touches the Oliver POS plugin or our servers. For integrated card payments via Stripe Terminal or any WooCommerce gateway, card information flows directly between the customer's card / terminal / browser and the gateway, keeping your shop's PCI scope to the SAQ-A or SAQ-A-EP minimum. For GDPR, the plugin transmits only the data documented in the External services section below, never sells data, never runs third-party analytics, and removes all stored Oliver POS data cleanly on uninstall.
Can I print receipts with Oliver POS?
Yes — thermal, inkjet, laser and Bluetooth receipt printers all work. The Oliver POS terminals ship with an integrated thermal printer that auto-prints after every checkout. Other setups print to whatever printer is connected as the device default. Email and SMS receipts are also supported.
All my products have barcodes — will Oliver POS scan them?
Yes. Any USB or Bluetooth barcode scanner that emulates a keyboard works out of the box. Add the barcode as the SKU or to a custom field in WooCommerce, and Oliver POS will look it up at the speed of the scanner. You can also scan barcodes with the device's built-in camera on iPhone, iPad and Android — no extra hardware required.
Can I accept card payments on my iPhone without a card reader?
Yes. Oliver POS supports Tap to Pay on iPhone (iOS 16.4+) and Tap to Pay on Android through our integration with Stripe Terminal. Tap a contactless card, Apple Pay or Google Pay against the back of the phone, the charge runs through your own Stripe account, and the completed payment is recorded on the WooCommerce order — no extra reader, no double entry, no reconciliation drift.
Is Oliver POS compatible with WooCommerce Subscriptions, Bookings, Gift Cards and Memberships?
Yes. Because Oliver POS reads and writes through the official WooCommerce REST API, your existing WooCommerce extensions keep working at the counter — including WooCommerce Subscriptions, Memberships, Bookings, Product Bundles, Points & Rewards, Gift Cards and WooPayments. There is no bespoke integration to install per plugin, and the customer experience on your online store stays unchanged.
Are the sync files in wp-content/uploads protected? I run nginx.
Since 4.8.0 the plugin writes an .htaccess guard into wp-content/uploads/oliver-pos/sync/ that returns 403 Forbidden for catalog.json.gz / delta.json requests that don't carry your store's pairing sync token (?token=…), while still serving the files statically — no PHP per request. On Apache and LiteSpeed this is automatic.
Nginx ignores .htaccess files, so add the equivalent rule to your server block (replace YOUR_SYNC_TOKEN with the token shown under Oliver POS → Settings → Sync):
location ~* /wp-content/uploads/oliver-pos/sync/.*\.json(\.gz)?$ { if ($arg_token != "YOUR_SYNC_TOKEN") { return 403; } }
Without the rule, behaviour on nginx simply stays as it was before 4.8.0 (files readable at an unguessable-by-policy but well-known path). Rotating the token in settings rewrites the Apache guard automatically; on nginx remember to update your server block too.
更新日志:
- Pairing no longer trips the server-health guard. The device hits
/metato detect the plugin during URL pairing and/stations/*to activate, but the overload protection could self-trip these low-volume, critical endpoints with a 503 — surfacing a misleading "Server is overloaded; retry in 60 seconds" mid-pairing. Both endpoints are now exempt from the server-health throttle so pairing stays reliable. - Accurate app download links during onboarding. The onboarding download buttons now point at the marketing-site download page (which hosts the direct download and TestFlight link) while the iOS App Store listing isn't live yet, and the macOS button shows a "Coming soon" pill instead of linking to an unavailable app.
- Refunds now keep POS and WooCommerce stock in sync. When you refunded a POS order with restocking enabled — especially from the WooCommerce admin — WooCommerce restored the overall product stock, but the per-outlet count that the POS app shows was left at its pre-refund value, so POS and WooCommerce disagreed. The plugin now restores per-outlet stock automatically on every refund (from the app, the WooCommerce admin, or the REST API), crediting the outlet the sale was deducted from, writing a stock-log entry and an order note, and recalculating the overall stock figure. Issued refunds are credited exactly once.
- Removed a redundant, broken app-side restock. Per-outlet refund restock is now handled entirely on the server, so the POS app no longer issues its own stock adjustment after a refund (which previously double-counted in theory and silently failed in practice). Manual stock adjustments — receiving, counts, corrections and transfers — are unaffected.
- Faster order confirmation for online stores. When a device POSTs queued orders and the store is healthy, the plugin now converts them into real WooCommerce orders inline and returns the actual WooCommerce order id in the same response — instead of only a "queued" acknowledgement the device had to poll for. The offline-first guarantee is unchanged: an order is safe the moment it is queued, and the durable Action Scheduler / WP-Cron drain remains the fallback if inline processing is skipped, times out, or errors.
- Fixes paid devices getting stuck on Free after a QR re-pair. Legacy QR-paired and admin-created stations were created with no bound device UUID, which the strict pairing check treated as a permanent mismatch — trapping a paid plan on Free because the device could never complete Phoenix pairing. Such a station now adopts the first device that presents its own WooCommerce key (trust-on-first-use); an already-bound station still rejects any other device, so the binding can never be hijacked.
- Upgrades are now detected on headless sites. The version-aware upgrade routine also runs on
rest_api_init, so a site whose plugin files were swapped by auto-update, WP-CLI, or a managed host — and that may never see a wp-admin page load — picks up the new version (and reseeds the cached/metapayload) on the device's very next REST poll instead of waiting for someone to open the dashboard. - Heartbeat reports live plugin and WordPress versions. The order-feed heartbeat now includes
plugin_versionandwp_version, read straight from the live constant / core (never a cached option), so the device re-runs its preflight and/metarefresh immediately after a file-only upgrade. - One-time review prompt for established stores. A conservative, wp.org-guideline-compliant notice asks for a WordPress.org review — shown only on Oliver POS's own admin screens, only after a store has had an actively paired device for 14+ days, styled as info (never a warning), and gone for good after a single dismissal.
- Listing refresh. Updated the plugin description and screenshot captions to cover tips, receipts and the built-in kitchen display (KDS), and re-optimised the wp.org banners and screenshots.
- Tests. New PHPUnit coverage for the order-queue drain, the trust-on-first-use device/station binding, the heartbeat version fields, and the review-notice timing and dismissal logic.
- Sync-file access guard. The static sync payloads (
catalog.json.gz,delta.json) underwp-content/uploads/oliver-pos/sync/are now protected by a plugin-generated.htaccessthat returns 403 Forbidden unless the request carries your store's pairing sync token (?token=…, the samestvalue embedded in every device connection key). The check runs inside mod_rewrite, so the files keep being served as plain static files with zero PHP per request — preserving the performance property that makes the catalog-file sync path viable on slow shared hosting. The guard is rewritten on every catalog rebuild, on sync-directory creation, and immediately on sync-token rotation. Apache and LiteSpeed are covered automatically; an equivalent nginx snippet is documented in the FAQ. Legacy installs without a stored token deliberately skip the rewrite rule so existing paired devices are never locked out. - Catalog rebuild on device pairing. Activating a station (QR scan / bootstrap pairing) now fires a new
oliver_pos_station_pairedaction; whencatalog.json.gzis missing or zero bytes, the plugin schedules the debounced full-sync regeneration (~30 s) so a freshly installed store has the fast bulk-catalog file ready before the device's initial sync begins — instead of the app falling back to hundreds of paginated/wc/v3/productscalls. Pairing an additional device against an existing catalog stays a no-op. - Tests. New
tests/test-sync-access-guard.php— 9 PHPUnit cases covering guard contents (token rule, 403 flag,.json/.json.gzscope), the empty-token no-lockout branch, guard seeding on sync-dir creation, immediate rewrite on token rotation, rebuild scheduling for missing / empty catalogs, the existing-catalog no-op, andoliver_pos_station_pairedfiring exactly once per successful activation (and never on a failed one).
- Fixes the "site already registered" account-creation deadlock. When a site had previously registered its free Oliver POS account but lost its locally-stored credentials — most often after a plugin update, a database restore, an environment switch, or a manual disconnect — the Dashboard onboarding panel reverted to the "Create your free account" step. Clicking it failed, because the backend correctly reported the domain was already registered, yet the plugin had no way to re-obtain the credentials (the account API key only ever lives on the managed backend). The merchant could neither register nor reach the connected dashboard. The plugin now recovers automatically through a domain-verified re-issue flow instead of dead-ending on that screen.
- New domain-verified credential recovery. When the backend reports the domain is already registered, the plugin runs a recovery handshake: the backend mints a one-time challenge, the plugin serves it from the registered site, and the backend fetches it back to prove the caller controls that exact domain before re-issuing the account credentials. This is the same HTTP domain-control proof used by Let's Encrypt and Google Search Console — credentials are never returned on the request body alone. On success the merchant lands straight on the connected dashboard; on failure they get a clear, actionable message instead of a silent loop. If the backend has not yet enabled the recovery endpoint the plugin degrades gracefully with a support-pointing message rather than erroring obscurely.
- New
GET /wp-json/oliver-pos/v1/recover-challengeendpoint (includes/rest-api/class-recover-rest.php). Unauthenticated and intentionally minimal — it returns only the single opaque, single-use, short-TTL challenge token the plugin itself just generated, carries no merchant data, and is exempt from the §4 503 self-trip so recovery still works on a pressured host.Pay_API_Client::recover_site()drives the two-step handshake and, on success, persists the freshly-issuedsiteId+ encryptedapiKey+registered_envexactly like first-time registration and drops any stale cached JWT (the backend rotates the API key on recovery).Billing::ajax_register()transparently triggers recovery when registration reports HTTP 409 / already-registered, covering both the Billing screen CTA and the Dashboard onboarding CTA (they share the handler). - Hardened the legacy credential migration so it can no longer cause this state.
Activator::migrate_pay_credentials()previously deleted the pre-4.1 flat credential options unconditionally, even when the copy into the environment-namespaced options had been skipped because the target row already existed empty — silently destroying the credential on upgrade. The migration now copies whenever the namespaced value is empty (not just absent), and only retires the legacy rows once the namespaced copies are confirmed present and non-empty; otherwise it leaves the legacy source in place and does not mark itself done, so the next upgrade retries instead of losing data. docs/phoenix-site-recovery-guide.md— implementation guide for the managed-backend team covering the two-step recover contract, the verification fetch, mandatory API-key rotation, SSRF guard, domain normalization, single-use short-TTL challenges, rate limiting, and audit + owner-notification requirements.
- Web register support — Phoenix bearer-JWT verification. The plugin now accepts
Authorization: Bearer <phoenix-jwt>on every/wp-json/oliver-pos/v1/*route and every proxied/wp-json/wc/v3/*route, so the Compose wasm-JS web register hosted atapp.oliverpos.comcan pair against a merchant site without ever sending a WooCommerce consumer secret. Tokens are RS256-signed by Phoenix and verified against the JWKS document the plugin caches from/.well-known/jwks.json(production:phoenix.oliverpos.com; staging:phoenix-staging.oliverpos.com, selected by the existingPHOENIX_ENVconstant). Iron-law: the browser MUST NEVER seeconsumer_key/consumer_secret— the bearer path is the only inbound auth surface for web-origin traffic, and a defensive guard rejects Basic auth from any web allowlist origin to keep a misconfigured upstream proxy from leaking secrets. Native iOS / Android apps continue to authenticate with WooCommerce consumer keys via the existingauthenticate_wc_api_keysbridge — the bearer path is purely additive. - Cross-origin (CORS) headers for the web register. Every authenticated REST response is decorated with
Access-Control-Allow-Origin(echoed from the matched allowlist origin —app.oliverpos.com,app-staging.oliverpos.com, plushttp://localhost:8080only whenWP_DEBUGorOLIVER_POS_DEVis on),…-Credentials: true,…-Expose-HeaderslistingX-OliverPOS-Server-Load,X-OliverPOS-Memory-Pressure,X-OliverPOS-Suggested-PerPage,X-WP-Total,X-WP-TotalPages,Retry-After(the app'sAdaptiveSyncPolicyand rate-limit cooldowns silently misbehave without this list), andVary: Originso CDN caches stay safe.OPTIONSpreflights are short-circuited oninitwith204 No Content+Access-Control-Max-Age: 600. Allowlist is filterable viaoliver_pos_web_register_cors_originsfor self-hosted dev installs. - Adaptive-sync headers widened to
/wc/v3/*. The fourX-OliverPOS-*advisory headers now also land on WooCommerce core REST responses so the web register's first-pair sync (which is dominated by/wc/v3/productsand/wc/v3/orderspulls) gets the same memory-pressure / suggested-per-page clamping that/oliver-pos/v1/*has had since 4.6.0. Newoliver_pos_server_health_route_patternsfilter (plural) lets sites broaden or narrow the scope further; the 4.6.xoliver_pos_server_health_route_patternsingular filter still works as a back-compat override. includes/auth/module. Four new classes, zero new external dependencies.Jwks_Clientcaches the JWKS document in a transient (TTL 24 h, single refetch onkidmiss, 60 s negative cache to prevent flooding Phoenix when bad tokens arrive).Jwt_Verifieris a hand-rolled RS256 verifier on top ofext-openssl— algorithm is pinned (rejectsalg=noneandHS256confusion attacks),exp/iat/nbfhonoured with a 30 s clock-skew leeway, required claims checked (siteId,outletId,stationId,deviceId,iat,exp).Web_Register_Authorchestrates extraction → verify → site / station cross-check, slots in atdetermine_current_userpriority 10 (before WC's auth at 15 and the existing WC-key bridge at 20), and surfaces deferred rejection reasons viarest_authentication_errorsso 401 / 403 bodies carry an actionable code instead of an opaque "logged out".Corshandles the allowlist + preflight + response-header decoration.Station::find_by_device_uuid()— new lookup used by the bearer path to resolve the WP user from the JWT'sdeviceIdclaim (the existingfind_by_user_device()couldn't be reused because the bearer path discovers the user FROM the station row, not the other way around).Rest_Filters::set_current_station_id()— public setter so the bearer-auth path can record the resolved station id without touching private state.oliver_pos_get_current_station_id()continues to work transparently across both the WC-key and bearer auth paths, so station-bound routes likePOST /stations/{id}/activateneed no changes.- Cross-team coordination note. Any change to the verifier (accepted algorithms, claim shape, JWKS URL, allowlist origins, expose-headers list) MUST be flagged to the Kotlin app team before shipping — the app's
PhoenixDeviceJwtProvider,JwtRefresher,BearerTokenHolder, andAdaptiveSyncPolicyare coupled to this contract. See theCROSS-TEAM:block inincludes/auth/class-jwt-verifier.phpanddocs/handover-2026-05-web-register.md§6 for the protocol. - Tests. New
tests/test-jwt-verifier.php(RS256 happy path,alg=none/ HS256-confusion rejection, signature tampering, temporal-claim leeway, required-claim enforcement, JWK → PEM conversion),tests/test-jwks-client.php(cache hit / miss / kid-rotation refetch / persistent miss negative cache, transport-failure, malformed-JWKS handling, env-aware URL resolution + filter),tests/test-web-register-auth.php(resolved-user happy path, deferred rejection plumbing viarest_authentication_errors, site / station mismatch → 403, Basic-from-web-origin → 401, native-call pass-through),tests/test-cors.php(allowlist resolution includingWP_DEBUG/OLIVER_POS_DEVgating, expose-list contract assertion, no-op for unknown origins). Existingtests/test-rest-filters-server-health.phpextended to cover/wc/v3/*widening and back-compat with the legacy singular pattern filter. docs/handover-2026-05-web-register.md— plugin-side companion to the app handover atoliver-pos-app/docs/handover-2026-05-web-register.md. Documents the wire contract, the allowlist, theOLIVER_POS_DEVflag, the JWKS cache TTL, the test fixtures, and the cross-team coordination protocol.- Out of scope, deliberately. No
/devices/bootstraproute alias (the app contract's path-naming preference) — the bearer path works against the existing/bootstrapand/bootstrap/previewroutes unchanged. No Stripe Terminal internet-reader work (Bucket B). No new endpoints; routes mentioned in the contract that this plugin doesn't currently expose (e.g./products/delta,/customers) land in their own follow-up PRs.
- Adaptive-sync resilience contract. Every
/oliver-pos/v1/*REST response now carries four advisoryX-OliverPOS-*headers that let the iOS / Android device shrink sync batches, add inter-page delays, and reduce variation concurrency before anything actually fails. Headers areX-OliverPOS-Server-Load(1-min load average normalised by detected CPU cores; literalunknownwhensys_getloadavg()is unavailable on Windows / App Engine / Cloud Run),X-OliverPOS-Memory-Pressure(low/medium/highderived frommemory_get_usage(true)vsini_get('memory_limit')with 60 % / 80 % cut-offs),X-OliverPOS-Suggested-PerPage(5–100ceiling the plugin thinks the host can sustain — the app's AIMD ladder clamps to this on the lower side and ignores it on the higher side, so a misconfigured plugin can never push a cashier into 1 000-item batches), andX-OliverPOS-PHP-Time-Used-Ms(telemetry only). Wire contract is in the app repo atdocs/plugin-adaptive-sync-guide.md§3. - 503 self-protection. New
rest_request_before_callbacksshort-circuit refuses/oliver-pos/v1/*requests with503 oliver_pos_overloaded+Retry-After: 60when the host is at ≥90 %memory_limitOR sustained 1-min load ≥2.0 per core — instead of letting PHP / nginx return a 504 / 502 / blank HTML page 30 s later. CPU alone (without sustained load) is deliberately NOT a trip reason — a fresh install pegs CPU during the initial catalog rebuild without a queue forming. The 503 body carries the documented{code, message, data:{status, retry_after, load_avg}}shape andRetry-Afteris lifted fromdata.retry_afterto a real HTTP header by the existingapply_retry_after_header()filter (now scoped to both 429 and 503). Critical-UX routes —/heartbeat,/bootstrap,/devices/phoenix-pair-code,/preflight,/orders— are exempt from self-tripping viaSELF_TRIP_SKIP_PREFIXES(heartbeat is the connectivity probe, bootstrap/pairing is critical UX, orders POST hands off to a durable queue). Skip list is filterable viaoliver_pos_server_health_self_trip_skip_routes. - New
GET /wp-json/oliver-pos/v1/preflightendpoint. Cheap startup-time capability probe so the device can clamp its AIMD ladder before firing the first real sync. Returns{ max_per_page, supports_partial_responses, average_load_avg_24h, php_memory_limit_bytes, php_max_execution_time_seconds, plugin_version, wp_version, wc_version }.max_per_pageis sourced from the liveServer_Healthsnapshot so pressure already clamps the advertised ceiling at first contact.supports_partial_responsesisfalsein 4.6.x per the §7 compatibility matrix — flipping totrueis a single PR once the §5 partial-responses contract is settled with the app team.average_load_avg_24hisnulluntil a rolling sampler ships; reportingnullis honest, reporting current load and calling it a 24-hour average would not be. Permission-gated onedit_shop_ordersand exempt from self-trip (the probe itself must always work on a buckling host). - Tools → Site Health → Info / Status integration. New
Oliver POS – Adaptive syncpanel surfaces the static host facts (detected CPU cores,memory_limit,max_execution_time), the current snapshot's suggestedper_pageceiling, today's 503 self-trip count, and the timestamp of the last trip. A direct (synchronous) Site Health Status test flips fromgood→recommendedat ≥5 self-trips/day andrecommended→criticalat ≥25/day, with copy that explains the degraded mode is safe (cashiers can keep selling) but usually means PHPmemory_limitis borderline. Lets support diagnose "host is buckling regularly" without tailing PHP logs. includes/class-server-health.php— single source of truth for the adaptive-sync probe. Per-request memoized snapshot (detect_cores()probesNUMBER_OF_PROCESSORSthen/proc/cpuinfo, nevershell_exec('nproc')which is blocked on every managed host this targets;detect_load()returnsnullwhensys_getloadavg()is unavailable;detect_memory_used/limit()reads PHP's INI). Filterable viaoliver_pos_server_health_snapshotso CI smoke tests and dev sites can force a known shape, andoliver_pos_server_health_is_overloadedfor kill-switch use. Daily self-trip counter is bounded to onewp_optionswrite per request (the alternative — increment-on-every-call — would itself contribute to load), keyed ongmdate('Y-m-d')so it rolls naturally on day-boundary.tests/test-server-health.php— 14 PHPUnit cases covering snapshot memoization + reset, memory-pressure threshold boundaries (59 / 60 / 79 / 80 / 95 %),suggested_per_pagederivation (pressure × load × cores),unknownload fallback, header emission on healthy /unknown/ multi-core / non-WP_REST_Responseinputs,is_overloaded()boundary tests (memory 90 %, load 2.0/core, multi-core scaling,nullload), filterable kill-switch,build_overloaded_error()wire-shape match againstplugin-adaptive-sync-guide.md§4.2, omission ofload_avgwhensys_getloadavg()is unavailable, daily counter increment, and rollover ongmdate('Y-m-d')change.tests/test-rest-filters-server-health.php— 9 integration cases dispatching real/oliver-pos/v1/*REST requests: every endpoint carries the four advisory headers, headers reflect the forced snapshot,/wp/v2/*core routes never get our headers (scope assertion), 503 fires withRetry-After+X-OliverPOS-*headers on a forced-overload snapshot,heartbeat/preflightare exempt, WP core routes never get a 503, the self-trip counter increments by one per refused request, andoliver_pos_server_health_self_trip_skip_routescan extend the allowlist at runtime.tests/test-preflight-endpoint.php— 6 cases asserting the documented shape, type enforcement on every field,max_per_pageclamps under pressure,supports_partial_responses=falseregression guard for the §7 matrix, payload filter, 403 for users withoutedit_shop_orders, andCache-Control: no-storeso capability changes propagate.- Plugin compatibility matrix moves to 4.6.x (per
plugin-adaptive-sync-guide.md§7). App-side reads of advisory headers go from no-op (4.5.x) to actively driving the AIMD ladder, and 503 /Retry-Afteris the new degraded-mode contract. Apps that don't read the headers ignore them; a plugin that doesn't emit them (older releases) keeps working with the existing fixed-batch behaviour, so the rollout is strictly additive in both directions. - Out of scope, deliberately. §5 ("time-budgeted
/products/delta") of the guide describes a/wp-json/oliver-pos/v1/productsendpoint that does not exist in this plugin — product catalog reads in the device app go through WooCommerce core's/wc/v3/products, which we can't addtime_budget_msto without monkey-patching WC. The §7 matrix flags partial responses as 4.7.x optional / 4.8.x required, so this is not a 4.6.0 blocker. Plugin-side handover docdocs/handover-2026-05-adaptive-sync.md§5 flags the open question to align with the app team before shipping any partial-response surface. - Legacy 2.x / 3.x → 4.x upgrade rescue notice. Two-pronged mitigation for merchants who are still on the original Oliver POS plugin (different codebase, removed from wp.org and re-published under the same
oliver-posslug as the 4.x rewrite). Prong 1 is the new= 4.6.0 =block in== Upgrade Notice ==above, which wp.org renders right above the "Update Now" button in the Plugins screen and Dashboard → Updates — the only message that reaches the merchant BEFORE they click. Prong 2 is a new one-shot, dismissiblenotice-warningrendered on the first wp-admin page load AFTER a pre-4.0 → 4.x jump: explains that paired devices and old settings are not carried over, links to the migration guide and support, and survives page reloads via a stickyoliver_pos_legacy_upgrade_fromoption (cleared on Dismiss). Detection runs insideActivator::maybe_upgrade()BEFOREoliver_pos_versionis bumped, so the original pre-4.0 fingerprint is preserved across subsequent 4.x → 4.x point updates. Fresh installs (oliver_pos_version = '0.0.0') and 4.x → 4.x upgrades deliberately do NOT trigger the notice. New class lives atincludes/admin/class-legacy-upgrade-notice.phpwith full unit coverage intests/test-legacy-upgrade-notice.php(record / render / dismiss + activator integration).
- Critical inventory-accuracy fix (OLV-2026-012). POS orders coming through
POST /oliver-pos/v1/orderswere decrementing product / outlet stock twice — once via WooCommerce core'swc_reduce_stock_levels()when the order transitioned tocompleted, and a second time via a customOrder_Queue::deduct_outlet_stock()call right aftersave(). A 2-unit sale against a 42-unit row landed at 38 instead of 40. Both stock-reduction order notes reported "now 40" because each handler captured its own pre-write snapshot, so the bug was invisible from the cashier's audit trail. Reproduced by the native team onms-oliver-small-store.instawp.coOrder #149 (Shoe Cleaner SKU 85960). - Single-source-of-truth decrement.
Order_Queue::populate_order()no longer performs its own per-outlet decrement. WooCommerce core'swc_reduce_stock_levels()→do_action('woocommerce_reduce_order_stock', $order)→Stock_Manager::route_stock_reduction()is now the single decrement primitive for both POS and online orders, and it already handles the atomicOutlet_Stock::decrement()UPDATE, the heal-on-read seed from legacy_oliver_stock_{outlet_id}postmeta, the dual-mode legacy meta dual-write, theStock_Meta::sync_global_stock()tail innew_onlymode, and the "Oliver POS: × N deducted from … (stock now: N)" cashier audit note. The previous custom decrement was a near-verbatim duplicate ofStock_Manager::deduct_outlet_stock()and added ~70 lines of stock logic for nothing but a second write. - Pre-flight check preserves the structured
insufficient_stock:device error. Removing the post-save decrement also removed the deficit-reporting branch the device relies on to render its stock-conflict UI. Replaced with a new privateOrder_Queue::preflight_outlet_stock()that runs BEFORE$order->save(), reads each line item's available outlet stock (with the same heal-on-read seed asStock_Manager), and short-circuits the save with aRuntimeException( 'insufficient_stock:' . wp_json_encode( $deficits ) )when any line can't be fulfilled. The deficit array shape (product_id,outlet_id,requested,available) is byte-for-byte identical, soOrder_Sync::handle_sync()keeps forwardingerror: "insufficient_stock"+deficits[]to the device unchanged. The outer catch then deletes the empty pending shell fromwc_create_order()viadelete_partial_order()andmark_failed()writes theinsufficient_stock:prefix onto the queue row (treated as terminal — no retry, since retrying would never make the deficit smaller). - New "Pair a device" button on the Dashboard header. Always-on affordance to mint a fresh station QR / connection key after disconnecting, reinstalling, or losing a paired device — without drilling into Outlets → edit → Stations. Reuses the existing
oliver_pos_add_stationAJAX pipeline and the samerenderQRCode/ connection-key copy helpers as the outlet-edit Stations meta box, so the QR contents and key are byte-for-byte identical between the two surfaces. The modal markup was lifted into a sharedOutlet_Admin::render_qr_modal()helper so there is a single source of truth. - Out of scope, deliberately unchanged. The wire payload contract on
OrderSyncEntry(nostatus/set_paid/reduce_stock/manage_stock/stock_quantityfields — locked in the iOS / Android app byLocalOrderTest.completedSaleEntryOmitsStatusField), the refund restock REST path (POST /oliver-pos/v1/products/{id}/stock→Stock_Rest::process_adjustment()), andStock_Manager's behaviour for online (non-POS) orders. - Operational note for already-affected merchants. Stores running 4.5.9 or earlier will have drifted stock counts proportional to POS volume since the bug was introduced. The fix stops future drift only; reconciling existing counts requires either a manual stock-take or a one-time admin action — flagging to the rollout team to coordinate before bumping merchants to 4.5.10.
tests/test-order-queue-stock-deduction.php— 9 PHPUnit cases exercising the fullOrder_Queue::enqueue()→process_pending()→process_claimed()→populate_order()pipeline against a realWC_Product_Simple, thewp_oliver_outlet_stocktable and the legacy postmeta. Includes the OLV-2026-012 canary (stock 42, qty 2 → final 40 — wired into CI as the regression guard), a quantity sweep (1, 3, 5), a two-line-item case, amanage_stock=falsecase asserting the outlet row stays put, the receipt-number idempotency case, the insufficient-stock failure path with deficit-shape and no-partial-order assertions, an order-notes assertion that exactly one "Oliver POS: × N deducted from … (stock now: 40)" note appears with the correct post-decrement value, and a refund-regression case confirmingOutlet_Stock::increment()still restocks by exactly the refunded quantity.
- New
POST /wp-json/oliver-pos/v1/staff/me/pin/changeREST endpoint — the only path that rotates an existing staff PIN. Requirescurrent_pin(constant-time-verified against the stored hash viawp_check_password) plus anew_pin(4–6 digits). Closes the long-standing "Set up or change PIN" cliff in the Oliver POS iOS app (bug OLV-2026-002): the app was reusing the first-set endpointPOST /staff/me/pin, which correctly returns409 oliver_pos_pin_existsonce a PIN is stored, so the new PIN never persisted. The first-set endpoint stays exactly as it is —/pin/changeis the new, dedicated rotation path. - Failed
current_pinattempts on the new endpoint share the exact same rate-limit bucket asPOST /staff/verify-pin(5 failures per 15 min, keyed by IP + WP user id). An attacker cannot bypass the verify-pin lockout by alternating between the two endpoints. Format errors (400), no-PIN-set (403), uniqueness collisions (409), and successful changes (200) never increment the counter — only the401 oliver_pos_invalid_pinbranch does. - Successful changes reuse
POS_Roles::set_pin(), so the new PIN hash is produced by the samewp_hash_password()pipeline as the first-set endpoint and the staff heartbeat hash is bumped on save (other paired devices resync on their next heartbeat — closes the "Device A and Device B disagree about the active PIN" UX hazard). - New bounded ring-buffer audit log (
oliver_pos_pin_audit_log, capped at 50 entries, FIFO eviction) records the fact of every PIN change —{ts, user_id, action: "pin_changed", ip, user_agent}. Neither the current nor the new PIN is ever passed to the audit helper or written to the log. Option is cleaned up on uninstall. tests/test-staff-me-pin-change-endpoint.php— 8 PHPUnit cases covering the 200 happy path (hash rotated, staff heartbeat hash bumped, audit row appended), each400 oliver_pos_pin_invalidshape, the401 oliver_pos_invalid_pinrate-limit increment,403 oliver_pos_no_pin_set,409 oliver_pos_pin_takencollision detection, mixed-endpoint429 oliver_pos_rate_limitedlockout withRetry-After, a regression guard that the plaintext PIN never appears in the serialised audit log, and confirmation that a successful change does not invalidate the auth session.
- Billing dashboard iteration on top of 4.5.7 —
Billingcore rework,Billing_Adminpolish, JS/CSS refinements, and additionalPay_API_Clientresilience. NewBillingClaimTestunit coverage. - First-run UX: promoted the "Create your free Oliver POS account" CTA from the Billing page into the existing Dashboard onboarding panel so it's the first thing a merchant sees after activation, with conversion copy ("Free forever · No credit card · Instant · Start selling") and a one-click flow. The Billing-page CTA stays as a fallback surface.
- Still a single explicit, disclosed click — WordPress.org Plugin Directory guideline 7 (no "phoning home" without informed consent) preserved. Activation continues to make zero outbound calls; the new card carries the same expandable "What gets sent when you click" disclosure as the Billing CTA, listing site URL, site name, and admin email before any request goes out.
- No new endpoints. The new Dashboard button reuses the existing
wp_ajax_oliver_pos_billing_registerhandler (nonceoliver_pos_billing), so the throttle, error mapping, and Phoenix register path are a single source of truth across both surfaces. - Hero subhead on the Dashboard panel updated to reflect the new step. When
Pay_API_Client::is_registered()is already true (e.g. the merchant registered from Billing first), the card renders in a compact "Account created" state in place so returning merchants see continuity rather than a missing step.
- Phoenix device pairing bridge, plan-tier gating,
/metawire-shape fix. Staff admin form values preserved on validation errors and the user dropdown is broadened.
- Fresh-install UX fix: outlet stock is now seeded from WooCommerce's existing
_stockon activation, so a single-outlet store sees real inventory the moment a device pairs. Previously every product showed "0 in stock" until the merchant manually entered per-outlet quantities — busy-work that defeated the "install → pair → start ringing" promise. - Implemented as a single bulk
INSERT … SELECTin the newActivator::maybe_seed_outlet_stock_from_woo()so it stays fast on 50k+ SKU catalogs. Only products / variations with_manage_stock = 'yes'andpost_status = 'publish'are seeded; unmanaged products (which rely on_stock_statusalone) are deliberately skipped so they don't suddenly look out-of-stock on the device. - Four belt-and-braces guards: the seed is a no-op when already run (one-shot
oliver_pos_outlet_stock_seededoption), when the install has more than one active outlet (multi-outlet stores must decide the split themselves), when thewp_oliver_outlet_stocktable already has any rows, or when legacy_oliver_stock_{outlet_id}postmeta exists. The seeder will never overwrite a value the merchant has typed in. - Self-heal for existing installs: the same routine runs from
Activator::maybe_upgrade()after the outlet has been verified, so a merchant who upgraded from 4.5.5 (or earlier) without ever pairing a device picks up the mirror automatically on the next admin page load. - Eight new PHPUnit cases in
tests/test-outlet-stock-seed.phpcover the mirror path (simple products, variations, negative stock, empty catalog) and every guard branch, plus a re-run idempotency check.
- Security: removed
wp_set_current_user( $customer_id )fromCoupon_Rest::init_cart_context()(POST/oliver-pos/v1/coupons/validate). The endpoint no longer impersonates the request'scustomer_idwhile running the coupon validation pipeline, closing an authorization-bypass primitive flagged by the WordPress.org plugin review team.WC()->customer = new WC_Customer( $customer_id )is still set, so per-user usage limits,customer_emailrestrictions, billing address, and tax location continue to evaluate against the right customer; role / capability-restricted coupons (e.g. "wholesale-only") will now correctly require the customer's own session. - Security: removed
wp_set_current_user( $order->get_customer_id() )fromPOS_Payment_Page::set_customer_context()on the POS pay-for-order page (?oliver_pos_pay=1&...&key=ORDER_KEY) as the same defensive sweep.WC()->customeris still scoped to the order's customer so billing and tax context are unchanged. - New
oliver_pos_payment_customer_idfilter andPOS_Payment_Page::resolve_payment_customer_id()static helper give third-party balance-based gateways (store credit, gift card, wallet) a stable hook for resolving the in-flight POS customer without callingget_current_user_id(). Seedocs/balance-gateway-migration.mdin the development repository for the worked migration example and POS-app test checklist. - The only remaining
wp_set_current_user()call sites in the codebase are now insidetests/(PHPUnit auth setup) — nothing in shipping code.
- WordPress.org submission pass — privacy, security, and Plugin Check cleanup before the directory listing goes live.
- Privacy / "phone home" hardening (Plugin Directory guideline 7): the silent
current_screenauto-register on the Billing and Oliver Pay admin pages is gone. Opening either screen on a fresh install now makes ZERO outbound calls tophoenix.oliverpos.com; the merchant has to click the new "Create your free Oliver POS account" CTA on the Billing screen (or the existing "Connect with Stripe" CTA on the Oliver Pay screen) for the site URL + admin email to be transmitted, and the Billing CTA lists exactly what gets sent before the click. - Removed the
Plan_Badgelive-Phoenix injection — tier badges on the Dashboard / Settings / Reports / Staff / Outlets / Receipts admin pages now read the persistedoliver_pos_subscription_planoption only and never trigger a Phoenix call. The persisted option is still refreshed by the Billing screen on every successful read. - Security:
GET /oliver-pos/v1/staffnow omits the legacypin_hashfield by default (theoliver_pos_emit_pin_hashoption flips to0). TheDeprecation/Sunsetheaders stay; the field is removed entirely in 4.6.0. Site owners running an older paired Oliver POS app build that hasn't been updated yet can re-enable it temporarily withwp option update oliver_pos_emit_pin_hash 1. - Security: receipt templates posted to
oliver_pos_save_templateare now fully sanitized per-field inReceipt_Templates::sanitize_template()— section type, alignment, paper width, every section-config scalar, and the styling block — before being persisted towp_options. Unknown section types and non-scalar config values are dropped. - Plugin Check / PCP cleanups:
wp_unslash()added around$_POSTintegers in product-fields meta saves, admin image preview now builds the<img>via DOM rather than HTML string concatenation, and the receipt-config / receipt-template AJAX handlerswp_unslashthe$_POSTfallback path. - Translation template regenerated against the 4.5.3 plugin-name / description rebrand; SVN
/assets/screenshot set trimmed to match the 8 captions in the readme (wp.org displays at most 10). - External-services disclosure refreshed to reflect the explicit-CTA flow and to list the previously-undocumented
/api/subscriptions/pricing-table-configand/api/subscriptions/plansendpoints. - Verified against WordPress 7.0 (released May 20, 2026). No blocks, no iframed-editor surfaces, no AI Client / Connectors / Abilities API consumers in the plugin, and
Requires PHP: 8.1is already above WP 7.0's new floor (7.4).Tested up to: 7.0in readme.txt. - No app-team contract changes other than the
pin_hashdefault flip; seedocs/handover-2026-05-staff-pin-online-verify.mdfor the rollout plan.
- Readme / SEO refresh — title, short description, plugin-header description and tags realigned with the new oliverpos.com positioning (iPhone, iPad, Android, Tap to Pay, Stripe Terminal). Swapped the
ipadtag for the higher-trafficposslug; iPad coverage stays in the title and short description. - Two new readme sections — "Real-Time Sync Across Every Device" and "Works With the WooCommerce Plugins You Already Run" (named compatibility for Subscriptions, Memberships, Bookings, Product Bundles, Points & Rewards, Gift Cards and WooPayments).
- Devices section reworked to lead with native iPhone / iPad / Android apps and Tap to Pay; web register for Mac / PC / Chromebook called out explicitly.
- Two new FAQs covering Tap to Pay on iPhone / Android (no extra reader required) and compatibility with the most-used WooCommerce extensions.
- Rewrote all eight screenshot captions for keyword density and image-search clarity. No code changes in this release.
- WordPress.org pre-submission pass — bundles unminified upstream sources for the vendored Chart.js / qrcode-generator builds, ships the full GPL-2.0 license text, regenerates the translation template, and refreshes the readme for the 6.9 release window.
- External-service disclosure for
js.stripe.com/v3/pricing-table.jsadded, and the script is now enqueued from PHP on the Billing admin screen instead of being injected at runtime by JavaScript. - Security hardening:
POST /stations/{id}/activaterejects station-key requests whose{id}does not match the authenticating key's bound station (returns403 oliver_pos_station_mismatch). - PIN-hash deprecation begins:
GET /staffadds apin_hash_deprecated: truemarker plusDeprecation/Warningresponse headers. A newoliver_pos_emit_pin_hashoption (defaulttrue) lets sites flip to the v4.6 behaviour early, in which case the per-rowpin_hashfield is omitted entirely. - New transient-backed rate limiter on
POST /bootstrap,GET /bootstrap/preview,POST /staff/verify-pin, andPOST /staff/me/pin(5 failures per 15 minutes per IP+user). Throttled requests return429 oliver_pos_rate_limitedwith aRetry-Afterheader. - HPOS-aware money-cents backfill — the migration now finds POS orders regardless of whether WooCommerce is using HPOS, fixing a stuck
oliver_pos_money_cents_migratedflag on HPOS-only stores. - Dashboard "View All" link routes to
admin.php?page=wc-orderswhen HPOS is active instead of the legacyedit.php?post_type=shop_orderURL (which is empty under HPOS). - Removed two unconditional
console.errorcalls from the Billing admin JS; diagnostics now gate behind?oliver_debug=1.
- Iteration on the 4.5.0 staging readiness — refinements to
Pay_API_Client(auth retry path), billing dashboard JS/CSS polish,Billing_Servicerework,Activatorcleanup, and a full rewrite of the Billing service unit-test suite.
- Phoenix staging readiness — Oliver Pay admin now shows an env pill (yellow "Phoenix: STAGING (test mode)" on staging, neutral on production) and a "Test connection" button that round-trips through
/api/subscriptions/plansagainst the active Phoenix environment. Staging mode is enabled by addingdefine( 'PHOENIX_ENV', 'staging' )anddefine( 'PHOENIX_STAGING_BYPASS_TOKEN', '...' )to wp-config.php; production is the default. - New
dev/staging-smoke.phpscript (wp eval-file) runs 13 assertions end-to-end against staging Phoenix including Connect account creation, Terminal location sync, and the §9.11 cross-env credential isolation check.
- Maintenance redeploy — re-runs the version-aware upgrade routine and refreshes plugin files on disk
- Maintenance redeploy — picks up the latest plugin name / description refresh used in the WordPress.org listing alongside the 4.4.0 billing dashboard overhaul.
- Billing dashboard overhaul — full plan cards with tier accents, dedicated lifetime card, non-blocking status banners for
past_due/canceled/unpaid, feature chips, and an embedded Phoenix-hosted pricing table section. - New helpers in
Billing_Adminfor plan/tier/state resolution, currency-aware price formatting, billing-period suffixes, and feature-chip humanisation. Billing_ServiceandPay_API_Clientrefinements; Phoenix call retry path tightened.Activator::maybe_upgrade()extended for the new billing data shape.- Order feed and sync generator hardening; uninstall cleanup expanded.
- Updated meta-endpoint test coverage.
- New
GET /wp-json/oliver-pos/v1/bootstrap/previewandPOST /wp-json/oliver-pos/v1/bootstrapREST endpoints power the "Connect with site URL" reverse-pairing flow shipped in the Oliver POS app. The merchant types only their WordPress URL on the device, approves a one-page wp-admin Application Password prompt, and the app self-configures. - Both routes use HTTP Basic Auth (Application Password preferred, real WP password as fallback) and require
manage_woocommerce. The mutatingPOST /bootstrapmints a WooCommerce REST API key, optionally creates a new outlet, registers a station bound to the device, and returns astore_connectionpayload. - Bootstrap is fully idempotent on
(user_id, device_uuid)— a re-run after a mid-pair crash returns the same key / secret instead of orphaning a duplicate WooCommerce API key. - Stations table gains
device_uuid,platform,user_id, andconsumer_keycolumns plus aUNIQUE KEY (user_id, device_uuid)for idempotency lookups. - One-shot wp-admin success notice is shown to the bootstrapping user on the next admin page load, then auto-clears.
- Readme rewrite — title, tags, short description and body all refreshed; every external link points directly at oliverpos.com (no redirect shorteners); new Privacy & Security section added.
- Billing admin rewrite — replaced the legacy 3-state Billing page with a single Phoenix-driven dashboard that shows the current plan badge, a "Manage Subscription" button (Stripe Customer Portal) and a "View Plans" button (Phoenix-hosted Stripe pricing table). Lifetime customers see a "Lifetime" tag and the View Plans button is hidden.
- New WP REST routes under
/wp-json/oliver-pos/v1/billing/(current,manage-link,pricing-link) proxy Phoenix from the server. The Phoenix API key and JWT never leave the server. - Five-minute transient cache on
/billing/current. The cache is invalidated automatically when the merchant returns from the Stripe portal so the badge picks up the new plan immediately. - New status banner on the dashboard for
past_due/canceled/unpaidsubscriptions. Non-blocking. - Removed the legacy
wp_ajax_oliver_pos_billing_*AJAX handlers. The Stripe Pricing Table now lives on Phoenix.
- Added
GET /wp-json/oliver-pos/v1/metaREST endpoint for the Oliver POS app's tax / cash / gateway configuration. Replaces the staticwp-content/uploads/oliver-pos/sync/meta.jsonfile. - Tax
rateis now serialised as a 4-decimal string (e.g."15.0000"). - Tax classes with no resolved rates for an outlet are omitted from
outlet_ratesinstead of being emitted as empty arrays. - New
tax.cart_discount_taxes_subtotalfield mirrorsprices_include_taxso the device can apply the correct cart-level discount semantics. - The cached meta payload now refreshes synchronously when a WC tax rate, outlet address, or
woocommerce_calc_taxestoggle changes. For the full release history including the 4.0.x rewrite and the legacy 2.x changelog, see oliverpos.com/changelog or theCHANGELOG.mdin the public development repository.