
OmniOffloader — Multi-Cloud Media Offload & CDN
| 开发者 | huzaifaalmesbah |
|---|---|
| 更新时间 | 2026年10月17日 02:59 |
| PHP版本: | 8.1 及以上 |
| WordPress版本: | 7.1 |
| 版权: | GPL-2.0-or-later |
| 版权网址: | 版权信息 |
详情介绍:
- Closer to your visitors. A CDN keeps copies of your media in data centers around the world, so each visitor gets them from a nearby location. Pages load faster, especially for visitors far from your server.
- Less work for your server. Your server no longer sends every image, so it has more power left for your pages, your shop and your admin screens, even during traffic spikes.
- Lower bandwidth costs. Media traffic goes through the CDN instead of your hosting plan's bandwidth.
- Better page speed scores. Faster-loading images help your Core Web Vitals, such as Largest Contentful Paint (LCP), which tools like Google PageSpeed Insights measure.
- Fewer stale files. Turn on object versioning and every changed file gets a new address, so the CDN never shows an old copy.
media.yoursite.com) with Cloudflare, Amazon CloudFront, BunnyCDN or your storage provider's built-in CDN. Your visitors only see your brand.
Works with these cloud storage providers
- Amazon S3
- Cloudflare R2
- DigitalOcean Spaces
- Backblaze B2
- Wasabi
- Any other S3-compatible storage, such as MinIO, Storj, OVHcloud, Linode or Scaleway. You enter the address and region your provider gives you, and you can even give it your own name.
- Offload new uploads automatically. Every new image is copied to the cloud in the background, with all its sizes. You keep working; the upload screen never waits.
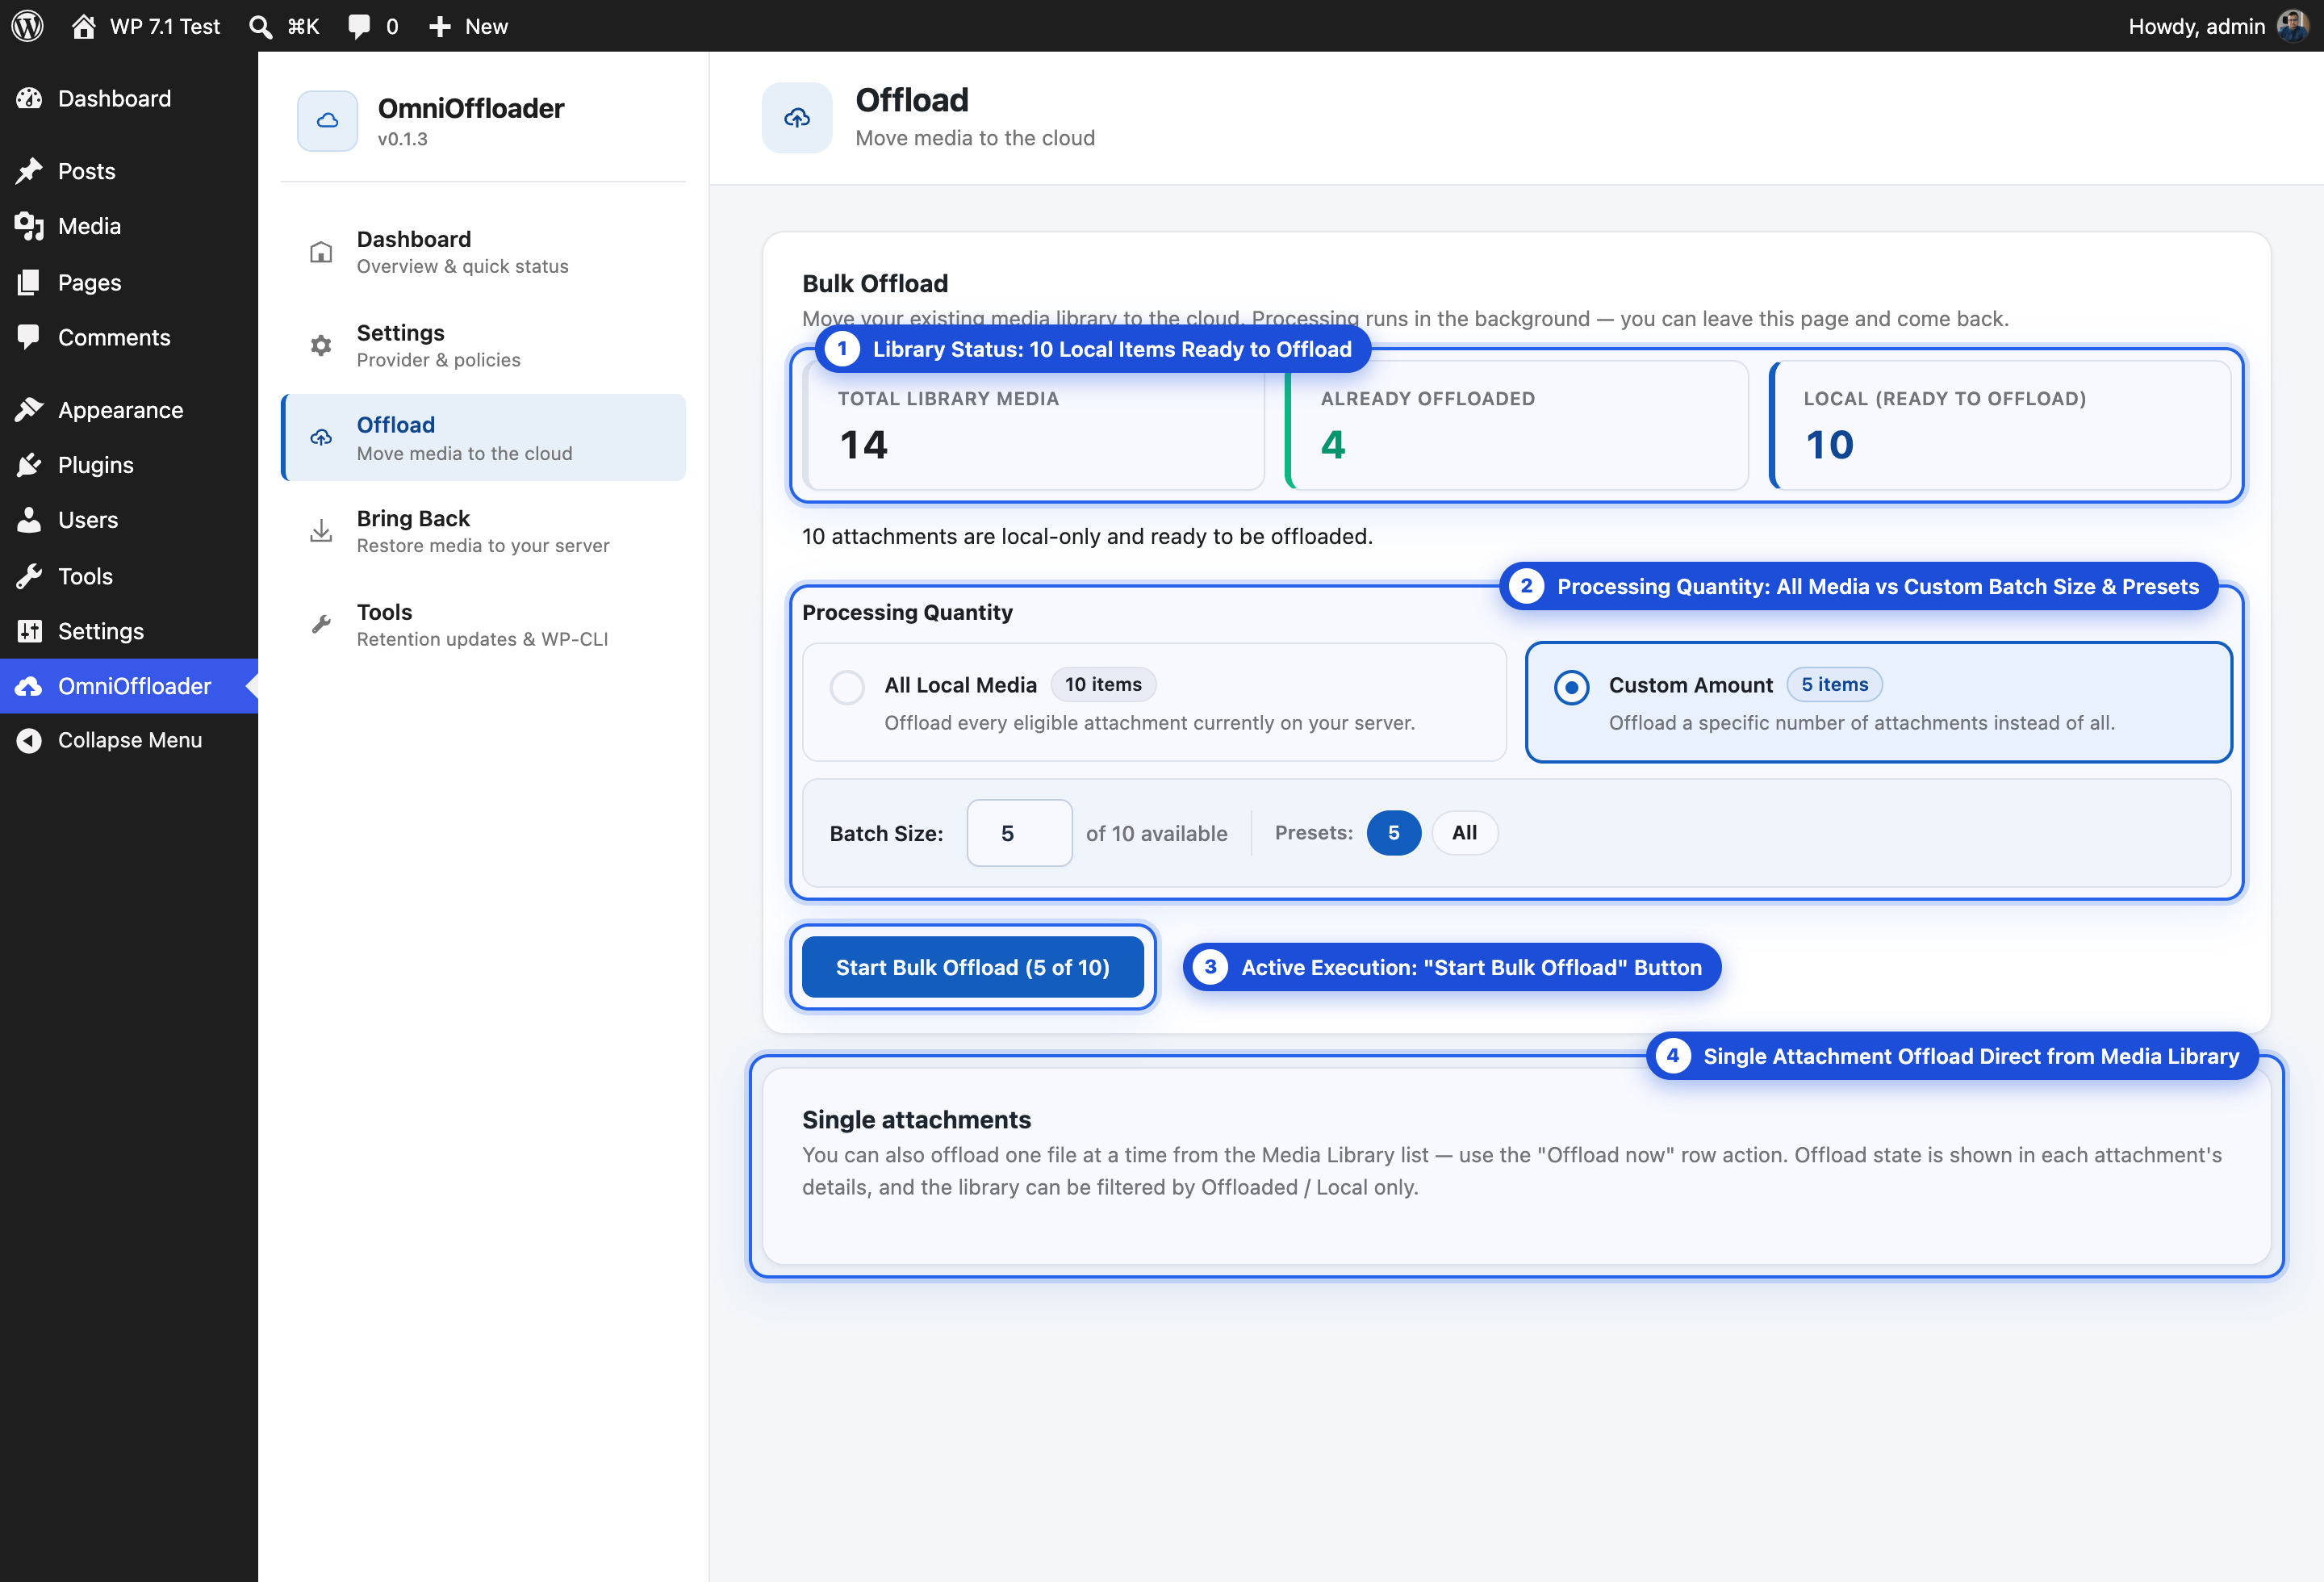
- Offload the media you already have. Move your whole library, or just a part of it (10, 50, 100 items or any number), with a progress bar and a Cancel button.
- Serve media from your CDN. Your images load from your own domain or CDN instead of your server. Not ready yet? Offload now, keep loading media from your server, and switch to the CDN later with one click.
- Choose what stays on your server. Keep everything (safest), remove only the extra image sizes WordPress creates, or move everything to the cloud to free the most space.
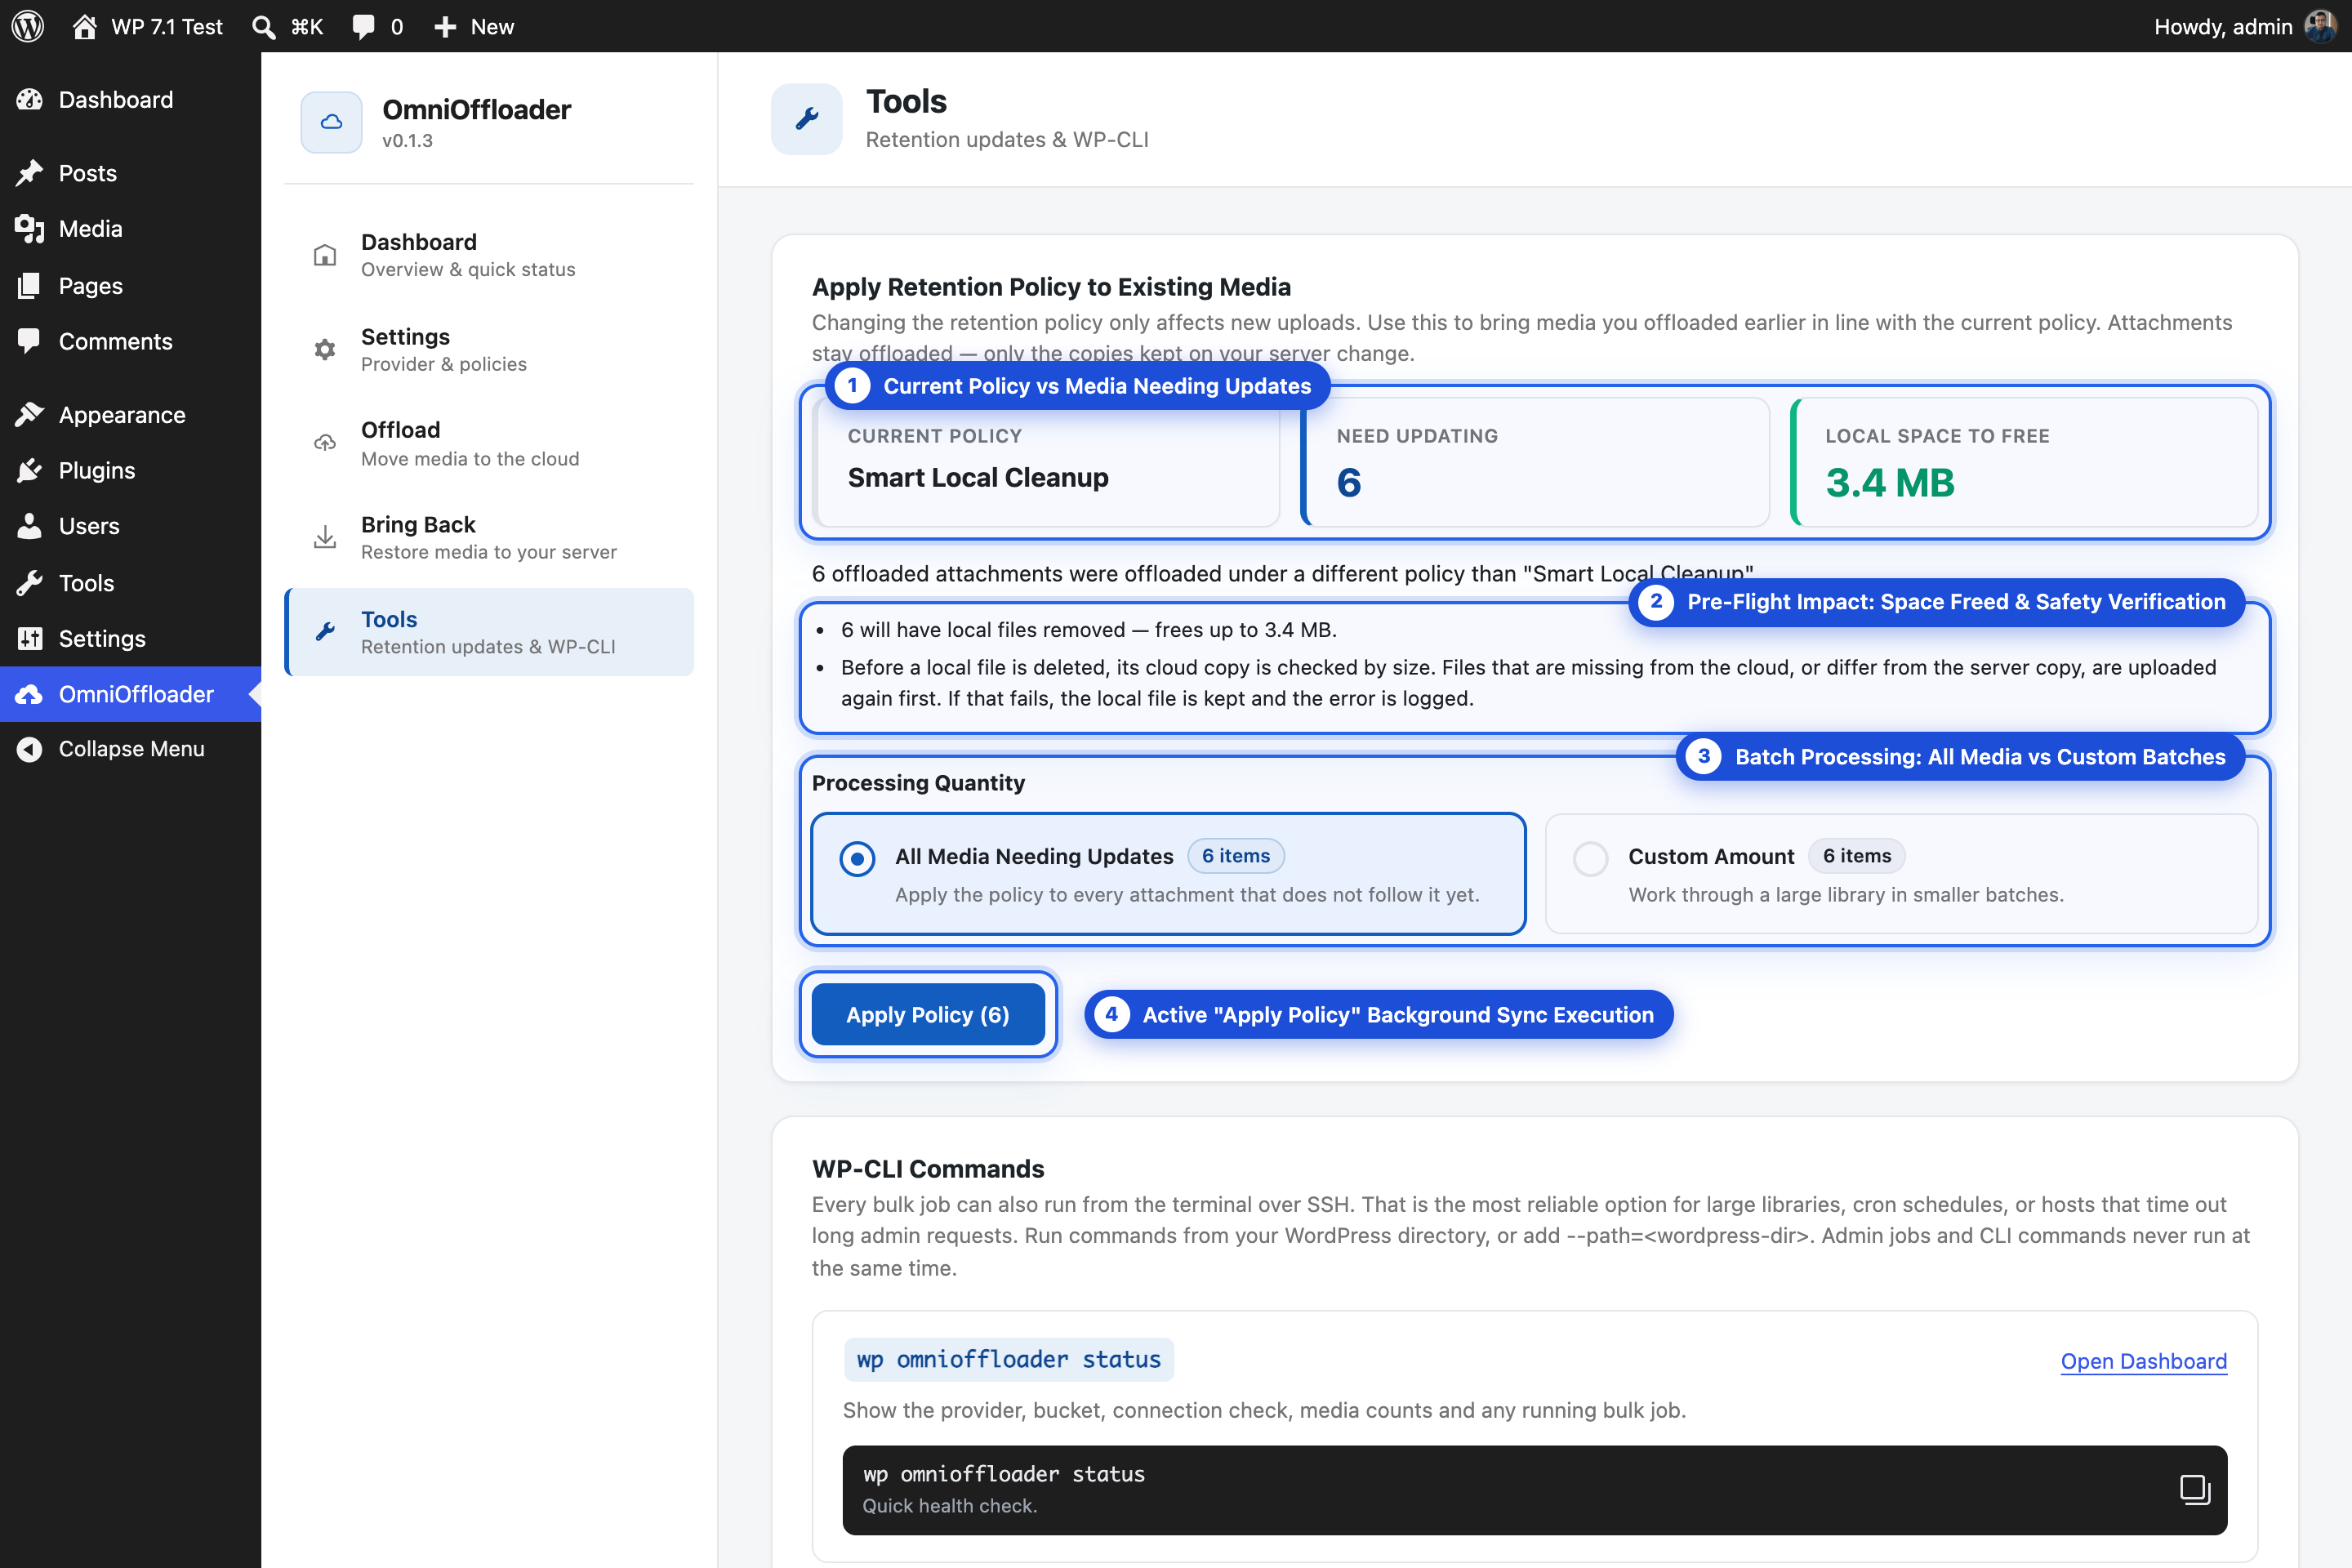
- Change your mind later. Picked a different option for what stays on your server? Apply it to media you already offloaded from the Tools screen. Every file is checked in the cloud before anything is deleted.
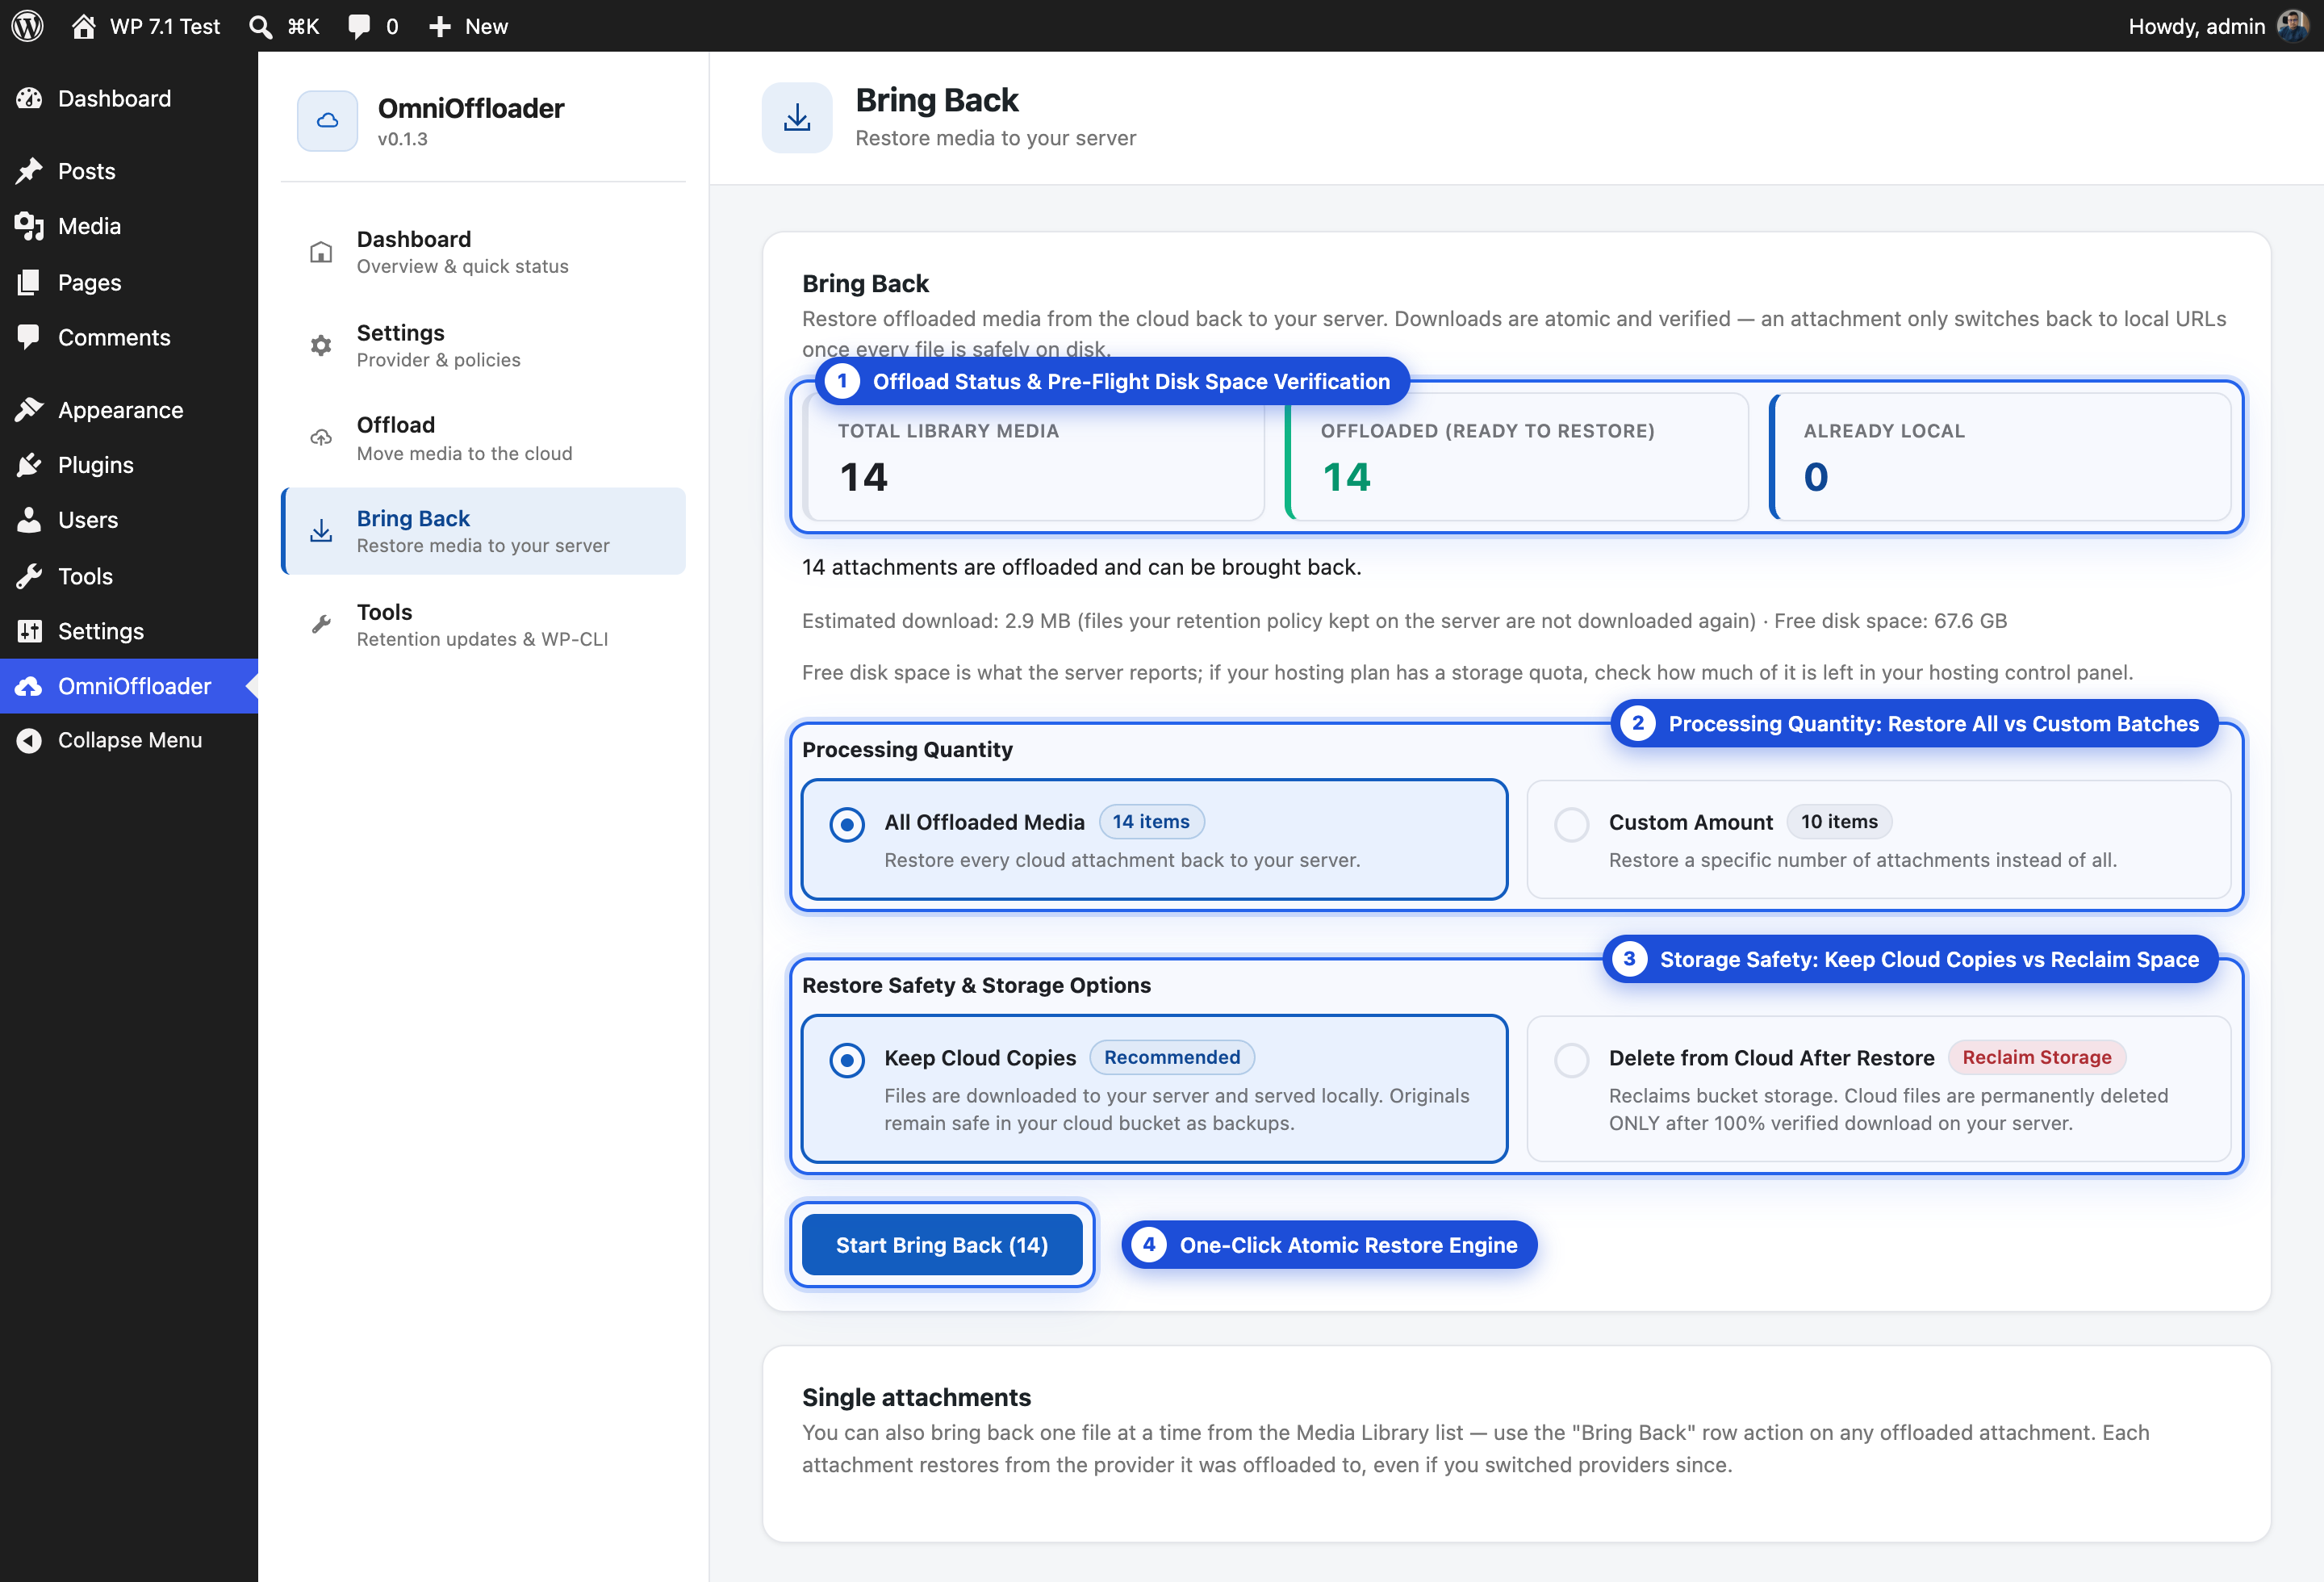
- Bring Back. Download media from the cloud to your server again, one file or all of it. It first checks you have enough disk space. Your cloud copy is kept unless you choose to delete it.
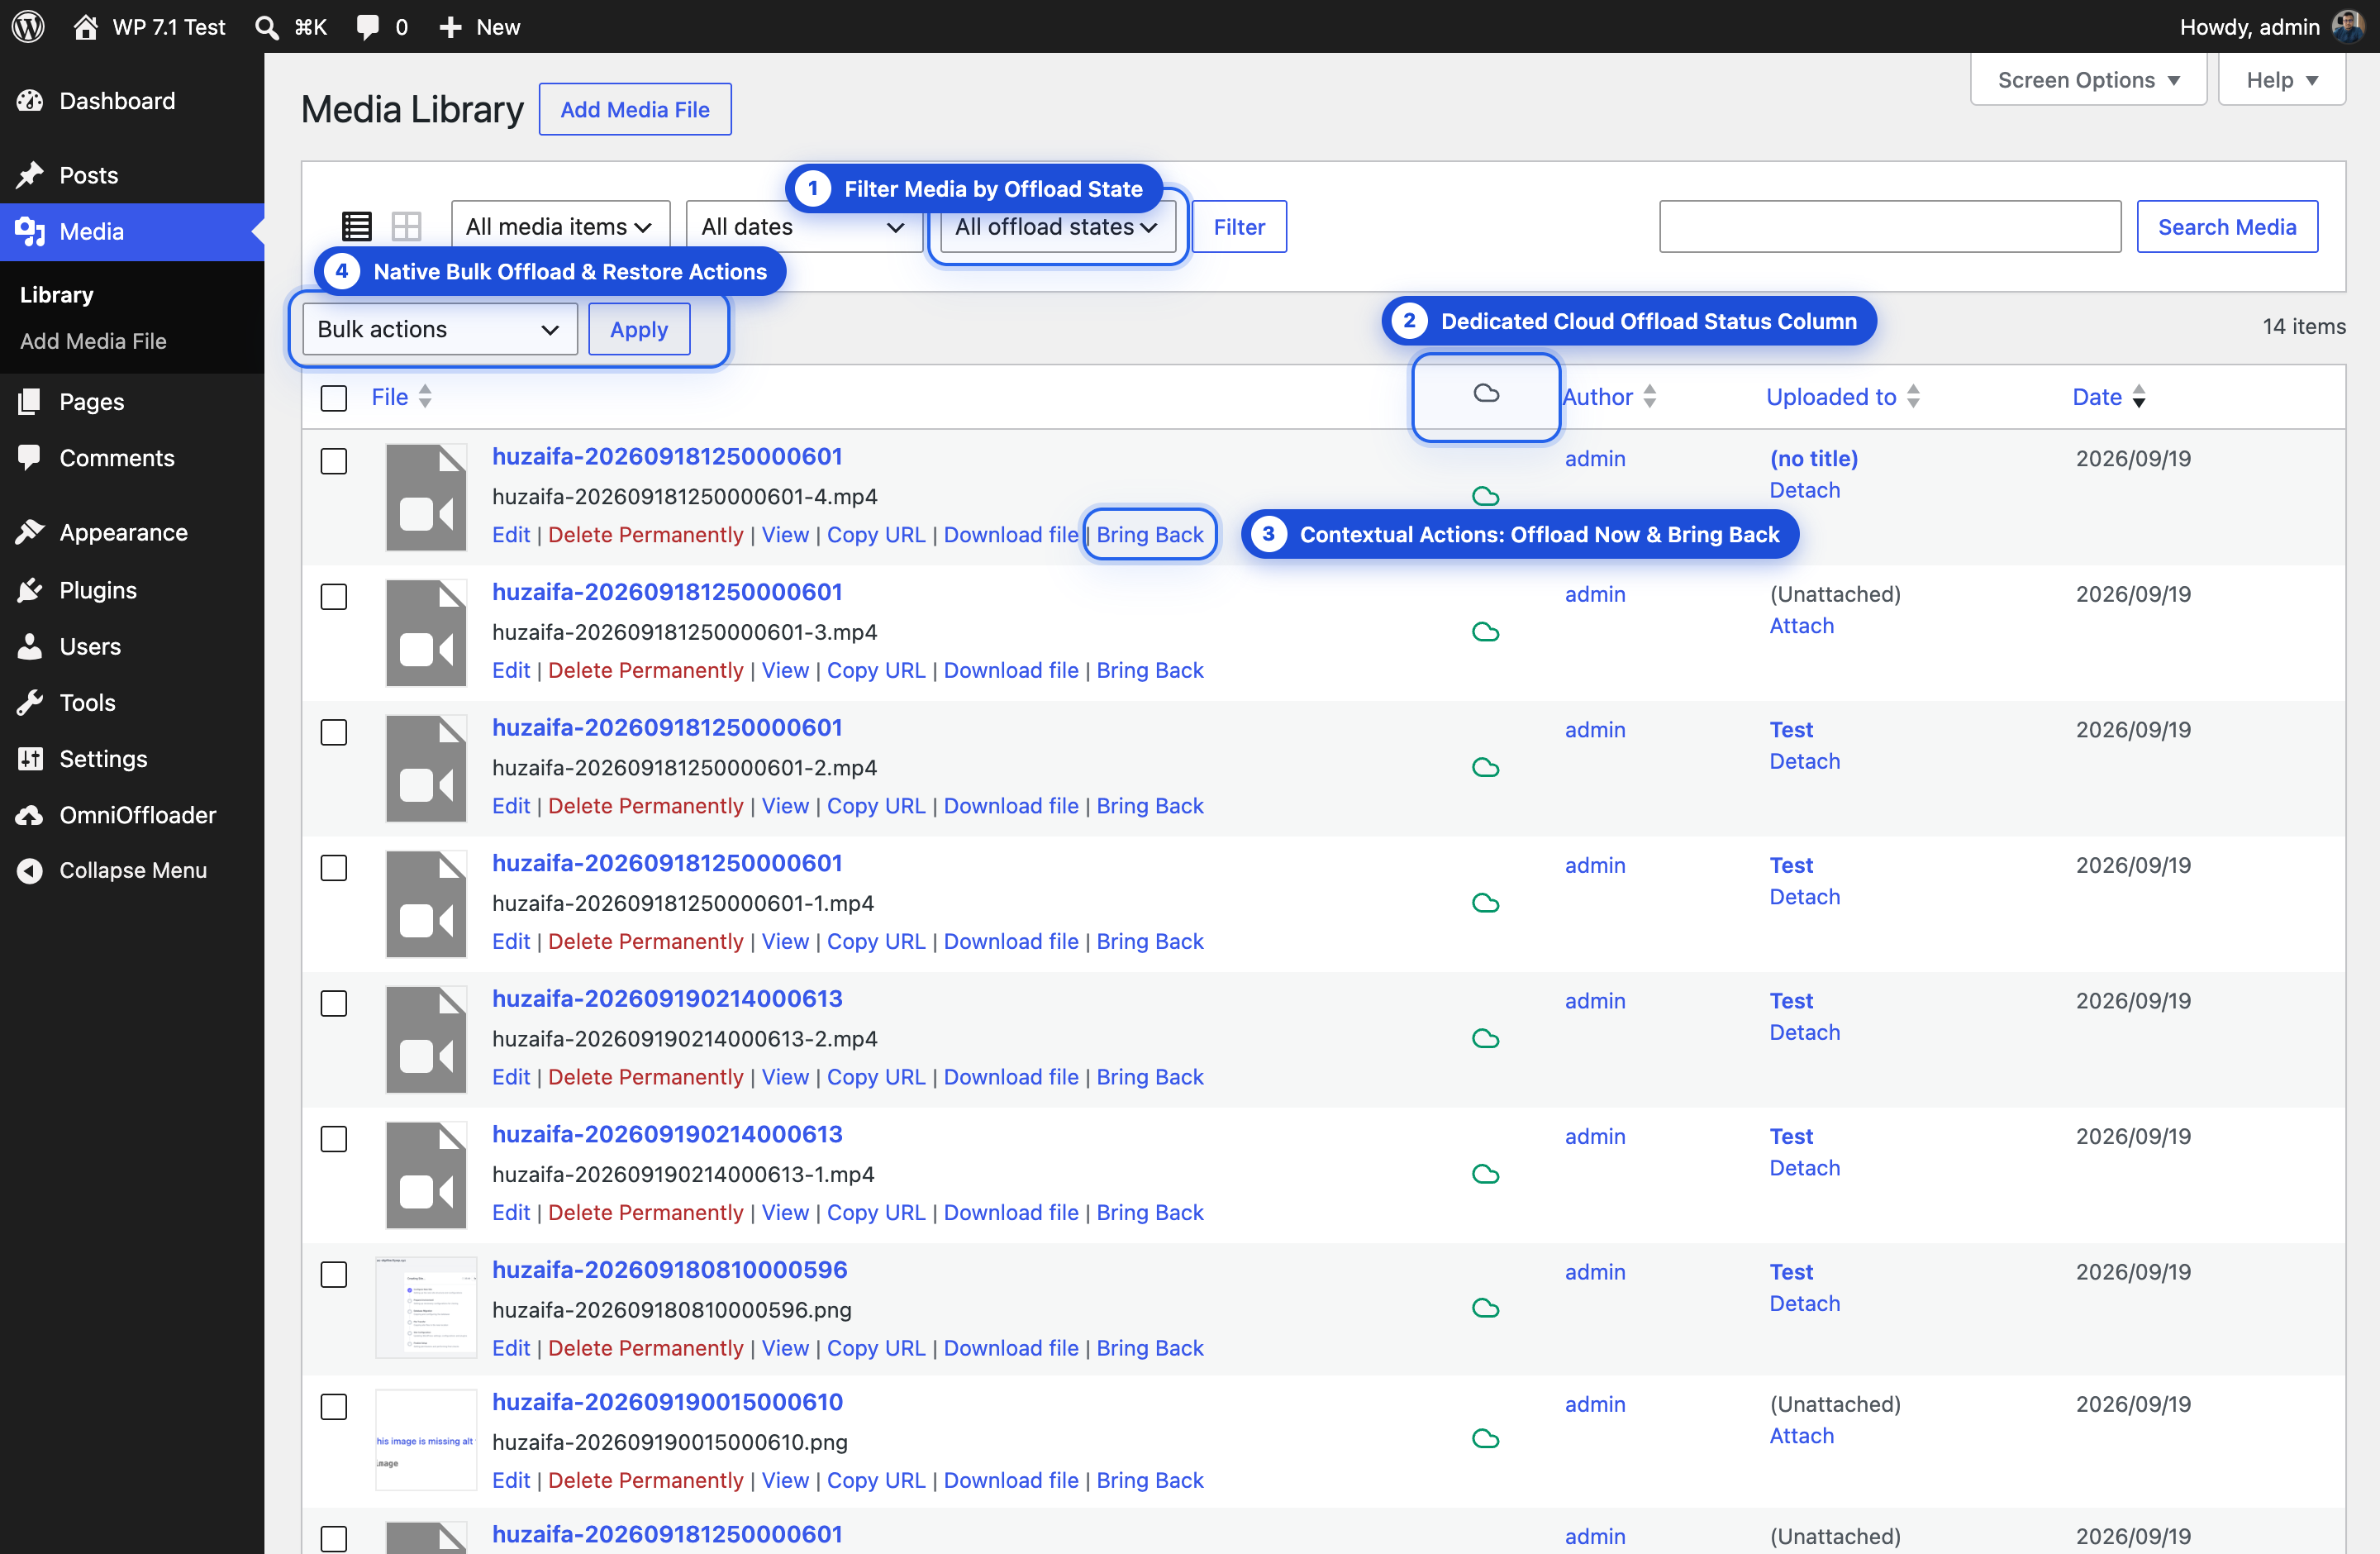
- See everything in the Media Library. A status column, badges, offload and Bring Back buttons, bulk actions, and filters for offloaded, local and failed media.
- Fix problems in one place. The Tools screen lists any media that failed to offload or restore, with the reason, and a button to try the failed offloads again.
- Keep the cloud tidy. When you delete media in WordPress, its cloud copy is deleted too (Mirror Delete, on by default for new sites).
- Organize your bucket. Store your files in a folder of your choice, and add a version number to file names so your CDN never shows an old copy. Changed the folder? Move your existing media into the new one from the Tools screen.
- Choose the transfer speed. Move 1, 3 or 6 files at the same time, or your own number up to 10. Pick a gentle speed on small hosting plans and a fast one on bigger servers.
- Keep your keys out of the database. Put your access keys in
wp-config.phpinstead, and the settings screen locks those fields. - Use WP-CLI if you like the terminal. Offload, restore, check and repair your media from the command line, much faster on a VPS. See the FAQ below.
- Runs for hours without you. Start a big offload from WP-CLI in the background, close your terminal, and check its progress, speed and time left anytime with
wp omnioffloader status. - Up to 64 files at the same time. On a VPS or dedicated server,
--concurrencymoves many files at once, so big libraries finish much sooner. - Picks up where it stopped. Stop a job, or lose the connection, and run it again: media already done is skipped.
- Checks the result.
wp omnioffloader verifyconfirms every file is really in your cloud storage and fixes anything missing. - Failed items never hold up the rest. A broken file is reported and skipped, and you can retry all failed items later with one click.
- Light on your server. Jobs run quietly in the background in small steps, and use little memory.
- You choose the pace. Choose Low on a small shared plan, Balanced (the default) for most sites, or Fast on a VPS or dedicated server.
- Large files are no problem. Videos and other files over 64 MB are uploaded in parts, so a dropped connection only costs one part. Files over 5 GB work too.
- No stuck jobs. If one file can't be moved, it is reported and the job carries on. If the connection to your storage breaks, the job stops and tells you why.
- Works on strict hosts. Some hosts block the background requests WordPress uses. Then the open admin page keeps the job going instead.
- Works with caching. Progress stays live with LiteSpeed Cache, Breeze, Redis and Memcached.
- A file is only deleted from your server after its cloud copy is confirmed.
- A file is only deleted from the cloud after Bring Back has confirmed it is back on your server, and only if you turned that option on.
- Restored files never end up half-written, and never outside your uploads folder.
- Only one big job runs at a time, so two jobs never work on the same files.
- Only administrators can move media between your server and the cloud. Other users upload and delete their own media as usual.
- Your access keys are never shown in the browser or written to logs.
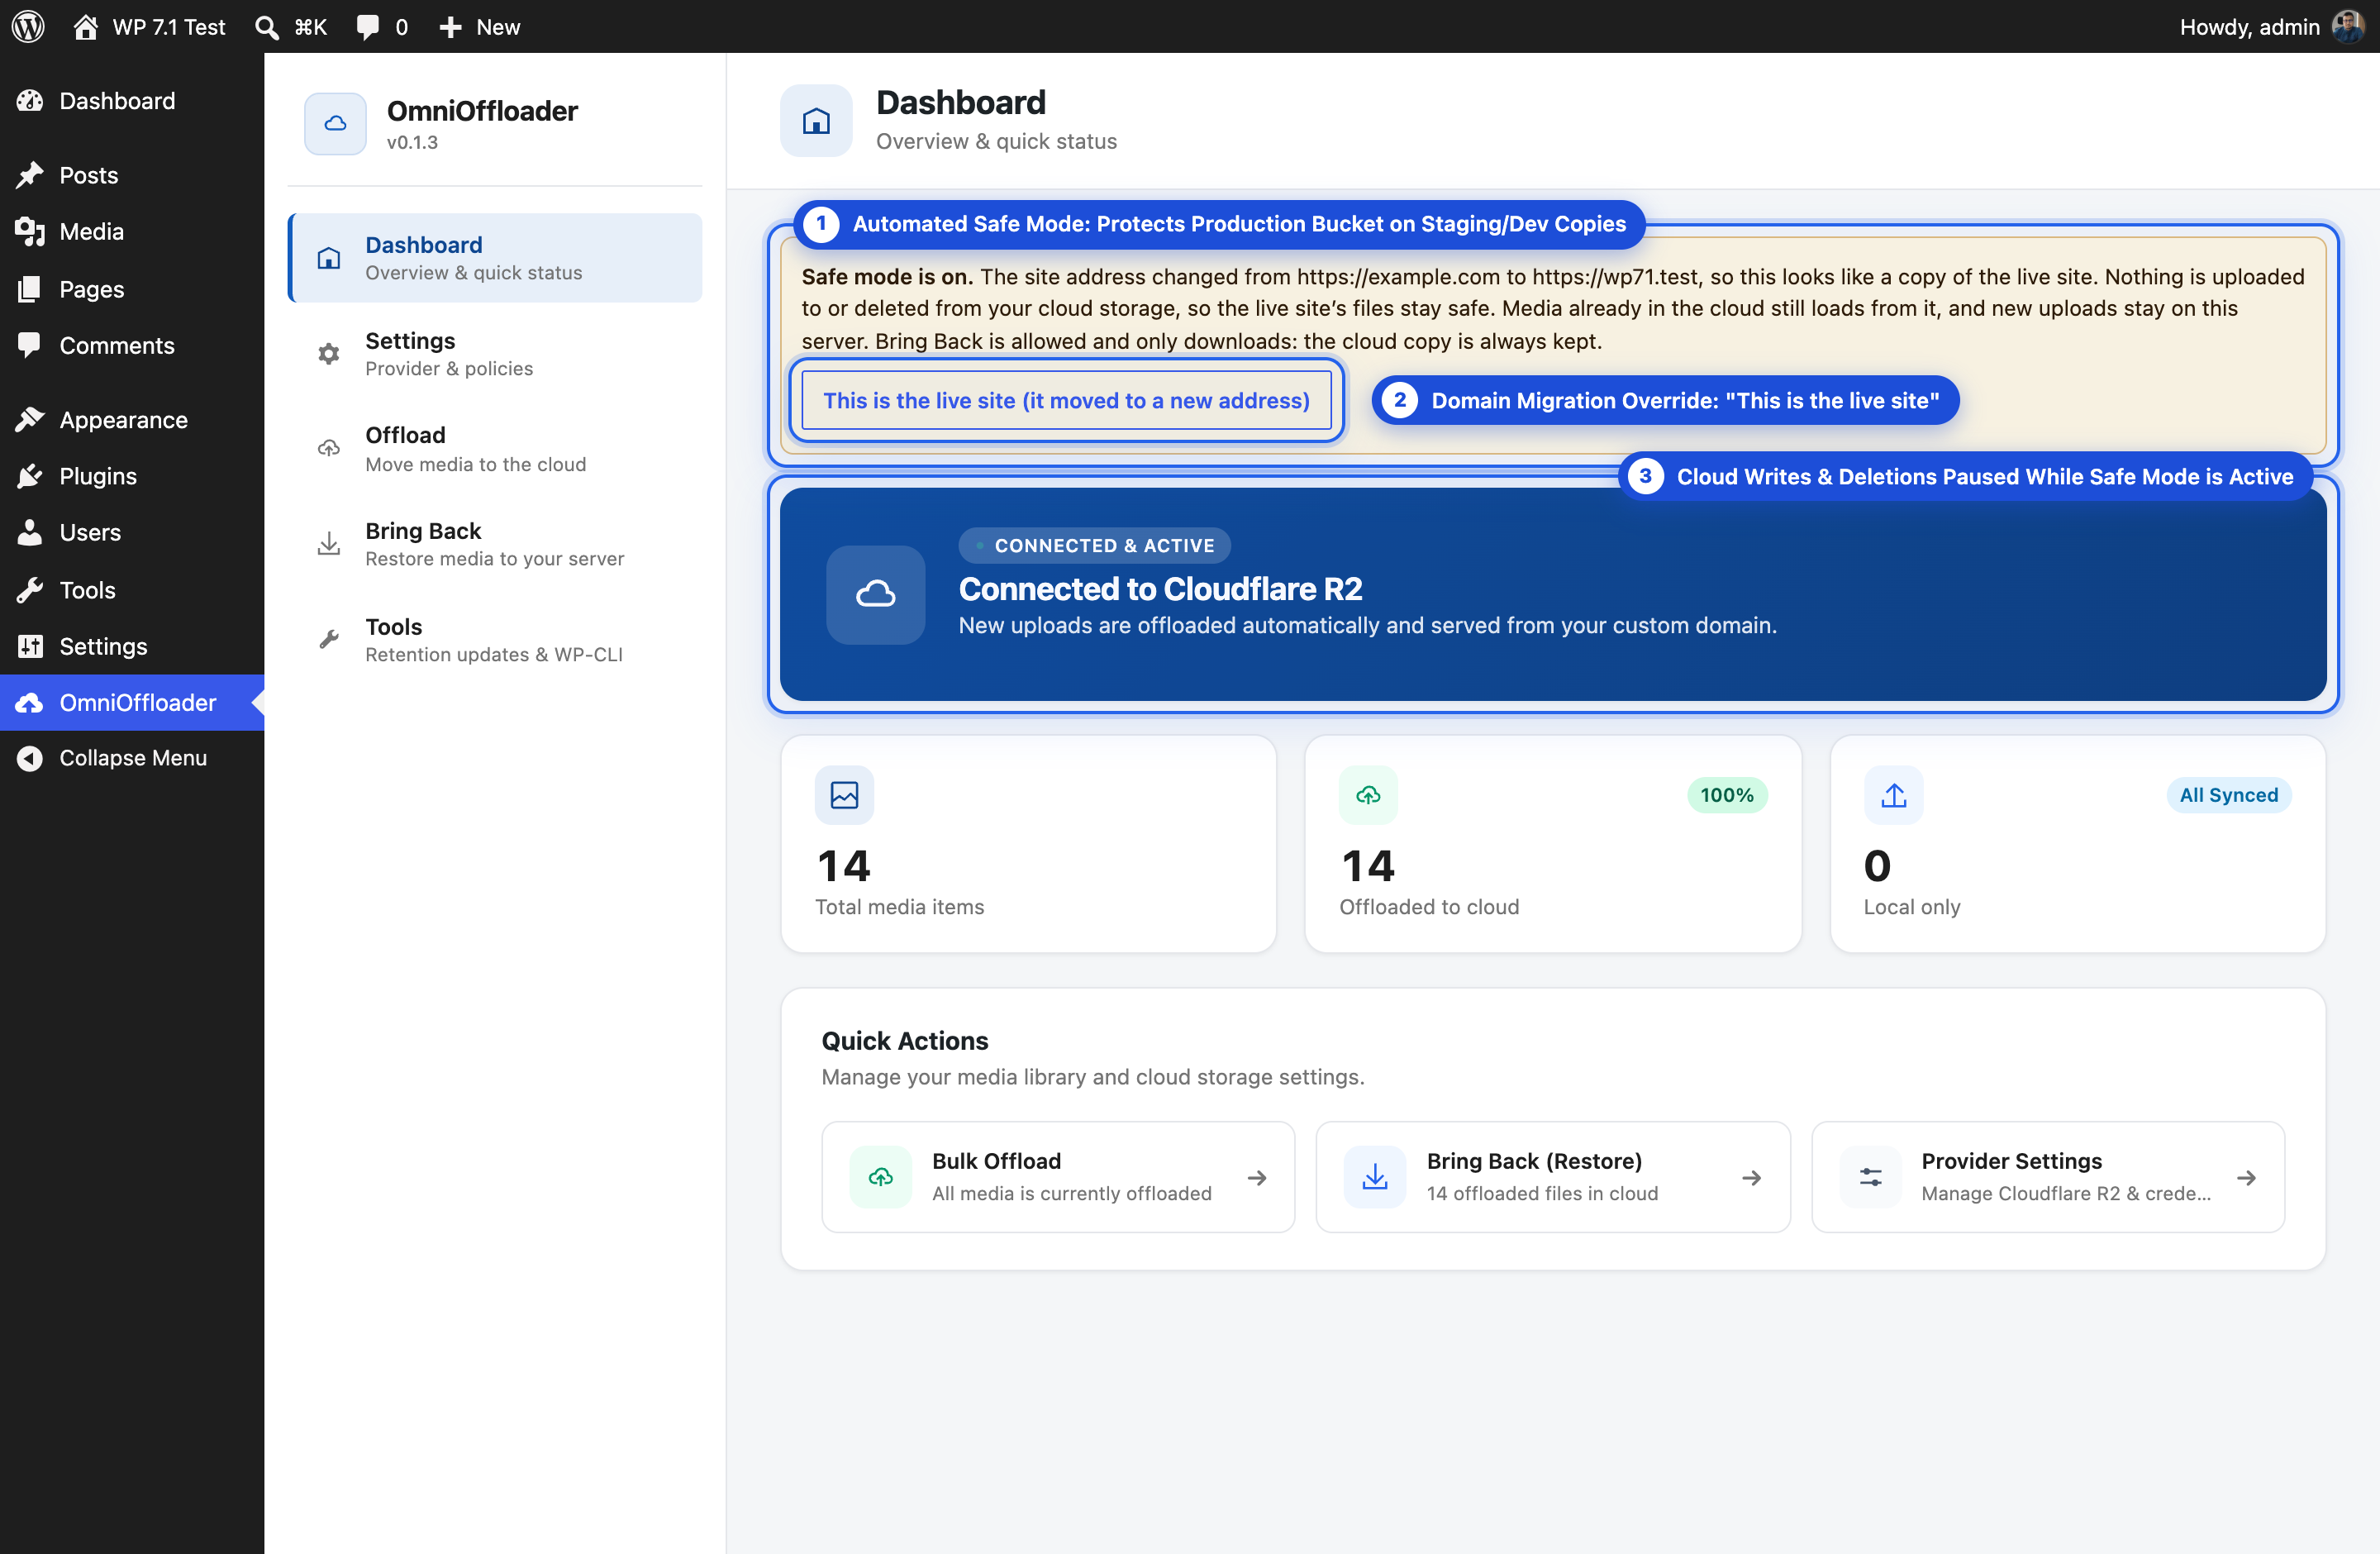
- Staging and local copies can't touch your live site's media. A copy of your site is recognised automatically and never uploads to or deletes from your cloud storage (Safe mode).
- Several sites can share one bucket, each in its own folder. A site never touches a folder another site already uses.
- Free up disk space. Cloud storage costs much less than hosting disk space.
- Smaller backups. A site without gigabytes of uploads is much quicker to back up and move.
- Cheaper hosting. With media in the cloud, a smaller hosting plan is often enough.
- No lock-in. Bring Back reverses everything whenever you want.
- Large sites with tens of thousands of images and files.
- Bloggers and news sites with years of images in the Media Library.
- WooCommerce stores with many product photos.
- Photographers, portfolios and agencies with large, high-quality images.
- Course, video and download sites that store big files.
- Agencies and developers who manage many sites, including several sites sharing one bucket.
- Anyone on shared hosting who is running out of disk space.
omnioffloader/v1) and WP-CLI (wp omnioffloader) are available.
Filters: omnioffloader_cloud_providers, omnioffloader_object_acl, omnioffloader_attachment_key, omnioffloader_attachment_delete_keys, omnioffloader_should_offload_attachment, omnioffloader_use_async_upload, omnioffloader_should_apply_retention, omnioffloader_media_block_names, omnioffloader_log_provider_errors, omnioffloader_multipart_threshold, omnioffloader_transfer_concurrency, omnioffloader_bulk_failure_limit, omnioffloader_free_disk_space, omnioffloader_cpanel_quota_file, omnioffloader_check_folder_claim.
Actions: omnioffloader_before_offload, omnioffloader_after_offload, omnioffloader_before_restore, omnioffloader_after_restore, omnioffloader_transfer_heartbeat.
Full reference with examples: Hooks and WP-CLI.
Licensing note
This plugin includes the AWS SDK for PHP (Apache-2.0). It is compatible with GPLv3, which this plugin's "GPL-2.0-or-later" license covers.
安装:
- In WordPress, go to Plugins → Add New, search for OmniOffloader, then install and activate it.
- Open OmniOffloader → Settings.
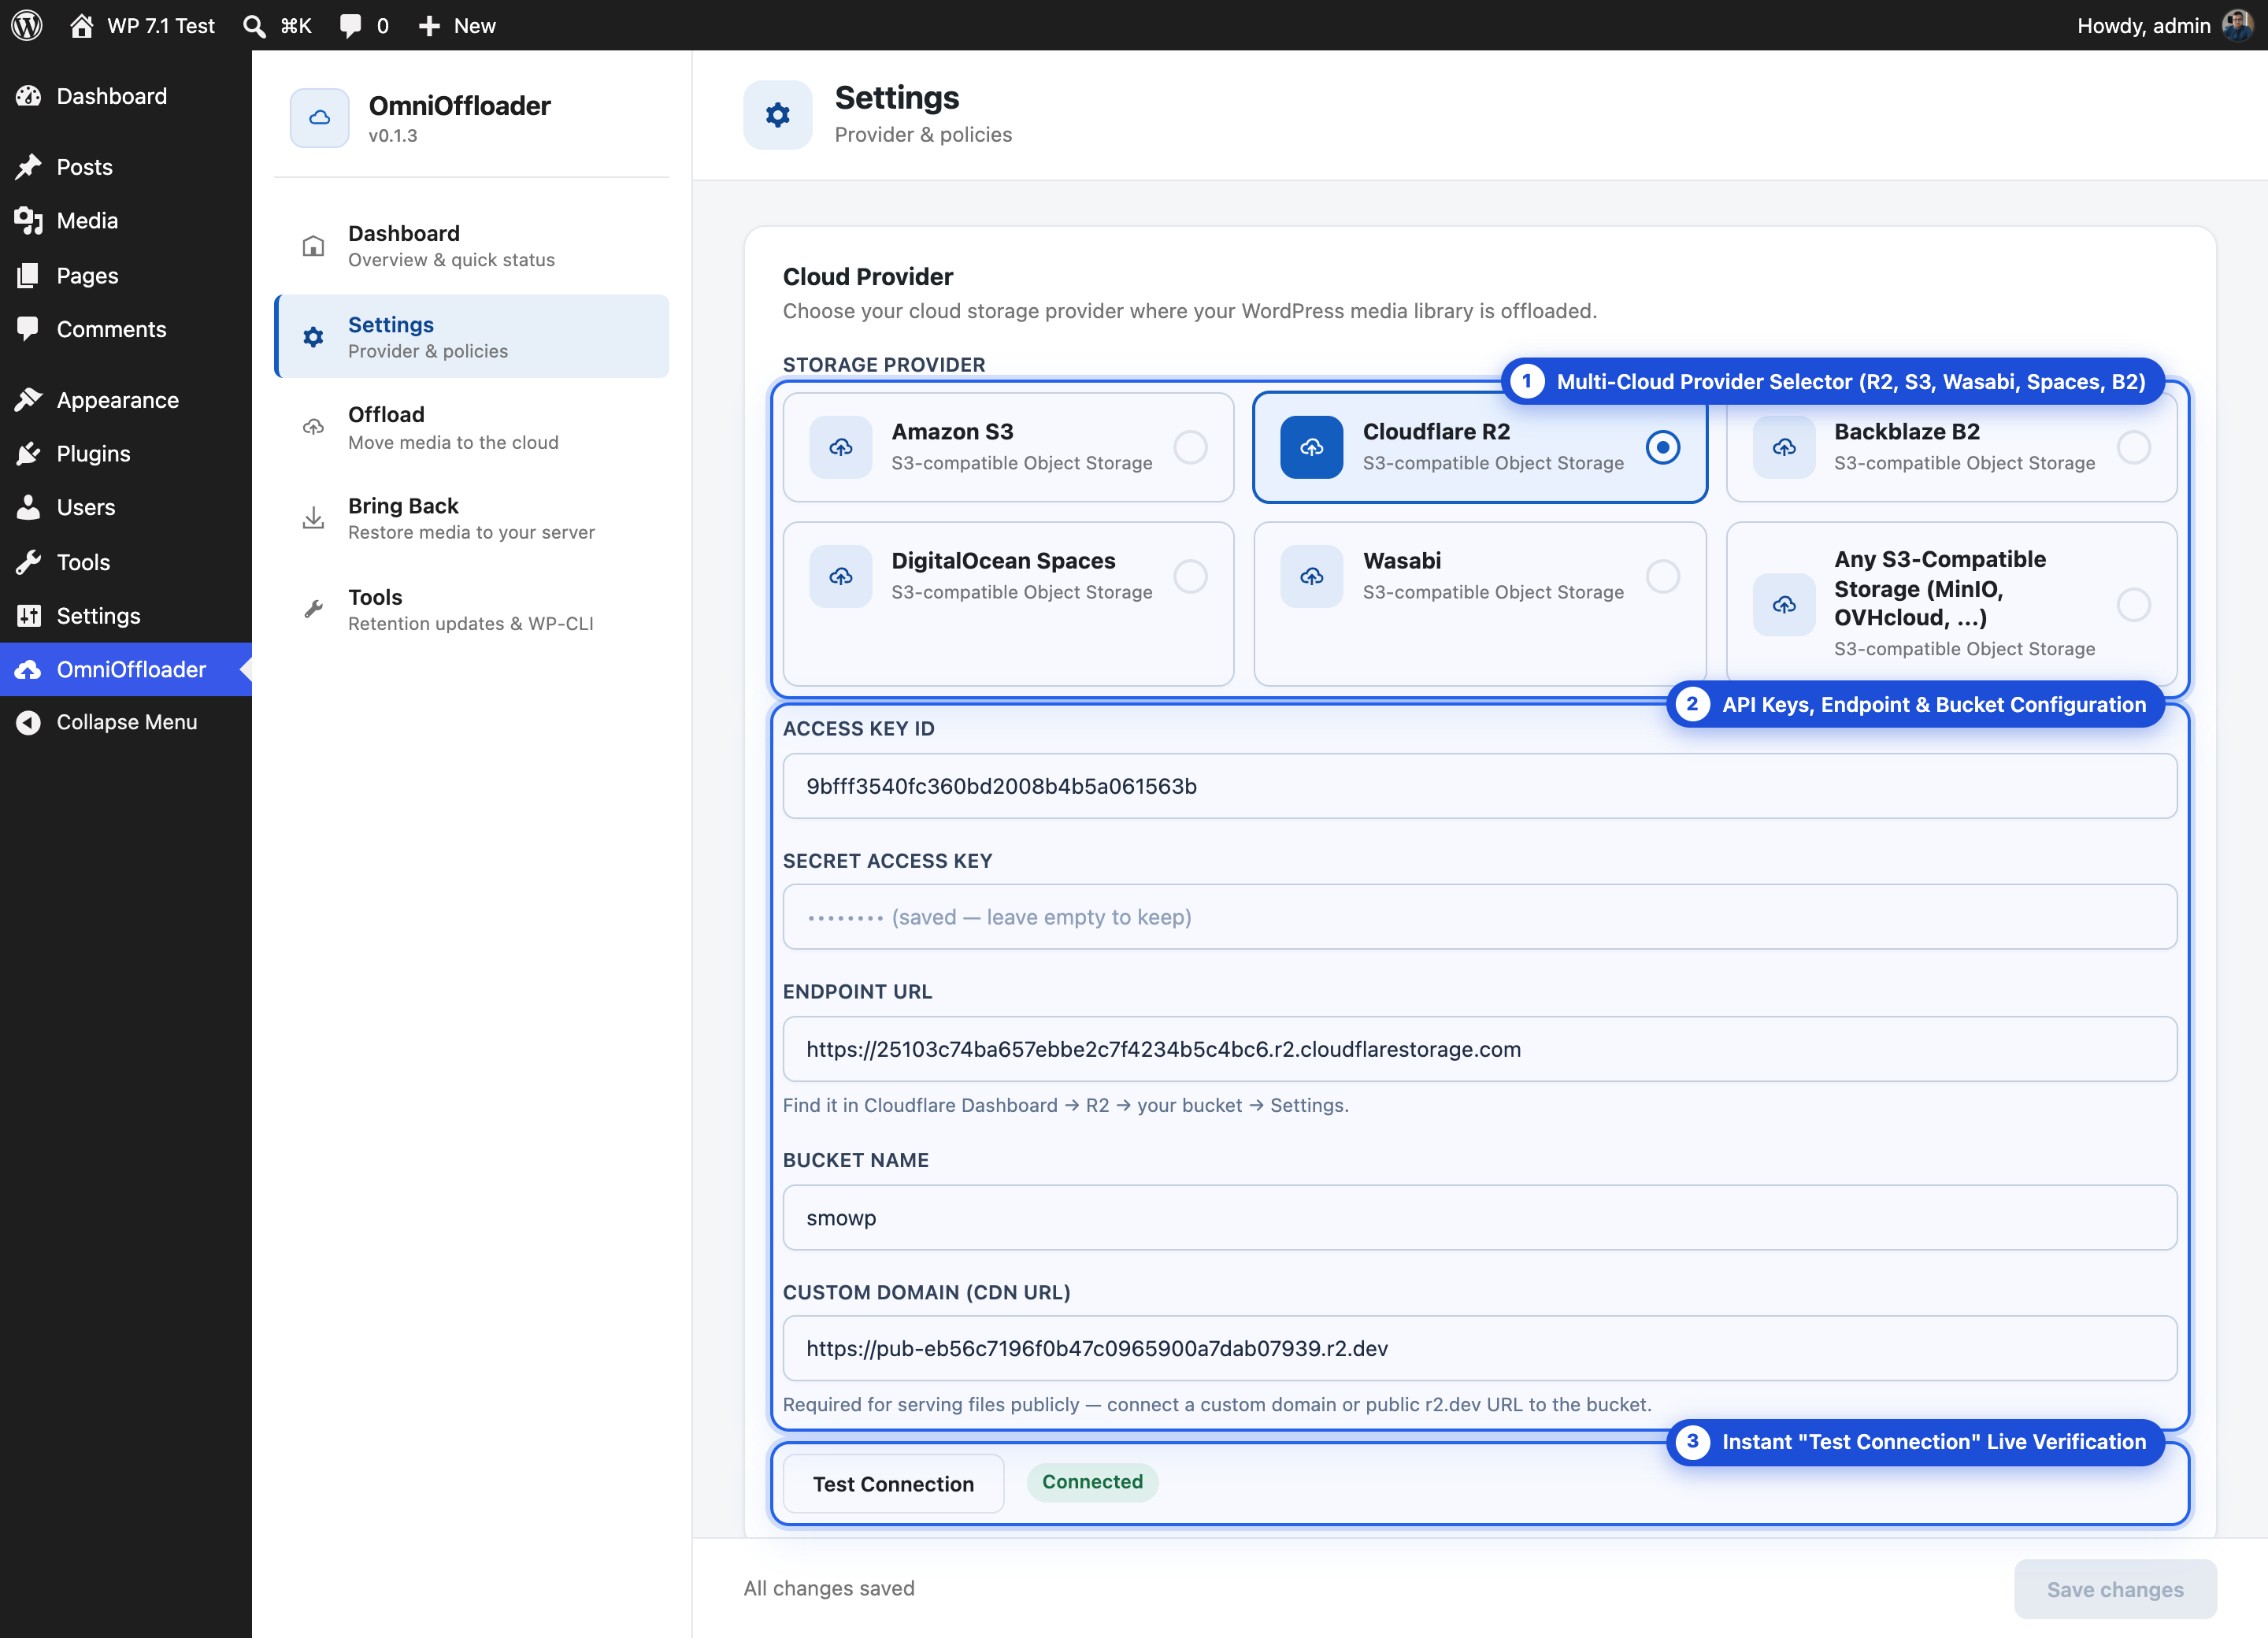
- Choose your storage provider and enter the details it gave you (keys, bucket name and so on). Add your custom domain or CDN address, then click Test Connection. The FAQ below has a short guide for each provider.
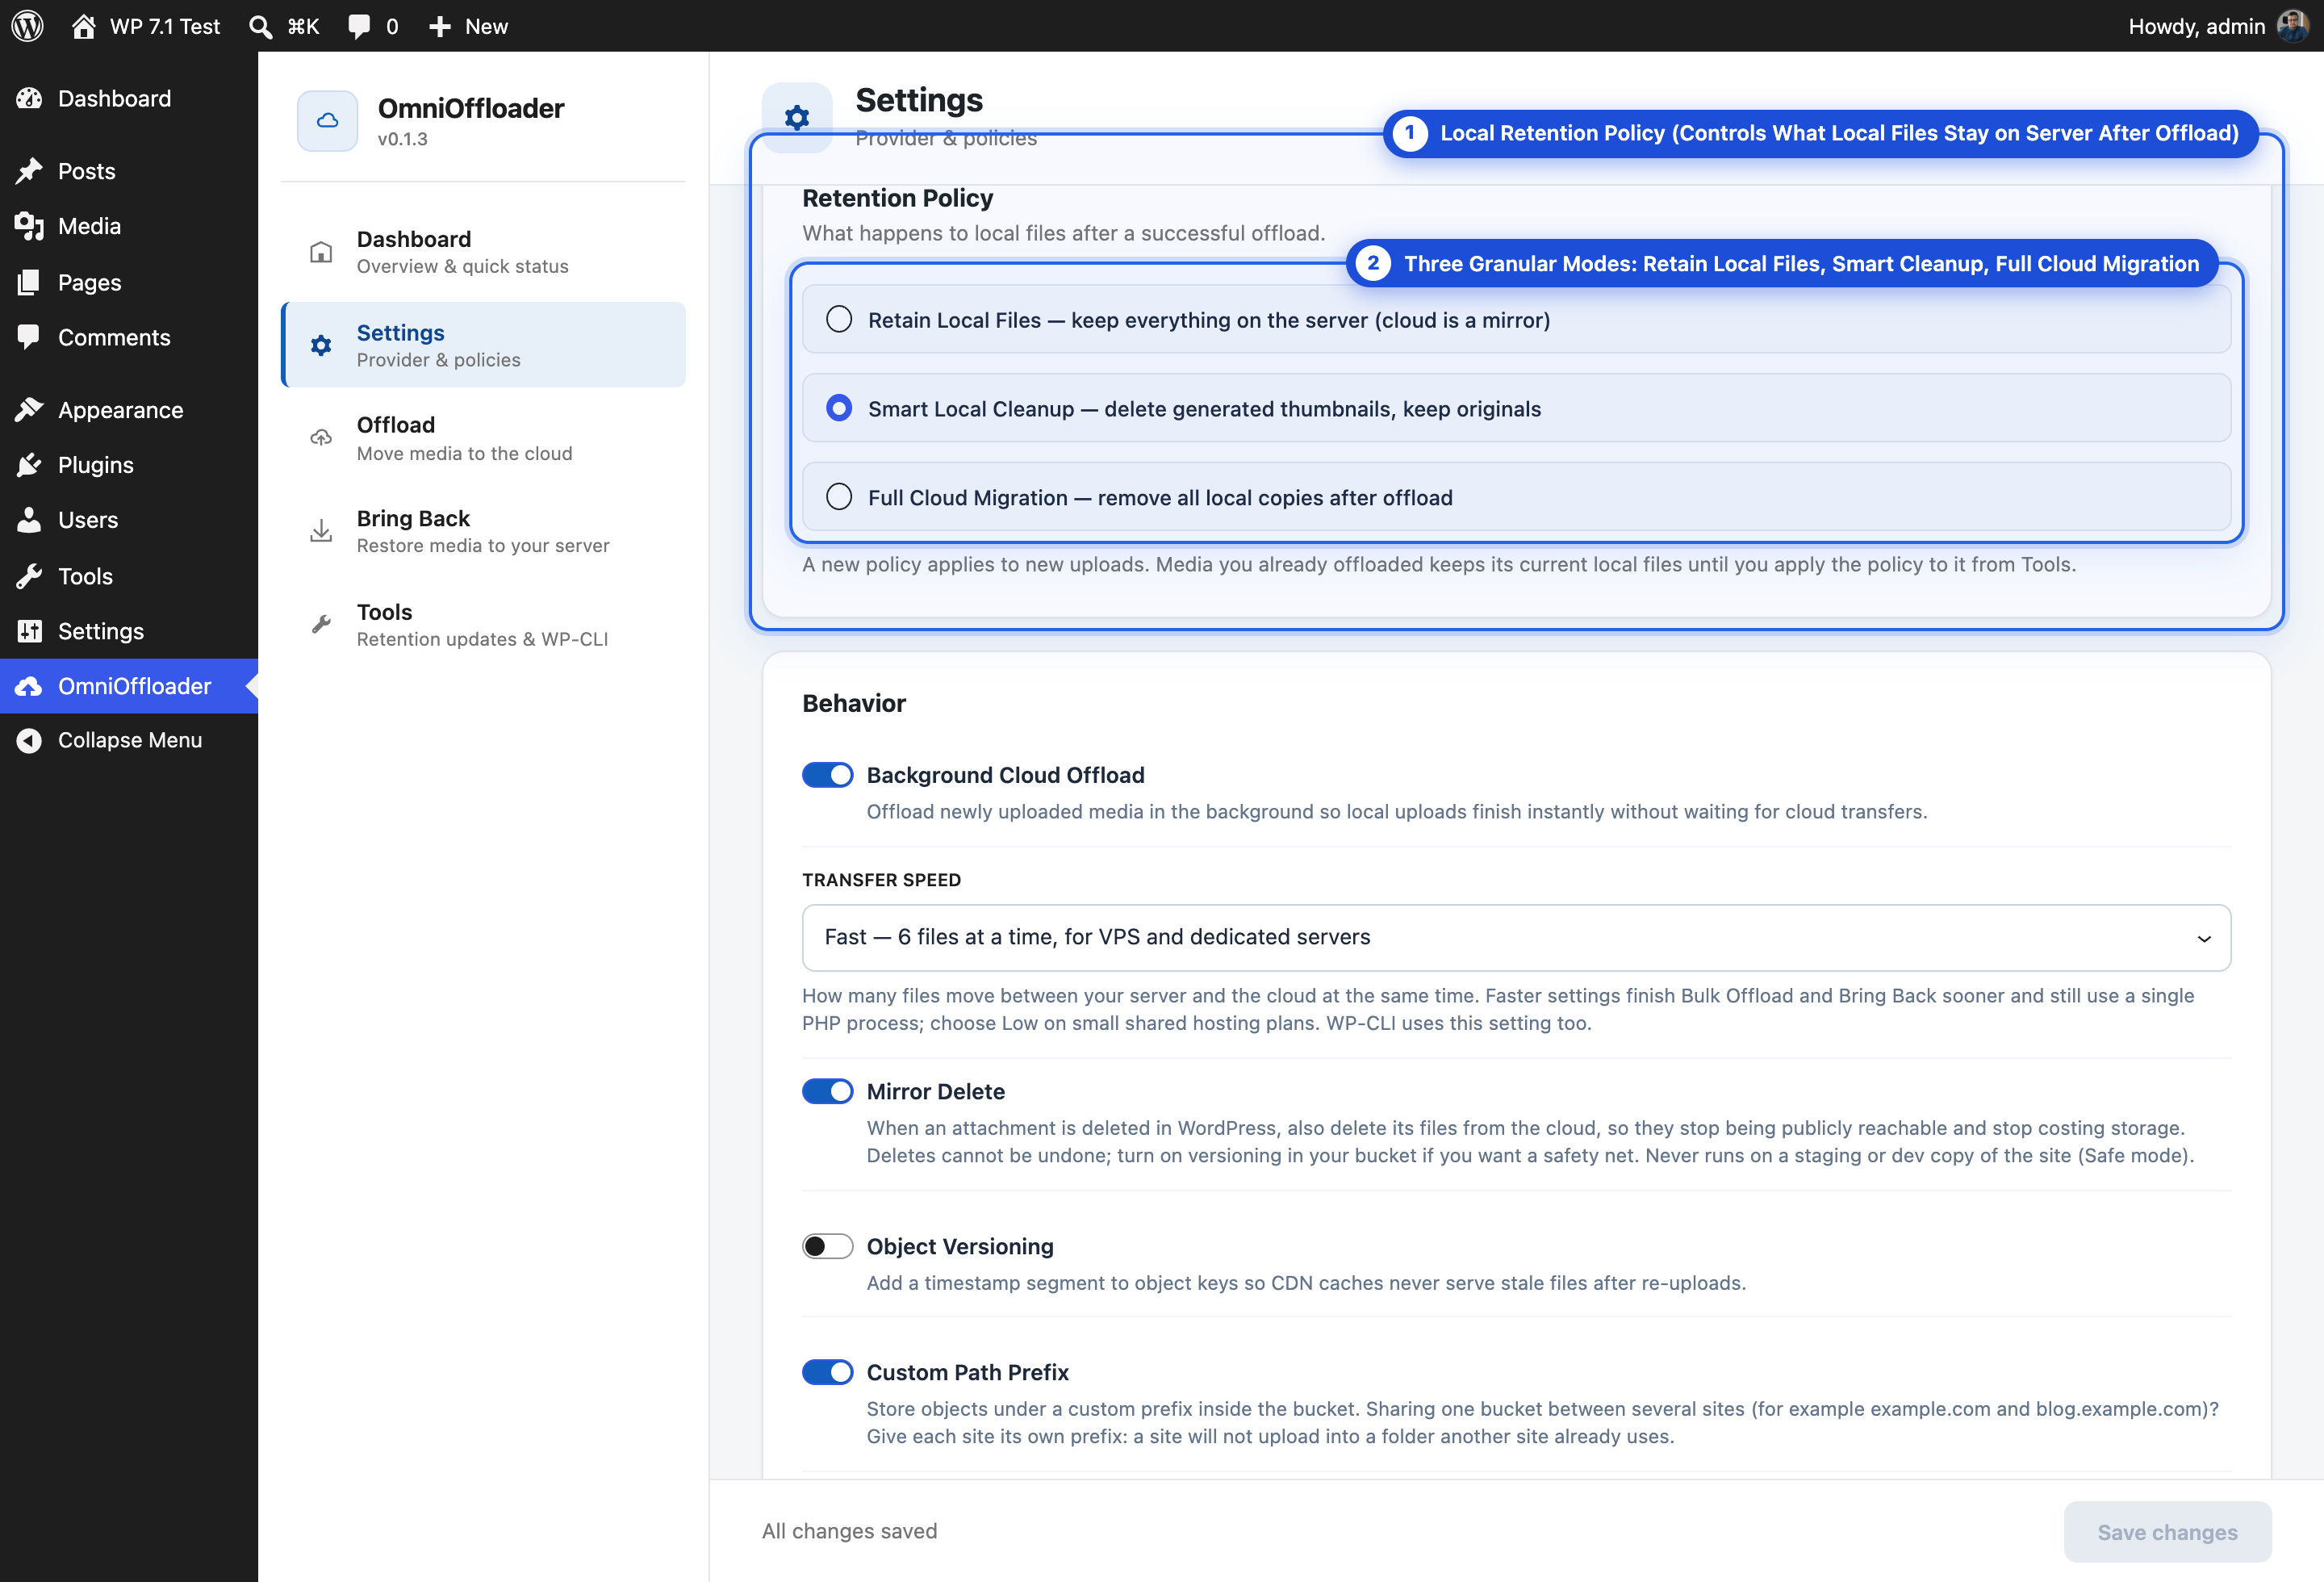
- Under Retention Policy, start with Retain Local Files. It keeps a copy of everything on your server while you check that your media loads correctly.
- Leave Transfer Speed on Balanced for now.
- Click Save changes.
- Go to OmniOffloader → Offload and click Start to move the media you already have. New uploads are offloaded automatically from now on.
屏幕截图:


常见问题:
Which cloud storage providers are supported?
Amazon S3, Cloudflare R2, DigitalOcean Spaces, Backblaze B2 and Wasabi each have their own setup. Any other S3-compatible storage (MinIO, Storj, OVHcloud, Linode, Scaleway and more) works through Any S3-Compatible Storage, where you enter the address and region from your provider.
How do I set up Cloudflare R2?
- In your Cloudflare dashboard, go to R2 and create a bucket.
- In the bucket's Settings, connect a Custom Domain (for example
https://media.yourdomain.com) or turn on the publicr2.devaddress, so visitors can see your files. - On the R2 overview page, open Manage R2 API Tokens. Create a token with Object Read & Write permission, and copy the Access Key ID and Secret Access Key.
- In the bucket settings, copy the S3 API address (
https://<account-id>.r2.cloudflarestorage.com). - In OmniOffloader Settings, choose Cloudflare R2. Enter the keys, that address as the Endpoint URL, the bucket name and your custom domain, then click Test Connection.
How do I set up Amazon S3?
- In the AWS console, create an S3 bucket in the region you want.
- In IAM, create a user with an access key, and allow it to read and write files in that bucket. Copy the Access Key ID and Secret Access Key.
- So visitors can see your files, either allow public reading with a bucket policy, or put Amazon CloudFront in front of the bucket.
- In OmniOffloader Settings, choose Amazon S3. Enter the keys, bucket name, region (for example
us-east-1) and your CloudFront or CDN address. Leave the address empty to serve straight from S3.
How do I set up DigitalOcean Spaces?
- In the DigitalOcean control panel, create a Space. Turn on its CDN if you want one.
- Create a Spaces access key and copy the key and secret.
- Note the region address (for example
https://nyc3.digitaloceanspaces.com) and the region (nyc3). - In OmniOffloader Settings, choose DigitalOcean Spaces. Enter the keys, that address as the Endpoint URL, the region, the Space name and your CDN or custom domain.
How do I set up Backblaze B2?
- In the Backblaze B2 console, create a bucket and set Files in Bucket are to Public.
- Note the bucket's S3 Endpoint (for example
https://s3.us-east-005.backblazeb2.com) and its region (us-east-005). - Under Application Keys, add a key with Read and Write access to the bucket. Copy the
keyIDandapplicationKey. - In OmniOffloader Settings, choose Backblaze B2. Enter the key ID, key, Endpoint URL, region and bucket name. Leave the CDN address empty to serve straight from Backblaze, or enter your CDN domain.
How do I set up Wasabi?
- In the Wasabi console, create a bucket and note its region (for example
us-east-1). - Create an access key and copy the Access Key ID and Secret Access Key.
- So visitors can see your files, allow public reading with a bucket policy, or put a CDN in front of the bucket.
- In OmniOffloader Settings, choose Wasabi. Enter the keys, bucket name, region and your CDN or custom domain.
How do I set up Storj or another S3-compatible provider?
For Storj:
- In the Storj console, create a bucket and open Access → Create S3 Credentials. Copy the Access Key and Secret Key.
- Share the bucket publicly (Objects → your bucket → Share) and copy the link, for example
https://link.storjshare.io/s/<KEY>/<BUCKET>. Change/s/to/raw/. - In OmniOffloader Settings, choose Any S3-Compatible Storage.
- Enter
https://gateway.storjshare.ioas the Endpoint URL andus-east-1as the region, and turn on Use Path-Style Endpoint. Add your keys and bucket name, and paste thehttps://link.storjshare.io/raw/...link as your Custom Domain / CDN URL.
Why do I need a custom domain or CDN address?
Most storage buckets don't show files to the public by default, and Cloudflare R2 has no public address at all until you add one. Connecting your own domain or a CDN to the bucket lets visitors see your media, and lets the CDN cache it close to them.
Will offloading break my image links?
No. OmniOffloader changes image addresses as each page loads, so posts, pages, featured images and responsive images all keep working. Your post content is never edited, and you don't need to search and replace anything in your database.
Do I have to delete the files on my server?
No. The default, Retain Local Files, deletes nothing. The cloud simply becomes a second copy. Choose Smart Local Cleanup to remove only the extra sizes WordPress creates and keep every original, or Full Cloud Migration to free the most space. A file is only removed from your server after its cloud copy is confirmed.
Which Transfer Speed should I choose?
It mostly matters when you move a lot of media at once: offloading your existing library, or Bring Back. It sets how many files move at the same time:
- Low: 1 file at a time. Best for small shared hosting plans.
- Balanced: 3 files at a time. The default, and right for most sites.
- Fast: 6 files at a time. For a VPS or dedicated server.
- Custom: your own number, from 1 to 10.
How long does offloading take? Can I close the browser tab?
It depends on your server's connection to your storage, the size of your files, and how many image sizes your theme creates. A faster Transfer Speed finishes sooner if your server can handle it. Yes, you can close the tab: the job keeps running in the background. Only on hosts that block WordPress's background requests does the job need the Offload page to stay open. There, leave it open until it finishes, or use WP-CLI.
Can I move my media back to my server later?
Yes, that's what Bring Back is for. It downloads your media to its original place on your server, checks that every file arrived, and then loads everything from your server again. Bring back one item, a set number, or your whole library. Your cloud copy is kept unless you choose to delete it.
What happens to my images if I deactivate the plugin?
It depends on what you chose to keep on your server. With Retain Local Files, everything is still on your server, so nothing changes. With Smart Local Cleanup or Full Cloud Migration, some or all files are only in the cloud, and they would stop showing. Run Bring Back before you deactivate in that case.
Some media failed to offload. What do I do?
Go to OmniOffloader → Tools → Failed Items. You'll see each item with the reason it failed. Fix the cause (for example a lost connection, or a file that is missing on your server), then click Retry Failed Offloads. In Media → Library (list view), the Offload failed filter shows the same items.
How do I check that all my files are really in the cloud?
Run wp omnioffloader verify from WP-CLI. It checks every offloaded file in your cloud storage and on your server, and lists anything missing. Add --repair to fix what it can: it uploads or downloads the missing files and never deletes anything.
I changed the retention policy. Why are old files still on my server?
A new policy only applies to new uploads at first. To apply it to media you already offloaded, go to OmniOffloader → Tools → Apply Retention Policy to Existing Media. Before any file is deleted from your server, its cloud copy is checked, and missing files are uploaded first. Switching to a policy that keeps more files downloads them to your server again.
Can I offload now and switch to the CDN later?
Yes. With Retain Local Files, turn off Serve Media from Cloud in Settings. Your media is still copied to the cloud, but your site keeps loading it from your server. When your CDN is ready, turn it on and everything switches at once, with nothing uploaded again. Clear your page cache after the switch. (With the other two policies, files are removed from your server, so media always loads from the cloud.)
I copied my site to staging or my computer. Can the copy damage my live site's media?
No. A copy has your live site's settings and keys, so without protection it could upload into your live bucket or delete files your live site still uses. OmniOffloader notices a copy and turns on Safe mode. It notices when:
- the site address changed,
- WordPress is set to a staging, development or local environment, or
- the site runs on a local address such as
localhost,.localor.test.
- Moved your live site to a new domain? Click This is the live site.
- Want to bring media down to a copy? Turn on Allow Bring Back on a copy (download only) in Settings. The cloud copy is always kept.
- Want to decide yourself? Add
define( 'OMNIOFFLOADER_SAFE_MODE', true );(orfalse) towp-config.php, or turn off Protect the live site when this is a copy in Settings.
Can several sites share one bucket and CDN?
Yes, for example example.com, shop.example.com and blog.example.com. Install OmniOffloader on each site with the same bucket, keys and CDN address, and give each site its own folder in Settings → Custom Path Prefix (such as www, shop and blog).
Each site marks its folder, so two sites can't overwrite or delete each other's files. Settings won't let you pick a folder another site already uses. If the folder really belongs to this site (for example after a domain change), click This folder belongs to this site.
On Amazon S3, you can also give each site its own access key that only works in its own folder.
I changed the folder (Path Prefix). What happens to media I already offloaded?
It stays in the old folder and keeps working. To move it into the new folder, use Tools → Move Media to the Current Folder, or run wp omnioffloader move --all. Within the same bucket, your storage provider copies the files itself, so nothing is downloaded to your server.
Can I keep my access keys out of the database?
Yes. Add them to wp-config.php as constants named OMNIOFFLOADER_{PROVIDER}_{FIELD}, for example:
define( 'OMNIOFFLOADER_CLOUDFLARE_R2_KEY', '...' );
define( 'OMNIOFFLOADER_CLOUDFLARE_R2_SECRET', '...' );
These always win over saved settings, and the settings screen shows those fields as locked. Either way, your secret key is never sent back to the browser.
Who can offload or bring back media?
Only administrators. Other users upload and delete their own media as usual. With Mirror Delete on, deleting media also deletes its cloud copy.
What about very large videos or files?
Files over 64 MB are uploaded in parts, so a dropped connection only costs one part, and files over 5 GB work too. If your host still cuts a transfer short, that item is reported with the reason and the job moves on.
Does it work with caching plugins?
Yes. Progress stays live with LiteSpeed Cache, Breeze, Redis and Memcached. On your public pages, OmniOffloader only changes image addresses, and doesn't slow them down with extra database work.
Does it work on multisite?
Yes, site by site. Each site in the network has its own settings, keys and jobs. Only a network administrator can point a site at a private or local storage address. Multisite hasn't had a dedicated test pass yet, so please try it on a staging network first.
Can I use it from WP-CLI?
Yes. OmniOffloader → Tools lists every command with examples and copy buttons. The main ones:
wp omnioffloader offload --all offloads every local item.
wp omnioffloader restore --all brings everything back.
wp omnioffloader retention applies a changed retention policy to existing media.
wp omnioffloader move --all moves media into the current folder.
wp omnioffloader verify --repair checks every file and fixes what it can.
wp omnioffloader errors --retry retries failed offloads.
wp omnioffloader status shows what is running and your media counts.
wp omnioffloader stop stops the running job.
Every command that changes something supports --dry-run, so you can see what it would do first. Only one job runs at a time, so two jobs never touch the same files.
Does it work for a very large media library?
Yes. The first offload takes a while on a big library, since every existing file is copied to the cloud once. After that, new uploads are offloaded automatically, so there's nothing more to do. Jobs run in small steps, so memory use stays low however big your library is, and a stopped job continues where it left off. For the fastest results on a big library, use WP-CLI (see the next question).
How can I offload a very large library faster?
Use WP-CLI on your server and move more files at once, for example wp omnioffloader offload --all --concurrency=32 (up to 64). Try a short run first with --limit=500. To keep a long job running after you close the terminal, start it like this:
nohup wp omnioffloader offload --all > ~/offload.log 2>&1 &
Check on it any time with wp omnioffloader status, and stop it with wp omnioffloader stop. Run the same command again to continue where it stopped. Step by step: Long runs and log files.
更新日志:
- Storage on the Dashboard: see how much of your media is in the cloud, how much is still on your server, and how much space was freed, overall and by retention policy.
- The Bring Back and Tools screens show their numbers instantly, even with tens of thousands of media items. OmniOffloader now keeps a running total as media changes, instead of going through the whole library each time you open the page.
- Failed Items on the Tools screen: see every item that failed to offload, bring back, update or move, with the reason, and retry failed offloads with one click.
- Media Library: a new Offload failed filter. Select the items and choose Offload to retry only those.
- WP-CLI:
wp omnioffloader verifychecks that every offloaded file is in your cloud storage and on your server. Add--repairto fix what it finds; it never deletes anything. - WP-CLI:
wp omnioffloader errorslists media with errors, retries failed offloads (--retry) and clears old errors (--clear). - WP-CLI:
wp omnioffloader status --format=json, for monitoring scripts. - Optional usage insights through Appsero. An admin notice asks first, and nothing is collected unless an administrator allows it. See External services for exactly what is sent.
- The OmniOffloader screens open right away, and the Settings fields no longer appear after a delay. Switching provider shows its fields instantly.
- While a bigger job is running, you now get a message instead of offloading or bringing back a single item, so two jobs never work on the same files.
- Media Library status labels can now be fully translated.
- Each release now ships the exact AWS SDK version it was tested with.
- Tidier code names in the admin screen styles.