
Postman SMTP Mailer/Email Log
| 开发者 | jasonhendriks |
|---|---|
| 更新时间 | 2016年3月13日 01:38 |
| PHP版本: | 3.9 及以上 |
| WordPress版本: | 4.4 |
| 版权: | GPLv2 or later |
| 版权网址: | 版权信息 |
标签
下载
详情介绍:
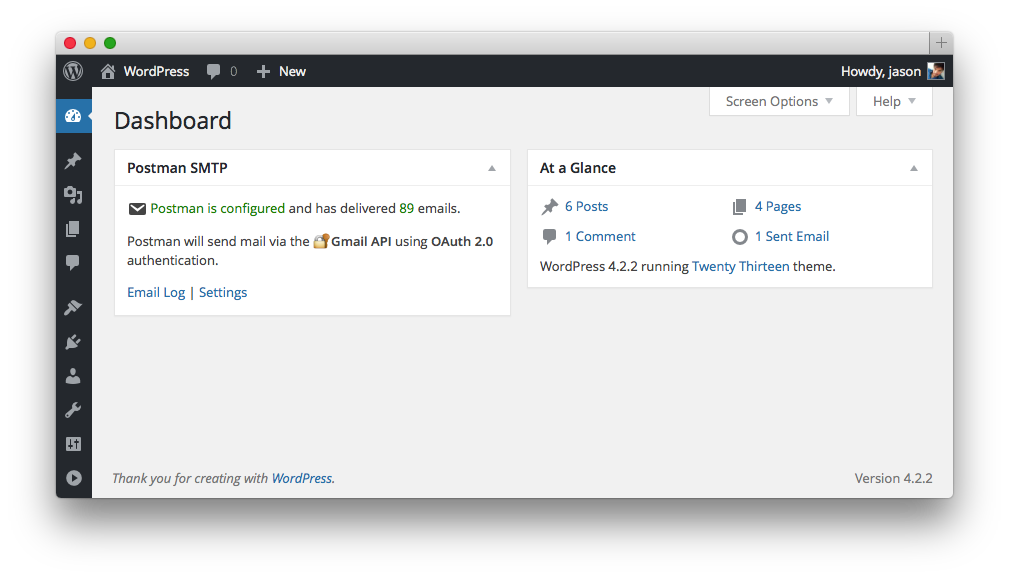
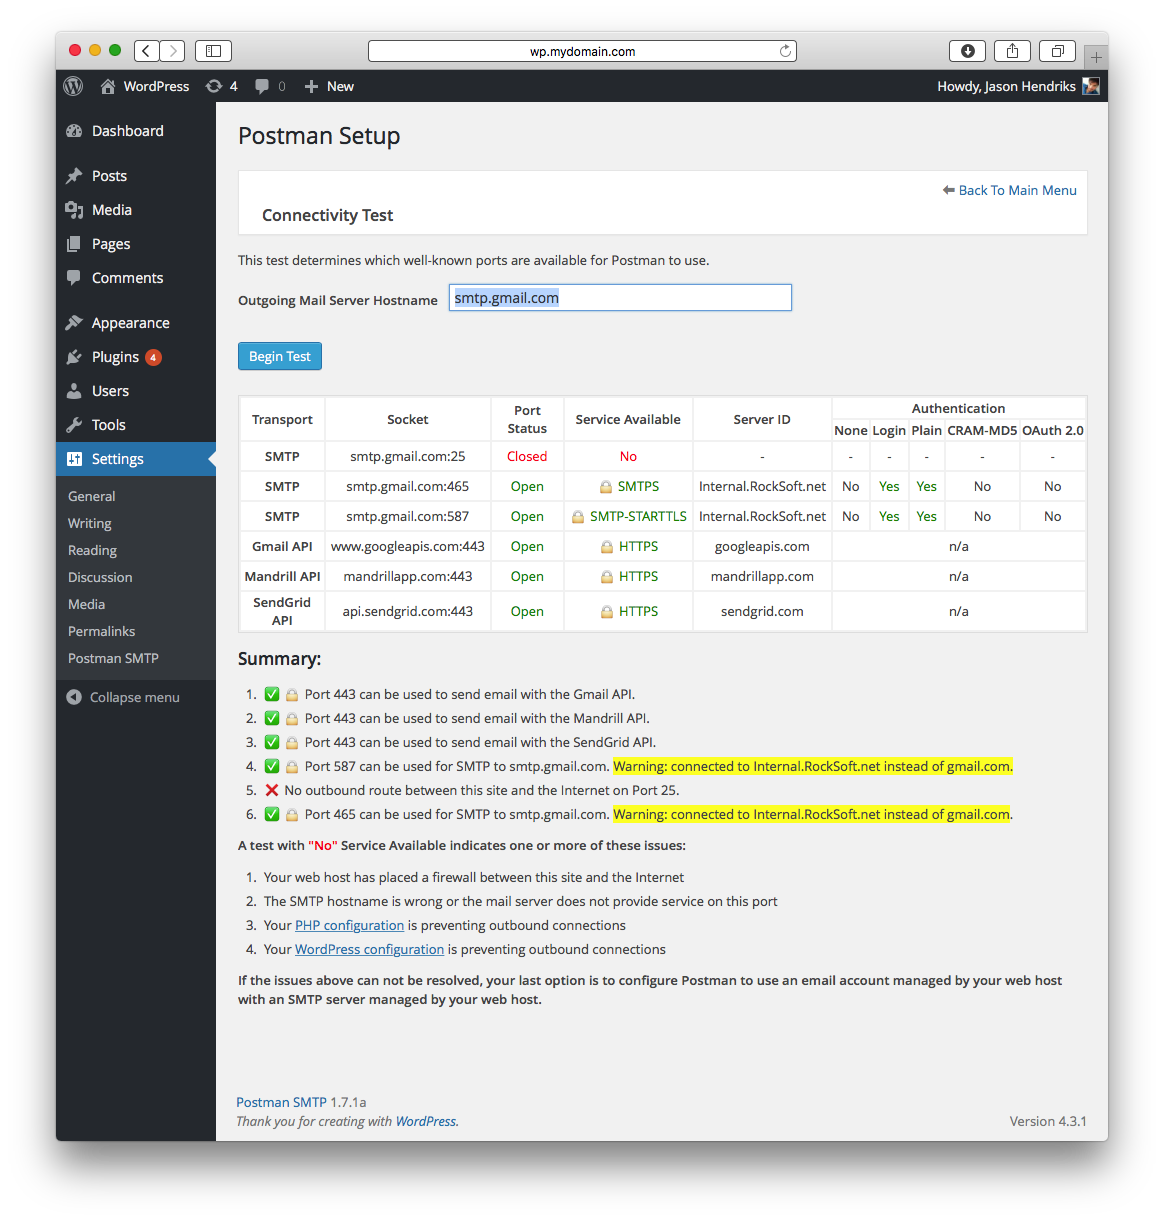
Postman is one year old! SparkPost API Integration is coming soon as Mandrill is no longer offering a free service.The Connectivity Test and intelligent Setup Wizard scan your SMTP server to detect firewall blocks and eliminate configuration mistakes. The built-in Email Log is an invaluable resource for diagnosing problems with emails. Even hosts that block the standard SMTP ports, like GoDaddy or Bluehost, can't stop your email as Postman can deliver via HTTPS if it can't use SMTP. Postman is not another WP Mail SMTP clone like WP Bank or Easy SMTP. It replaces the default WordPress SMTP library, PHPMailer, with the heavy-duty Zend_Mail. Never lose an email to PHP mail() again. Standard Features
- Easy-to-use, powerful Setup Wizard for perfect configuration
- Commercial-grade Connectivity Tester to diagnose server issues
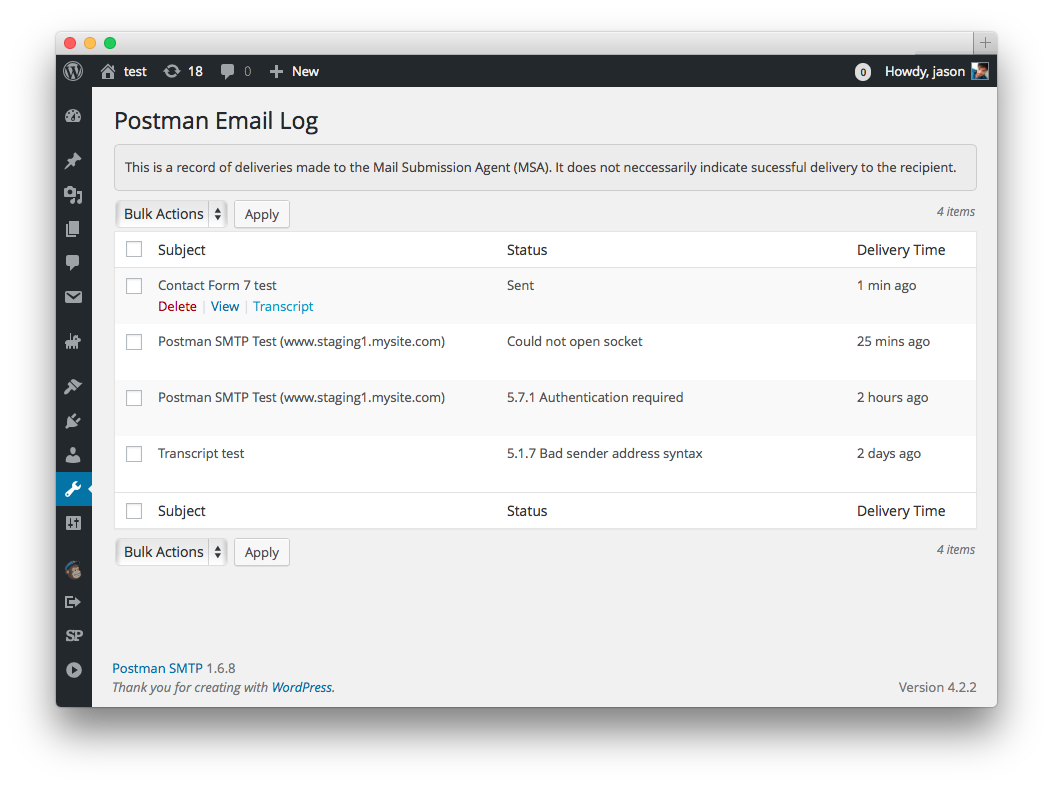
- Log and resend all emails; see the exact cause of failed emails
- Supports International alphabets, HTML Mail and MultiPart/Alternative
- Supports forced recipients (cc, bcc, to) and custom email headers
- SASL Support: Plain/Login/CRAM-MD5/XOAUTH2 authentication
- Security Support: SMTPS and STARTTLS (SSL/TLS)
- Copy configuration to other instances of Postman
- Supports the proprietary OAuth 2.0 implementations of Gmail, Hotmail and Yahoo
- Fire-and-forget delivery continues even if your password changes
- Gmail: By combining OAuth2 and the Gmail API, Postman can deliver where other plugins can not
- Gmail API for sending Gmail and Google Apps email (requires a Google account)
- Mandrill API for sending any email (requires a Mandrill account)
- COMING SOON: Sparkpost API for sending any email (requires a Sparkpost account)
- SendGrid API for sending any email (requires a SendGrid account and PHP 5.3)
Postman needs translators! If you are a non-English speaker, please get involved!
- Woocommerce
- Contact Form 7
- Gravity Forms
- Fast Secure Contact Form
- Visual Forms Builder
- Contact Form Builder
- PlanSo Forms
- MyMail Newsletter by revaxarts
- SendPress Newsletters
- WP HTML Mail
- Email Templates
- WordPress Leads
- .. and every other plugin that uses the WordPress API wp_mail to send mail!
- WordPress 3.9 and PHP 5.2 with SPL and iconv
- Memory: 750KiB per process at idle
- Reliable mail delivery with custom email domains requires an SPF record
- Reliable SMTP delivery requires credentials with an email service provider
- OAuth 2.0 features require a Gmail, Hotmail or Yahoo mail OAuth 2.0 credentials
安装:
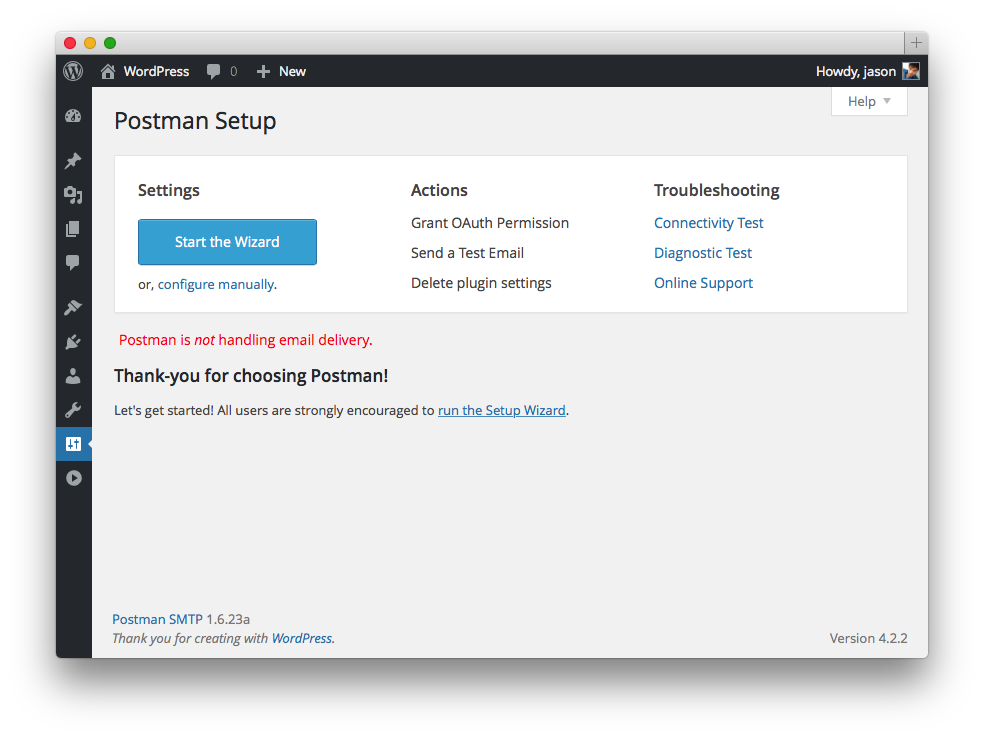
To send email reliably, you must use the SMTP server assigned to that email. If Postman is unable to connect to the right SMTP server, you may have to ask your host to open the ports, or create a new email account managed by your host, or switch hosts! The Connectivity Test utility will tell you which ports are open and the actions available to you.Easy install and setup! (Recommended for all users)
- Install and activate the plugin through the 'Plugins' menu in WordPress.
- In the WordPress 'Settings' menu select 'Postman SMTP'.
- Choose 'Start the Wizard' and follow the instructions.
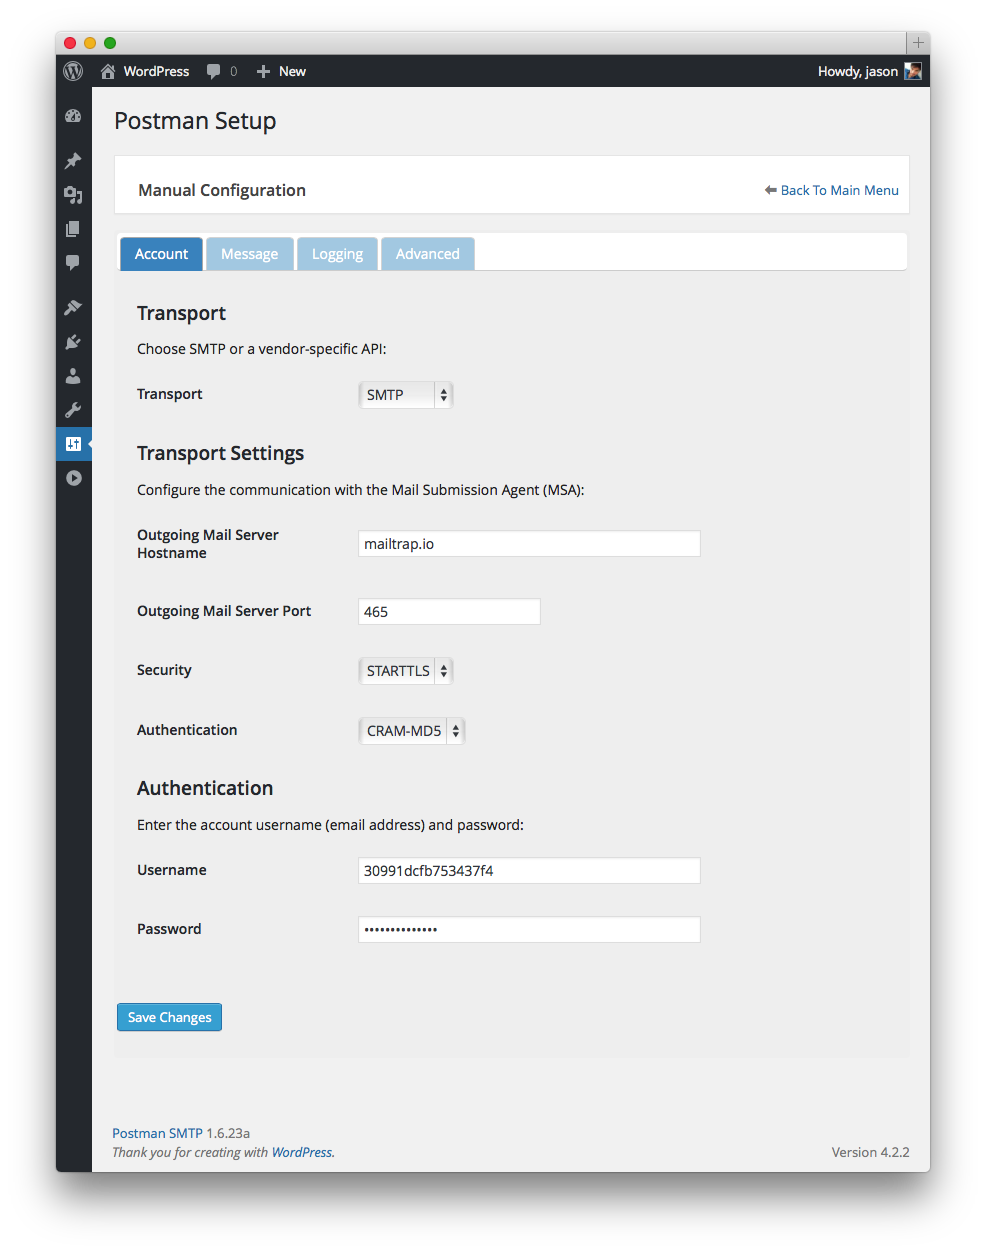
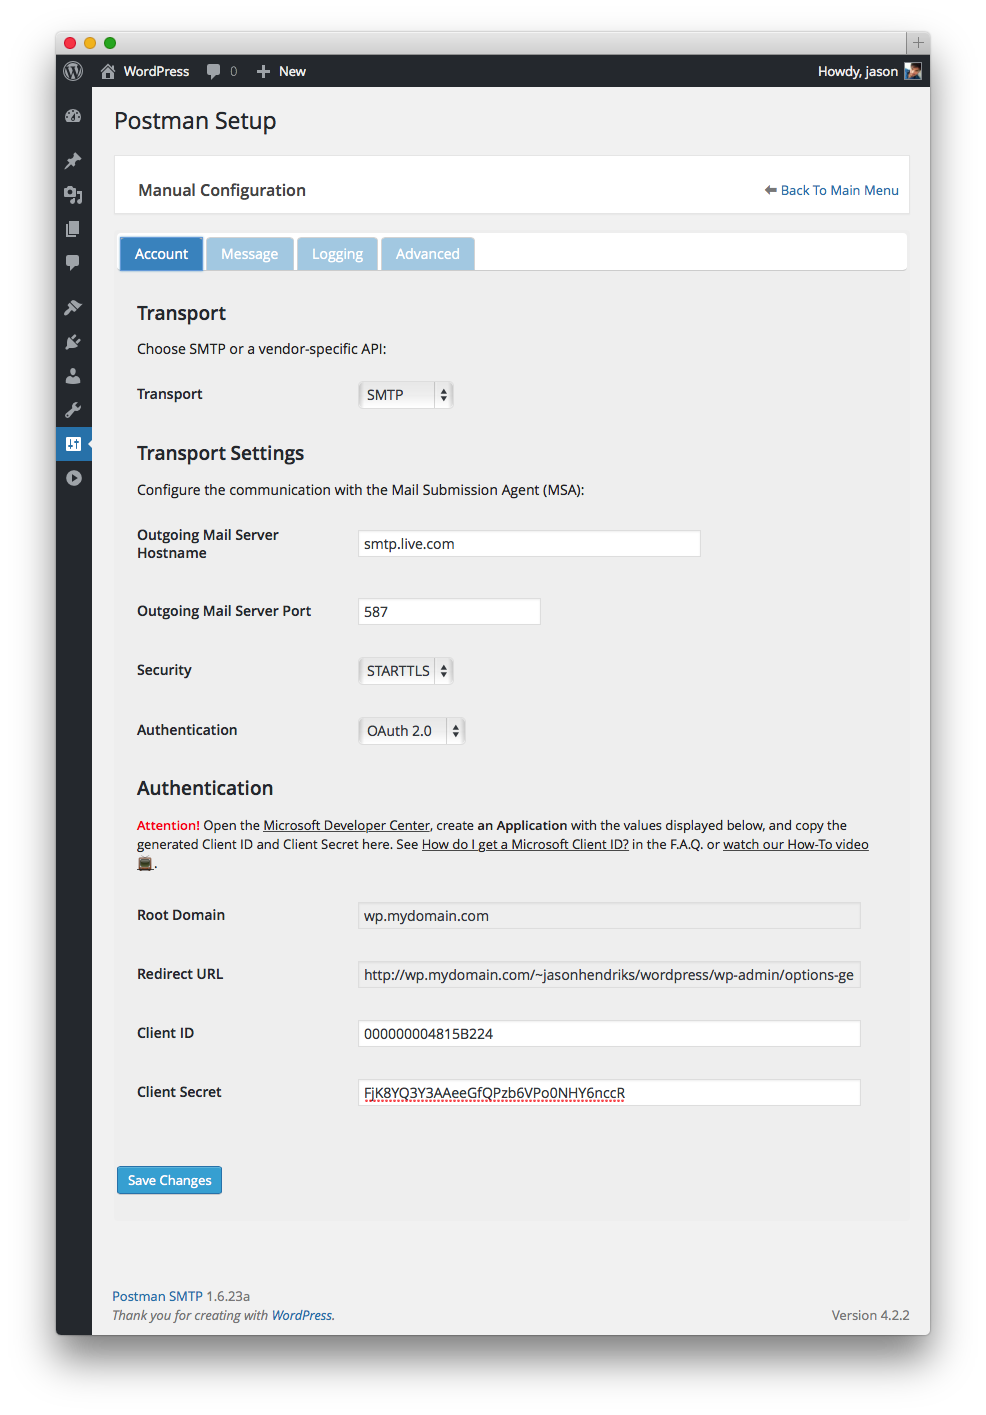
- Choose configure manually
- In 'Transport', choose 'SMTP'
- In 'Outgoing Mail Server Hostname', enter the SMTP Server's hostname
- In 'Outgoing Mail Server Port', enter the SMTP Server's port
- In 'Security' choose the appropriate type (a good guess is SMTPS for port 465, STARTTLS otherwise)
- In 'Authentication', choose the authentication type (a good guess is 'Plain')
- If your Authentication method is not 'None', enter your username (probably your email address) and password.
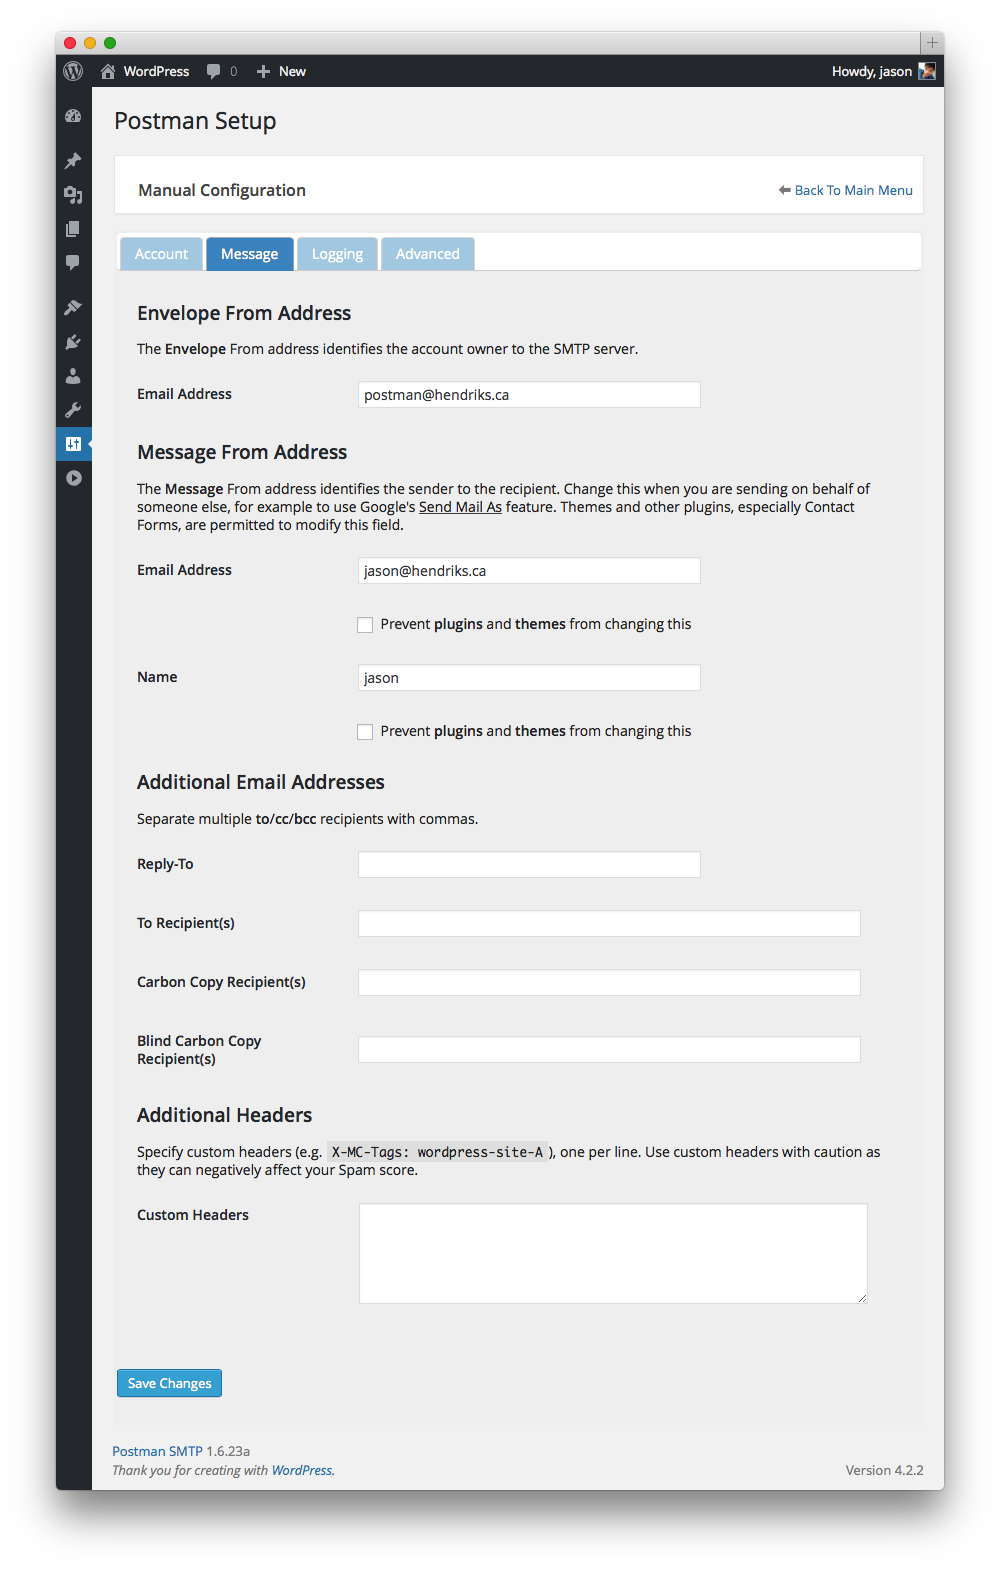
- Choose the 'Message' tab.
- In 'Envelope From Address' enter your email address. This MUST be the same address you login to webmail with.
- In 'Message From Address' enter your email address. Or this can be an alias, mailing list, or group email if you wish.
- Choose the Save Changes button.
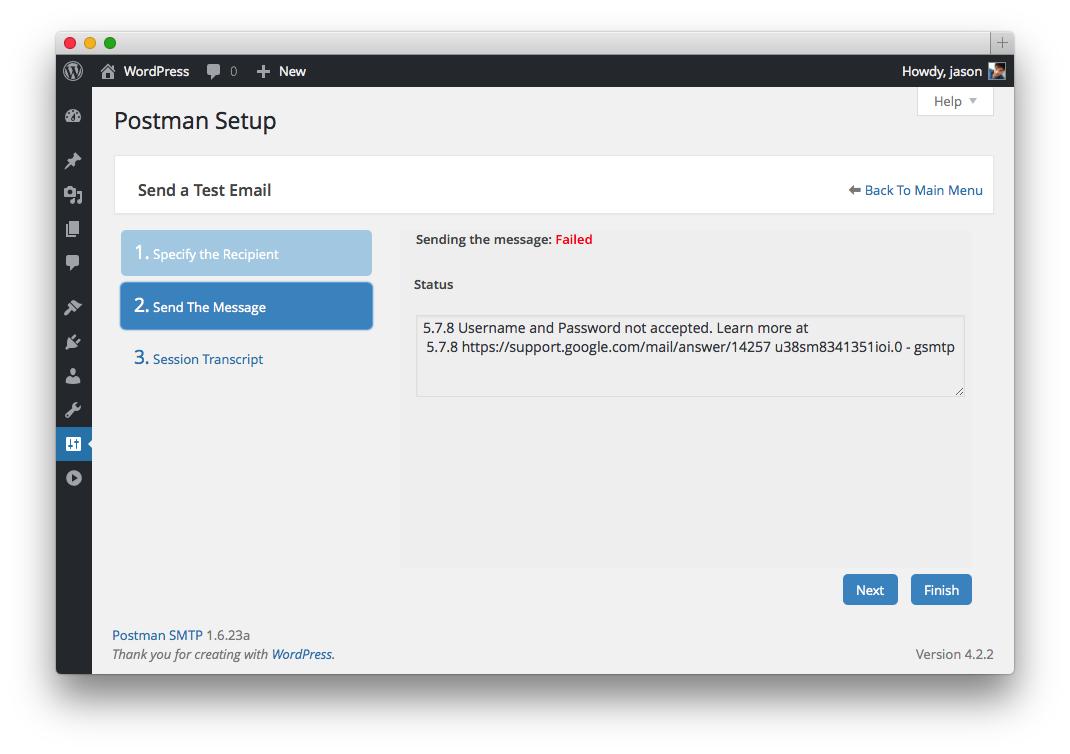
- Send yourself a test email.
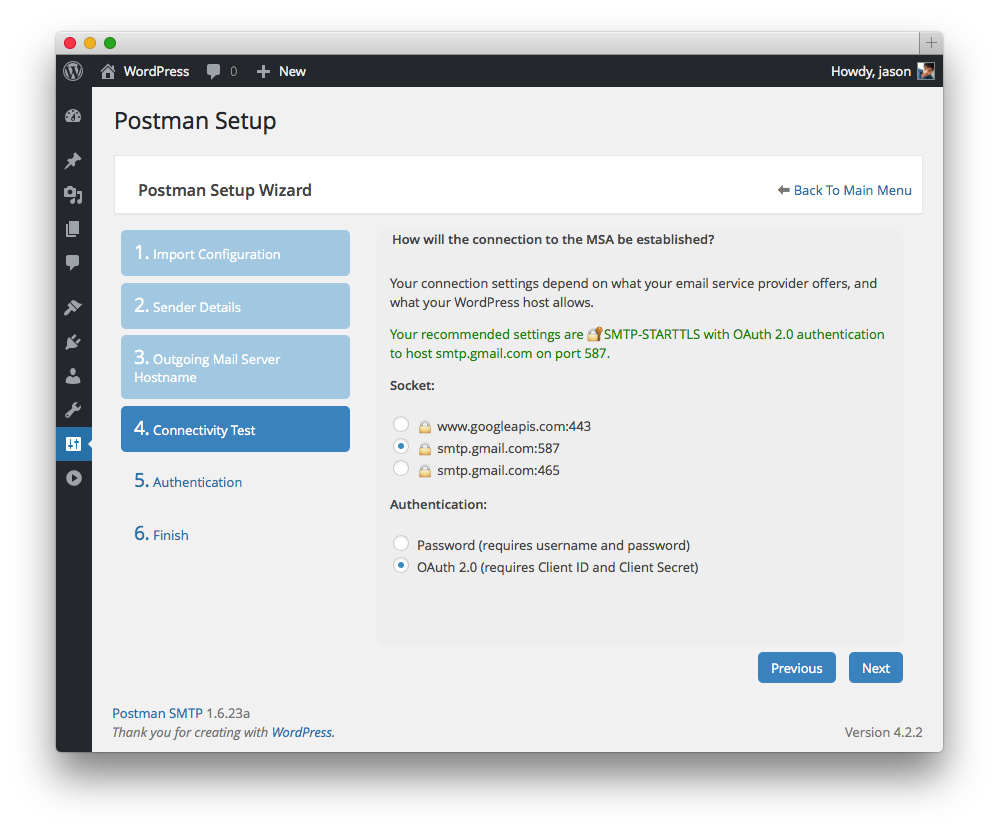
- Choose configure manually
- In 'Transport', choose 'SMTP'
- In 'Outgoing Mail Server Hostname', enter the SMTP Server's hostname
- In 'Outgoing Mail Server Port', enter the SMTP Server's port
- In 'Security' choose the appropriate type (a good guess is SMTPS for port 465, StartTLS otherwise)
- In 'Authentication' choose 'OAuth 2.0'
- Postman will give you a link to the Client ID maintenance page of your email service provider. Create a Client ID for your WordPress site.. instructions for this are detailed in the FAQ
- Copy your generated Client ID and Client secret into the plugin's Settings page.
- Choose the 'Message' tab.
- In 'Envelope From Address' enter your email address. This MUST be the same address you login to webmail with.
- In 'Message From Address' enter your email address. Or this can be an alias, mailing list, or group email if you wish.
- Choose the Save Changes button.
- Choose the 'Request OAuth2 Permission' link and follow the instructions.
- Send yourself a test email.
Postman is developed on OS X with PHP 5.5.14 and Apache 2.4.9. Postman is tested in a Red Hat OpenShift environment with PHP 5.3.3 and Apache 2.2.15 with Gmail, Hotmail and Yahoo Mail (US). Postman is tested with mailtrap.io.
屏幕截图:
常见问题:
What is OAuth 2.0?
A modern replacement for traditional password-based authentication. Postman supports the OAuth 2.0 implementations of all three major e-mail providers: Gmail, Hotmail and Yahoo Mail.
How does OAuth 2.0 work?
Postman requests a limited access OAuth 2.0 token (valet key) to access the APIs (enter the house) and perform a specific service (handle Gmail, stay out of Google Docs) with no need for you to surrender your username and password credentials (master house key). Once access is granted, Postman commandeers the WordPress wp_mail() function to provide an incredibly stable mail sub-system.
Can't I just tell Google to allow less secure apps and keep using my old password?
Google does have a setting to allow less secure apps but this option is not available if you're using Google Apps to manage a domain. There are many reasons why OAuth 2.0 is better than any password-based mechanism:
- Postman will never ask for your password, so your password can't be stolen
- If you change your password regularly, you will never have to update Postman's configuration
- You have tighter control over the data Postman has access to. For Google users it can never access your Calendar or Docs or YouTube; for Yahoo users it can never access your Flickr
- If your WordPress site gets hacked, you can revoke Postman's email access without impacting any other application or website that has access to your account
NEVER give out your Gmail, Microsoft or Yahoo password to a 3rd-party or 3rd-party program that you don't fully trust.
What is a Client ID?
To use OAuth, your website needs it's own Client ID. The Client ID is used to control authentication and authorization and is tied to the specific URL of your website. If you manage several websites, you will need a different Client ID for each one.
How do I get a Google Client ID? (For Gmail users only!)
- Go to Google Developer's Console and login with the same email address that you are configuring Postman with.
- Choose 'Create a New Project'. This project will be for Postman SMTP only.
- Select 'Consent Screen' from under 'APIs & auth'. Into 'Email address' choose the correct Gmail address and in 'Product name' put 'Postman SMTP'. Choose 'Save'.
- Select 'Credentials' from under 'APIs & auth'. Choose 'Create a new Client ID'.
- For the 'Application Type' use 'Web application'.
- In 'Authorized Javascript origins' enter the 'Javascript Origins' given by Postman (either from the wizard[screenshot], or from the manual configuration page[screenshot]).
- In 'Authorized Redirect URIs' enter the 'Redirect URI' given by Postman (either from the wizard[screenshot], or from the manual configuration page[screenshot]).
- Choose 'Create Client ID'.
- Enter the Client ID and Client Secret displayed here into Postman's settings page screenshot.
![[screenshot]](http://plugins.svn.wordpress.org/postman-smtp/assets/examples/Screen_Shot_2015-03-06_at_2_34_22_PM.png)
![[screenshot]](http://plugins.svn.wordpress.org/postman-smtp/assets/examples/Screen_Shot_2015-03-06_at_2_44_48_PM.png)
How do I get a Microsoft Client ID? (For Hotmail/Live/Outlook.com users only!)
- Go to Microsoft account Developer Center and select 'Create application'.
- In the 'Application name' field enter 'Postman SMTP'. Select 'I accept.'
- Select 'API Settings' from under 'Settings'.
- In 'Redirect URL', enter the redirect URI given by Postman (either from the wizard, or from the manual configuration page). Select Save.
- Select 'App Settings' from under 'Settings'.
- Enter the Client ID and Client Secret displayed here into Postman's settings page.
How do I get a Yahoo Client ID? (For Yahoo Mail users only!)
- Go to Yahoo Developer Network and select 'Create an App'.
- In the 'Application Name' field enter 'Postman SMTP'. For 'Application Type' choose 'Web Application'.
- In 'Home Page URL', enter the 'Home Page URL' given by Postman.
- In 'Callback Domain', enter the 'Callback Domain' given by Postman.
- Under 'API Permissions' choose 'Mail'. Under 'Mail' choose 'Read/Write'
- Click 'Create App'
- Enter the Client ID and Client Secret displayed here into Postman's settings page.
How can I revoke Postman's OAuth 2.0 access?
- If you have a Google Account, from the Google Developer's Console use the Delete button under the Client ID.
- If you have a Microsoft Live account, from the Microsoft account Developer Center, select the Application and choose Delete Application.
- If you have a Yahoo Account, from the Yahoo Developer Network My Apps, select the Application and choose Delete App.
更新日志:
- [Ticket] - v1.7 ignores the content-type header set in the Additional Headers. Fixed.
- [Ticket] - Fixed an issue where v1.7 admin screens crash for non-admin users when Postman is not configured. Fixed a multiste issue where v1.7 site admins lose access to their Postman settings screen. Special thank-you to Domi2015 for giving me access for testing! :)
- Localized jQuery Validation messages
- Localized MyMail messages
- Put the local translation files back, as WordPress on-line translations do not work as advertised
- [Ticket] - the Optimizepress plugin calls wp_mail before the WordPress init hook, before Postman is fully initialized, so I made a change to accomodate this behavior
- [Ticket] - v1.7 admin screen may become inaccessible after upgrading. Fixed.
- [Ticket] - v1.7 breaks compatibility with WordPress Leads. Fixed.
- Happy Halowe'en! 30,000 installations! - 2015-10-31
- Integrated Mandrill API
- Integrated SendGrid API
- Language files have been removed from the plugin as translations are now performed on-line. If you are a non-English speaker please constribute!
- Postman commandeers email when activated and sends using the WordPress default of localhost:25 - this is for people who want to use it to diagnose email problems without configuring SMTP
- Re-send failed e-mails from the Email Log screen
- Added an internal 'manage_postman_smtp' capability for advanced management with, for example, User Role Editor
- [Ticket][Ticket] Added an import/export tab to the Advanced Configuration screen for those who want to duplicate settings between sites.
- [Ticket] Added option to disable e-mail address validation
- [Ticket] Fix for fatal error when using a non-administrator in the admin menu.
- 20,000 installations! - 2015-09-09
- Translated into Greek, thank-you Michael Kotsarinis!
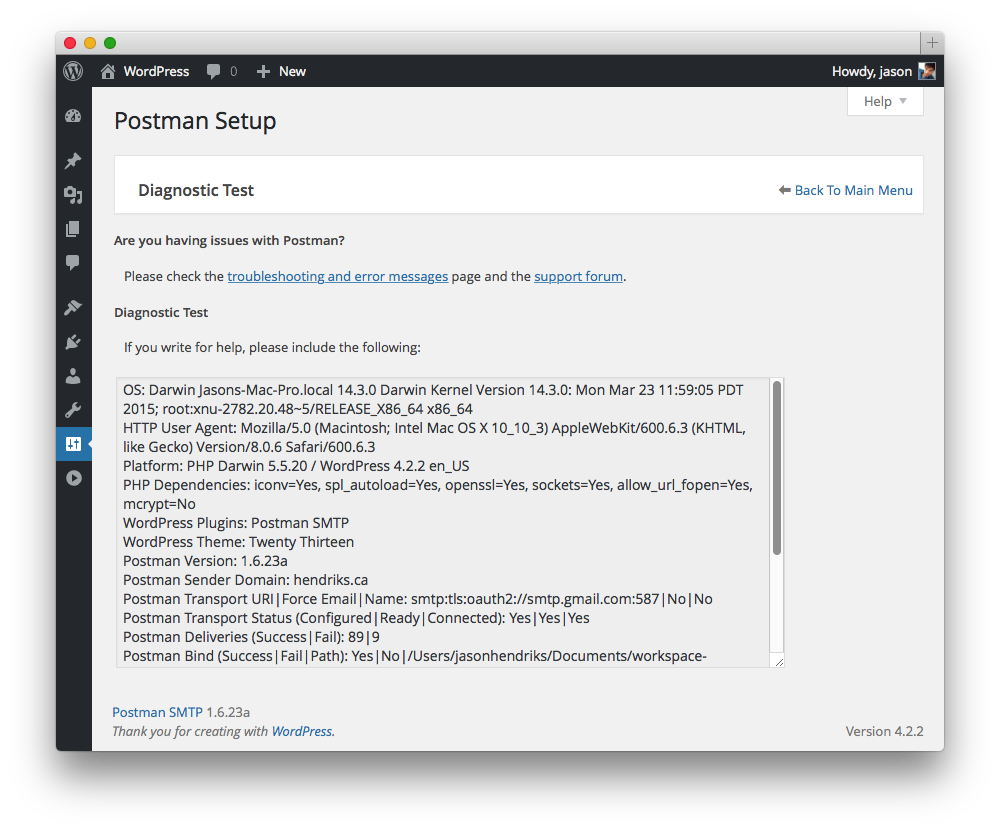
- Diagnostic Test displays all the wp_mail-related hooks of active plugins and themes
- When validating e-mail addresses, Postman will disclose which field has a validation issue in the error message
- Default log entries bumped from 10 to 250
- [Ticket] Added nasty fake input field hack to prevent browsers from autofilling username/password fields.
- [Ticket] Added a warning to the Email Log for emails that have an empty subject line
- [Ticket] Test Email detects Ajax errors and displays them in the Status window
- [Ticket] Removed the references to images in Postman's copy of jquery-ui.css causing HTTP 404
- [Ticket] Fixed an Ajax name collision with the plugin MemberPress
- [Ticket] Some sites can not handle International (UTF-8) characters in the Test Email. Fixed.
- [Ticket] Fix for PHP Notice: Undefined offset: 1 in postman-smtp/Postman/Postman-Mail/google-api-php-client-1.1.2/autoload.php on line 22
- [Ticket] Silenced PHP warnings in Zend_Mail from ini_set
- 10,000 installations! - 2015-06-27
- 9,000 installations! - 2015-06-20
- [Ticket] Causes bbPress or Buddy Press to generate warning messages. Fixed.
- [Ticket] User reported error "Fatal error: Internal Zend error - Missing class information" - Whoops, used 'require' PostmanState.php instead of 'require_once' PostmanState.php which was causing errors. Fixed.
- [Ticket] [Ticket] MyMail Newsletter Plugin for WordPress refuses to use wp_mail. I don't want to make this a habit, but I've integrated Postman with MyMail's proprietary delivery mechanism.
- [Ticket] Found an environment where the plugin's call to new Exception was creating PHP Fatal errors. Fixed.
- [Ticket] Perform validation on all email headers before sending message
- The Gmail API transport displays a copy of the payload during the Send Email Test and saves this payload to the Email Log
- No longer shows the Javascript pop-up if the error is caused by the user cancelling everything (by checking JSON response.responseText for null)
- Finally realized that for the last five months I've been relying on register_activation_hook to fire during plugin updates - and it doesn't. Lovely. Well this change should eliminate all the "update doesn't work!" bugs for good.
- [Ticket] I enable Strict mode when I code Postman to ensure it's error free and I forgot to turn it off. This was causing all plugins and themes to show their warnings. Fixed.
- [Ticket] I didn't thoroughly test the Gmail API, causing "Catchable fatal error: Argument 1 passed to PostmanGmailApiModuleTransport::getAuthenticationType() must be an instance of PostmanOptions, none given." Fixed.
- [Ticket] I didn't thoroughly test the Gmail API, it wasn't warning the user if the Envelope Sender Address is missing. Fixed.
- [Ticket][Ticket] Found a problem in the Activation Handler. It was re-encoding passwords when it shouldn't have been. Fixed.
- 8,000 installations! Big milestone! The author of Contact Form 7 has officially endorsed Postman SMTP as the SMTP plugin of choice! You can't wipe the smile from my face :D
- [Ticket] Postman is determining the current user's admin capability incorrectly. Fixed.
- [Ticket] Added an additional From field, the Envelope From Address, so users can use a different From address than the Account address (for example, to use a Google Apps' Group email address)
- Added a uniqueness (based on site URL) to the lock filename in case this is shared hosting
- Persistence-level updates now run across all subsites on a multisite installation
- You know you're having a really bad day when you have to have do three releases. Fix for "Fatal error: Call to a member function addError() on a non-object". This happens when wp_mail is blocked by another plugin and a non-admin user accesses the site.
- [Ticket] Fixed a bug "Fatal error: Cannot redeclare IsNullOrEmptyString()" I introduced in v1.6.15
- Added Cc and Bcc addresses to Email Log
- [Ticket][Ticket] Force a Logout of Google before launching the Developers Console so it's obvious to the user which account is being used
- Now using Google Developers Console Gmail Wizard URL in place of Google Developers Console URL to simplify Client ID creation
- [Ticket] Removing the BCC header in the case of the Gmail API was incorrect and causing lost recipients. Fixed.
- Fixed a compatibility issue (PHP Fatal Error) with the Postman Gmail API Extension
- [Ticket] Fixed a bug (PHP Warning) I introduced in v1.6.13
- 7,000 installations!
- Translated into Dutch, thank-you Louise
- [Ticket] Add process-locking to make sure the OAuth2 token is refreshed synchronously
- Use the Zend_Mail setReturnPath option to communicate the Mail-From and Sender as the SMTP account, allowing arbitrary addresses in the From header
- [Ticket] Added Emoji lock icons to Dashboard and Main Setting screens to indicate security
- [Ticket] Emails from the Email Users plugin were causing undeliverable errors - fixed by removing the SMTP Return-Path header that Email Users injects
- 6,000 installations! - 2015-05-26
- Postman now calls wp_mail when sending a test email. This marks the beginning of the "Postman API"
- Shaved admin memory use from ~6MB to ~4MB; Non-admin memory use holds at ~2MB
- Now loading the Sent Email post type for all admin screens, in case other custom post type-related plugins (e.g. WordPress Importer) need it
- Wasn't comfortable how plugin_data was being retrieved, so reverted back to hard-coded plugin name and version
- Save original wp_mail parameters to Email Log so that a Resend action can be implemented
- [Ticket] Removed sanitize_text_field from the PostmanSanitizer to prevent corruption of some passwords
- [Ticket] Removed the WordPress function call wp_slash - systems that don't support it can now use logging
- A lot of general code clean-up and memory optimizations
- [Ticket] Fix for "Fatal error: Call to undefined function spritnf() in PostmanEmailLogController.php on line 284" - sometimes PHP really sucks compared to Java
- Added a link to a HowTo Video for configuring Google OAuth 2.0 in the OAuth2 authentication section
- 5,000 installations!
- Looks for php_openssl and php_socket in the Pre-Requisites check
- [Ticket] I hate when you have to have a fix for a fix. It means you need to hire more testers.
- [Ticket] Changed the way Postman performs the API Connectivity Test to more resemble how Google does it
- [Ticket] Found a host that the Connectivity Test gets confused on : send.one.com. STARTTLS detection was failing. Fixed.
- [Ticket] Some users insist on running Postman in WordPress < 3.6 which has no wp_slash function. Logging is disabled in this case.
- [Ticket] Found a PHP envrionment that choked in the catch block trying to call a function (get transcript) on an object instantiated in the try (mail engine). Fixed.
- [Ticket] If wp_mail is called with a recipient list that ends in a comma, Postman tries to add an empty address to the message. Fixed.
- The SMTP Session Transcript was not being saved for errors! Fixed.
- [Ticket][Ticket][Ticket][Ticket][Ticket] Fixed a long-standing bug where Postman would ignore the Grant Code from an OAuth provider if it wasn't in the very next HttpRequest that the site received. Changed this to use a three-minute window.
- [Ticket] Fixed a Javascript bug
- Added an Ajax failure handler to every Ajax post
- SMTP transport requires a Sender Email Address be set
- Wizard will not clear the hostname if it comes back null
- If the host does not support "humanTime", the Email Log will fall back to an ISO date
- Added a new advanced option: Transcript size to adjust how much of the transcript is saved in the log
- The wizard gets confused if the user specified auth type is undefined for the newly chosen socket. for example, a gmail address, with a mailtrap.io server, toggling between the gmailapi socket and the mailtrap socket. Fixed.
- Show a warning on the main setting screen if the Delivery mode is not set to Production
- 4,000 installations!
- [Ticket] Some of the changes released in v1.6 broke the Gmail Extension. Fixed.
- [Ticket] Added a new advanced option: Stealth Mode to hide the Postman X-Mailer signature
- Added a Transcript option in the Email Log
- Fixed how the Wizard handles new GoDaddy Office-365 supported email
- You test and test and test, and there's always a bug. Fixed a problem in the Port Recommender where it thought STARTTLS was offered when it isn't (test case: test@aol.com)
- Fold all code from the Postman Gmail Extension back into Postman
- Remove warning from main screen for sender override if it's already on
- Delivery mode - production, logging, test
- Help screens
- Log all email attempts with error messages (if any)
- Truncate logs to max amount
- View all the email attempts, and view a single entry
- Delete single, delete batch, and delete the entire log on pugin data purge
- Highlight Logging option to users
- Obscure password from front-end
- Ask to see password when typing
- When the wizard is looking up details on the email address, disable the smtp hostname field
- Wizard check server ID and warn for MITM 'attack'
- Check for GoDaddy SMTP server during Wizard and use that SMTP server
- Check for Gmail during wizard and remember for gmail api option.
- Present choices to user when select the auth type and socket in wizard more elegantly (radio buttons?)
- Warn when using AUTH with NO encryption - done with padlock emoji
- Add hostname to connectivity test table.
- Remove hard-coded plugin version number
- 3,000 installations!
- Minor fix in Wizard: OAuth labels weren't updating dynamically (since v1.5.11)
- Lots of changes at Yahoo's Developer Network required changes here: updated format of Callback Domain; updated Yahoo Developer Network portal launch link; renamed Consumer Key/Secret to Client ID/Client Secret; updated FAQ for Yahoo Client ID instructions
- [Ticket] Updated stylesheet to avoid interference from Dating Solutions Plugin (DSP)
- [Ticket] PHP 5.2 users: fix test messages that show failures but still get delivered; fix Contact Form 7 submission freezes
- Translated into Turkish, thank-you ercan yaris
- 2,000 installations! :D
- Commercial-grade improvements to Connectivity Test and Setup Wizard. The new wizard prevents misconfiguration by interrogating the MTA for capabilities and intelligently suggests the best settings for the user. Steve Jobs would be proud.
- Fixed Wizard's MSA hostname guess for GoDaddy addresses (smtp.secureserver.net is the MTA not the MSA)
- Fixed Wizard's MSA hostname guess for Outlook 365 addresses (smtp.live.com is for their free Hotmail service)
- Added French/Italian translation for JQuery Validation
- Fix for Fatal error: Cannot redeclare class PEAR_Common in C:\PHP5\PEAR\PEAR\Common.php - similar to this error in WP Minify
- Added JQuery tabbed UI for manual configuration screen
- Added functionality to add to, cc, and bcc recipients to every message
- Added functionality to add custom headers to every message - useful for Mandrill "SMTP" headers
- [Ticket] The Setup Wizard will check for IP addresses in the site URL and warn the user when they are about to configure OAuth 2.0 that this will fail.
- [Ticket] Added functionality to prevent plugins and themes from overriding both the sender name and sender email address
- [Ticket] Hide PHP warnings from
stream_set_timeout()in case the host has disabled this function.
- 1,000 installations! :D
- [Ticket] Postman will not shut down if it can't find OpenSSL. It will just display a warning to the user.
- [Ticket] renamed Zend framework classes to prevent errors with other plugins using the Zend framework
- [Ticket] Added ajax error checks, especially for Error 502 : Bad Gateway (from WPEngine.com) when sending test e-mail
- Multipart/Alternative was horribly broken, clearly no-one was using it. It's working now, and Postman's new Test Message is Multipart/Alternative. Thanks to Victor Hung of poofytoo for the use of his cartoon.
- Add PHP library pre-requisite checks to Binder, Dashboard widget, Admin screen and Admin screen error messages.
- Translated into Italian, thank-you Andrea Greco
- Obfuscated e-mail address in Diagnostic Info
- Fixed Wizard's SMTP hostname guess for Apple addresses (icloud.com, me.com, mac.com)
- Added a Dashboard Widget to display Postman status
- [Ticket] Added diagnostics check for iconv library
- Moved the SMTP transcript to it's own step in the Send Email Test
- Moved 3rd-party plugin import to the Setup Wizard
- [Ticket|Ticket] Stopped writing to error log if a language file can't be found
- Added the Http User Agent string to the diagnostics
- [Ticket] Added support for the wp_mail filter - this adds compatibility with plugins like email-log
- Better diagnostics - includes a port check on the currently configured host:port
- Fixed a bug where multiple error messages at once overwrite each other
- [Ticket] Fixed a bug in Sanitizer for cases where WordPress calls sanitize twice in a row - known WP bug
- Added a dedicated screen for Diagnostics (so that I can add more intensive, slower-running checks like DNS)
- Fixed port-testing race condition bug in Postman Setup Wizard when using Gmail API Extension
- Fix for error "Fatal error: Cannot redeclare class PostmanOAuthTokenInterface" when using Gmail API Extension
- Checks to make sure that the hostname used for SMTP/OAuth 2.0 is one that is supported
- Removed display_errors=On, Mr. Space Cadet here left it in the previous release by accident
- Bugs slipped through. In the Wizard, choosing port 465 was not hiding the authentication label. Worse, choosing port 587 was not showing the authentication buttons.
- In the wizard, if no ports are available for use, the error message was not being displayed.
- [Ticket|Ticket] Added support for modular transports. The first external transport is the Postman Gmail Extension, which uses the Gmail API to send mail out on the HTTPS port, a convenient way around traditional TCP port blocks for Gmail users
- [Ticket] Made my debug logging "less agressive" so that broken systems (those that pipe warning messages to STDOUT regardless of the WordPress WP_DEBUG_DISPLAY setting or PHP's display_errors settings) will no longer experience the Port Test hanging during a check
- Fixed a bug in the Setup Wizard where it would not use OAuth 2.0 on port 587
- Fixed a bug where Postman refused to send mail with Password authentication and no encryption (who does that??)
- All text has been externalized in prep for I18N Internationalization and localization
- Fixed a bug where the Setup Wizard would force OAuth 2.0 configuration, instead of falling back to Password, even if the required port was closed
- Added more error checking, and more warning messages.
- Translated into French, thank-you Etienne Provost
- Happy Valentine's Day! Sending Yahoo email now supported with OAuth 2.0 authentication! If the Wizard detects that a Yahoo server has been entered, it automatically configures OAuth 2.0
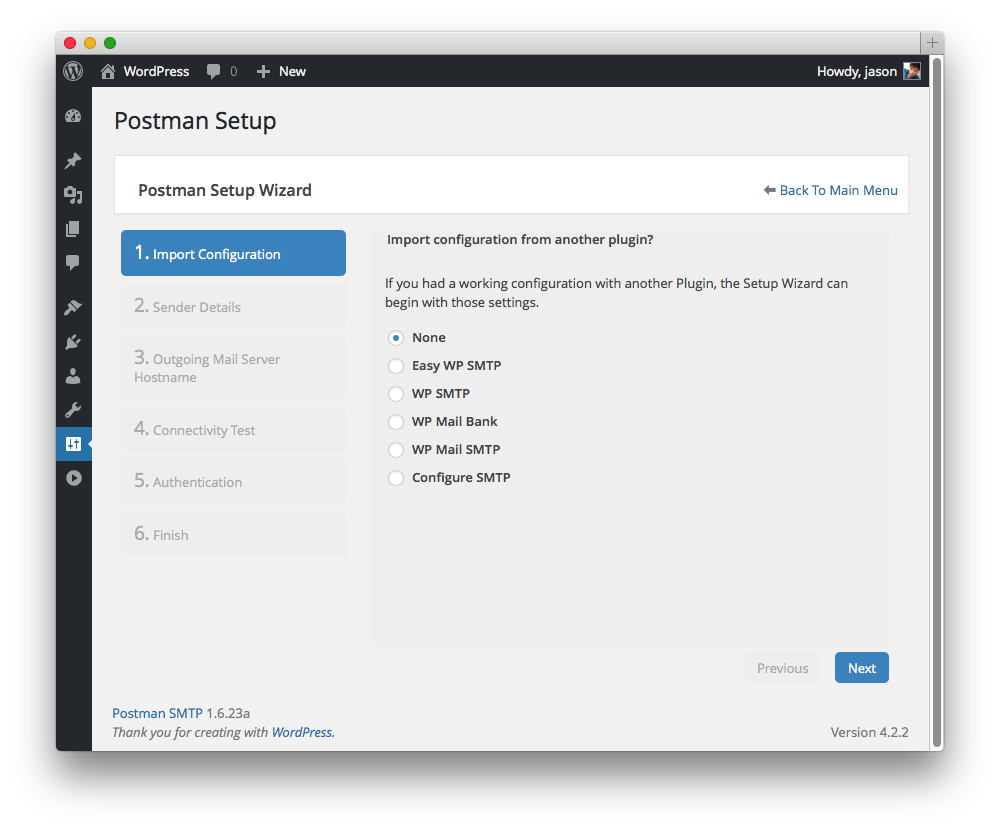
- First time users may choose to import settings from any of the Big Four WordPress SMTP plugins (five if you count Easy SMTP Mail, a clone of WP Mail SMTP): Easy WP SMTP, WP Mail Bank, WP Mail SMTP and WP SMTP
- [Ticket] Suppressed warning messages generated by calls to fsockopen - they were causing the remote Ajax queries to hang
- The wizard was resetting some settings by accident, namely Connection Timeout, Read Timeout and Reply-To
- [Ticket] Found an environment where calls to error_log were being displayed in the HTML even after display_errors was disabled. Therefore, disabled error_log calls by default. The log may be re-enabled in Advanced Settings
- The Bad, Postman! screen was messing with the Port Test Ajax call when fsockopen generated an error and debug level is set to E_ALL in php.ini. Therefore added a switch in the configuration "Show Error Screen" that is off by default. When it is off, Port Test works perfect but errors generate a WSOD. When it is on, errors are displayed in the "Bad, Postman!" screen but Port Test fails.
- I heard that some hosts, like WPEngine, do not allow writing to the Http Session. Well that's balls. I've modified the code to write to the database instead.
- 500 downloads and six 5-star ratings in only three weeks! Cool! 8-)
- Replaced the Google OAuth API with pure PHP code. No more unexpected Google API errors.
- [Ticket] Enabled overriding of the timeouts in the configuration screen. If Postman is intermittently sending mail, doubling the TCP Read Timeout may help
- Added the SMTP session transcript output when a test message fails to send.
- Fixed the error: Class 'Zend_Mail_Protocol_Smtp_Auth_Plain' not found in /Postman/Postman-Mail/Zend-1.12.10/Mail/Transport/Smtp.php on line 198
- Passwords in the database are now Base64-encoded so casual viewing of the database won't reveal them
- Fixed a couple minor database upgrade bugs: for new users who use Password Authentication, and for old users that don't have an expiry token stored
- Added a version shortcode, mostly for promotion of Postman on my own websites
- Serveal minor tweaks to the user interface, including focus, style, validation, and enabling/disabling inputs where applicable
- [Ticket] Fixed the error: PHP Fatal error: Call to private PostmanAuthorizationToken::__construct() This occurs when upgrading from a pre-v1.0 version of Postman (when PostmanAuthorizationToken had a public constructor) to v1.0 or higher
- [Ticket] Fixed the error PHP Fatal error: Class 'Google_IO_Stream' not found in /Postman/Postman-Auth/google-api-php-client-1.1.2/src/Google/Client.php on line 600 by including Google/IO/Stream.php
- Postman now has a modest fatal error screen, rather than a dreaded white screen of death
- Sending Hotmail/Windows Live/Outlook.com email now supported with OAuth 2.0 authentication! If Wizard detects that a Hotmail server has been entered, it automatically configures OAuth 2.0.
- Separated Authentication input from Encryption input for finer configuration control
- Added additional authentication types: plain and CRAM-MD5. 'basic' became 'login'
- Added Ajax to manual config and wizard screens to allow dynamic OAuth2 redirect url + help text changes in response to hostname changes
- Removed 'Allow Plugin to Override Sender' user input
- Added Online Support link in menu
- Clarified text in 'Run a Port Test' so people won't continue to ask me about connection problems (hopefully)
- Support for Sender Name and Reply-To. Turns out Google no longer honours the MUA Return-Path header due to Spam. Makes sense, so I've decided not to add a Return-Path field to Postman's configuration.
- Support for WordPress filters wp_mail_from and wp_mail_from_name
- Disable stats-keeping for email sent by the test function
- Minor tweaks to the Wizard to support WordPress v3.9
- [Ticket] Fixed a bug I introduced in 1.1. Thanks to user derrey for catching this one. Zend_Mail crashes when attempting to throw an exception when the 'from' standard header was added as a header : "Zend_Mail_Exception code=0 message=Cannot set standard header from addHeader()"
- [Ticket] Added support for international characters (the WordPress default is UTF-8) which can be specified with headers or the wp_mail_charset filter
- Added support for multi-part content type which can be specified with headers or the wp_mail_content_type filter
- Overhaul of the UI - A navigation pane is shown at the top of each page and each major function has been separated into its own screen
- Postman now supports sending with basic auth and no auth just like the other SMTP plugins
- Added a Port Test function so users can have peace of mind whether the plugin is failing (never!) or whether the host has firewalled them
- [Ticket] Now supports email headers, such as a text/html content-type
- Now supports email attachments
- Added a warning if the user has configured OAuth but not requested permission from Google
- Added a warning if the user is using Google with Basic auth (or worse) and a suggestion to enable OAuth 2.0
- Recording of successful/failure tally
- Fixed error: "Undefined variable: authorizationToken" was preventing mail delivery outside of the admin screen.
- Fixed warning message that Postman couldn't bind to wp_mail immediately after Activation
- Added prerequisite checks to make sure the PHP environment can handle Postman
- Moved the screenshots and icons out of /trunk and into /assets
- [Ticket] Fixed "Configure and Authorize the plugin" missing the link address. Thanks to user kaorw for catching ths one.
- [Ticket] Fixed "Warning: Missing argument 2 for update_option()". Thanks to user kaorw for catching ths one. Fixed by calling delete_option instead of update_option().
- [Ticket] Fixed "Fatal error: Call to undefined function str_getcsv()". Thanks to user micb for catching ths one. This function is not available before PHP 5.3. Fixed by replacing str_getdsv() with custom implementation.
- [Ticket] Removed the namespace for users with older version of PHP
- Changed the Postman Redirect URI (now includes a trailing ?page=postman) - this means Client ID's from 0.2.4 or earlier MUST be updated with the new Redirect URI or re-created from scratch.
- Fixed issues on servers where the plugin is installed as a symbolic link.
- Better error handling/debugging with php logging and assertions.
- Fixed an environment-specific error that prevented Postman reloading the setting screen after sending a test email
- wp_mail() accepts multiple recipients (array and string)
- display a warning to the user if another plugin is preventing Postman from overriding wp_mail
- paired down the external libraries to only what was required - from 3,700 files to just 75
- default Gmail port corrected to 465 - previously 465 was hardcoded but 587 was saved to the database
- Added 'Delete All Data' button to erase the stored tokens
- OpenShift production problem: This environment didn't like the callback and there were possibly invalid characters in the source script
- First release. Happy Fig Newton Day! It was a grueling week-end, studying PHP and OAuth and Googling like a Boss, but it's done and it works!