
Brilliant Web-to-Lead for Salesforce
| 开发者 |
brilliantplugins
nickciske |
|---|---|
| 更新时间 | 2022年2月25日 03:37 |
| 捐献地址: | 去捐款 |
| PHP版本: | 7.4 及以上 |
| WordPress版本: | 5.9.1 |
| 版权: | GPLv2 |
标签
下载
详情介绍:
安装:
- Upload the
pluginfolder to the/wp-content/plugins/directory or install via the Add New Plugin menu - Activate the plugin through the 'Plugins' menu in WordPress
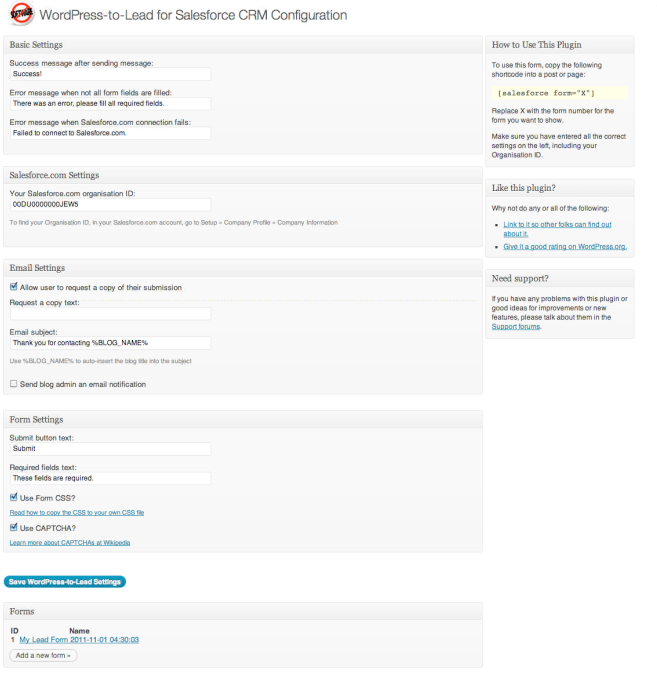
- Enter your Salesforce.com Organization ID on the plugin configuration page.
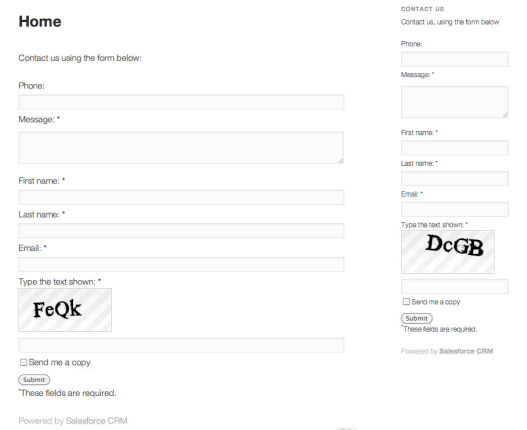
屏幕截图:
常见问题:
Does this plugin have any hooks or filters? Is there documentation?
Yes, quite a few. Hooks & Filters Documentation
I'm not seeing any errors, but the entry didn't get added to Salesforce!
To turn on in browser debugging, add a hidden field (enabled) named debug and set the value to 1.
To turn on debugging via email, add a hidden field (enabled) named debugEmail and set the value to you@yourdomain.com (your email address).
Also check for debug logs at SalesForce to see if a validation rule is the culprit: Administration Setup | Monitoring | Debug Logs.
I'm not receiving new submission emails
99% of the time the plugin is sendign these... and the issue is at the WordPress or server level. The Give team has an excellent article on diagnosing and troubleshooting email issues.
What are the built in field names? Not all the fields are working when I use the Field Label in the lead edit screen?
SalesForce is inconsistent in naming built in fields, and even misreports the names of some fields (like MobilePhone, which is actually mobile) in the customize fields screen. Generating a Web to Lead form gets you the real names, but the list below should help as well.
Built in fields
Leads
`
Human Name API Name
First Name first_name
Last Name last_name
Title title
Website URL
Phone phone
Mobile mobile
Fax fax
Email email
Address street
City city
State/Prov. state
Zip zip
Country country
Description description
Industry industry
Rating rating
Annual Rev. revenue
Employees employees
**Cases**
Human Name API Name
Contact Name ** name
Email email
Phone phone
Subject subject
Description description
Company company
Type * type
Status * status
Case Reason * reason
Priority * priority
Case Origin N/A (not settable via the WebToCase API)
- = must use a value from the picklist defined in your install ** = note that this will be auto prefixed as 'sf_name" in form output and POST data `
SIC Code Product Interest Primary Current Generator(s) Number of Locations
How do I setup Web to Lead/Case for my SalesForce Account?
How do I setup a Web to Case form?
Choose Web to Case in the Form Settings (bottom of the form editor page).
Where do I find my Salesforce organization ID?
To find your Organization ID, do the following steps:
- Log in to your SalesForce.com account
- Go to Setup » Company Profile » Company Information
- You'll find the Organization ID in the lower right hand corner of your screen
How do I use a SalesForce custom field?
- Go to Setup » Customize » Leads » Fields
- If your custom field does not exist yet, create it now.
- Find the API Name for your field (e.g. Custom_Field_Example__c). If it doesn't end in "__c" it's not the API name and will not work.
- Add a new field to your form using the form editor on the plugin admin screen
- Enter the API Name as the field name (left most box), then fill out the other fields normally (make sure to enable the field!).
- Save your changes -- new submissions will now post that custom field to SalesForce.
How do I use the checkbox field?
Like any other field. Note that it is a single checkbox, not a checkbox list (yet).
Note: You must provide a value for your checkbox. Generally 1 is what you want (unless you're expecting something other than true/false in SalesForce). If you don't provide a value, your checkbox will never get sent with the form data (and even if it did, it won’t "check" the box at SalesForce as "empty" = unchecked).
Checkbox lists and radio buttons will be in a future update.
How do I pre-check a checkbox?
Before you do, consider if a pre-checked checkbox (opt-out) is really what you want to do. If you insist on proceeding anyways: see the Pre-check a checkbox example in Other Notes.
How do I use the select (picklist) field?
Hint: Use the form importer!
Use it like any other field -- however you'll need to specify the options (and optional values) for each field using the options box (far right). You'll also need to use the "internal name" from Salesforce as your field name (see next FAQ).
The value box for a select list is the default value (the one selected on a fresh form).
`
/ Preferred format: /
// Use same data for display and value passed to SF
one
two
three
// Use different data for display and value passed to SF, require user to select something (assuming field is required)
Select One|
name1|value1
name2|value2
// Use different data for display and value passed to SF
name1|value1
name2|value2
/ Legacy Format (does not allow the use of colons in names or values): /
//Use same data for display and value passed to SF
one|two|three
//Use different data for display and value passed to SF, require user to select something (assuming field is required)
Select One: | name1:value1 | name2:value2
//Use different data for display and value passed to SF
name1:value1 | name2:value2
`
Some useful options lists -- you can remove any line(s) you don't want/need:
Note: If state and country aren't a valid combo, or the state doesn’t match the default country of your Salesforce install, your lead will likely be rejected -- so be careful with these!
States / Provinces
Select One| State| AL|Alabama AK|Alaska AZ|Arizona AR|Arkansas CA|California CO|Colorado CT|Connecticut DE|Delaware FL|Florida GA|Georgia HI|Hawaii ID|Idaho IL|Illinois IN|Indiana IA|Iowa KS|Kansas KY|Kentucky LA|Louisiana ME|Maine MD|Maryland MA|Massachusetts MI|Michigan MN|Minnesota MS|Mississippi MO|Missouri MT|Montana NE|Nebraska NV|Nevada NH|New Hampshire NJ|New Jersey NM|New Mexico NY|New York NC|North Carolina ND|North Dakota OH|Ohio OK|Oklahoma OR|Oregon PA|Pennsylvania RI|Rhode Island SC|South Carolina SD|South Dakota TN|Tennessee TX|Texas UT|Utah VT|Vermont VA|Virginia WA|Washington WV|West Virginia WI|Wisconsin WY|Wyoming DC|District of Columbia AS|American Samoa GU|Guam MP|Northern Mariana Islands PR|Puerto Rico UM|United States Minor Outlying Islands VI|Virgin Islands, U.S. Province| AB|Alberta BC|British Columbia MB|Manitoba NB|New Brunswick NL|Newfoundland and Labrador NS|Nova Scotia NT|Northwest Territories NU|Nunavut ON|Ontario PE|Prince Edward Island QC|Quebec SK|Saskatchewan YT|Yukon
Countries
AF|Afghanistan AX|Åland Islands AL|Albania DZ|Algeria AS|American Samoa AD|Andorra AO|Angola AI|Anguilla AQ|Antarctica AG|Antigua and Barbuda AR|Argentina AM|Armenia AW|Aruba AU|Australia AT|Austria AZ|Azerbaijan BS|Bahamas (the) BH|Bahrain BD|Bangladesh BB|Barbados BY|Belarus BE|Belgium BZ|Belize BJ|Benin BM|Bermuda BT|Bhutan BO|Bolivia (Plurinational State of) BQ|Bonaire, Sint Eustatius and Saba BA|Bosnia and Herzegovina BW|Botswana BV|Bouvet Island BR|Brazil IO|British Indian Ocean Territory (the) BN|Brunei Darussalam BG|Bulgaria BF|Burkina Faso BI|Burundi CV|Cabo Verde KH|Cambodia CM|Cameroon CA|Canada KY|Cayman Islands (the) CF|Central African Republic (the) TD|Chad CL|Chile CN|China CX|Christmas Island CC|Cocos (Keeling) Islands (the) CO|Colombia KM|Comoros (the) CD|Congo (the Democratic Republic of the) CG|Congo (the) CK|Cook Islands (the) CR|Costa Rica CI|Côte d'Ivoire HR|Croatia CU|Cuba CW|Curaçao CY|Cyprus CZ|Czech Republic (the) DK|Denmark DJ|Djibouti DM|Dominica DO|Dominican Republic (the) EC|Ecuador EG|Egypt SV|El Salvador GQ|Equatorial Guinea ER|Eritrea EE|Estonia ET|Ethiopia FK|Falkland Islands (the) [Malvinas] FO|Faroe Islands (the) FJ|Fiji FI|Finland FR|France GF|French Guiana PF|French Polynesia TF|French Southern Territories (the) GA|Gabon GM|Gambia (the) GE|Georgia DE|Germany GH|Ghana GI|Gibraltar GR|Greece GL|Greenland GD|Grenada GP|Guadeloupe GU|Guam GT|Guatemala GG|Guernsey GN|Guinea GW|Guinea-Bissau GY|Guyana HT|Haiti HM|Heard Island and McDonald Islands VA|Holy See (the) HN|Honduras HK|Hong Kong HU|Hungary IS|Iceland IN|India ID|Indonesia IR|Iran (Islamic Republic of) IQ|Iraq IE|Ireland IM|Isle of Man IL|Israel IT|Italy JM|Jamaica JP|Japan JE|Jersey JO|Jordan KZ|Kazakhstan KE|Kenya KI|Kiribati KP|Korea (the Democratic People's Republic of) KR|Korea (the Republic of) KW|Kuwait KG|Kyrgyzstan LA|Lao People's Democratic Republic (the) LV|Latvia LB|Lebanon LS|Lesotho LR|Liberia LY|Libya LI|Liechtenstein LT|Lithuania LU|Luxembourg MO|Macao MK|Macedonia (the former Yugoslav Republic of) MG|Madagascar MW|Malawi MY|Malaysia MV|Maldives ML|Mali MT|Malta MH|Marshall Islands (the) MQ|Martinique MR|Mauritania MU|Mauritius YT|Mayotte MX|Mexico FM|Micronesia (Federated States of) MD|Moldova (the Republic of) MC|Monaco MN|Mongolia ME|Montenegro MS|Montserrat MA|Morocco MZ|Mozambique MM|Myanmar NA|Namibia NR|Nauru NP|Nepal NL|Netherlands (the) NC|New Caledonia NZ|New Zealand NI|Nicaragua NE|Niger (the) NG|Nigeria NU|Niue NF|Norfolk Island MP|Northern Mariana Islands (the) NO|Norway OM|Oman PK|Pakistan PW|Palau PS|Palestine, State of PA|Panama PG|Papua New Guinea PY|Paraguay PE|Peru PH|Philippines (the) PN|Pitcairn PL|Poland PT|Portugal PR|Puerto Rico QA|Qatar RE|Réunion RO|Romania RU|Russian Federation (the) RW|Rwanda BL|Saint Barthélemy SH|Saint Helena, Ascension and Tristan da Cunha KN|Saint Kitts and Nevis LC|Saint Lucia MF|Saint Martin (French part) PM|Saint Pierre and Miquelon VC|Saint Vincent and the Grenadines WS|Samoa SM|San Marino ST|Sao Tome and Principe SA|Saudi Arabia SN|Senegal RS|Serbia SC|Seychelles SL|Sierra Leone SG|Singapore SX|Sint Maarten (Dutch part) SK|Slovakia SI|Slovenia SB|Solomon Islands SO|Somalia ZA|South Africa GS|South Georgia and the South Sandwich Islands SS|South Sudan ES|Spain LK|Sri Lanka SD|Sudan (the) SR|Suriname SJ|Svalbard and Jan Mayen SZ|Swaziland SE|Sweden CH|Switzerland SY|Syrian Arab Republic TW|Taiwan (Province of China) TJ|Tajikistan TZ|Tanzania, United Republic of TH|Thailand TL|Timor-Leste TG|Togo TK|Tokelau TO|Tonga TT|Trinidad and Tobago TN|Tunisia TR|Turkey TM|Turkmenistan TC|Turks and Caicos Islands (the) TV|Tuvalu UG|Uganda UA|Ukraine AE|United Arab Emirates (the) GB|United Kingdom of Great Britain and Northern Ireland (the) UM|United States Minor Outlying Islands (the) US|United States of America (the) UY|Uruguay UZ|Uzbekistan VU|Vanuatu VE|Venezuela (Bolivarian Republic of) VN|Viet Nam VG|Virgin Islands (British) VI|Virgin Islands (U.S.) WF|Wallis and Futuna EH|Western Sahara* YE|Yemen ZM|Zambia ZW|Zimbabwe
Note: Leading & trailing whitespace is trimmed when names and values are displayed, so feel free to use spaces to make things more readable.
How do I use the Date field?
Choose it from the dropdown, that's all you have to do.
If you want to customize the date format or display/functionality of the datepicker UI, you can set the options by entering a list of options in the Options box of the field editor, one per line.
Note that you must end each option with a comma, or you'll end up with a javascript error instead of a datepicker.
Note that any options you specify will override the default options.
e.g.
Default date format - Year, Month, Day
dateFormat : 'yy-mm-dd',
Month, Day, Year
dateFormat : 'mm-dd-yy',
Day, Month, Year
dateFormat : 'dd-mm-yy',
Day, Month, Year + Show the button panel
dateFormat : 'dd-mm-yy', showButtonPanel: true,
More information about the datepicker options can be found here:
- Examples: http://jqueryui.com/datepicker/
- API Reference: http://api.jqueryui.com/datepicker/
How do I find the "internal name" of my picklist field?
Hint: Use the form importer!
Picklists in SalesForce (Web to Lead at least) are a strange beast -- you'd think you could pass the field name and SF would map it on their end... but they don't make it that easy. Instead you need to use the internal SF ID of the picklist... which looks more like: 00Nd0000007p1Ej (this is just en example, this is not the id of your field).
Where do you find this cryptic value? You can find it in two places (that I know of):
- Edit the field and it'll be in the URL:
e.g.
https://na14.salesforce.com/00Nd0000007p1Ej/... - Generate a Web to Lead form with your field included and it'll be in the HTML
e.g.
TestPicklist: <select id="00Nd0000007p1Ej" name="00Nd0000007p1Ej" title="TestPicklist">
How do I use the HTML field?
- Optionally enter a label (field will display full width if a label is not entered.
- Enter HTML code in the options box.
<form> or </form> tags in an HTML field as they will likely break your form.
How do I use a lookup field with a picklist field in the plugin?
Hint: Use the form importer!
Since it's a lookup field the value of the options has to be SalesForce's internal id, not the value you'd think it would be. Otherwise when Jane Doe gets married and becomes Jane Smith you'd break all the links to her user.
Basically, you need to generate a Web to Lead form in Salesforce and grab the option values from the HTML it generates.
e.g.
Find the lookup field. This is the bit you're looking for:
<option value="00Nd0000007p1Ej">Joe Schmoe</option>
<option value="00Nd0000007p1aB">Jane Doe</option>
...
00Nd0000007p1Ej (just an example) is the SF internal ID for that choive. Enter that as the value in your pick list field options like this:
00Nd0000007p1Ej:Joe Schmoe|00Nd0000007p1aB:Jane Doe
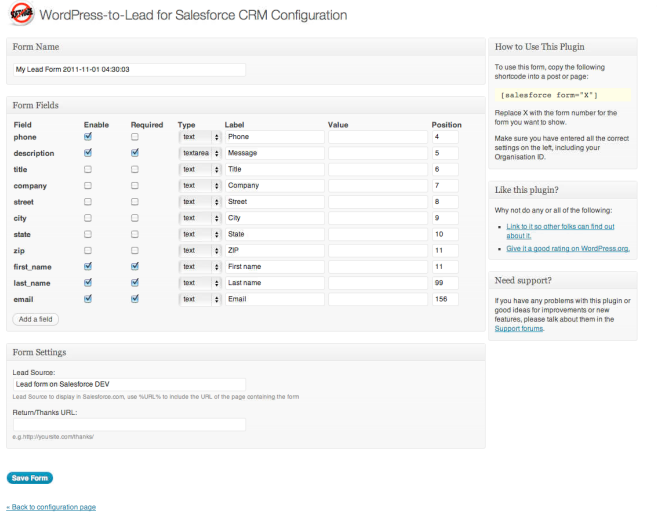
How do I change the order of input fields?
Right now, the only way of ordering input fields is by changing the position numbers on the right hand side of the input fields table in the admin settings. Drag and drop re-ordering is on the roadmap.
How do I apply my own styling to the form?
Instructions for disabling or overriding the CSS are included on the plugin settings screen (see Style Settings).
What does "Use WPCF7 CSS integration" do?
This option adds the WPCF7 classes to the form fields so you get the WPCF7 CSS styles applied (if that plugin is also activated).
Is it possible to make multiple forms with this plugin?
Yes, version 2.0 introduces this feature. Version 2.1 allows you to duplicate forms to reduce re-entering data. Version 2.5 allows you to import Web-to-Lead forms from Salesforce.
How do I change the Lead Source that shows up in Salesforce?
You can easily change this by going into the admin panel and, under form settings, changing the Lead Source for that form.
I want to include the full URL the form is embedded on, but SF limits the lead source to 40 characters -- how would I do that?
The lead source supports using %URL% as the lead source (which will be replaced with the form embed url), but SF inexplicably limits the lead source to 40 characters. Here's how to route around that: ` /* How to use:
- Create a custom URL field at SalesForce (or Text field that holds more than 255 characters if you desire). A URL field makes it clickable in the lead detail view(s).
- Replace URL_CUSTOM_FIELD_NAME below with the name of the custom field you setup in SalesForce, it will be something like EmbedUrl__c
- Add a hidden field to each form with the same field name (e.g. "EmbedUrl__c")
- Profit */ add_filter( 'salesforce_w2l_field_value', 'salesforce_w2l_field_embedurl', 10, 3 ); function salesforce_w2l_field_embedurl( $val, $field, $form ){
Can I change the submit button?
Of course you can! Go into the admin panel and, under Form Settings, change the text from the default "Submit" to whatever you'd like it to be!
Will I lose data if I upgrade to 2.0? Do I need to change anything?
Nope! The plugin will migrate your existing data to the new format. Your existing form will become Form 1 and be output by the [salesforce] shortcode).
How do I show my other forms?
Just use [salesforce form="X"] (X is the form number).
Or select a form number in the widget.
I put my campaign name in the Campaign_ID field but it's not working
The Campaign_ID field requires the Campaign ID -- the name will not work. To find the Campaign_ID, go your the campaign page and look in the URL bar for the ID: e.g. https://salesforce.com/621U000000IJat In this example, 621U000000IJat is the Campaign_ID -- make sure you use the ID from the campaign you want the lead attached to and not the example ID shown here.
Does the return/thanks URL have to be on my site?
No, as long as it's a valid URL it will work. However it should be an absolute URL regardless of where it is located. e.g. http://yoursite.com/thanks/ not just /thanks/
Is there a limit to how many leads can be captured?
While the plugin has no limits, SalesForce does limit API calls per day: The daily limit for Web-to-Lead requests is 500. If your organization exceeds its daily Web-to-Lead limit, the Default Lead Creator (specified in the Web-to-Lead setup page) receives an email containing the additional lead information. See also: How many leads can we capture from our website?
Can I hide the admin message insisting I enter my organization id?
Yes. Be careful -- that's there to remind you that the plugin doesn't do much without one.
Add this to functions.php or a custom plugin (see other notes for more detailed instructions):
add_filter( 'salesforce_w2l_show_admin_nag_message', '__return_false', 10, 1 );
更新日志:
- Remove Daddy Analytics settings and output (company no longer operating)
- Fix WordPress.org assets to support new deploy process
- Fix broken assets folder
- Fix issues with GitHub auto deploy action
- Auto prefix field names known to conflict with WP_Query (like
namein WebToCase). Does not alter other field names for backwards compatibility. Prefix and list of fields to be prefixed is configurable via filters. - Update tested up to version
- Remove inactive contributors
- Restore missing assets in WordPress.org repository
- Add support for showing year in datepicker
- Update tested up to version
- Fix PHP notice
- Update tested up to version
- Use compact recaptcha in sidebar forms
- Add support for Google Recaptcha
- Change Reply-to header to use built in email field
- Add Reply-to filter (
salesforce_w2l_cc_admin_replyto_email) to allow overriding the default behavior - Rebrand plugin as Brilliant Web-to-Lead for Salesforce by BrilliantPlugins
- Change API endpoints per https://help.salesforce.com/articleView?eid=ss-tc&id=Updating-the-Web-to-Case-and-Web-to-Lead-Endpoint-URL&language=en_US&type=1
- Fix widget constructor to be compatible with WP 4.3 (thanks Steven Stevenson)
- Add setting to remove WP CF7 javascript to fix it hijacking forms with WP CF7 CSS integration turned on
- Add setting to enable SSL verification of SalesForce SSL cert when connecting to the API
- Use protocol-less URLs for external resources -- fixes insecure content issues (thanks Charles Augello)
- Pass $post to
salesforce_w2l_api_urlandsalesforce_w2l_cc_admin_email_subject(thanks Haruhiko Kobayashi)
- Add setting to make it easier to CC multiple people on new submissions
- Add settings to specify the from name & from email for emails sent by the plugin (note: other plugins may override these settings via filters)
- Add examples for filtering field values
- New ad artwork/links
- Use esc_url_raw instead of sanitize_url
- Update tested with version
- Add Date field with jQuery datepicker functionality
- Add email field type (a text field with auto-validation)
- Update ad artwork
- Add filter for retUrl (redirect URL)
- Add filter for success message
- Fix incorrect form id/anchor bug that broke scrolling to the form after submit
- Fix "Wrong parameter count for trim()" bug in form editor.
- Fix javascript error when not using placeholder label layout
- Make colons after labels optional (see form settings near the bottom to disable)
- Add filter to allow suppression of the admin screen nag about a missing organization id
- Fix bug that was adding a colon after checkboxes and HTML field labels
- Fix checkbox label alignment on top-aligned forms
- Fix Top Aligned label radio option not being checked when selected (admin)
- Add label layout option for sidebar forms
- CSS tweaks to improve field spacing and improve default sidebar layouts
- Restrain overly wide select fields in sidebar forms
- Beautify CSS formatting consistent
- Further improve auto detection of new options format
- Fix bug in auto detect of new options format that could break fields with newlines and pipes mixed together
- Improve importer to allow forms that have been modified to be imported (thanks Mark Loeffler)
- Fix new hidden fields becoming text fields upon save (typo)
- Added a new picklist options format: newlines and pipes (vs pipes and colons) to allow colons to be used in names/values (and make it easier to read)
- Make all input tags self closing e.g.
<input />for xhtml compatibility - Disable W3TC object caching when captcha is used (until a cache friendly captcha solution is added)
- Add Content-Type header to form POST
- Tested up to 4.0
- Add plugin icon
- Form id 1 can now be duplicated
- Duplicate forms have (copy) appended to the form name to clearly mark them as the duplicated form
- Refactor
salesforce_cc_adminto allow a customizable subject (translators: affects localization strings) - Email admin on submission errors as well as successes, append result data
- Add
salesforce_w2l_post_datafilter (see 'Other Notes') - Add
salesforce_w2l_before_submit,salesforce_w2l_error_submit,salesforce_w2l_after_submitactions (see 'Other Notes')
- FAQ: Clarify the mess that is picklist fields/names
- Fix label with when using top aligned labels
- Add clearfix to sf_field container
- Fix PHP notice when deleting a form
- Added importer option (finally) to make it easier to generate W2L forms at SF then auto import them
- Allow debug mode to be set (was getting set to 0 before submit)
- Remove debugEmail from user email fields
- Update debug info and add built in field name info on FAQ
- Fix PHP warnings due to switch to strlen for required field validation
- Fix bug where "0" (zero) was not considered a valid value for required fields
- Fix regression bug where checkboxes turn to text fields due to capitalization of option label
- Allow lead_source to be a form field (i.e. don't overwrite value if it already exists)
- Allow filtering of wp_remote_post arguments
- Add picklist FAQ regarding field names
- Add Multi-Select field (aka MultiPicklist)
- Refactor code to properly handle strings and arrays as field values (to support multi-selects)
- Add embed URL example code to FAQ
- Add lead source back into admin email
- Add filter for lead source
- Fix issue where deleting form title made the edit link disappear
- Fix settings url in alert to go to settings tab
- Add filter to allow form action to be removed
- Fix issue with OID and other fields being appended to the user confirmation email
- Add
salesforce_w2l_cc_user_suppress_fieldsfilter to allow supression of fields in the user confirmation email
- Readme improvements
- Fix bug in load_plugin_textdomain call
- Readme improvements
- Change value input size to match label field
- Fix confusing wrapping on form editor on very wide screens (reported by cindybou)
- Change name of and add note to filters and hooks section
- Add filter for field values
- Add salesforce_get_form and salesforce_get_field helper functions
- Version number bumps
- Allow some settings to be overridden per form (Success Message, Captcha, OrgId, etc)
- Support for option to use placeholders instead of labels (per form)
- Remove newlines in form HTML that were being converted to upon output
- Add Settings link to plugin list screen
- Grey out non enabled fields in admin
- Set a default checkbox width as some themes think input{ width: 100% } is a good idea...
- All default CSS now uses relative sizes
- Prevent multiple submission of form data (even if it's the same form id on the page multiple times)
- Remember "send me a copy" between submits
- Defined DONOTCACHEPAGE if captcha is enabled
- Fix PHP notices when form is submitted
- Update ads and landing page URLs
- Add support links to plugin list page, restore WP.org plugin link
- Load text domain on plugin init, add .pot file
- Fix PHP warnings and notices
- Add email and captcha error to settings page.
- Added filter to user and admin email content
- Fix deprecated (in PHP 5.3) ereg_replace functon in captcha lib
- Fix untranslatable string (invalid email)
- Set input height to auto (18px causing issues with themes containing plentiful padding)
- Change "Daddy Analytics Webform URL" to "Daddy Analytics Web to Lead URL ID"
- Fixed slashes issues in field labels, select options and field labels in emails
- Test using new deploy script: https://github.com/eyesofjeremy/Github-to-WordPress-Plugin-Directory-Deployment-Script
- Bug: Fixed checkboxes not retaining checked state after submit
- Bug: Only output DA JS when token has been entered
- Wrapped all output in a div tag to allow styling of success and error messages
- Added #anchor to action to keep form on screen after submit when not the first item in a page (may not work in older versions of IE)
- Add per field validation filter and error output (thanks to http://HomeStretchMktg.com for sponsoring this feature)
- Added tabs to plugin settings page
- Moved form list to its own tab (vs the bottom of the settings screen)
- Added syntax highlighting to defaut CSS example on new Styling tab
- Tested and working in WordPress 3.8
- Fixes a bug that caused the organization id field to be hidden on new installs
- Add drop down field type (thanks jbuchbinder)
- Improve form HTML (thanks jbuchbinder)
- Add from and reply to options for emails (thanks jbuchbinder)
- Add delete checkbox to form editor (thanks jbuchbinder)
- Add HTML field type (thanks jbuchbinder)
- Add simple checkbox field (thanks jbuchbinder)
- Add ability to duplicate forms (thanks jbuchbinder)
- Add WPCF7 CSS integration option (thanks jbuchbinder)
- Add wrapper divs with class names to visible fields
- Remove Powered by SF for all forms
- Make required field indicator consistent with message
- Comments to lead option (thanks simonwheatley)
- Global DaddyAnalytics settings added to make integration easier
- Added filters to aid in extending the plugin
- Hide fields with no label in admin and user email
- Required fields now trim whitespace from the value before validation (e.g. a space or tab is no longer a valid value)
- Fixed checkbox/label alignment
- Readme improvements
- Added daily limit info to FAQ
- Removed previous contributors no longer involved in plugin development, added credit to readme
- Refactored and cleaned up codebase
- Added filters to allow code based overrides of select features (see Other Notes for details)
- Added Web to Case option (per form setting)
- Fixed first field being added having a duplicate position to last field
- Select fields can have a default value set
- Captcha image now works on subfolder installs (e.g. /wordpress/)
- Removed captcha dependence on including wp-load.php
- Small formatting fixes (checkbox spacing and submit button CSS)
- Fixed issue with captcha URL being broken on some installs
- Added several filters, including one to allow editing of the distribution list for new lead notifications and one to allow filtering of the form HTML before output
- Fixed bug where captcha would wrap outside form on some themes
- Fixed bug where forms other than id 1 did not show field labels in emails
- Fixed bug causing unexpected output upon activation
- Fixed bug that caused form to always be in 'sidebar' mode
- Now supports more than 1 form per page
- Forms now have a unique ID for use with CSS and jQuery: salesforce_w2l_lead_[ID] and salesforce_w2l_lead_[ID]_sidebar
- Fixed a bunch of notices and warnings
- Improved internationalization
- Multiple forms can be created and inserted via shortcode or widget
- Spam protection (with optional captcha)
- Fixed "Cannot use object of type WP_Error as array" bug
- Fixed bug that showed successful submissions as "Failed to connect to SalesForce.com"
- Hidden fields can now be used
- Campaign_ID can now be set per form
- Widget now hides description text upon submission
- Admins can receive an email of submissions
- Users can request a copy of their submission (if enabled)
- Custom return/thanks URL can be defined per form
- Country field added
- Fix in backend security, preventing XSS hack in the backend.
- CSS fix for when sidebar widget and contact form are on the same page.
- Fix in email verification.
- One more escape, plus a check to see whether the email address entered is valid.
- Added escaping around several fields to prevent XSS vulnerabilities.
- Initial release.