Social Media Share Buttons - Socialized
详情介绍:
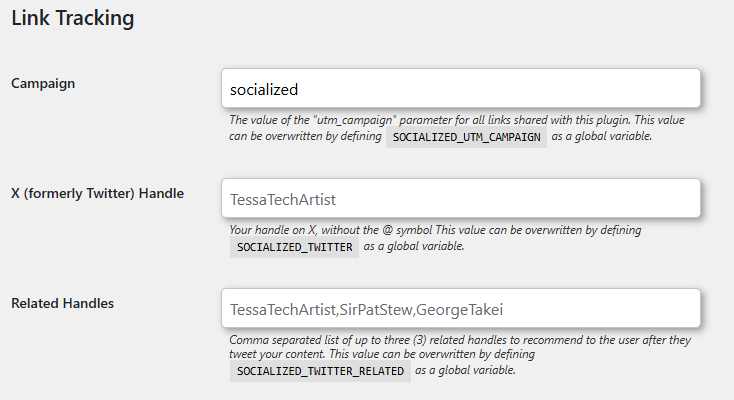
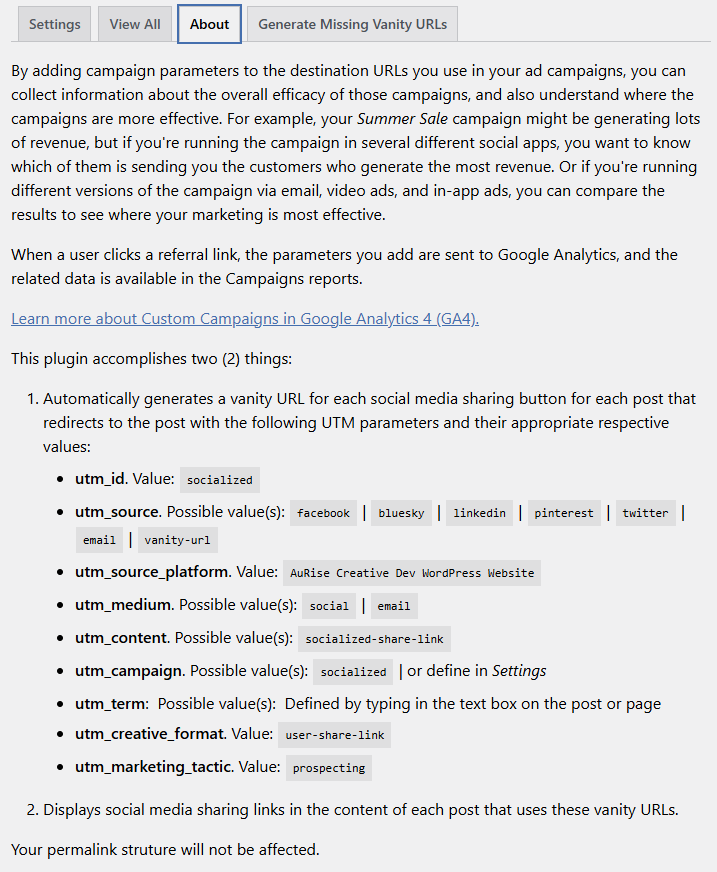
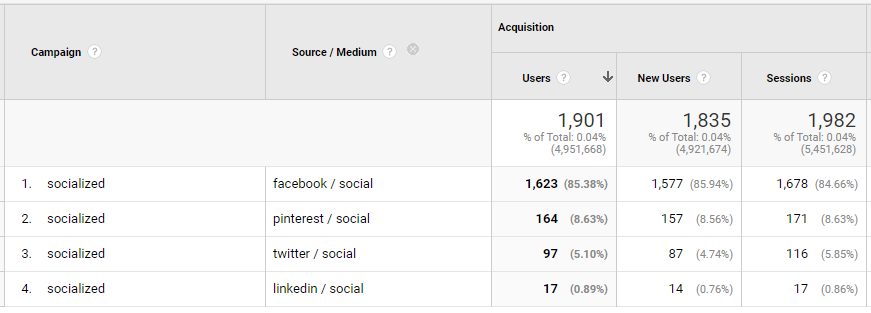
utm_id- value:socializedutm_source- possible value(s):facebook|twitter|linkedin|bluesky|pinterest|email|vanity-urlutm_medium- possible value(s):social|email|vanity-urlutm_content- possible value(s):socialized-share-linkutm_campaign- value:socialized| or define in Settingsutm_term- value: Defined by typing in the text field in the metabox on the post or page | or the “Focus keyphrase” by Yoast SEOutm_creative_format- value:user-share-linkutm_marketing_tactic- value:prospecting
安装:
- Log in to your WordPress dashboard.
- Navigate to Plugins > Add New.
- Where it says "Keyword" in a dropdown, change it to "Author"
- In the search form, type
TessaWatkinsLLC(results may begin populating as you type but my plugins will only show when the full name is there) - Once you've found my plugin in the search results that appear, click the Install Now button and wait for the installation process to complete.
- Once the installation process is completed, click the Activate button to activate my plugin.
- After this plugin is activated, see below for additional instructions for setup.
- Download my plugin from WordPress.org; it will be in the form of a zip file.
- Log in to your WordPress dashboard.
- Navigate to Plugins > Add New.
- Click the Upload Plugin button at the top of the screen.
- Select the zip file from your local file system that was downloaded in step 1.
- Click the Install Now button and wait for the installation process to complete.
- Once the installation process is completed, click the Activate button to activate it.
- After this plugin is activated, see below for additional instructions for setup.
- Download my plugin from WordPress.org; it will be in the form of a zip file.
- Unzip the contents; you should have a single folder named
socialized. - Connect to your WordPress server with your favorite SFTP client.
- Copy the folder from step 2 to the
/wp-content/plugins/folder in your WordPress directory. Once the folder and all of its files are there, installation is complete. - Now log in to your WordPress dashboard.
- Navigate to Plugins > Installed Plugins. You should now see my plugin in your list.
- Click the Activate button under my plugin to activate it.
- After this plugin is installed and activated, see below for additional instructions for setup.
- Navigate to Tools > Socialized to change any global settings to fit your needs.
- When creating new posts or editing existing ones, use the meta box to configure settings specific to that post.
- Publish your post to see the buttons on the page.
屏幕截图:
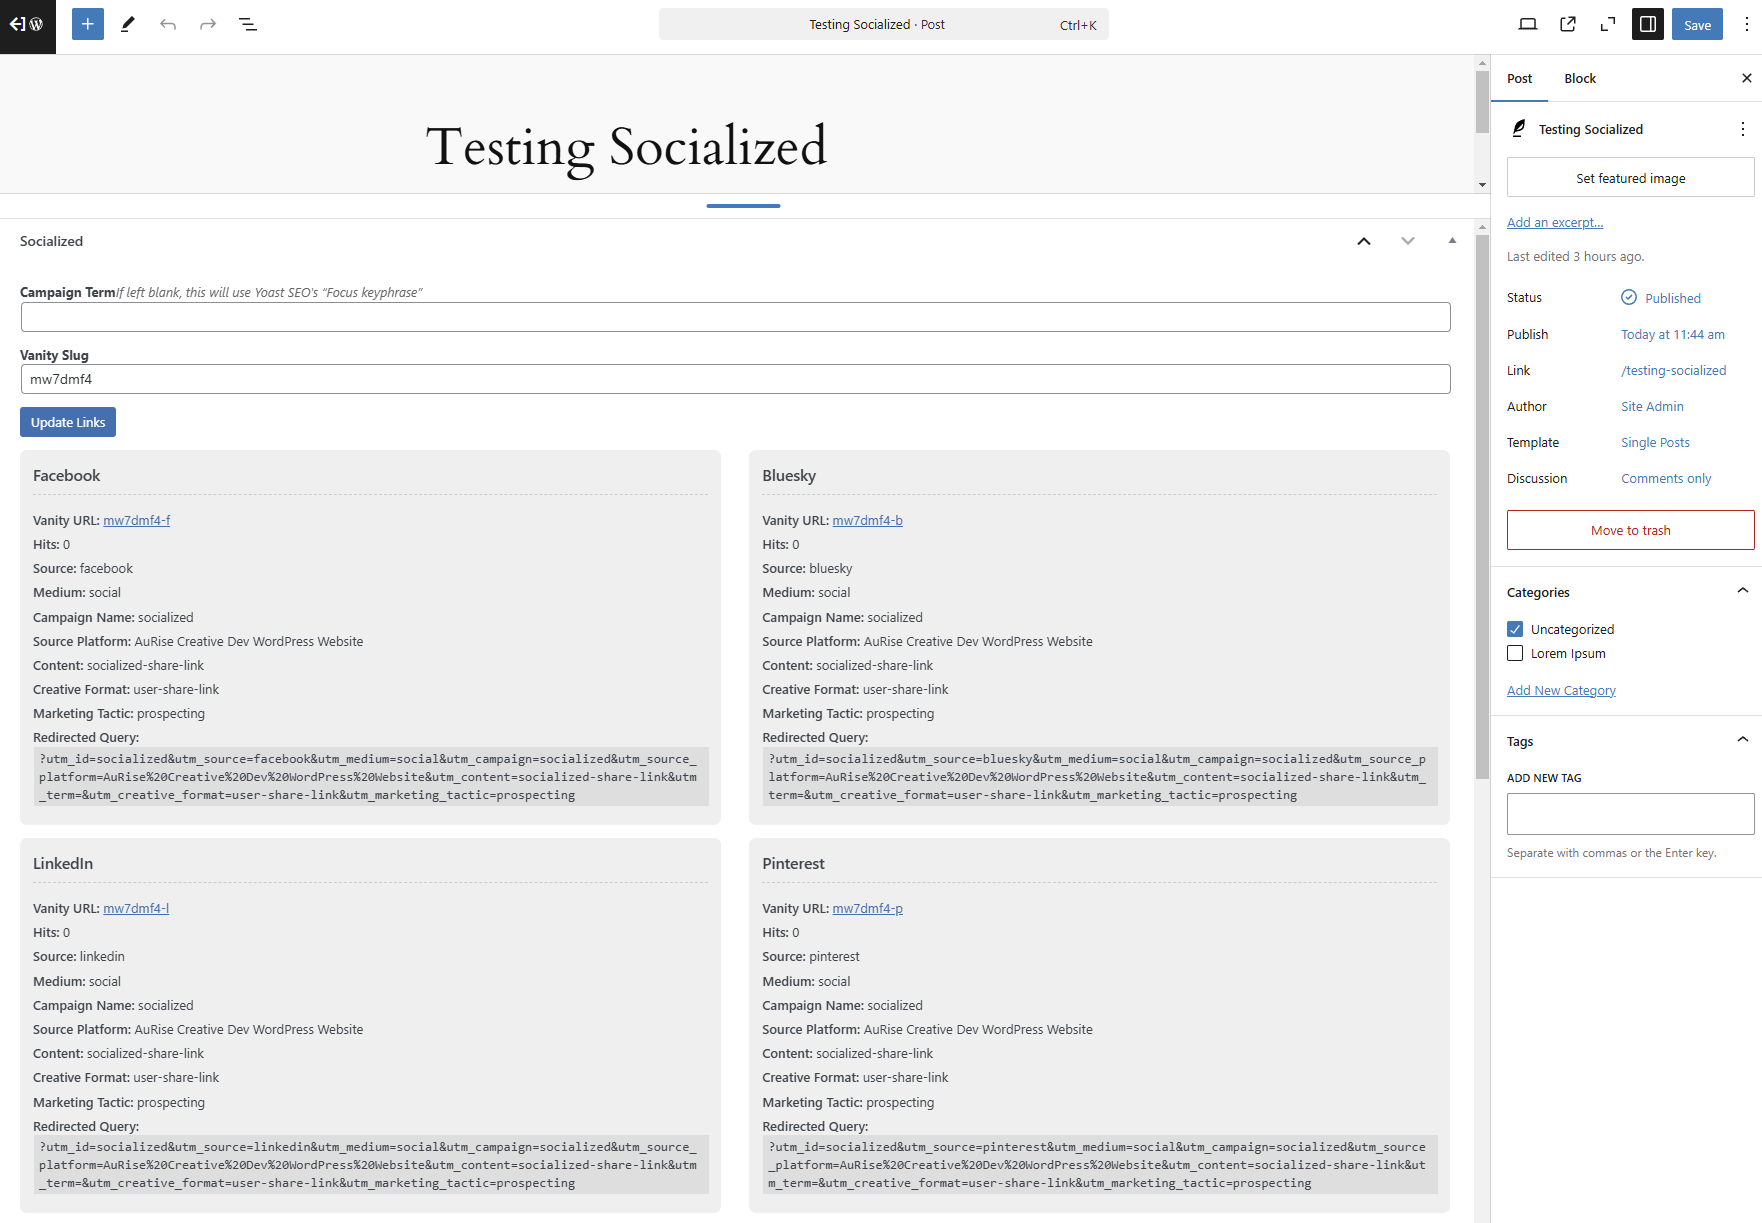
![The Socialized plugin metabox when creating/editing a post. This screenshot shows it with [Gutenberg] Blocks enabled but it is also compatible with Classic WordPress.](https://cdn.jsdelivr.net/wp/socialized/assets/screenshot-16.png)


常见问题:
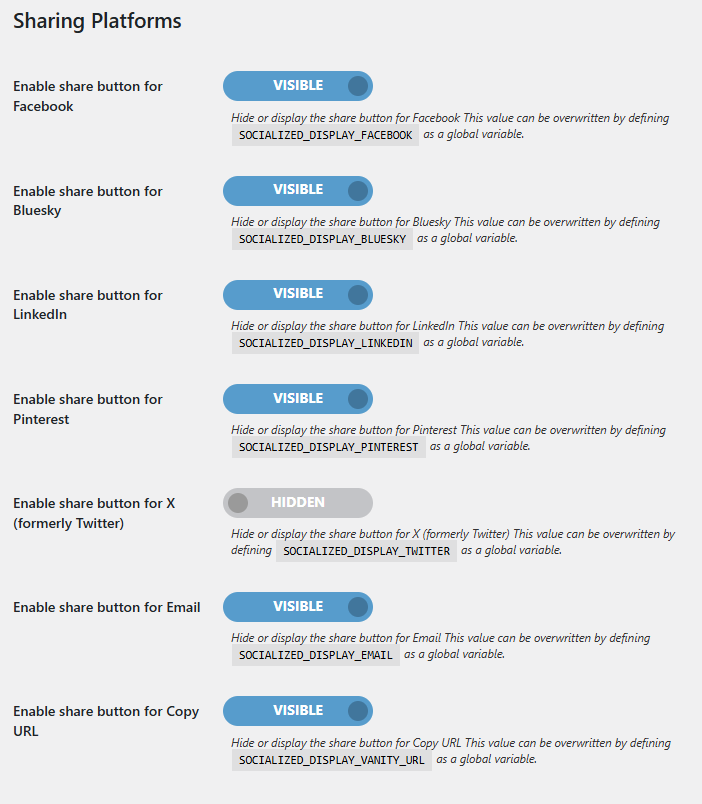
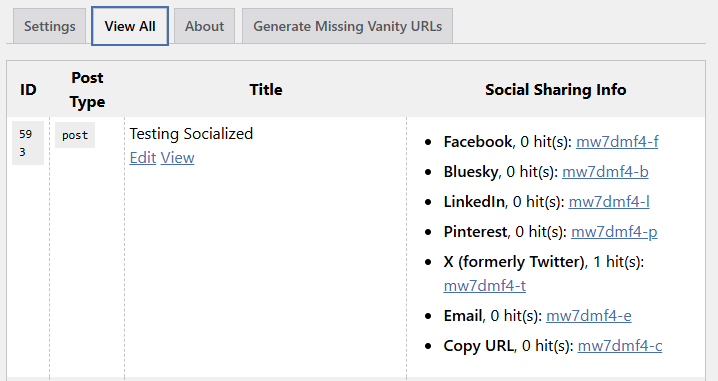
What platforms are supported?
Facebook, X (formerly Twitter), LinkedIn, Bluesky, Pinterest, email, and copying to clipboard (for sites with SSL enabled) are supported.
Can I change the name of the campaign?
Yes! You can change the name of the campaign, or the value of utm_campaign, from the plugin settings page.
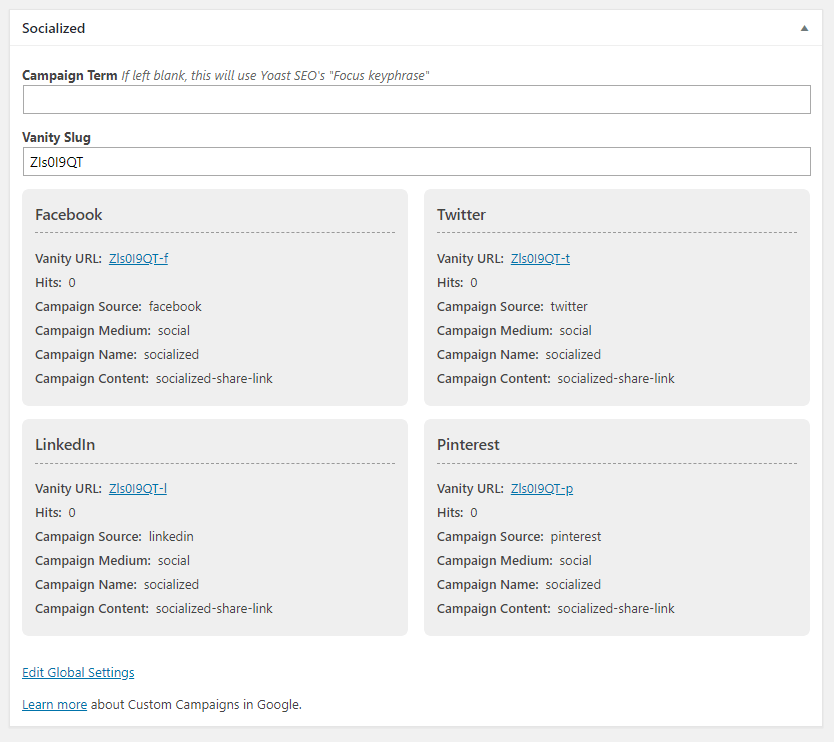
Can I change the vanity URL?
Yes! When a new post is created, a random string will be generated for that post, but you can edit it to be whatever you want. However, it will be suffixed with a dash and a character to recognize the platform and map it to the correct campaign parameters.
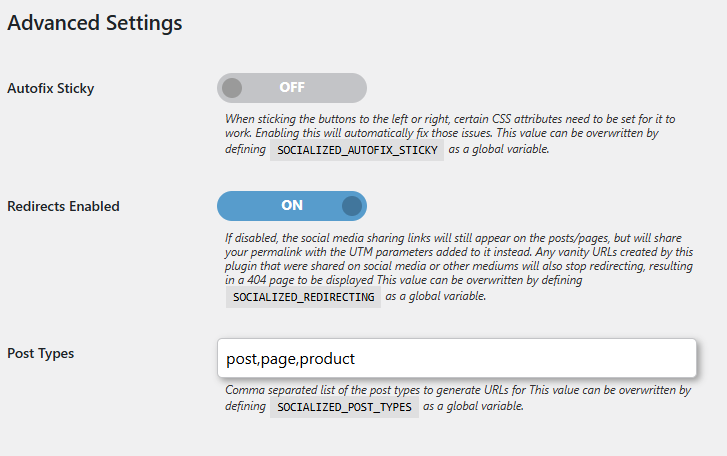
Does this affect my page's URL, permalink, or canonical URL?
No. This won't have any effect on your page's URL, permalink, permalink settings, or canonical URL. The vanity URL is simply another way of getting to your page but with the added Google campaign parameters automatically added. This plugin does not create any new pages, only redirects, so there won't be any duplicate content issues.
Does this affect my page's SEO or “page rank”?
It will not harm your page's SEO. Since the vanity URLs redirect using 301 permanent redirects, the “page rank” is transferred to your original page, preserving your SEO value.
Does this affect my domain authority?
Yes, but in a good way! Using a URL shortener service like bit.ly or TinyURL gets a miniscule amount of “domain authority” when pages are redirected through their domains since it is ultimately their URL that gets shared on other websites. You actually gain this bonus back when it is your domain that gets shared instead.
How does it choose an image to share on Pinterest?
If there is an image in the content of your article, it will find the first one and use that. Otherwise, it will fall back to using the featured image. If no image is associated with the article, then Pinterest will display all of the images found on the page, allowing the user to select which they want to use.
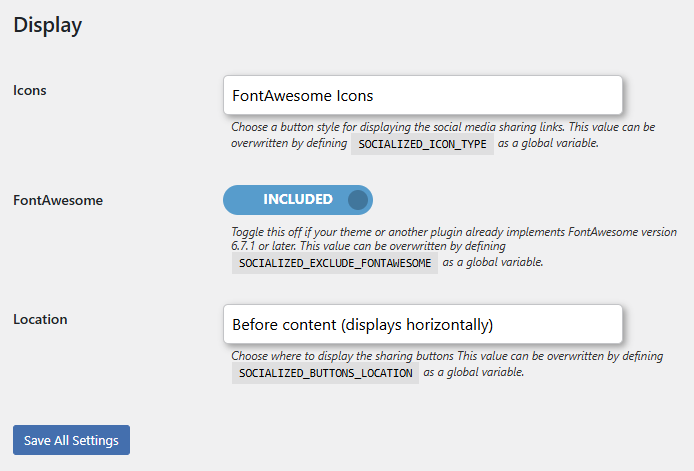
What icons do you have?
You can choose between lossless PNG images, Font Awesome icons, or text. The HTML is simple so you can easily change the appearance with CSS.
Is this compatible with the Yoast SEO plugin?
Yes! If you leave the "Campaign Term" blank in the metabox on your page, the utm_term value will default to your page's "focus keyphrase" in Yoast SEO's metabox.
更新日志:
- Updated FontAwesome assets to version 6.7.1
- Added Bluesky sharing button
- Fixed a bug for Pinterest sharing that would sometimes try to send the text "No image available" instead of an empty string.
- Updated FontAwesome assets to version 6.4.2
- Updated Twitter icon to X
- Updated backend admin logo and UI to match other AuRise Creative plugins
- Overhauled plugin code to be more consistent with other AuRise Creative plugins
- Values for the checkbox/switch plugin options are now stored as
1or0instead of the stringstrueandfalse. DB will update automatically when updating to this version or later. - Option to individually show or hide the different platforms are now available in the settings
- Filter added to
get_the_excerptto remove the text generated by Socialized from appearing - Using aria-hidden attribute on the "Copied!" tooltip for the vanity URL to improve accessibility
- added
utm_idparamter with the value ofsocializedto all redirecting URLs for Google Analytics 4 - added
utm_creative_formatparamter with the value ofuser-share-linkto all redirecting URLs for Google Analytics 4 - added
utm_marketing_tacticparameter with the value ofprospectingto all redirecting URLs for Google Analytics 4 - Displays the query in the backend
- Removed /languages folder in plugin to use WordPress Translate instead
- Update: marked the plugin ready for WordPress core version 6.3
- Update: updated the
wp_register_script()andwp_enqueue_script()functions to load assets withasyncanddeferattributes
- Fix: Added the
nofollowvalue to therelattribute for frontend sharing links to help reduce unnecessary crawling by search engines.
- Fix: Fixed a fatal error that "DOMDocument" was not found.