Tempmails
| 开发者 |
neosmartapps
neoparker007 |
|---|---|
| 更新时间 | 2026年4月6日 11:46 |
| 捐献地址: | 去捐款 |
| PHP版本: | 7.4 及以上 |
| WordPress版本: | 6.9 |
| 版权: | GPLv2 or later |
| 版权网址: | 版权信息 |
详情介绍:
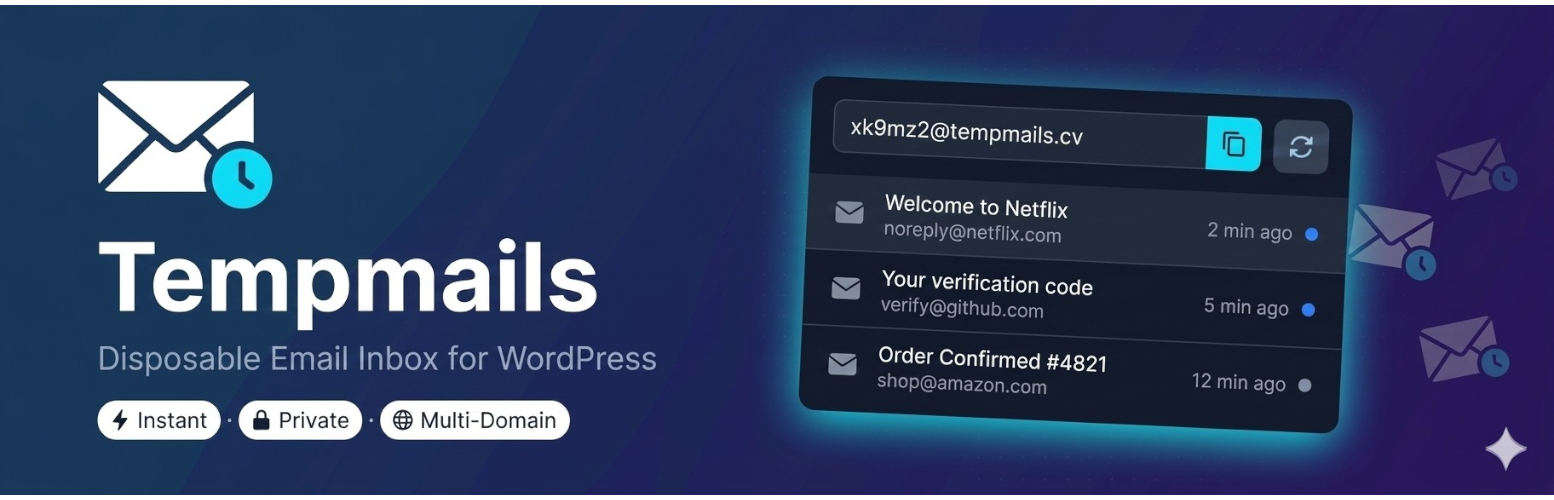
Self-hosted. Privacy-first. Fully yours.Tempmails turns your WordPress site into a self-hosted temporary email service. Visitors generate a random disposable email address, receive messages in a real-time inbox, and discard them when done — all without leaving your site. Unlike third-party services, Tempmails runs entirely on your own server and IMAP mailbox. You own the data, the domain, and the brand. 🔒 No third-party email APIs 📬 Real IMAP inbox — not a simulation 🎨 Material Design 3 UI — beautiful out of the box ⚡ AJAX-powered — no page reloads 🚀 Quick Links Everything you need to get started, get help, and stay connected:
- 🌐 Official Website — tempmails.cv — docs, roadmap, and addon announcements
- 🎬 Installation Tutorial — Watch the step-by-step video guide below
- 📺 YouTube Channel — NeoSmartApps on YouTube — tutorials, walkthroughs, and new release demos
- ☕ Support the Project — Buy us a coffee via PayPal — Tempmails is free forever; your support keeps development alive
- 🖥️ Need Hosting? — Tempmails works best on a VPS or shared host with catch-all IMAP support. We recommend Hostinger (affiliate link — we earn a small commission at no extra cost to you)
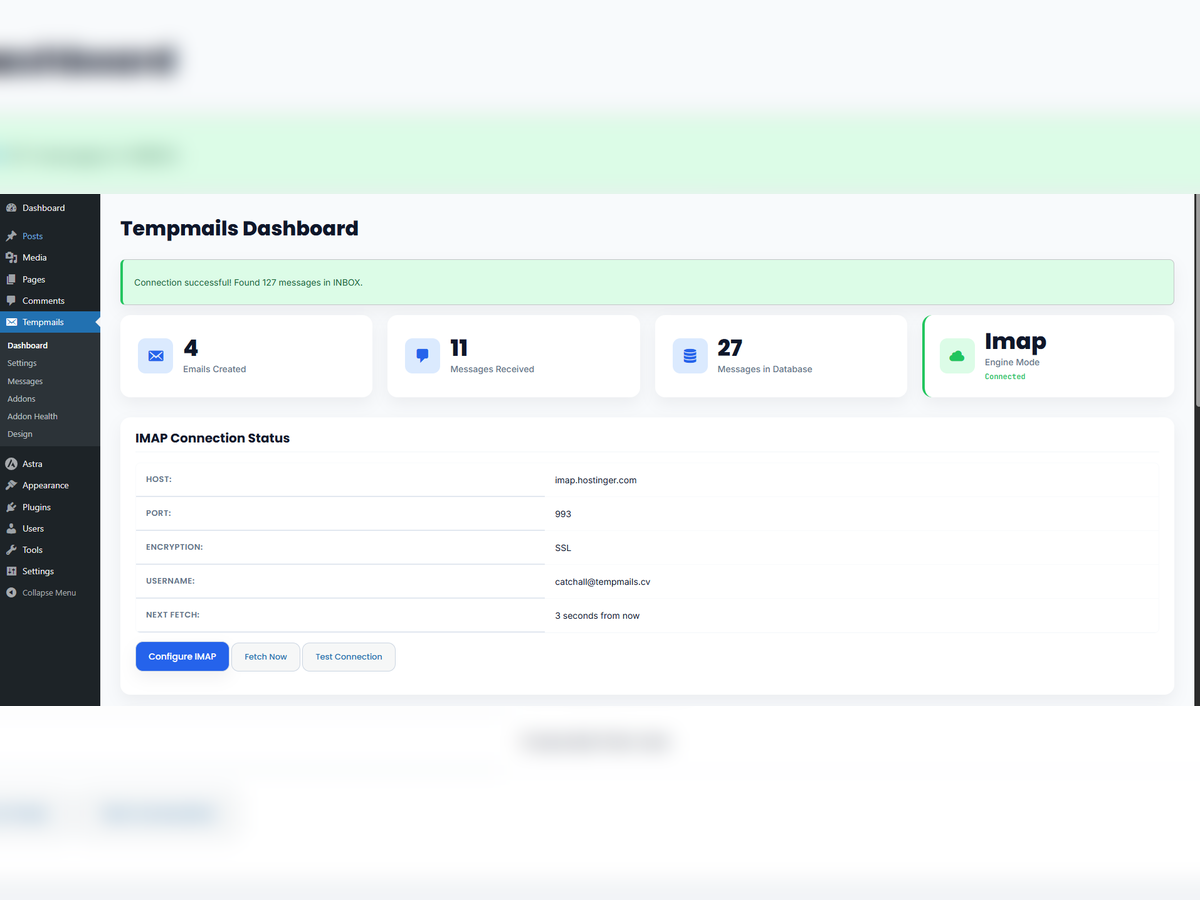
- IMAP Email Fetching — connects to any catch-all IMAP mailbox
- Auto Email Generation — random disposable addresses on your own domains
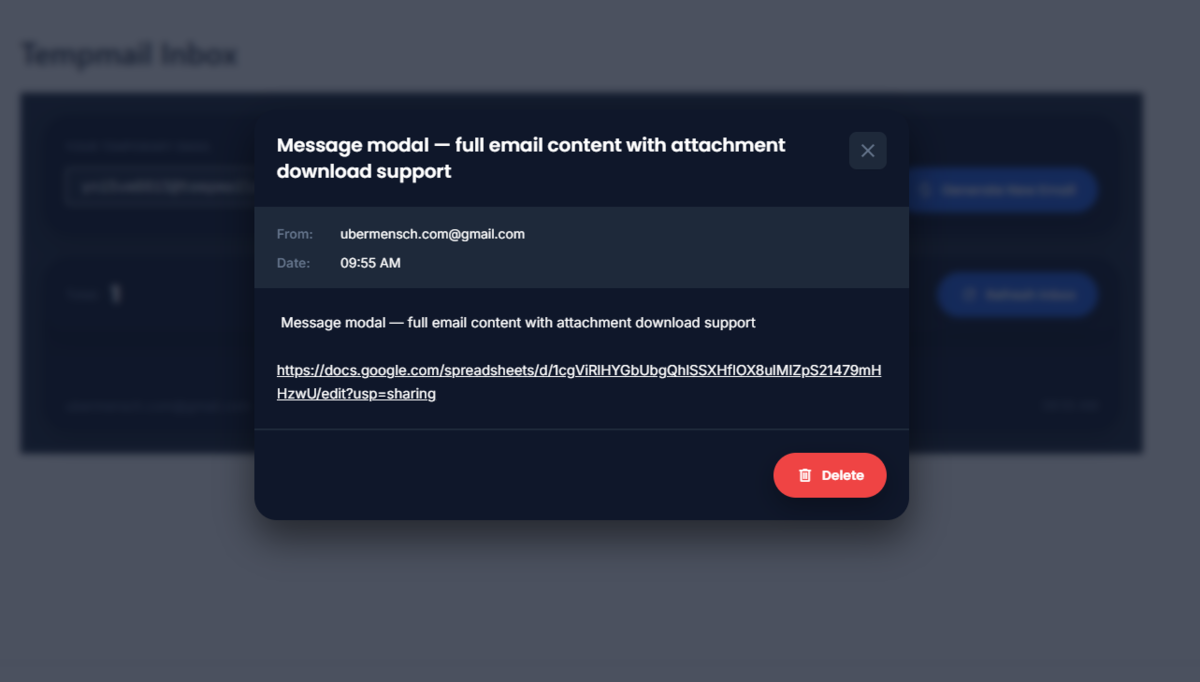
- Real-time Inbox — AJAX-powered message viewer with configurable auto-refresh
- Attachment Support — download files with 40+ allowed extensions
- Material Design 3 UI — modern, responsive inbox with Inter & Poppins fonts
- White-labeled — fully rebrandable, no third-party branding in the UI
- Design Panel — live color picker and label customization in admin
- Soft Delete — messages are never hard-deleted; safe for compliance
- Cookie-based sessions — no user accounts or registration required
- Zero external data transmission — all data stays on your server
- Uses WP database, cron, options, nonces, and security APIs throughout
- Settings API compliant admin panel
- Full i18n/l10n support with
.potfile included
[tempmails_inbox]
This renders the full inbox UI — email generation, copy button,
auto-refresh, message list, and message viewer modal.
Addon Ecosystem
Tempmails Core is frozen infrastructure. All new functionality is
delivered via addons using a documented, stable hook system — your site
never breaks on Core updates.
Available addon hooks cover: email generation, message routing, inbox
access control, multi-domain support, billing integration, and more.
See the Hooks section below for the full reference.
Privacy
Tempmails stores temporary email addresses in browser cookies to
maintain inbox sessions between page loads. No personal data is collected,
stored against user accounts, or transmitted to any external service.
See External Services below for details on the optional GitHub
ecosystem feed.
安装:
- WordPress 5.8 or higher
- PHP 7.4 or higher
- PHP extensions:
imap,mbstring,json - A mail server with catch-all forwarding configured on your domain
- Upload the
tempmailsfolder to/wp-content/plugins/or install via Plugins → Add New → Upload Plugin - Activate the plugin through Plugins → Installed Plugins
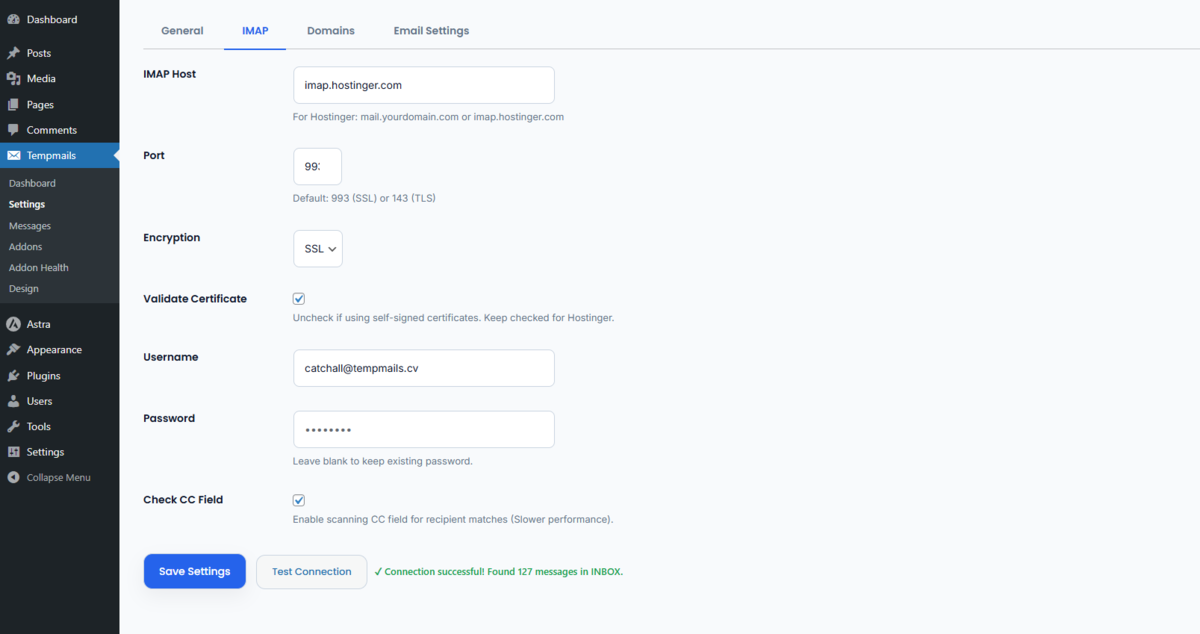
- Go to Tempmails → Settings → IMAP and enter your mail server credentials:
- Host:
mail.yourdomain.com - Port:
993(SSL) or143(TLS) - Encryption: SSL or TLS
- Username:
catch-all@yourdomain.com - Password: your IMAP mailbox password
- Click Test Connection to verify the credentials
- Click Save Settings
- Create a new WordPress page and add
[tempmails_inbox] - Publish — visitors can now generate and use temporary email addresses instantly
@yourdomain.com land in the single mailbox
Tempmails reads from.
In cPanel, set the Default Address for your domain to deliver to your
catch-all inbox:
*@yourdomain.com → catch-all@yourdomain.com
Hostinger users: enable catch-all under hPanel → Email → Default
Address. New to Hostinger? Get started here
(affiliate link) — their hPanel makes IMAP catch-all setup
straightforward even for beginners.
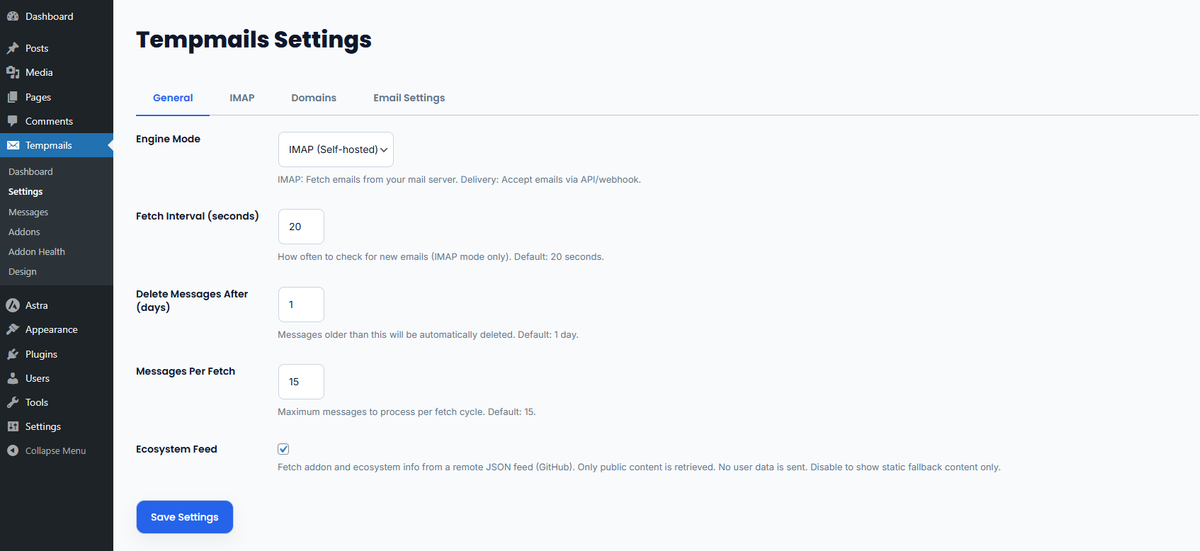
Server Cron (Recommended for Reliable Fetching)
WordPress cron only fires when your site receives traffic. For consistent
email delivery, add a real server cron job in cPanel → Cron Jobs:
* * * * * wget -q -O - https://yoursite.com/wp-cron.php?doing_wp_cron >/dev/null 2>&1
Or using WP-CLI:
* * * * * cd /path/to/wordpress && wp cron event run --due-now >/dev/null 2>&1
屏幕截图:
常见问题:
Does this plugin require a third-party email service?
No. Tempmails connects directly to your own IMAP mailbox. You need a mail server with catch-all forwarding — Hostinger, any cPanel-based host, or any standard IMAP server works.
What PHP extensions are required?
The imap, mbstring, and json extensions must be enabled on your
server. Most shared hosting providers include these by default. The plugin
will display a clear error and refuse to activate if any are missing.
Can I use my own domain names for generated addresses?
Yes. Go to Tempmails → Settings → Domains and add one domain per line. All listed domains must route their catch-all to your IMAP mailbox.
How is message deletion handled?
Tempmails uses soft delete. When a user deletes a message, the
to_address field is changed to an internal tombstone value rather than
removing the database row. Deleted messages never appear in inbox queries.
This behavior is permanent and guaranteed across all versions.
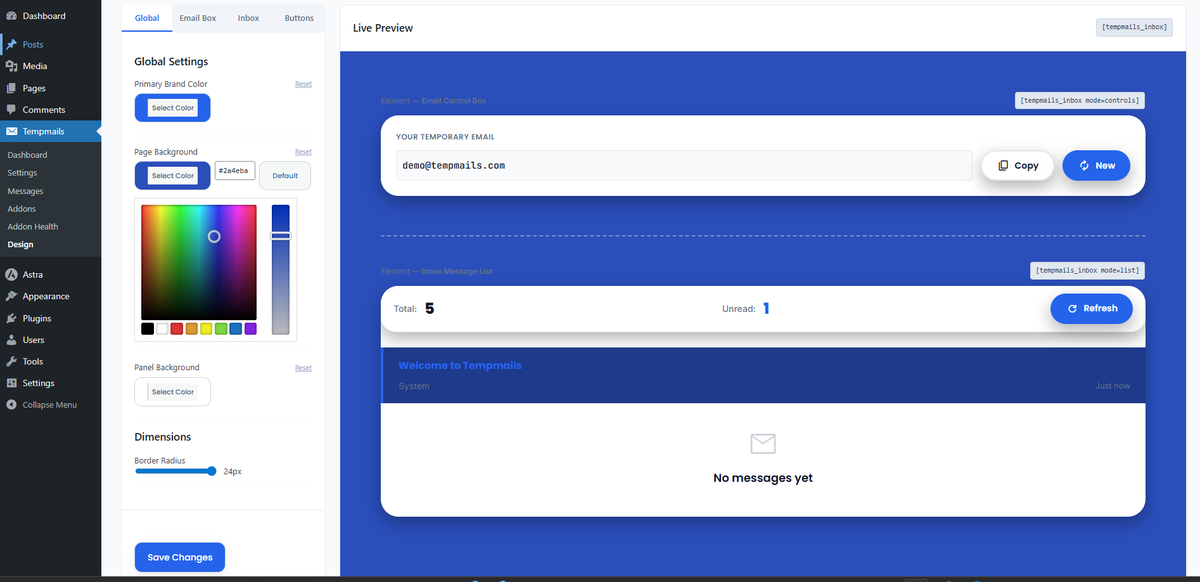
Can I white-label the inbox UI?
Yes. All user-facing text is translation-ready and overridable via filters. The Design Panel under Tempmails → Design lets you change colors, button labels, empty state text, and border radius — with a live preview.
How do I build an addon?
Register your addon using the tempmails_registered_addons filter, then
hook into any documented action or filter. Core is frozen — all new
functionality must be delivered via addons. See the Hooks section for
the full reference.
Emails are not appearing in the inbox
- Go to Tempmails → Settings → IMAP and click Test Connection
- Verify catch-all forwarding is active on your mail server
- Confirm WordPress cron is running — use the free WP Crontrol plugin to inspect scheduled events
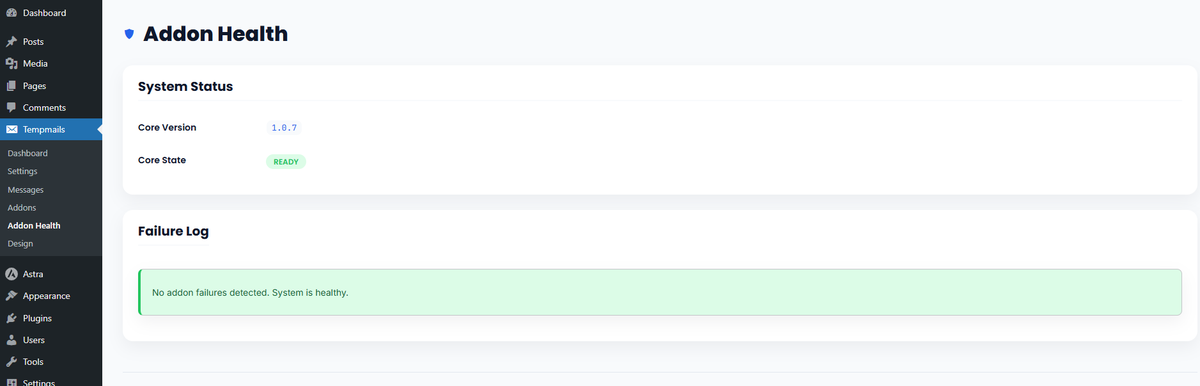
- Check Tempmails → Addon Health for any logged errors
How do I enable debug logging?
Add these two lines to wp-config.php:
define('WP_DEBUG', true);
define('WP_DEBUG_LOG', true);
Tempmails logs all errors to the standard WordPress debug log at
/wp-content/debug.log and to the Addon Health page in admin.
更新日志:
- Security: ajax_delete_message() — $_POST['message_id'] now wrapped with sanitize_text_field( wp_unslash() ); phpcs:ignore suppression comment removed
- Security: Removed raw
<style>echo in Design admin page — static CSS moved to assets/css/admin.css - Security: inject_css_variables() now uses wp_add_inline_style() instead of echo; all CSS custom property values wrapped with esc_attr()
- Security: inject_frontend_css_variables() now escapes all CSS values with esc_attr() and passes the CSS string through wp_strip_all_tags() before calling wp_add_inline_style()
- Security: wp_footer fallback in inject_frontend_css_variables() replaced
raw
<style>echo with a registered dummy style handle using wp_register_style() + wp_add_inline_style() — no more unescaped output - Security: Inline
<script>in shortcode output replaced with wp_add_inline_script('tempmails-frontend', ...) - Security: Inline
<script>in ecosystem admin block replaced with wp_add_inline_script('tempmails-admin', ...) - Security: ajax_mark_seen() — $_POST['message_id'] now wrapped with sanitize_text_field() in addition to wp_unslash()
- Security: save_settings() — raw $_POST no longer passed directly to do_action(); sanitized via array_map('sanitize_text_field', wp_unslash($_POST)) before reaching tempmails_before_save_settings and tempmails_before_save_imap_settings hooks
- Security: get_emails() in Email Generator — cookie emails now sanitized with array_filter(array_map('sanitize_email', $raw)) after maybe_unserialize()
- Fixed: IMAP fetch now uses imap_search('UNSEEN') instead of last-N sequence range — stops the infinite re-fetch loop
- Fixed: Added synthetic Message-ID generation (synthetic-{md5}) for emails with no Message-ID header
- Fixed: Added Delivered-To / X-Original-To / X-Forwarded-To raw header fallback when To: addresses cannot be parsed
- Fixed: Added last-resort raw body fallback with FT_PEEK for complex MIME structures
- Changed: Renamed "Messages Received" dashboard stat card label to "All-Time Received"
- Fixed: All action hooks now fully integrated into Core
- Fixed:
tempmails_email_generatedfires correctly on every email creation - Fixed:
tempmails_inbox_accessedfires on every inbox view - Fixed:
tempmails_message_receivedfires when a new message is stored - Fixed:
tempmails_message_marked_seenfires correctly on message read - Fixed:
tempmails_message_deletednow correctly passes$emailparameter - Fixed:
tempmails_cleanup_completednow passes deleted message count - Fixed: Admin JS (
admin.js) now correctly enqueued on all Tempmails admin pages - Fixed: Dashboard stats now increment correctly
- Added: Ecosystem Feed opt-out toggle in Settings → General
- Fixed: Modal z-index conflicts with some themes
- Fixed: Message list rendering in certain theme layouts
- Fixed: Attachment download failing for some file types
- Changed: Improved CSS specificity for modal overlay
- Changed: Enhanced frontend.css for broader theme compatibility
- Added: Material Design 3 UI components
- Added: Inter and Poppins font integration
- Added: Material Symbols icon library
- Fixed: Frontend styling conflicts with page builders
- Fixed: Button hover states
- Added: Addon Health monitoring page in admin
- Added: Error logging for addon hook callbacks
- Added:
Tempmails_Addon_Handler— wraps all addon hooks in try/catch - Fixed: PHP errors from misbehaving addons no longer crash Core
- Fixed: Nonce verification on all AJAX endpoints
- Fixed: Message-ID sanitization now preserves
<>characters - Fixed: Attachment unserialization on frontend display
- Security: Stricter AJAX security checks across all endpoints
- Security: Proper SQL escaping in all database queries
- Added: Ecosystem communication layer UI in admin
- Added: ecosystem.css for addon discovery panel
- Added: Visual addon cards in admin
- Added: IMAP email fetching engine
- Added: Auto-refresh inbox via AJAX
- Added: Attachment download support
- Fixed: Database table creation on plugin activation
- Fixed: Cron scheduling on activation
- Initial release
- Core email generation engine
- Message storage with soft delete
- Admin dashboard with statistics
- Frontend shortcode
- Basic IMAP integration