
TinyPNG - JPEG, PNG & WebP image compression
| 开发者 | TinyPNG |
|---|---|
| 更新时间 | 2026年6月30日 14:33 |
| 捐献地址: | 去捐款 |
| PHP版本: | 4.0 及以上 |
| WordPress版本: | 7.0 |
| 版权: | GPLv2 or later |
| 版权网址: | 版权信息 |
标签
下载
详情介绍:
- Next-gen format conversion, convert images to WebP and AVIF for even smaller files (NEW)
- Smart compression algorithm, reduce image file sizes without visible quality loss
- Broad format support, supports AVIF, WebP, PNG, animated PNG (APNG) and JPG.
- Automatic image compression, compresses new images on upload.
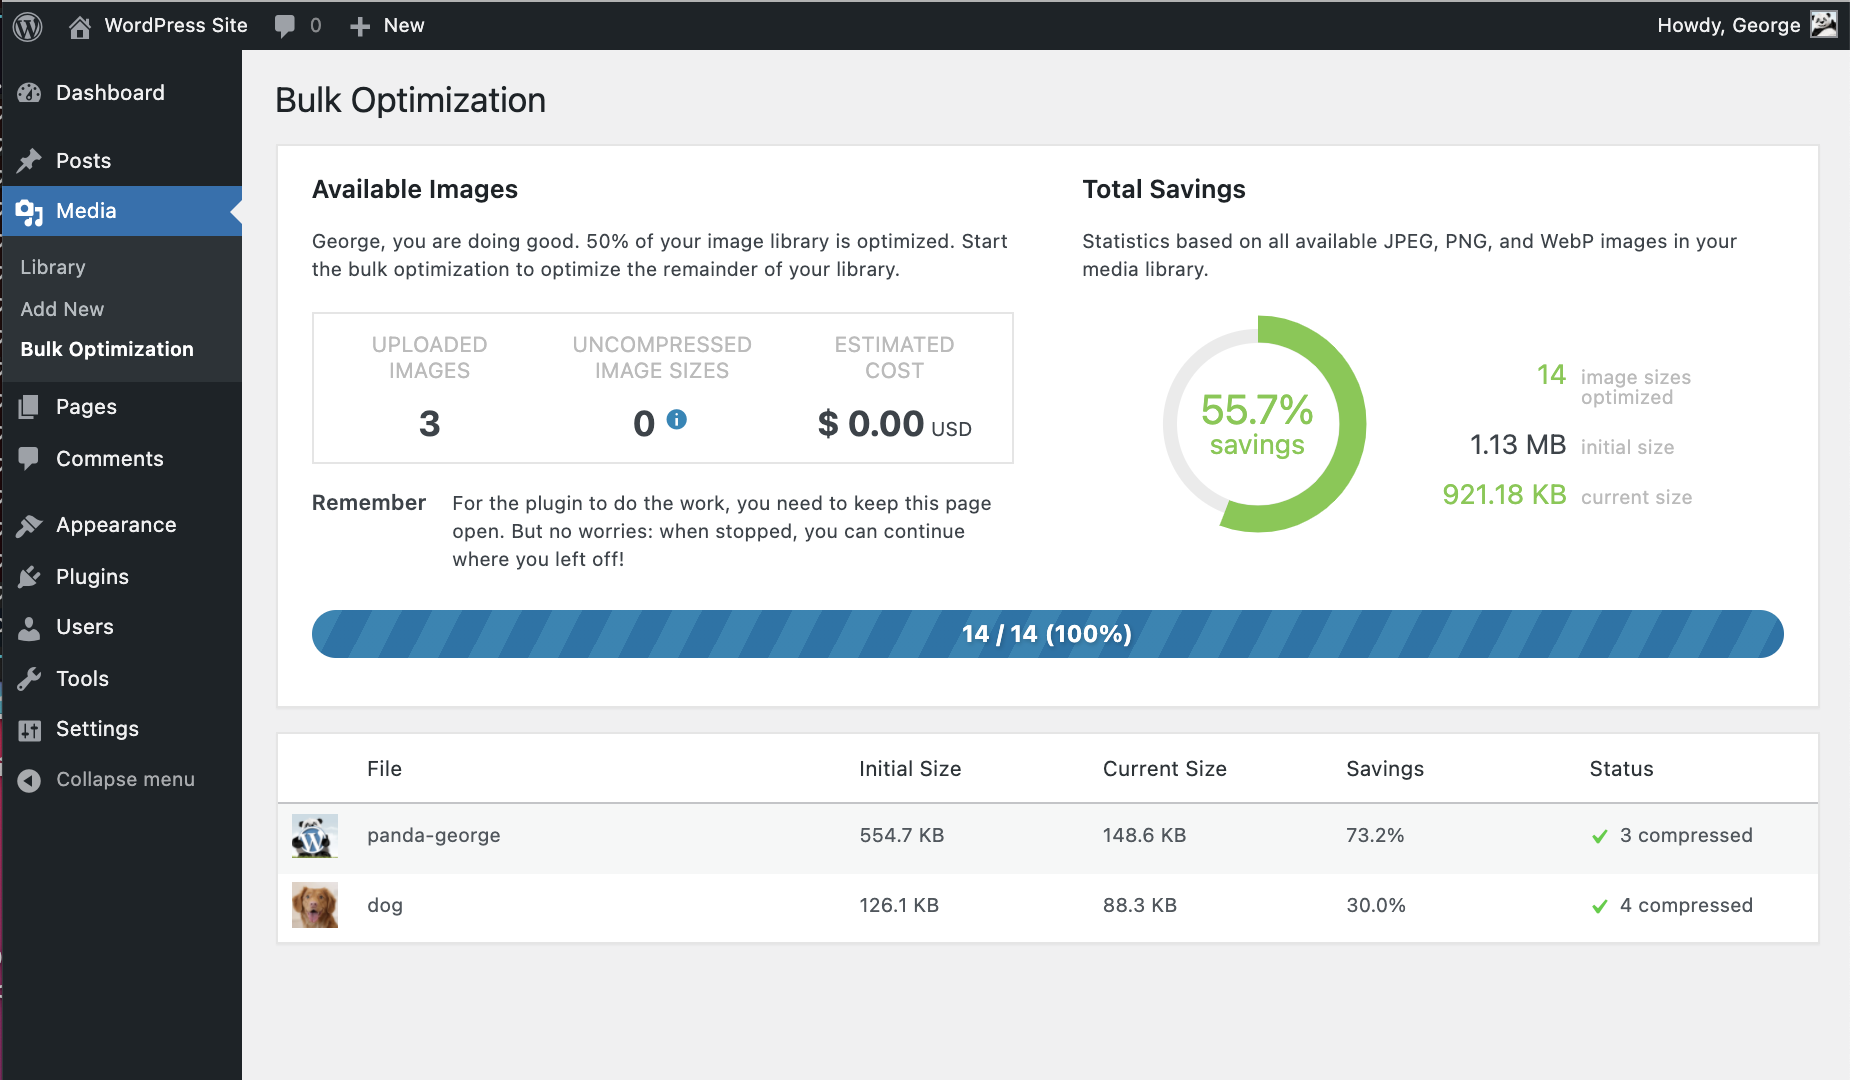
- Bulk optimization, optimize your full media library in just one click.
- Individual image control, optimize a single image straight from your media library.
- Preserve meta-data, choose to retain copyright metadata, creation date and GPS location in your original images.
- Resize large images, automatically resize huge image uploads by setting a maximum width and/or height for more reasonable browser display.
- Custom thumbnail optimization, choose which image size should be processed.
- Advanced background processing, optimization run quietly in the background to speed up your workflow.
- Multisite support, use one API key across all sites.
- Detailed statistics, see how much file size you have saved by compressing your Media Library
- George the Panda, our lovely mascot brings joy and hugs.
- and much more…
- WebP images are 25–34% smaller than JPEG (lossy) according to Google.
- AVIF can reduce image size by up to 50% compared to JPEG, often even beating WebP in compression.
- Display JPEG images more quickly with progressive JPEG encoding.
- Color profiles are automatically translated to standard RGB color.
- Convert CMYK to RGB to save more space and add compatibility.
- WPML
- WooCommerce
- WP Retina 2x
- WP Offload
- How to set up the TinyPNG WordPress plugin?
- How to compress existing images with the WordPress plugin?
安装:
- Visit Plugins > Add New.
- Search for 'tinypng' and press the 'Install Now' button for the plugin named 'TinyPNG - JPEG, PNG & WebP image compression' by 'TinyPNG'.
- Activate the plugin from your Plugins page.
- Go to the Settings > TinyPNG page and register a new account.
- Or enter the API key you got from https://tinypng.com/developers.
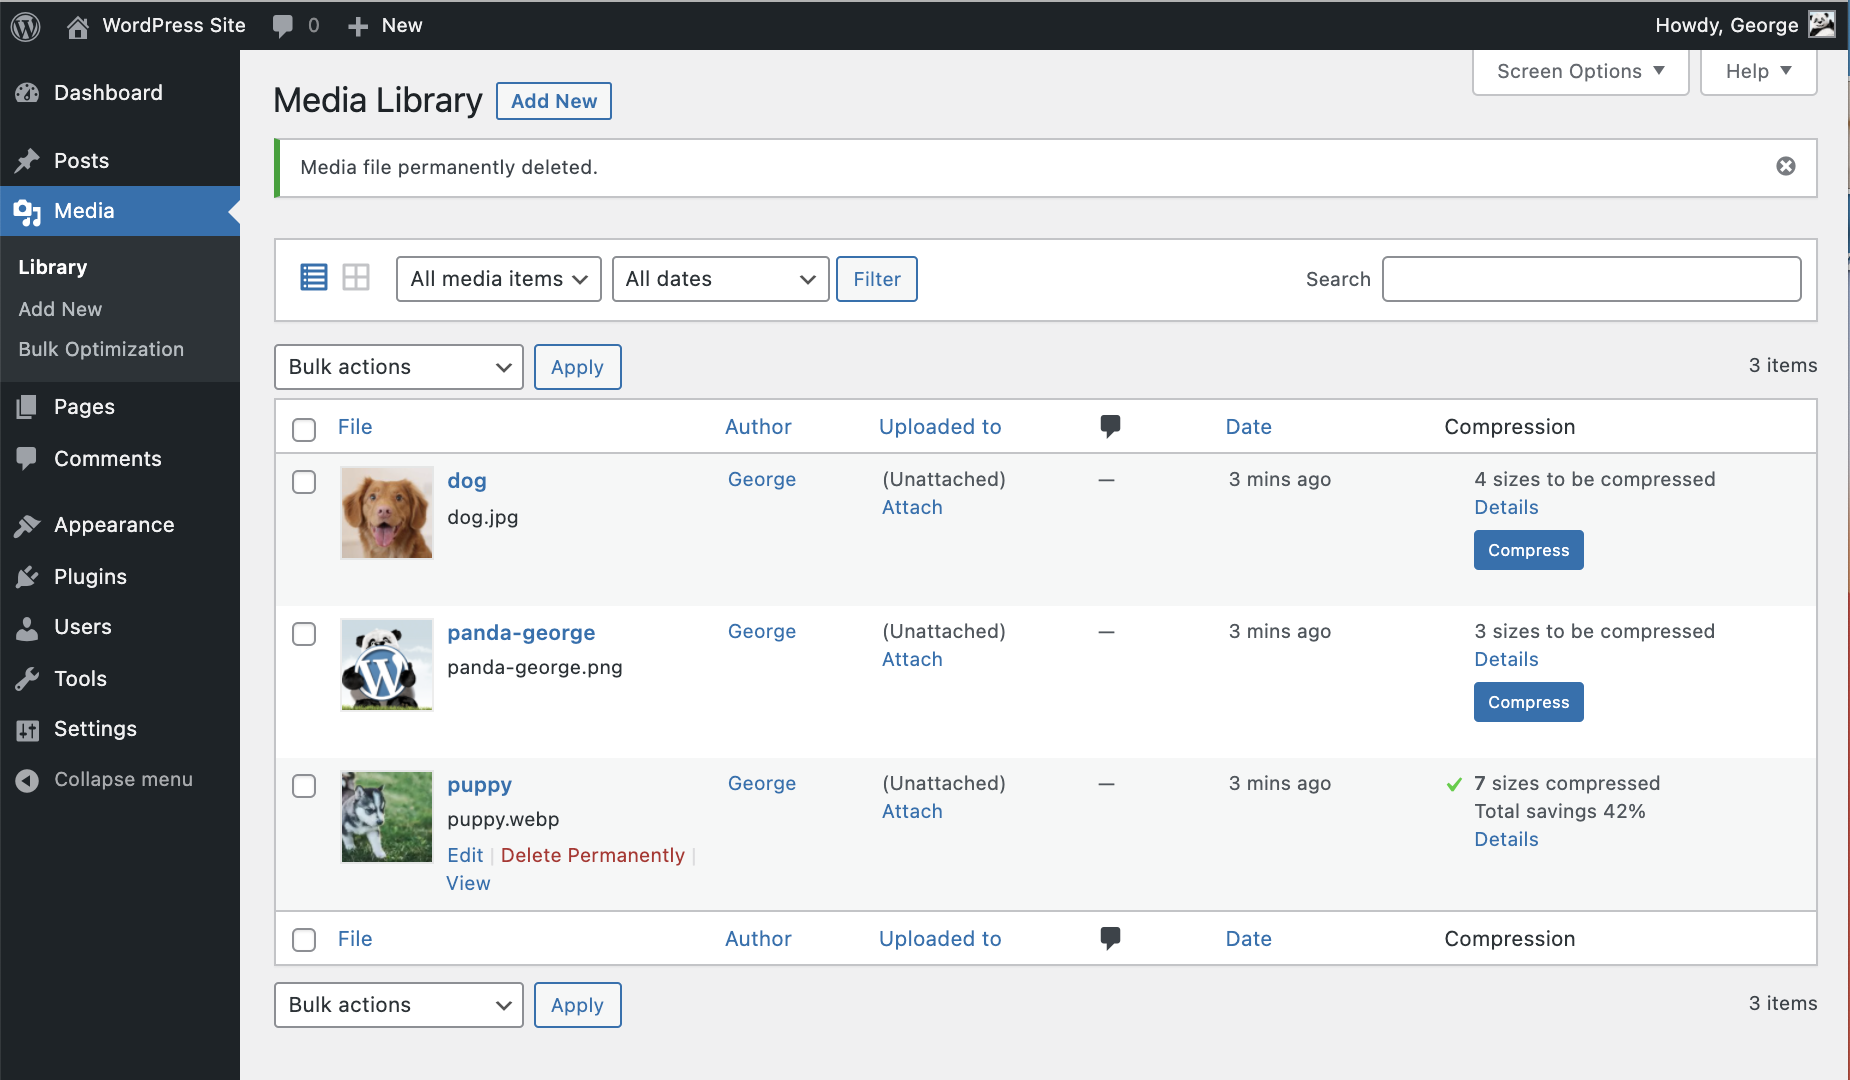
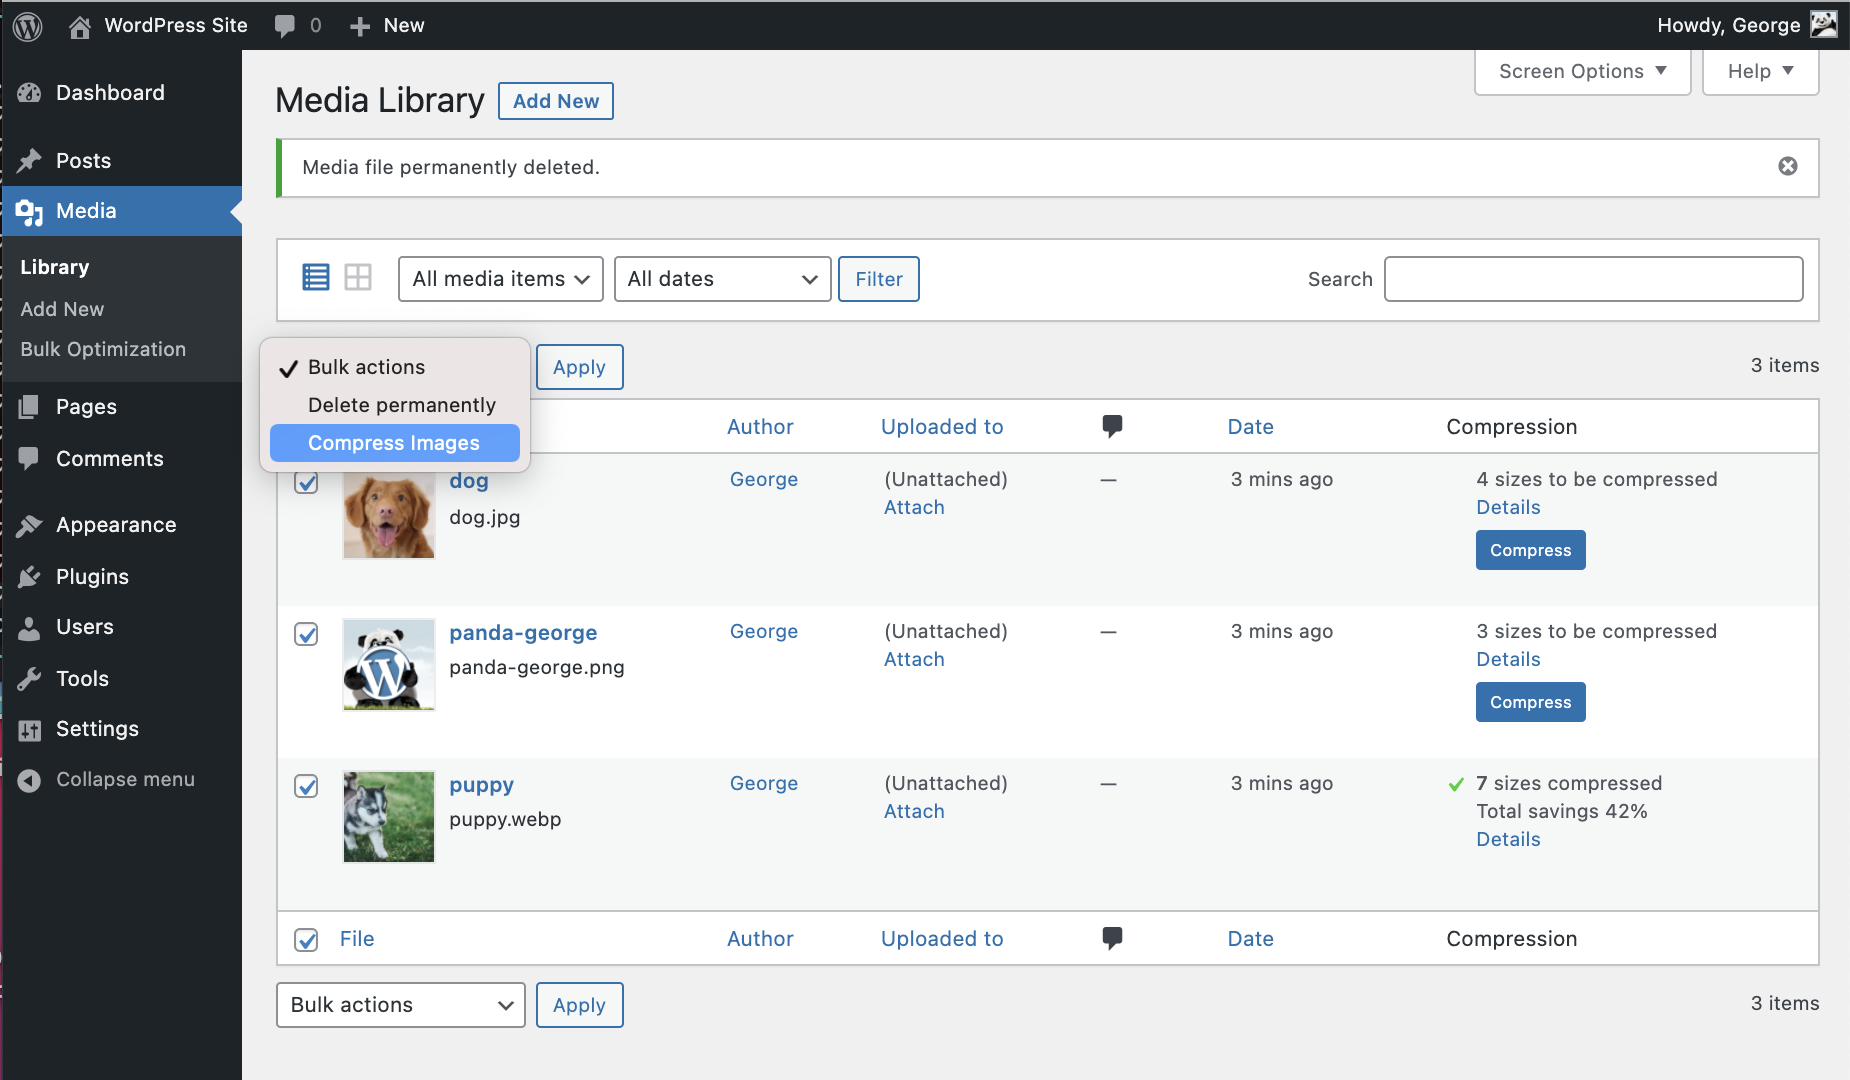
- Go to Media > Bulk TinyPNG and optimize all your images!
- Download the plugin named 'TinyPNG - JPEG, PNG & WebP image compression' by 'TinyPNG'.
- Upload the
tiny-compress-imagesdirectory to your/wp-content/plugins/directory, using your favorite method (ftp, sftp, scp, etc...) - Activate the plugin from your Plugins page.
- Go to the Settings > TinyPNG page and register a new account.
- Or enter the API key you got from https://tinypng.com/developers.
- Go to Media > Bulk TinyPNG and optimize all your images!
define( 'TINY_API_KEY', 'YOUR_API_KEY_HERE' );
Once set up you will see a message on the Settings > TinyPNG page. This will work for normal and multisite WordPress installations.屏幕截图:
常见问题:
Q: How many images can I optimize for free?
A: In a default WordPress installation you can optimize around 100 images for free each month. WordPress creates different thumbnails of your images which all have to be compressed. Some plugins even add more sizes, so take a look at the Settings > TinyPNG - JPEG, PNG & WebP image compression page before you start optimization.
Q: How much does it cost to use the plugin?
A: The plugin is free to use, you receive 500 free compressions each calendar month. If you need to compress more, you can upgrade to the pay-per-compression pricing. You can view the current pricing at tinify.com. When you use the bulk optimization tool, the plugin will first scan your media library and show you an estimated number of credits needed to optimize all uncompressed images. You can decide whether you want to upgrade your plan or stay within the free limit.
Q: How can I remove the 500 limit?
A: Just add your Payment details on your account dashboard to remove the limit. For a small fee the additional compressions above 500 will then be charged to your account at the end of each month.
Q: What happens to the optimized images when I uninstall the plugin?
A: When you remove the plugin all your optimized images will remain optimized.
Q: I don't recall uploading 500 photos this month but my limit is already reached. How is this number calculated?
A: When you upload an image to your website, WordPress will create different sized versions of it (see Settings > TinyPNG). The plugin will compress each of these sizes, so when you have 100 images and 5 different sizes you will do 500 compressions.
Q: Is there a file size limit?
A: Yes, but they are very generous! The maximum file size is 500MB and the maximum canvas size is 256MP (16000px by 16000px in any ratio).
Q: Can I use the same API key on all my websites?
A: Yes, there are no limitations. You can add the same key everywhere.
Q: Can I hide my API key from the admin?
A: Yes, you can hide your API key from the admin so other admin users will not be able to see it. To do this you should define the API key in your wp-config.php file. See the installation instructions for more information.
Q: What happens when I reach my monthly limit?
A: Everything will keep on working, but newly uploaded images will not be optimized. Of course we encourage everyone to switch to a paid account to cover the hosting and development costs of the service.
Q: Can I optimize all existing images in my media library?
A: Yes! After installing the plugin, go to Media > Bulk TinyPNG, and click on the start button to optimize all unoptimized images in your media library.
Q: How do I switch to a paid account?
A: You can upgrade to a paid account by adding your Payment details on your account dashboard. Additional compressions above 500 will then be charged at the end of each month as a one-time fee.
Q: Does converting to AVIF or WebP use more credits?
A: When the conversion feature is enabled (to convert images to AVIF or WebP), each image will use double the number of credits: one for compression and one for format conversion.
更新日志:
- chore: migrated meta key from
tiny_compress_imagesto_tiny_compress_images - feat: when original is set to be compressed, it will also compress images filtered by big_image_size_threshold.
- fix: added check for valid path before deleting converted image
- fix: use hook uninstall_plugin instead of uninstall.php to prevent dependency deletion
- fix: will copy sizes attribute to picture element
- fix: will no longer clear logs on each save settings
- feat: if supported, can serve modern formats like webp/avif through htacess rules
- fix: when img has no src, will not attempt to transform it to a picture element
- chore: updated tiny package to 1.6.4
- fix: resolved warning when img tag was missing src attribute
- fix: prevent picture element on product pages (WooCommerce)
- feat: download logs and diagnostics
- chore: updated phpcs rules and formatting
- Added support for WordPress 6.9
- fix: Improve compatibility with Avada page builder
- fix: prevent picture element when using a page builder
- added a guard to prevent bulk processing to requeue already processed images
- Changed the source priority for picture elements
- Resolved an issue where the amount of parameters were incorrect when rendering a notice.
- Resolved issue where a picture element would be nested within a picture element
- Added a link to leave a review in the bulk and settings page
- Renamed menu title for bulk to "Bulk TinyPNG"
- Renamed menu title for settings to "TinyPNG"
- Resolved warning when library was empty
- Resolved warning when resize options was empty
- New feature to enable converting images to WebP or AVIF
- Removed devdependencies and test files from plug-in
- Fixed a warning when library contained no images
- Will only check local file removal if AS3CF is active
- Support files uploaded through the WordPress REST API
- Removed notification on WooCommerce incompatibility
- Updated Tinify SDK from 1.5.2 to 1.6.2
- Improved support for WP Offload
- Error resolved where Tiny_Helpers was not available
- Error when mb_strimwidth is not available resolved
- CSRF fix, added nonce check
- Removed more deprecated PHP syntax that was triggering a warning message.
- Updated Wordpress compatibility
- Removed deprecated PHP syntax that was triggering a warning message.
- Fixed a bug that sometimes prevented failing requests to the Tinify servers from being retried.
- Correct filesize metadata retrieval for compressed images in WordPress 6.
- Updated WordPress compatibility.
- You can now optimise WebP images, in addition to JPEG and PNG.
- Fixed bug that caused the original version of images that started with a special character to not be compressed.
- Updated Wordpress compatibility.
- Support for WP Retina 2x Pro.
- More capability checks for extra security.
- Less resource intensive AJAX requests.
- Fixed CSS issues from Analytify plugin.
- Removed legacy Enhanced Media Library compatibility.
- Remaining free compressions shown in settings page.
- Easier way to upgrade a free account.
- WPML and WPML Media compatibility in collaboration with the authors of WPML. Make sure to upgrade WPML to version 4.1.
- Added a notice to the Bulk Optimization page for free accounts with not enough available free compressions.
- Added a new hook after compression of an image useful for CDN cache flushing.
- Fixed bug that caused an error when registering a new account.
- No longer use create_function, which is deprecated in PHP 7.2. The plugin no longer supports PHP 5.2.
- Rephrased incompatible plugins notice to avoid confusion.
- Compress new images in the background to speed up your workflow.
- Turbo-charged Bulk Optimization page with simultaneous image compression.
- Improved memory usage for installations with extreme media libraries.
- Detection of incompatible plugins.
- Fallback to fopen whenever the curl_exec function is disabled.
- Additional notices for WP Offload S3 users.
- Several minor fixes and tweaks.
- Fixed bug in compression of file types other than JPEG and PNG that have a thumbnail generated automatically.
- Fixed bug in the Bulk Optimization page that sometimes caused it to stop.
- Fixed a problem that would prevent dashboard widget from loading.
- Tweaked styling of the dashboard widget for the latest version of WordPress.
- Fixed a warning in the media library when certain plugins are used.
- Fixed bug with drop-down menu in the Media Library.
- Compression limit notice now links directly to your API dashboard.
- Tweaked styling of the dashboard widget.
- Changed links to make it easier to go directly to your API dashboard.
- Fixed a compression issue for some fopen users.
- Improved robustness in case an unexpected network error occurs.
- Fixed false positive warning with Sucuri scanner.
- Fixed compression issue for fopen users.
- Fixed an error that was introduced in v2.2.0 where all custom image sizes did not show up.
- Added support for image sizes with unspecified height or width.
- New dashboard widget that shows your media library savings.
- Support compressing medium_large image sizes.
- Compression of retina images generated by WP Retina 2x.
- Solved a bug which caused the API key to be cleared on the settings page.
- Fixed an error that occurred with some PHP 7 installations.
- Fixed an fopen error when preserving metadata.
- Faster Bulk Optimization page with reduced memory usage (thanks to @esmus).
- Fixed XML-RPC error (thanks @ironmanixs, @gingerdog, @quicoto and @isaumya).
- Fixed a bug when searching from the admin interface (thanks to @bapcsuk).
- Completely new Bulk Optimization page.
- Better detection of image sizes with duplicate filenames.
- Simplified account activation and API key creation.
- Fix to the bottom drop-down menu in the Media Library.
- Use the latest PHP client library for connecting to TinyJPG and TinyPNG.
- Added fallback to fopen for older systems running PHP 5.2.
- Show more information about compressed image sizes in details popup.
- Add compression details to image overview.
- Preserve GPS locations and creation dates in the original JPEG images.
- Option to preserve copyright information in your original PNG images.
- Improved detection of unsupported file types.
- Option to preserve copyright information in your original JPEG images.
- Added proxy support for cURL.
- Support for translate.wordpress.org plugin translations.
- Improved compression status in the Media Library with new details window.
- Show total compression savings on the Media Settings page.
- Moved Compress All Images from the Tools to the Media menu.
- Resize original images by specifying a maximum width and/or height.
- Support for the mobile WordPress app (thanks to David Goodwin).
- Indication of the number of images you can compress for free each month.
- Link to the Media Settings page from the plugin listing.
- Clarification that original images will be overwritten when compressed.
- Detect different thumbnail sizes with the same dimensions.
- Media library shows files that are in the process of compression.
- Added option to bulk compress your whole media library in one go.
- Better indication of image sizes that have been compressed.
- Detection of image sizes modified after compression by other plugins.
- Prevent compressing the original image if it is the only selected image size.
- Show if you entered a valid API key.
- Display connection status and number of compressions this month.
- Show a notice to administrators when the free compression limit is reached.
- The plugin now works when php's parse_ini_file is disabled on your host.
- Avoid warnings when no image thumbnail sizes have been selected.
- The API key can now be set with the TINY_API_KEY constant in wp-config.php. This will work for normal and multisite WordPress installations.
- Enable or disable compression of the original uploaded image.
- Improved display of original sizes and compressed sizes showing the total compression size in the Media Library list view.
- Initial version.