Trade Ideas Vision
| 开发者 | tradeideas01 |
|---|---|
| 更新时间 | 2017年3月10日 05:18 |
| PHP版本: | 4.0 及以上 |
| WordPress版本: | 4.6.1 |
| 版权: | GPLv2 or later |
| 版权网址: | 版权信息 |
详情介绍:
[tivision code="cloudcode" height="height" width="width"]
In order to use this plugin, you will also need to have an active Trade Ideas account
in order to create the Smart Layouts to be displayed as well to generate the cloudcode to paste into the shortcode above.
Please refer to Installation for further details.
安装:
- Visit 'Plugins > Add New'
- Search for 'TradeIdeas Vision'
- Activate TradeIdeas Vision from your Plugins page.
- Download the TradeIdeas Vision zipfile.
- Unzip and place the 'tradeideas-vision' directory to your '/wp-content/plugins/' directory.
- Activate TradeIdeas Vision from your Plugins page.
- Please login to Trade Ideas at the following url: http://hadoop.trade-ideas.com/TIProWeb/TIPro.html?dev_tools=1
- After successful login, select Tools > Windows from the toolbar after which you will see the 'Current Windows' popup display. This popup shows the windows currently being displayed in the application.
- On the 'Current Windows' popup, click the 'Close All' button, after which all current windows being displayed will close.
- Now go to the toolbar and select New > then the window type that you wish to be included within your Smart Layout.
- You may configure your selected window by right-clicking in the body of the window and selecting 'Configure' which will then display the Config Window.
- After having configured your selected window with the desired strategies and/or filters, exit the Config Window by clicking OK.
- Repeat steps 4 - 6 above for all additional windows that you wish to be included in your Smart Layout.
- Once you have the windows that you want to display in your Smart Layout configured correctly, position them on screen in roughly the layout that you want them to appear.
- Now from the toolbar, click 'Smart Layout'. The dropdown will highlight the appropriate layouts based upon the number of windows that you have displayed. The icons to the left of each selection will help you to choose the correct layout option.
- After selecting your desired option from the dropdown, the 'Save Special Layout' dialog appears. Type in the name for the layout and click 'OK'. The Layout is now saved to your cloud list.
- From the toolbar go to Tools > Load From Cloud
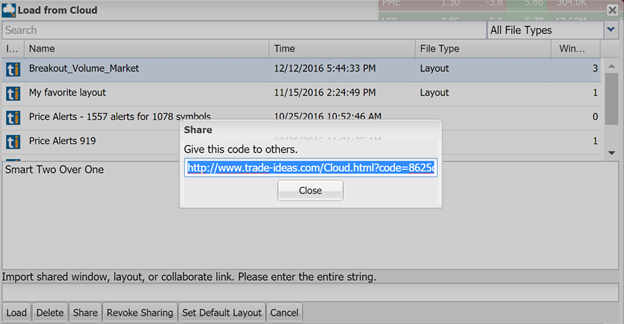
- In the 'Load From Cloud' dialog, click on the name of the layout that you had created in the previous steps followed by clicking the 'Share' button. The 'Share' dialog now appears.
- Within the 'Share' dialog, you will now see a url containing the cloudcode. You may copy the url that's shown to someplace temporary, and get the 32 character number that comes after 'code='. This is the cloudcode parameter that will be used in the shortcode tag for your WordPress document.
[tivision code="cloudcode" height="height" width="width"]屏幕截图:
常见问题:
What is the 'code' argument?
The code argument is a value which corresponds to a layout which has been saved to the Trade Ideas servers. This value is 32 characters long. If you accidentally enter a value which is not 32 characters long (or enter no code at all) , a default window will be displayed. If you enter a code which is 32 characters long, yet doesn't correspond to any existing layout an error message will be displayed.
Is the data shown in the layout windows in real time?
No, the data is delayed by 15-20 minutes.
I've included charts in my layout but they do not appear. Why can't I see them?
Charts only appear when there's live data. Trade Ideas Vision only uses delayed data.
Why doesn't my Single Stock Window symbol link with other windows that may be present in my layout?
This feature does not work in Trade Ideas Vision. Layouts are displayed within an iframe. Due to cross-site security restrictions, clicking on the iframe will not be captured by the content of the iframe(your layout).
更新日志:
- First release.


