Upsell Funnel Builder for WooCommerce – Create Upsells, Cross-Sells, Order Bumps, Frequently Bought, and Popups.
| 开发者 |
WP Swings
wpswings |
|---|---|
| 更新时间 | 2026年6月16日 18:18 |
标签
下载
详情介绍:
安装:
- Upload the Upsell Order Bump Offer for the WooCommerce folder to the /WP-content/plugins/ directory.
- Activate the plugin through the ‘Plugins’ menu in WordPress.
屏幕截图:


常见问题:
What is a funnel builder?
A funnel builder is a powerful tool used to create and manage sales funnels for businesses. A sales funnel is the process a customer follows, from first discovering a product to making a purchase. With a sales funnel builder, you can easily design and automate each step of this journey, starting from the funnel page, where potential customers first learn about your product, to the checkout page, where they complete the purchase.
How to build a funnel for free?
To build a funnel for free using the WP Swings One Click Upsell Funnel for WooCommerce plugin, follow these steps:
- Install the Free Plugin: Download and install the One Click Upsell Funnel plugin from the WordPress repository.
- Create a New Funnel: Navigate to the Upsell Funnels option in your WooCommerce dashboard. Click on “Add New Funnel” to start creating a new funnel.
- Set Up Funnel Details: Enter the funnel name, choose the target products or categories, and define the offer triggers that will activate the upsell funnel.
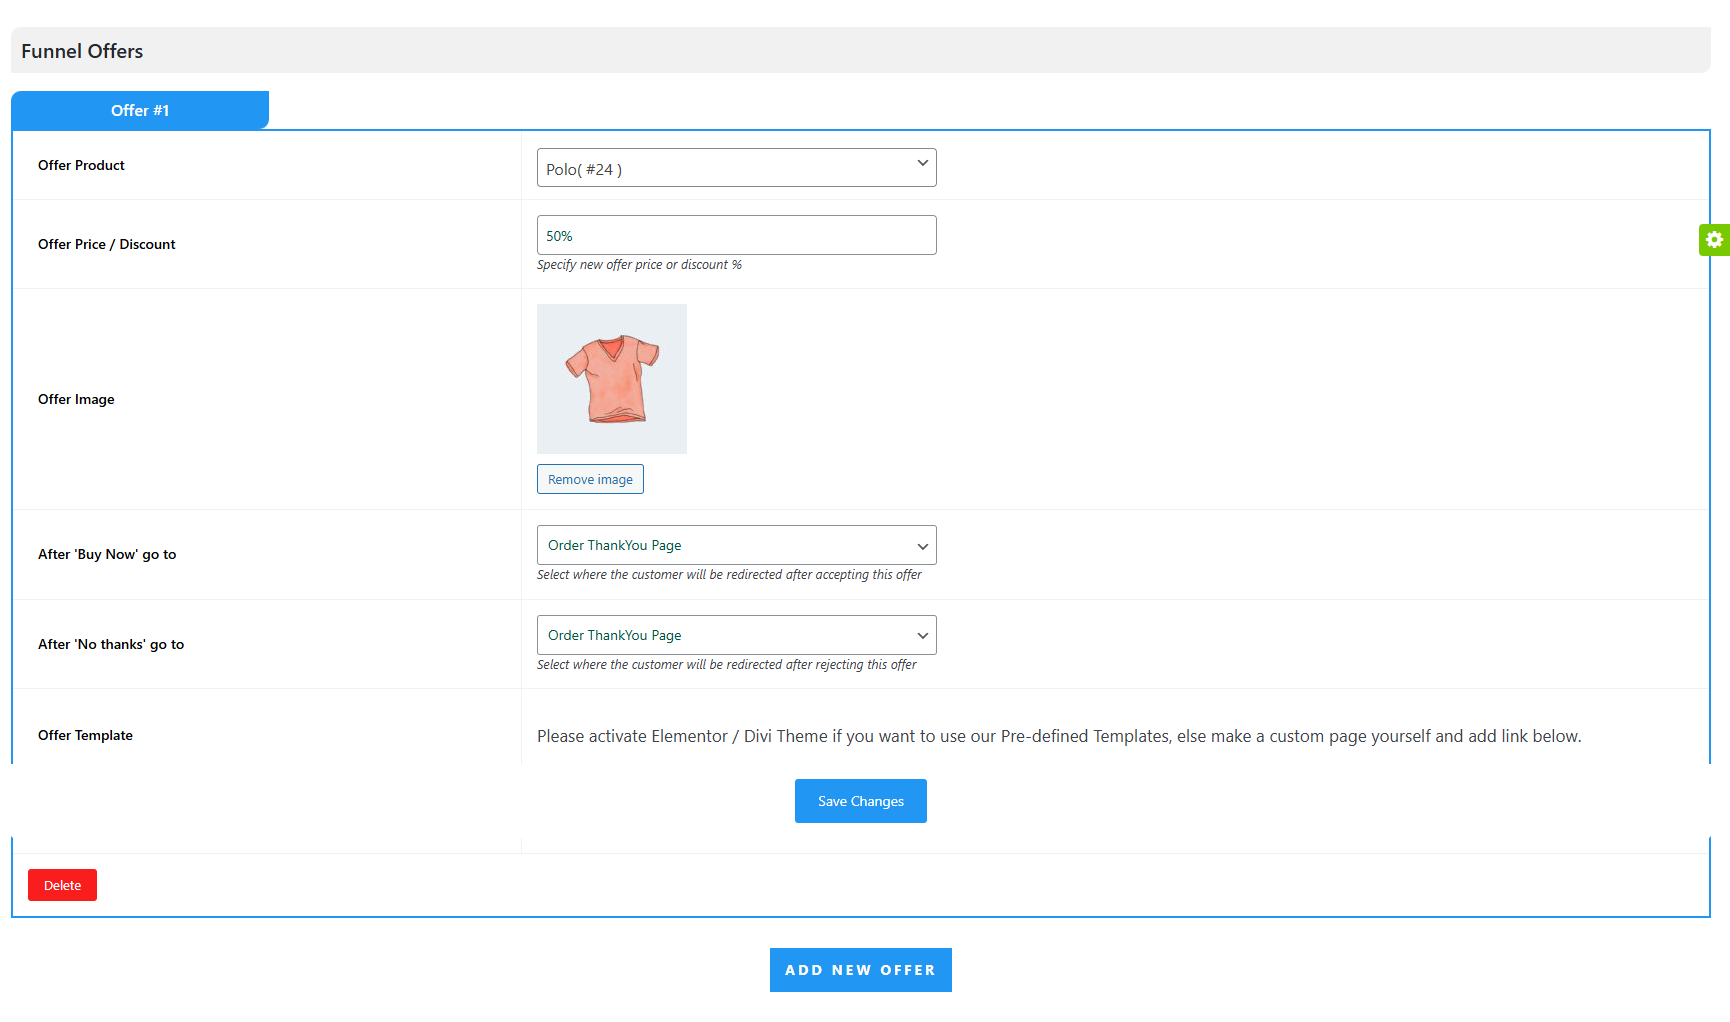
- Customize the Offer Pages: You can customize the upsell or downsell offer pages, adjusting content, design, and pricing to match your brand’s needs.
- Activate and Test: Once your funnel is ready, activate it and test the entire customer journey to ensure everything works as expected.
How to create upsell in WooCommerce?
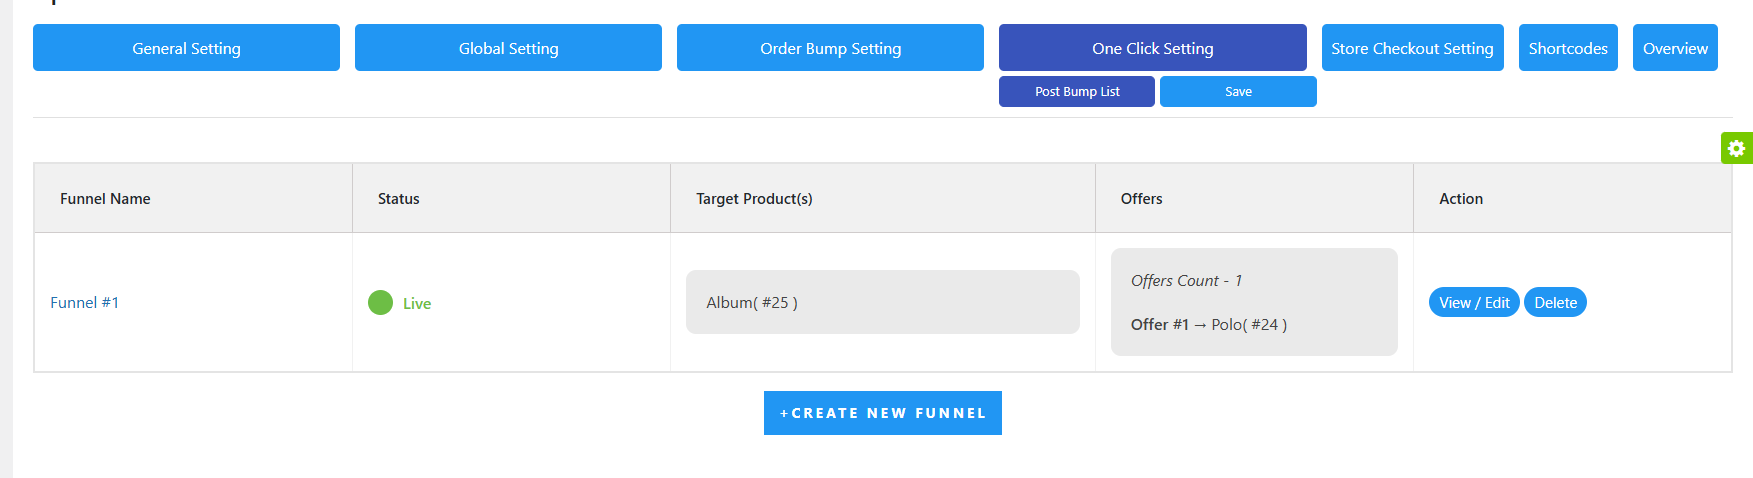
Follow these steps to create an upsell funnel in WooCommerce: – Go to Funnel List: Find all your created funnels here. – Create a New Funnel: Click Create New Funnel and enter details like: – Name: Funnel’s name for easy tracking. – Min Cart Amount (Premium): Trigger based on cart value. – Target Products/Categories: Select specific items or categories. – Frequently Bought Offers (Premium): Suggest related products. – Add Offers: Include product details like price, image, and redirect pages. – Custom Offer Pages: Use shortcodes for personalized pages. – Go Live: Disable Sandbox Mode and save changes.
What types of Products does the upsell plugin support?
Customers can buy one-click WooCommerce products of the following types: Free Version: Simple Products and Variable Products Premium version: Simple, Variable, Bundled, and Subscription products.
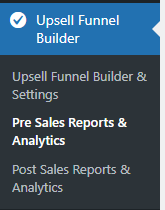
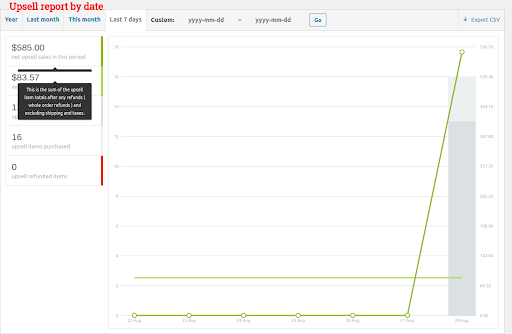
Can I track the performance of my Upsell Funnels?
Yes, we have Upsell Sales by Funnel Stats that show Individual Funnel Performance metrics such as Trigger Count, Success Count, Offers Viewed, Offers Accepted, Offers Rejected, Offers Pending, Conversion Rate, and Total Sales. With the help of these metrics, you can easily figure out how your Upsell funnels are performing and make changes accordingly.
What page builders does this plugin support?
Most of the major WordPress page builders like Elementor, WPBakery, Divibuilders, Thrive Architect, and other WordPress page builders are supported for creating attractive upsell offers.
What is the difference between Order Bump and Upsell in eCommerce?
In eCommerce, both Order Bumps and Upsells are clever ways to increase your sales, but they go about it in different ways: – Order Bump: Think of an order bump as a quick and easy offer that pops up during checkout. It’s something small and complementary to what the customer has already added to their cart, like an extra accessory or a simple upgrade. It’s usually presented as a checkbox that customers can tick without much thought, making it a seamless add-on. – Upsell: An upsell is a little more intentional. It's about offering your customer a higher-priced version of the product they've already chosen, or perhaps a completely different product that adds more value. This is usually presented after they've made their initial purchase decision, either in a follow-up pop-up or on a new page after checkout.
What is frequently bought together?
Frequently Bought Together typically refers to a carefully selected group of products aimed at increasing revenue for a woocommerce store. This feature is commonly used for upselling or cross-selling items, rather than simply showcasing products that are frequently purchased together.
What Is Cross Sell?
Cross-selling involves promoting related products or services that can fulfill additional needs of the customer. Here is a Woocommerce cross sell example, if a customer buys a smartphone, a retailer might suggest accessories like a case or screen protector. In financial services, a bank might cross-sell a personal loan to a customer who already has a mortgage.
How to add related products in WooCommerce?
To add related products to WooCommerce, you can utilize the built-in feature in woocommerce:-
- Access the Product Page Navigate to your WordPress dashboard. Go to Products > All Products and select the product you want to edit.
- Add Related Products Scroll down to the Product Data section and click on the Linked Products tab.
Here, you can add: – Up-Sells: Products that are more expensive or of higher quality than the current product. – Cross-Sells: Complementary products that customers might want to buy along with the current product.
What Is A Bump Offer?
A bump offer, also known as an order bump, is an additional product or service presented to customers during the checkout process of an online purchase. It typically appears as a checkbox alongside the main product, allowing customers to easily add complementary items to their order just before completing their payment. This strategy is designed to increase the average order value by encouraging impulse buys of lower-cost items that enhance the primary purchase.
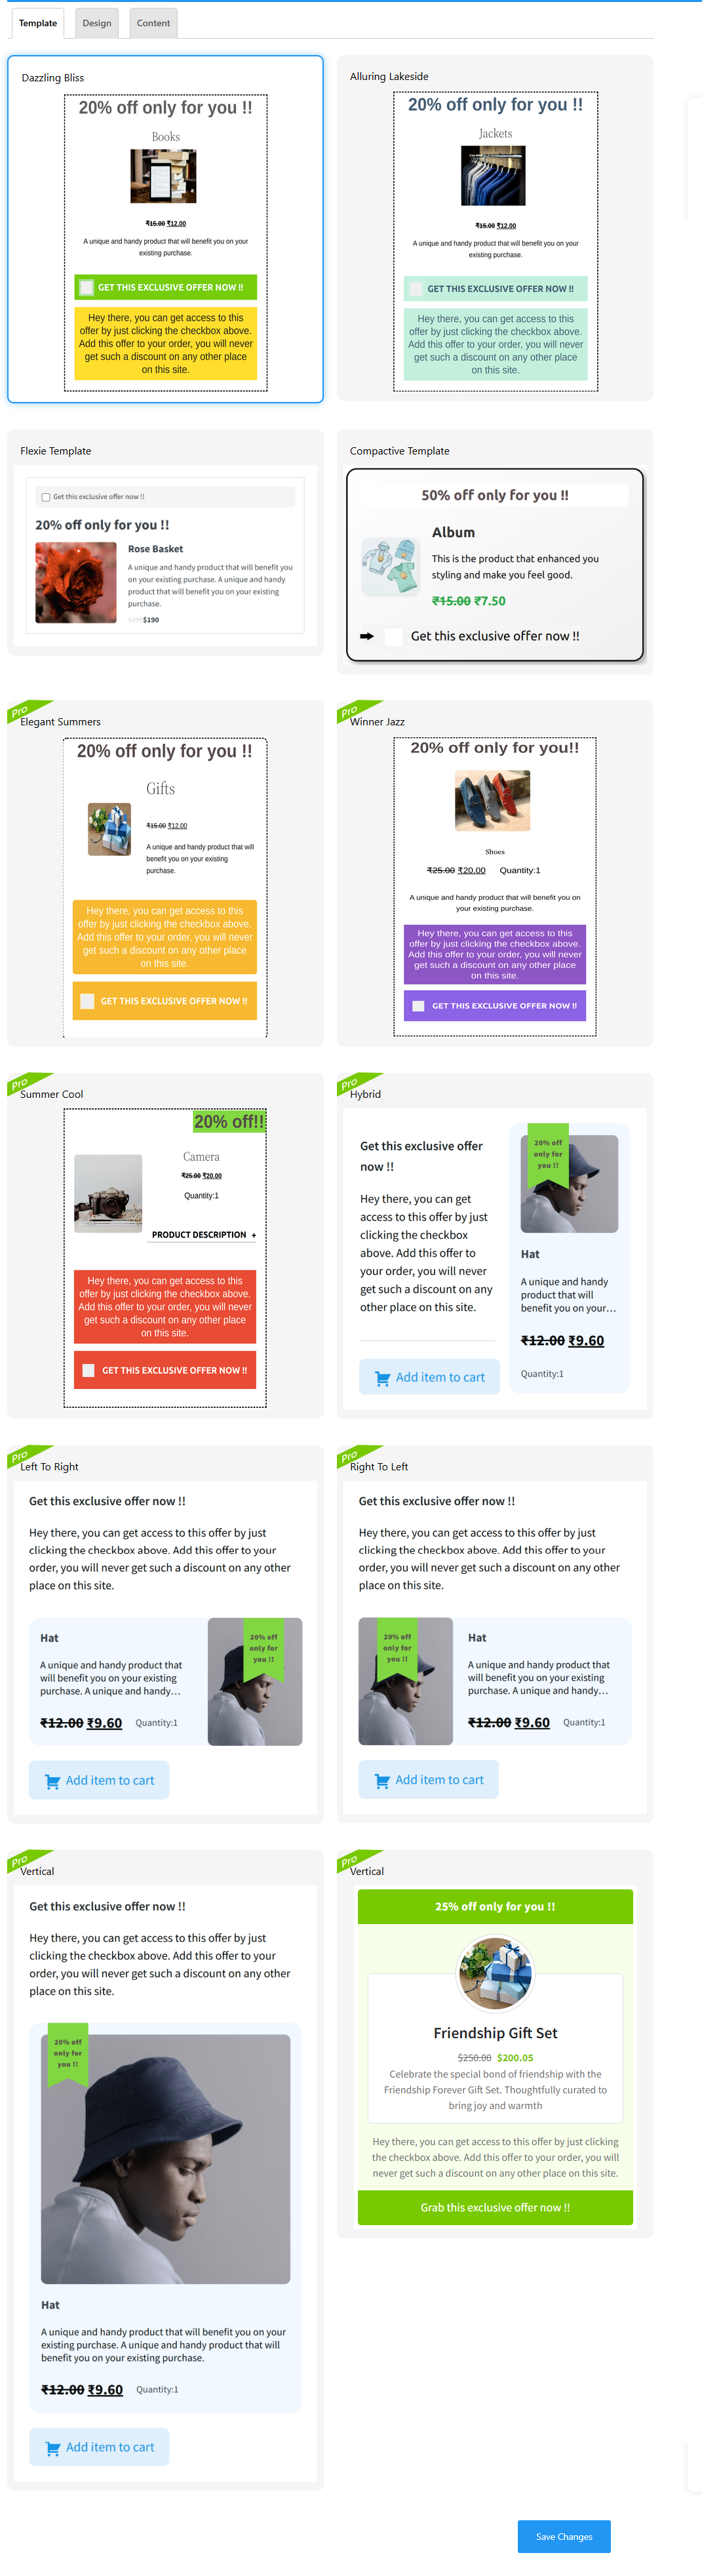
Can I add more templates as per my website design?
Yes, you can add more than one template with different designs and colors. In the free version, we have provided two free templates and in the premium version more than 8+ templates have been added, and more are coming soon. If you want to make or build your template with us, you can connect to our support team as template designs convert your sale
What is Offer Appearance?
In the offer appearance of order bump you can show offers in two types, one is simple to offer in a static format and the other is in the form of a pop-up. Whatever suits your users you can use as per need. This Simple Offer feature is only available in the premium version of the plugin
How to show the Bump offer on using the CheckoutWC 's Checkout?
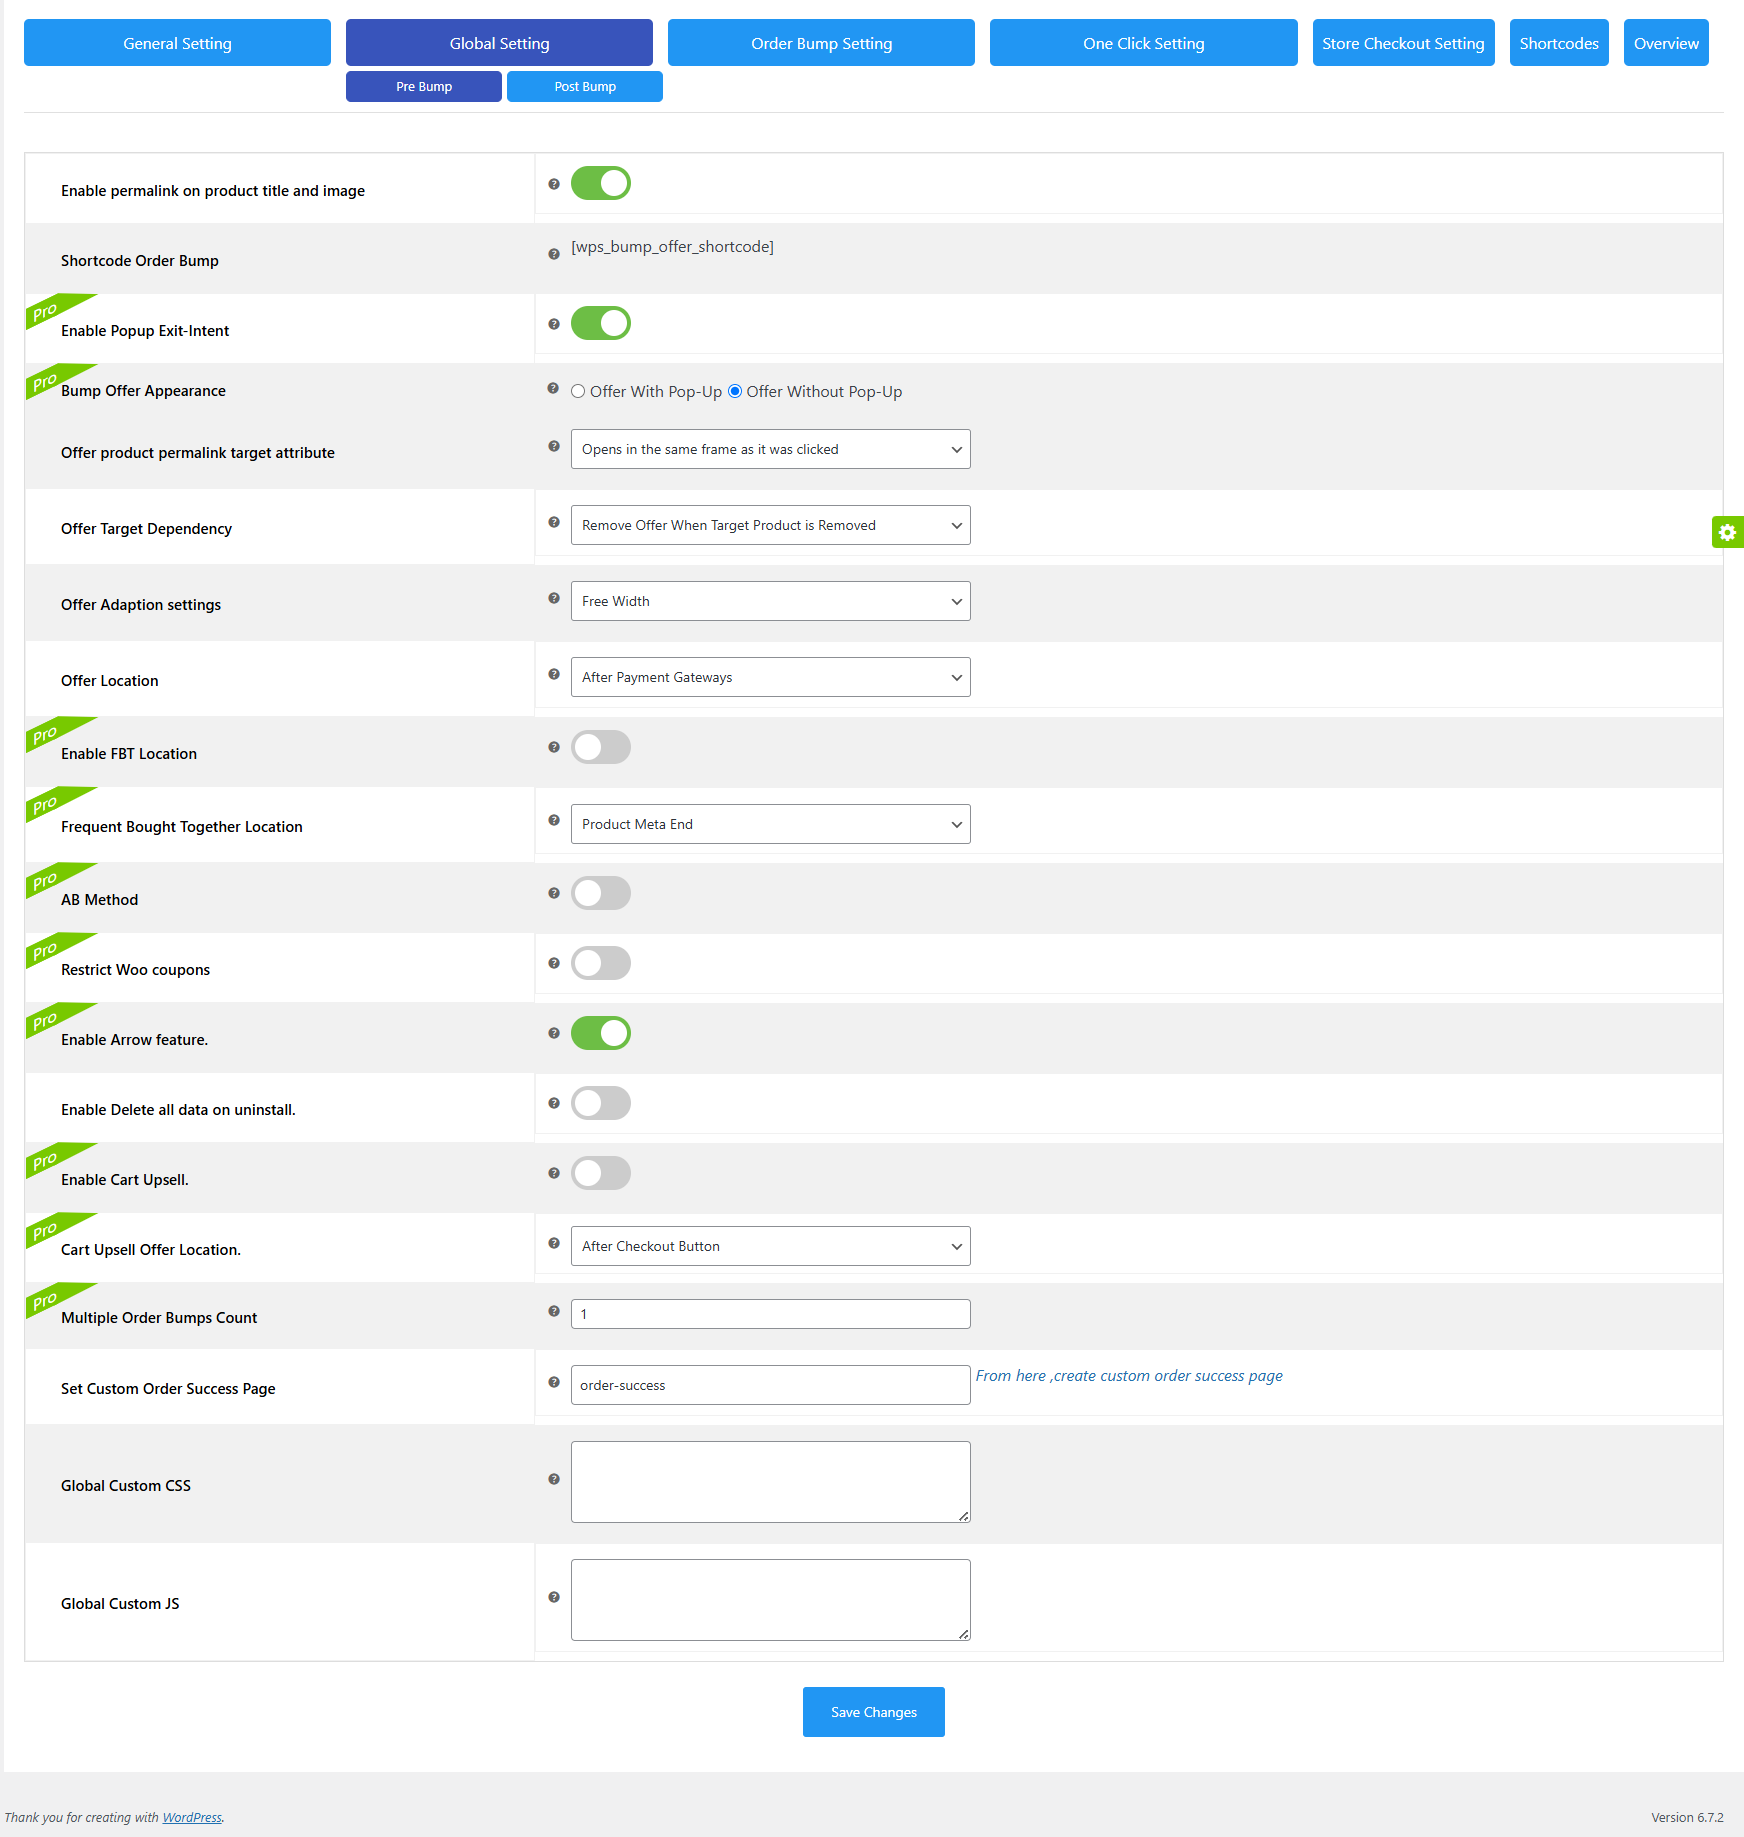
After activating the CheckoutWC plugin, then go to our Global settings and Go to "Offer Location", set any setting (Prefer "Before Payment Gateway" or "After Payment Gateway ") and then save once. Now, you can use the Order Bump with the CheckoutWC plugin.
Is the order bump compatible with all themes?
That’s a query that helps us to make it much better now. Although it appears impossible, we have managed to make it compatible with all of the available themes. We have tested our plugin with a large number of themes, and several customers have reported success. In any case, if your theme is incompatible, we would be grateful if you could inform our team so that we could check the compatibility.
Who can use the upsell order bump plugin?
The upsell order bump plugin can be useful to all the store owners on WordPress and WooCommerce who are in search of increasing AOV and sales of their stores whether they are
- Bloggers
- E-book Sellers
- E-Commerce Owners
- Small and larger-scale businesses
- Retailers
- Trainers
How to Set up WooCommerce Order Bumps?
Follow these steps to create an order bump with our plugin:
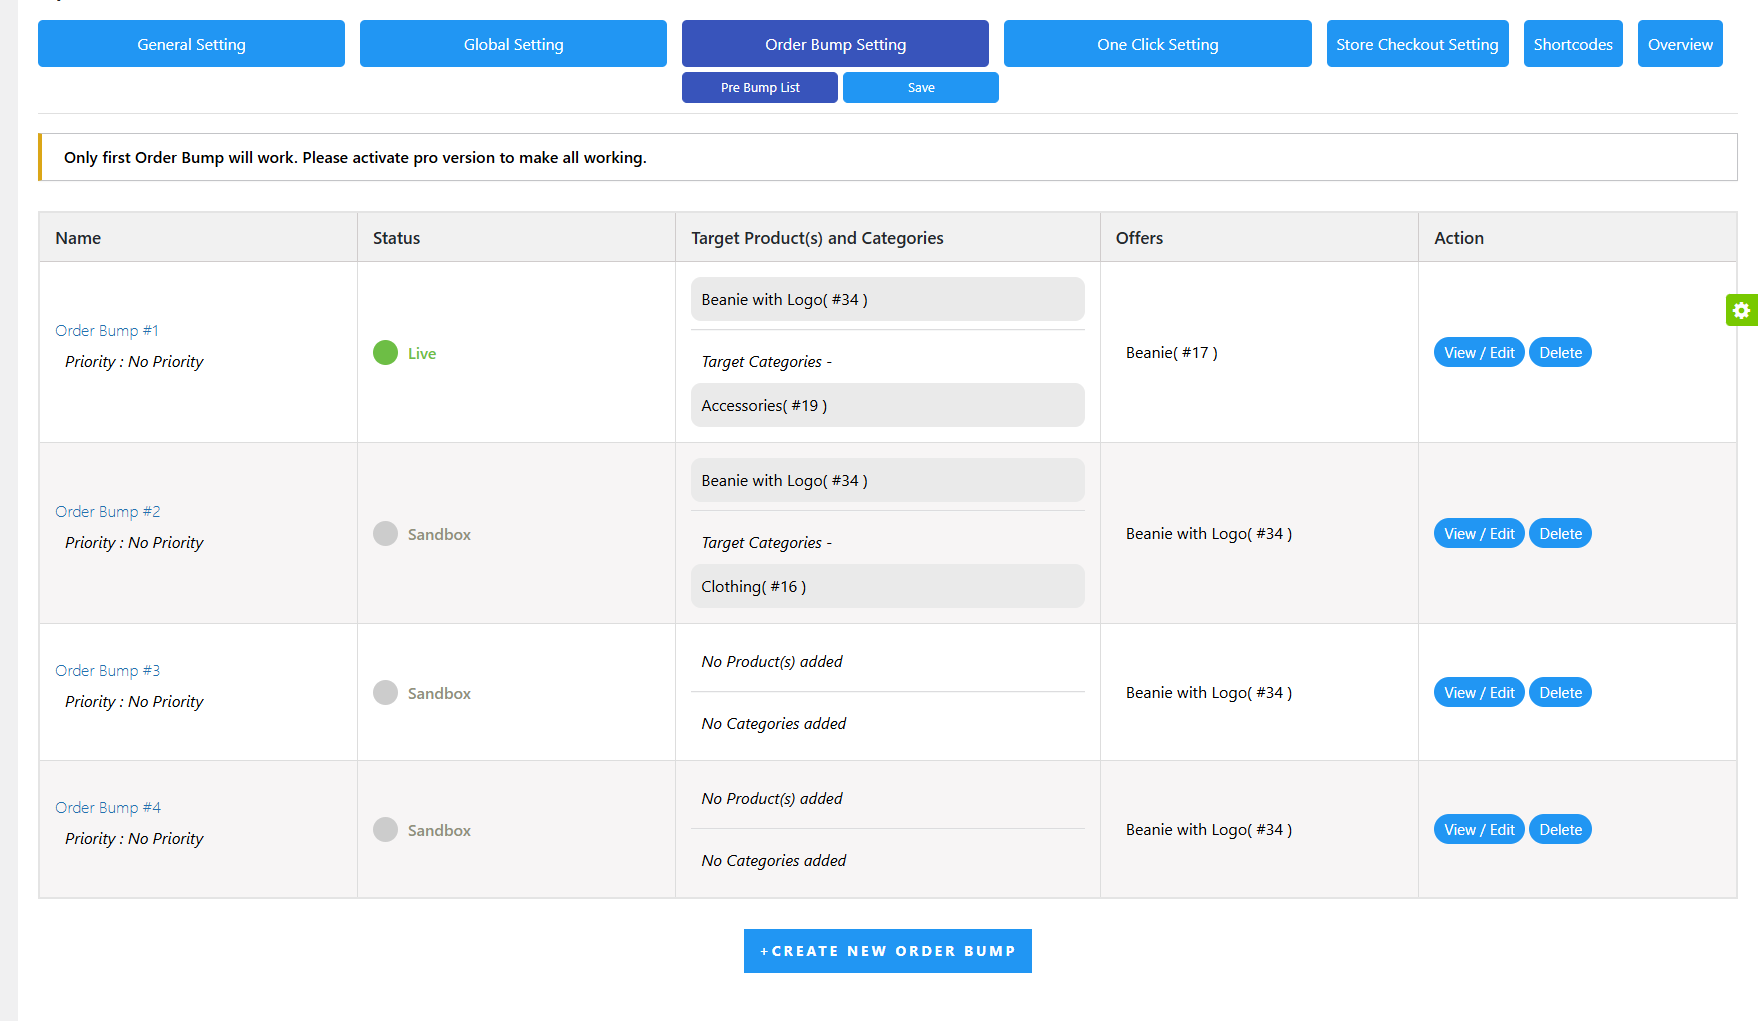
- Navigate to your WordPress dashboard > Order Bump and click on the Order Bump List section.
- Click on the “Create New Order Bump” button in this section.
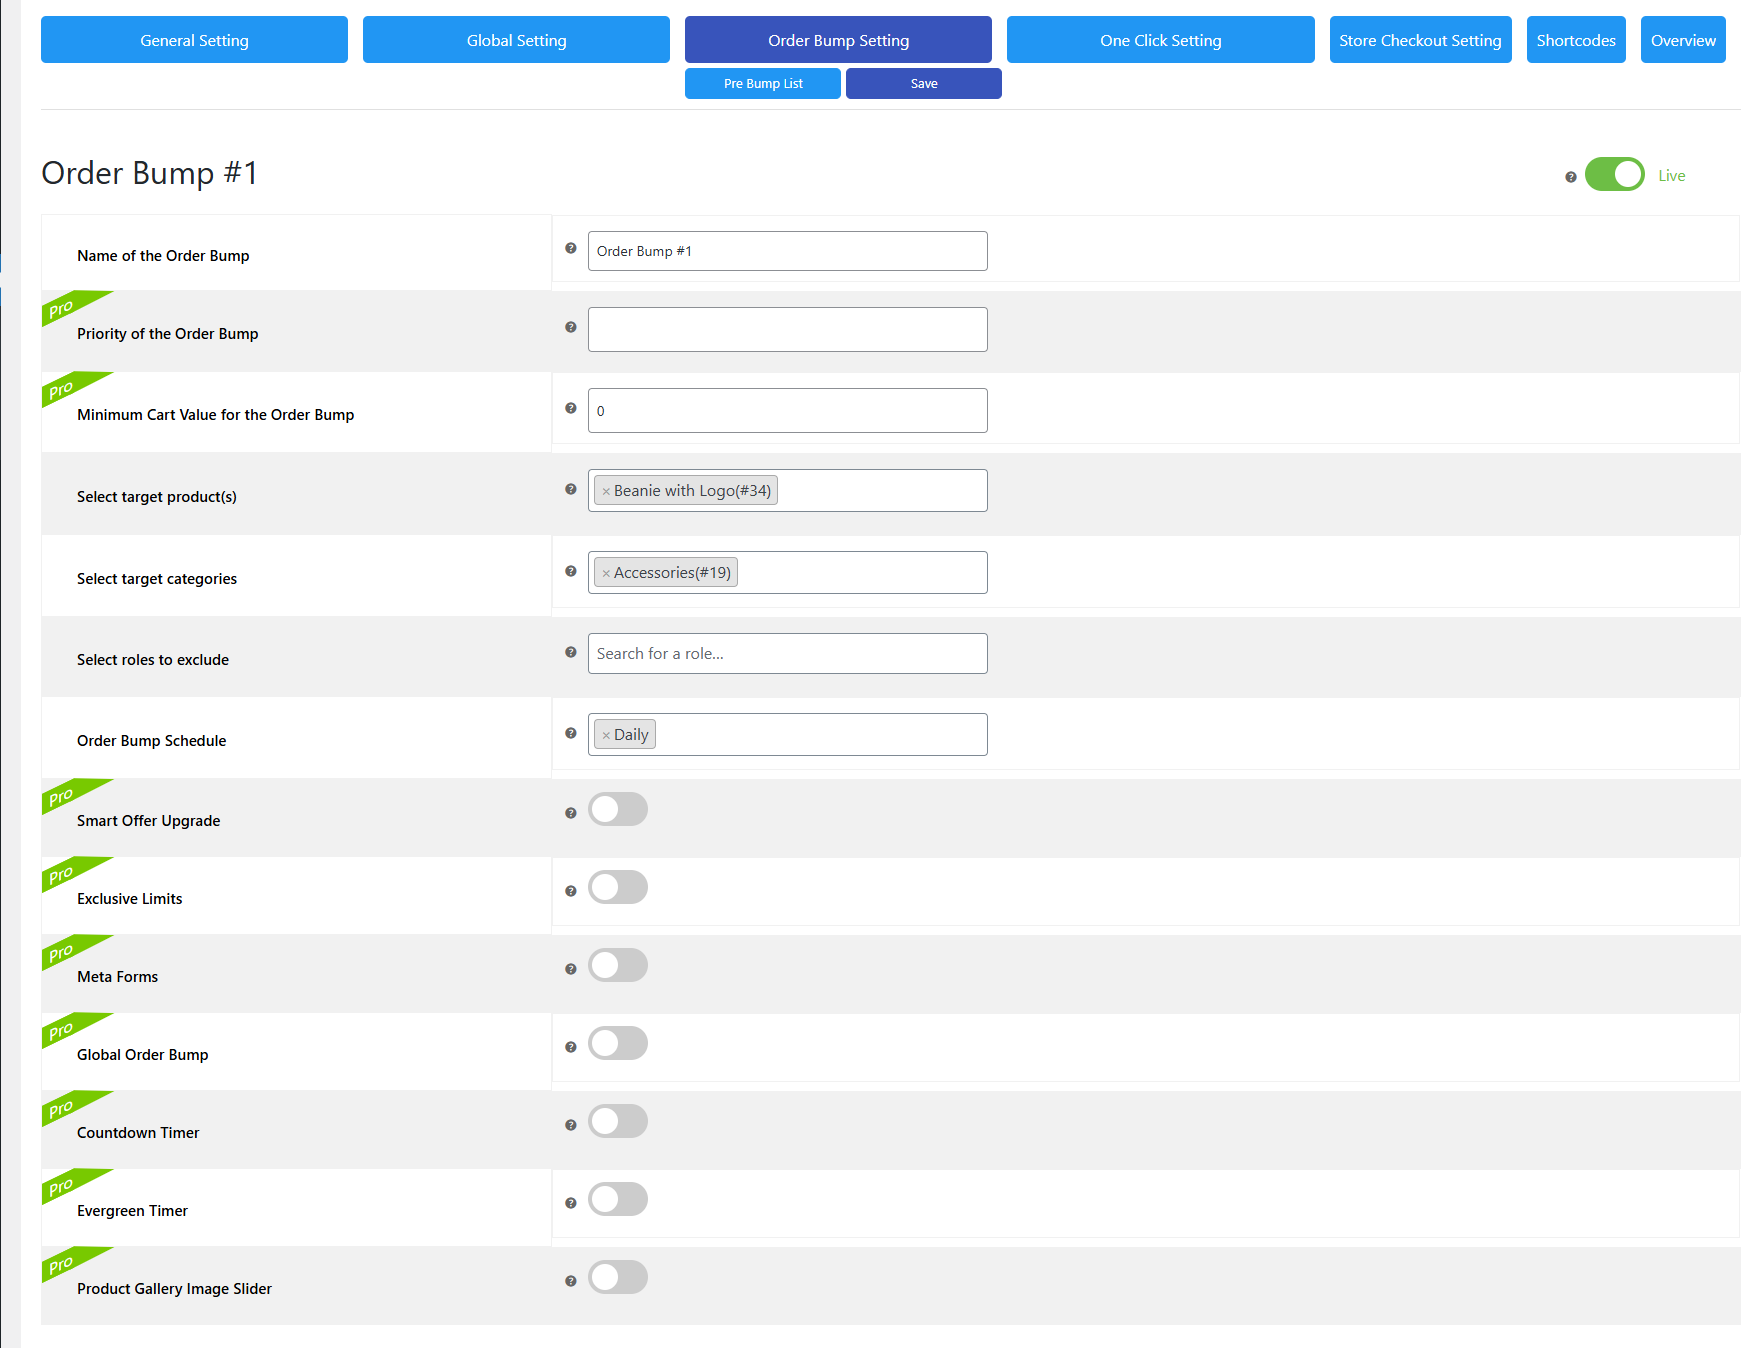
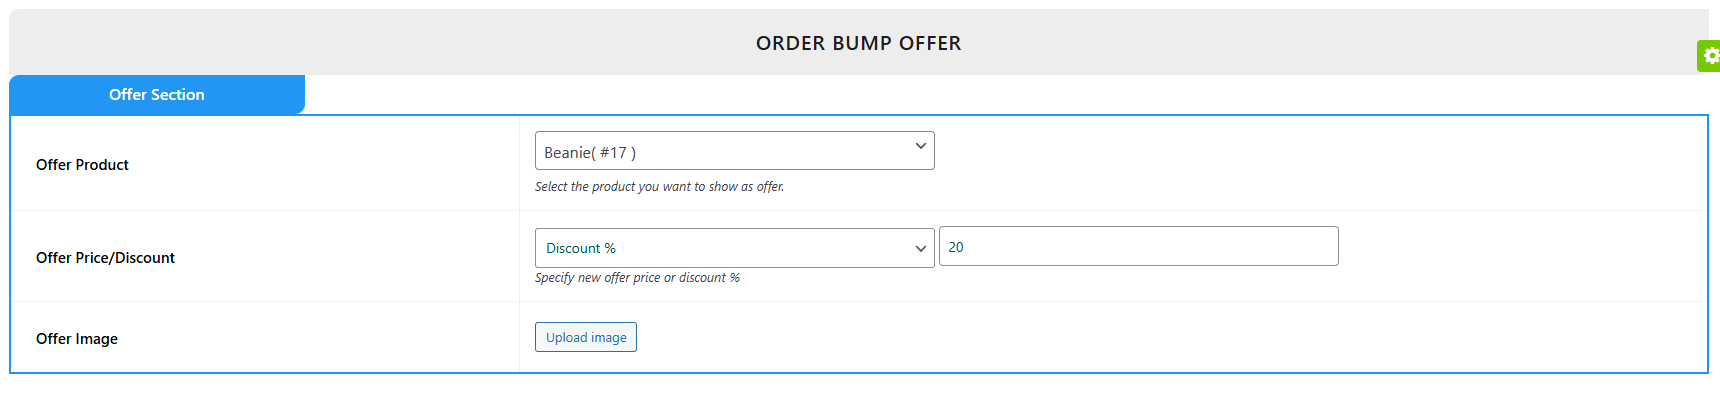
- Name your bump offer, select the target product, and target category, and schedule your offer for specific days accordingly
- Add your offer product and discount.
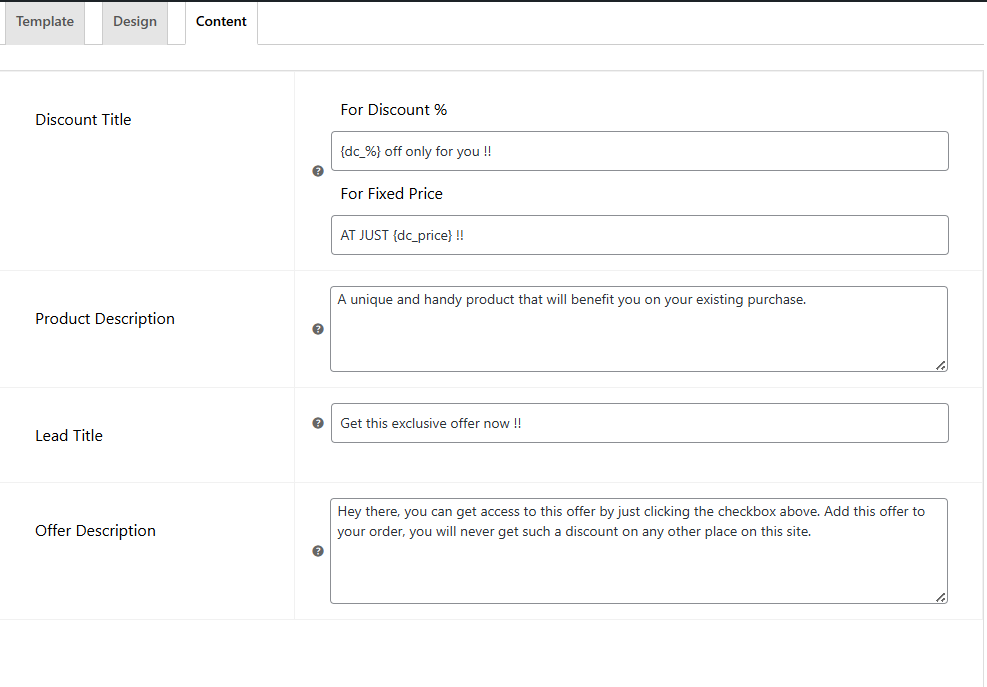
- Select the offer template and customize the design and content as you want.
- Make the funnel Live and save changes.
My Order Bump Offer not showing?
If your order bump offers are not displaying on your site, make sure:
- Your Order Bump offer is Live and not in sandbox mode.
- You have added the correct target product or target category product in the cart.
- Your Order Bump Schedule is set to Daily or for the correct weekday that you are checking.
Are the offer templates fully customizable?
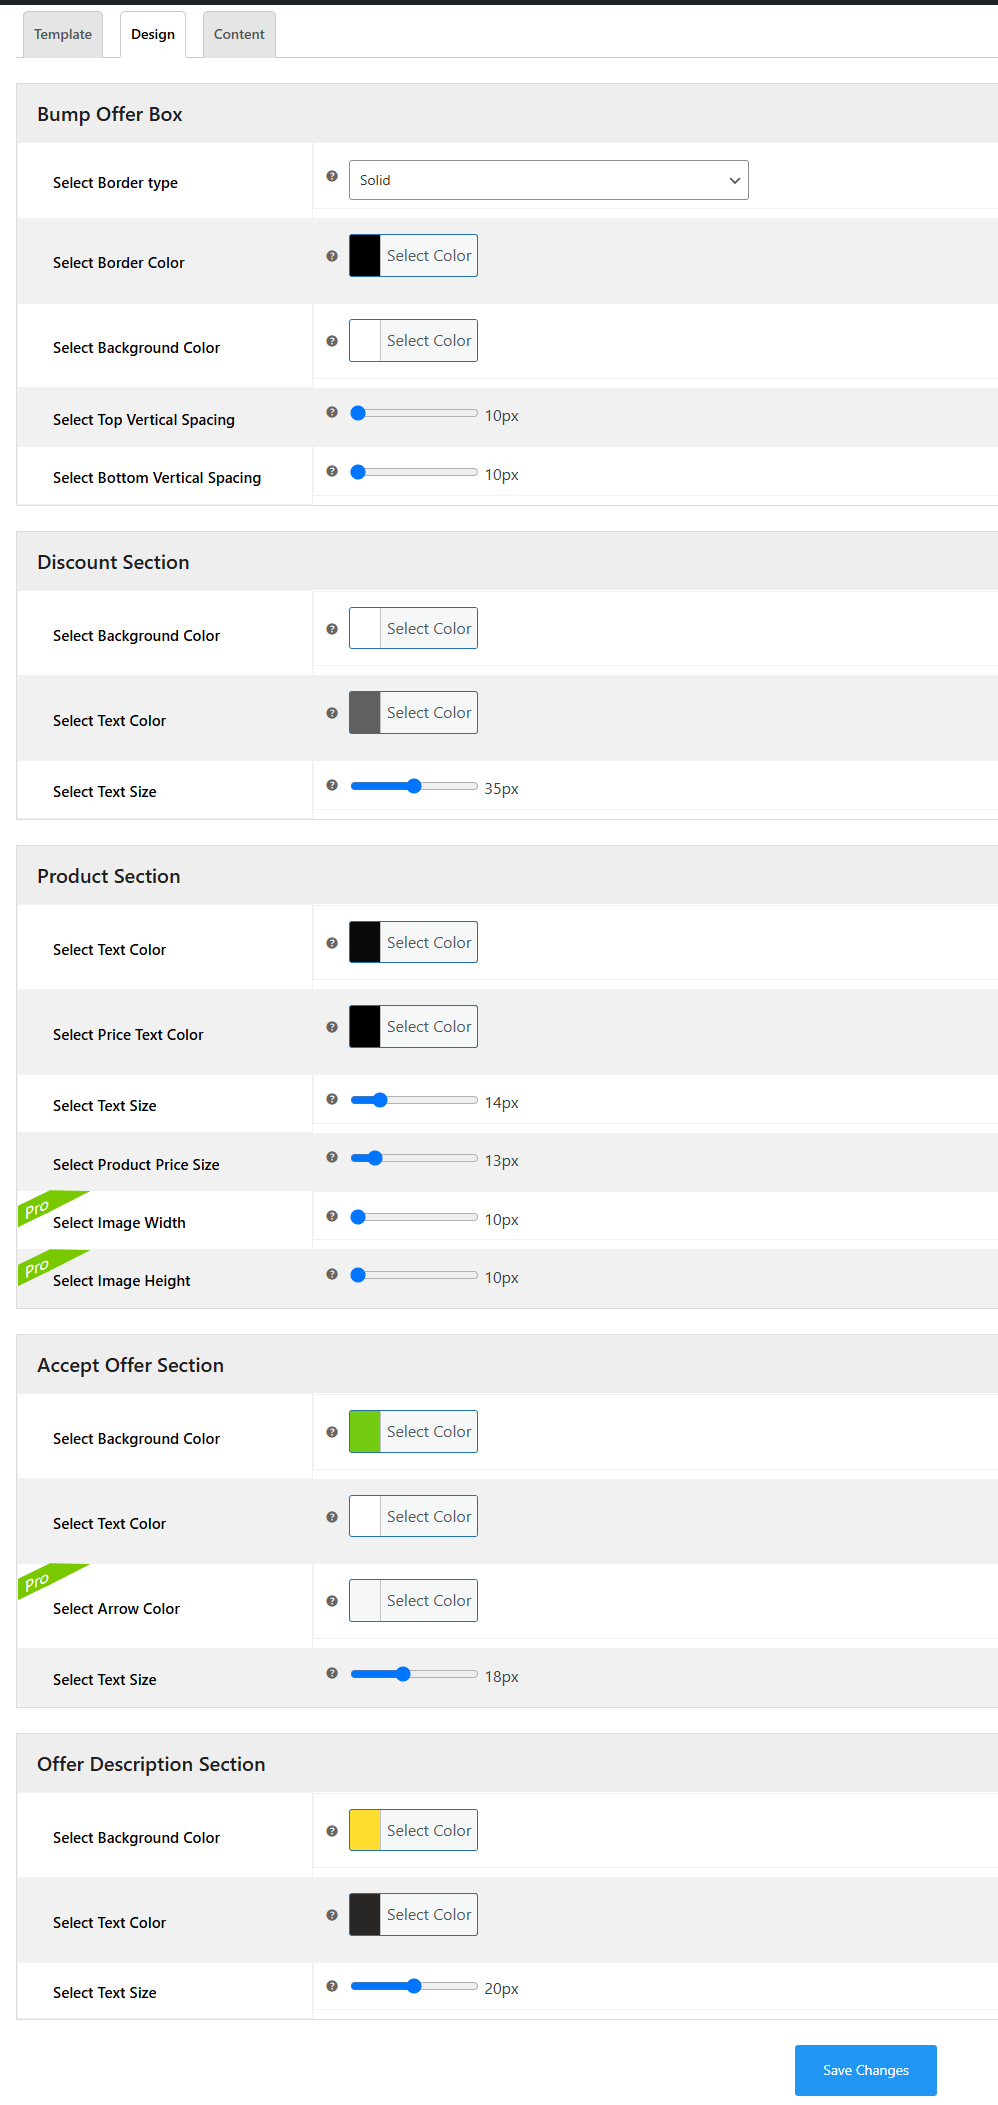
Yes, the offer templates are fully customizable. Admin of the site can change the following as per their needs.
- Offer Design
- Offer Size
- Offer Content
- Background color
- Text size
- Text color
- Timer of urgency
- Arrow pointer
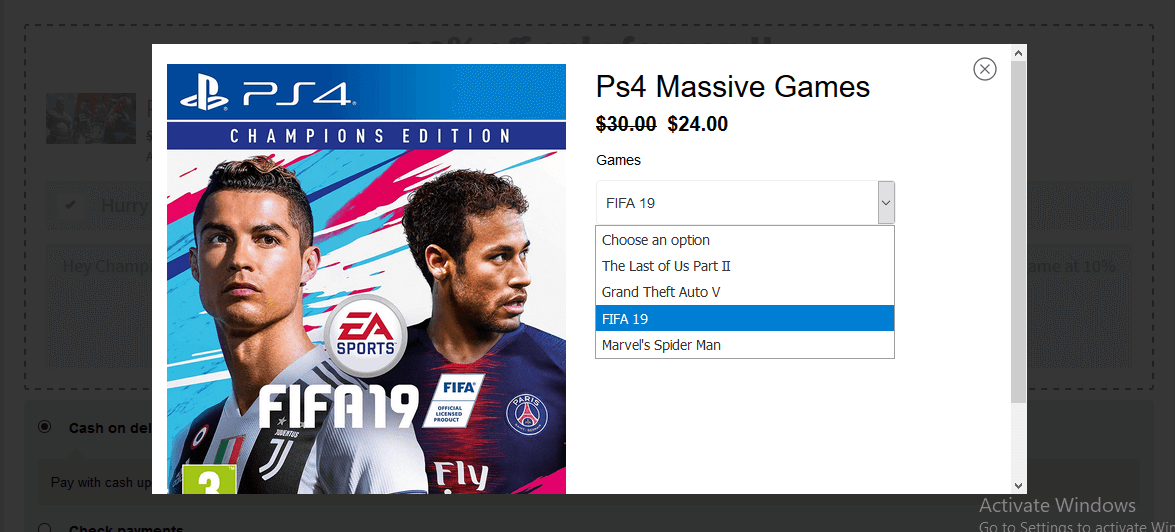
For variable offer products why there is no drop-down to select variation?
For a Variable Offer product as soon as the customer ticks the checkbox to accept the offer, a variation pop-up will appear with respective variations, variation product images, and offer prices.
Can I show more than one order bump on one page?
Yes, in the premium version of WooCommerce order bump, you can show more than one bump at a time. To set that go to Global settings and set the number of bumps you want to show like 2,3 or more.
Can I change the location where the offer should be shown?
Yes, you can change the location of the Order Bump Offer on the Checkout page. Here is the list of the available locations:
- Before Order Summary.
- Before Payment Gateways.
- After Payment Gateways.
- Before Place Order Button.
What happens if the customer has already added the product to the cart that I was going to show as a bump offer?
In this case, you can skip the bump offer. To do this, go to the “Global Settings” of our WooCommerce bump offer plugin. There you’ll find a feature named “Skip for Same Offers.” Click on the dropdown in front of it and select Yes and save changes. Now if a customer has added an order bump offer product in his cart, the plugin won’t show them the same product as the WooCommerce bump offer.
What happens to the bump offer product if the customer removes the target product from the cart?
In this case, you get two options. Either remove or keep the offered product in the customer's cart. To do this, you need to go to the Order Bump Upsell plugin’s 'Global Settings' > 'Offer Target Dependency' feature, you’ll see two options here: “Remove offer when target product is removed” – As the Target product is removed the offer product associated with the target will also be removed from your customer's cart. “Keep offer when target product is removed” – As the Target product is removed the offer product associated with the target will be converted into a normal product in your customer's cart.
Can I offer subscription products as Order bumps?
Yes, our plugin supports Simple, Variable, and Subscription products.
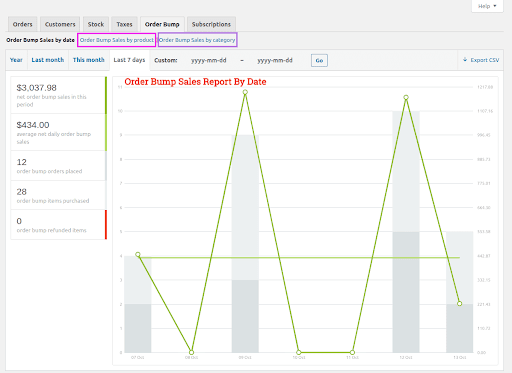
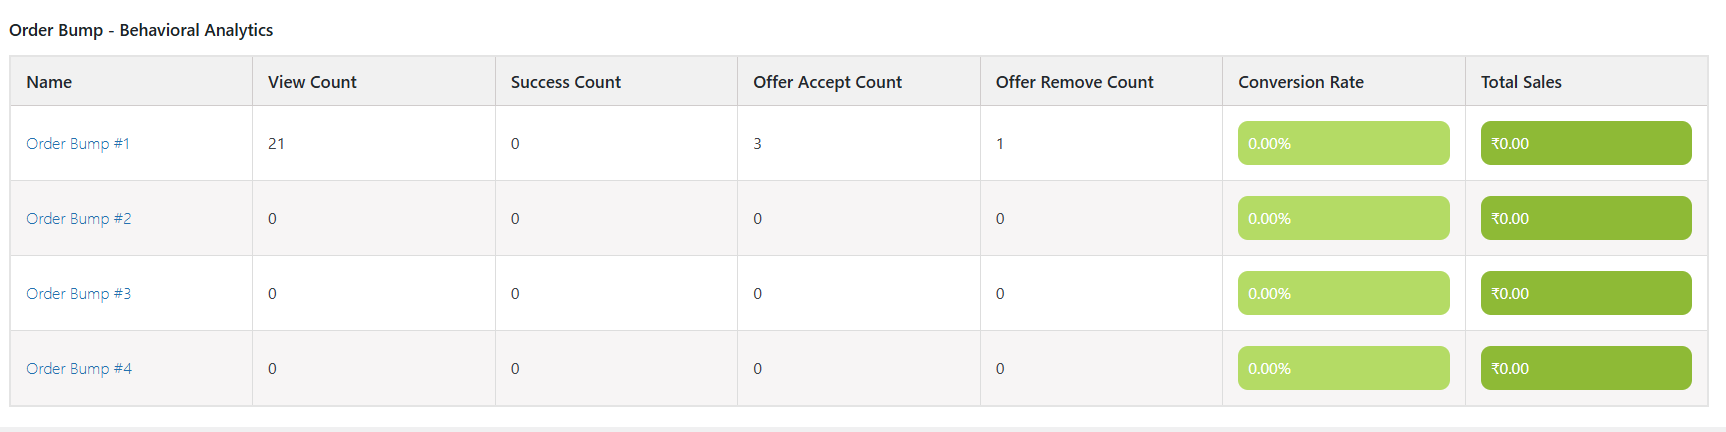
Can I track the performance of my Order Bumps?
Yes, we have Order Bump – Behavioral Analytics that shows Individual Order Bump Performance metrics such as View Count, Success Count, Offer to Accept Count, Offer to Remove Count, Conversion Rate, and Total Sales. With the help of these metrics, you can easily figure out how your Order Bumps are performing and make changes accordingly.
I installed an upsell plugin, created funnels, and added the offers too but still, it does not show up on purchasing the funnel targets.
If the upsell offers are not showing, make sure the:
- You’ve enabled the One-Click Upsell funnel plugin. Navigate to Global Settings and enable the plugin if it is disabled.
- Your funnel is not in Sandbox Mode. If it is, edit the funnel and make it Live, and Save Changes.
- You are testing for the correct target product or category you’ve set in the funnel builder.
- The offer page is published.
- You’re making the payment through one of our supported payment gateways. The offer will not be displayed if you make payments through a payment gateway not supported by our plugin.
- Make sure you have selected any one of the following sales funnel templates or made your own custom template and inserted a page link.
My Question is Not Listed.
Please visit WooCommerce Order Bump Knowledge Base
更新日志:
- New: Compatibility with the latest WP 7.0 and WC 10.8.1
- Fix: Refactored base price retrieval to use WooCommerce parent product price API.
- New: Compatibility with the latest WP 6.9.4 and WC 10.7.0
- New: UI/UX layout changes
- New: New funnel builder template
- New: Compatibility with the latest WP 6.9.4 and WC 10.6.1
- New: New responsive order bump templates with standard theme compatibility.
- Enhancement: 'Clone' feature for upsell funnel listing.
- New: compatibility with the latest WP(6.9.1) and WC(10.5.2).
- New: Compatibility With Points and Rewards Plugin
- Enhancement: New smooth UI/UX layout change.
- New: Import and Export of Order Bump and Upsell Funnels.
- Enhancement: React component based order bump and upsell analytic section.
- New: Compatibility with latest WP(6.9.0) and WC (10.4.3).
- New: Multiple Popup Types & Templates – lightbox popups, slide-ins, full-screen welcome mats
- New: Advanced triggered rules to triggering funnel / bump
- New: Compatibility with the latest WP 6.9 and WC 10.4.2
- New: multi-conditional-based funnel and bump visibility.
- New: Compatibility with the latest WP 6.8.3 and WC 10.3.5
- Fix: Deprecate issue fixes.
- New: Add labels to the post and pre-funnel offer
- New: Compatibility with the latest WP 6.8.2 and WC 10.1.2
- Enhancement: Pictorial Representation of the post and pre-funnel report
- Enhancement: UI upgrade of A/B Testing Report
- New: Compatibility with WordPress 6.8.2 and WooCommerce 10.1.2
- New: Compatibility with the WooCommerce Cart Abandonment Recovery plugin.
- Enhancement: Offer notice placement changes and banner updates
- New: Compatibility with WordPress (6.8.2) and WooCommerce (10.0.4)
- Fix: Product Edit Tab Switch Condition.
- Enhancement: Improved license handling code for the Pro version.
- New: Added an Admin UI tab for the "Features" section.
- New: Compatibility with WordPress (6.8.1) and WooCommerce (9.9.4).
- New: Compatibility with WordPress (6.8.1) and WooCommerce (9.8.5).
- New: Compatibility with WordPress (6.8.1) and WooCommerce (9.8.4).
- New: Compatibility with WordPress 6.8 and WooCommerce 9.8.2.
- Enhancement: Improved template appearance on Cart and Checkout pages.
- New: Latest WP (6.7.2) and WC (9.7.1) compatibility
- New: Funnel Schedule
- New: Global Funnel
- New: Exclusive Offer
- New: Smart Offer Upgrade
- New: Pre-Designed Upsell Funnel Templates
- New: Funnel List
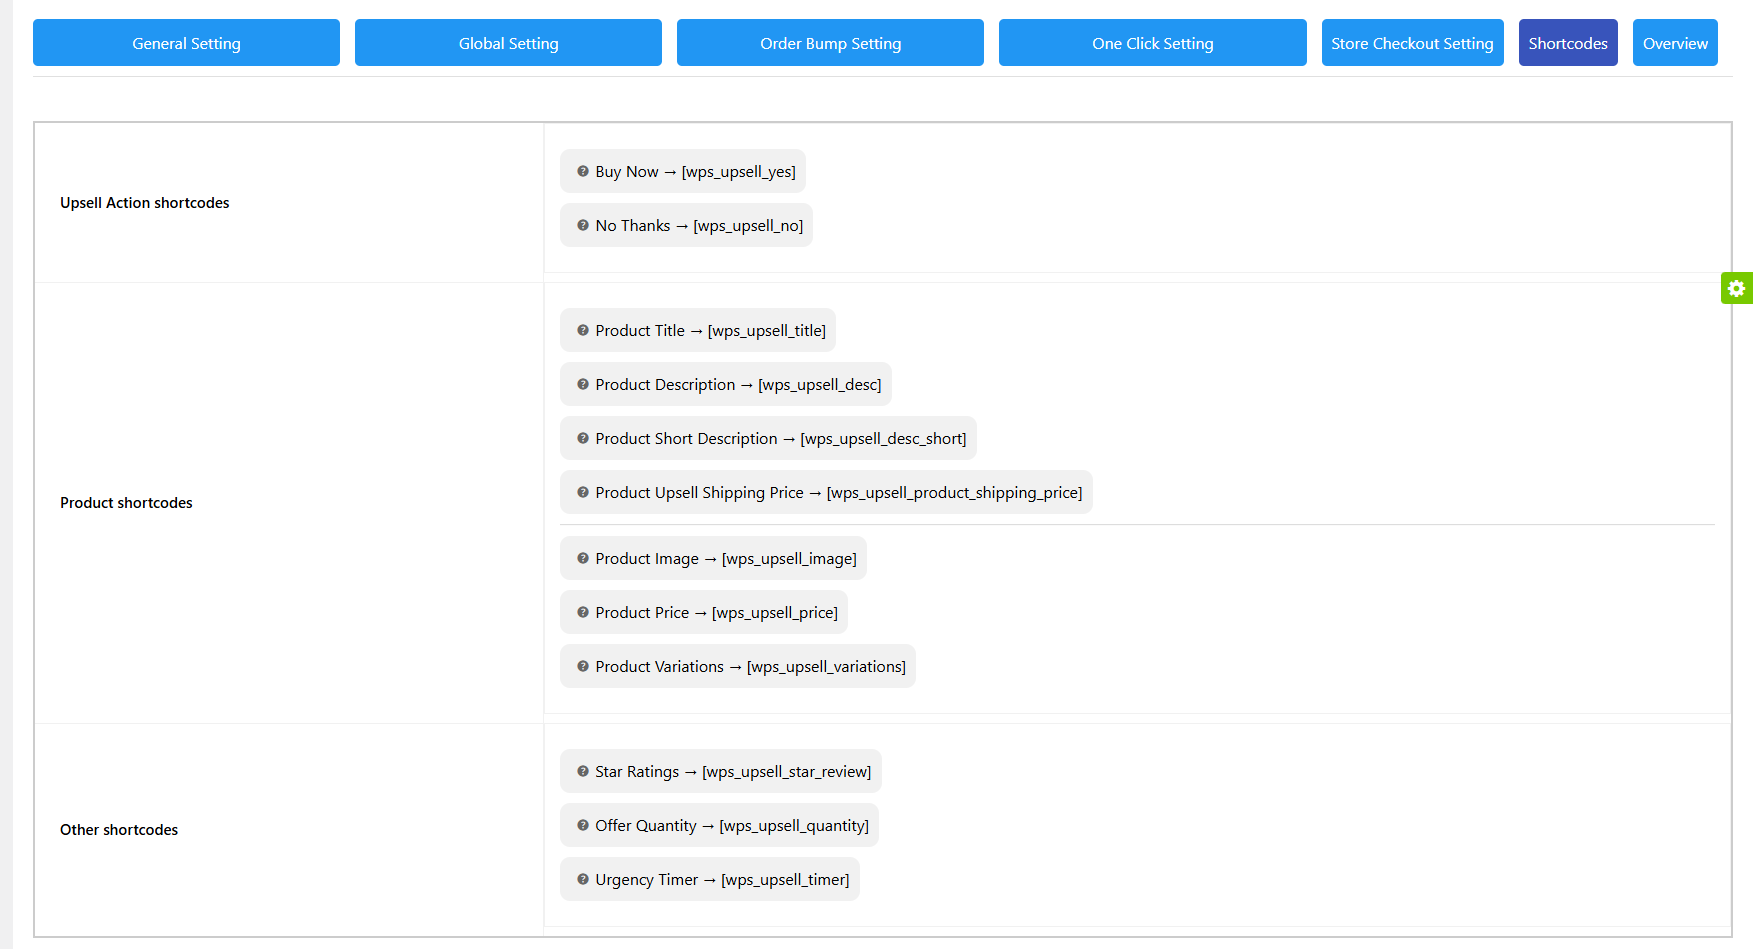
- New: One Click Upsell Shortcodes
- New: Payment Gateway Support
- New: Exit intent Popup for upsell funnel
- New: Global CSS and JS
- New: Dynamic Shipping Price on Upsell
- New: Upsell Sales Report Tracking
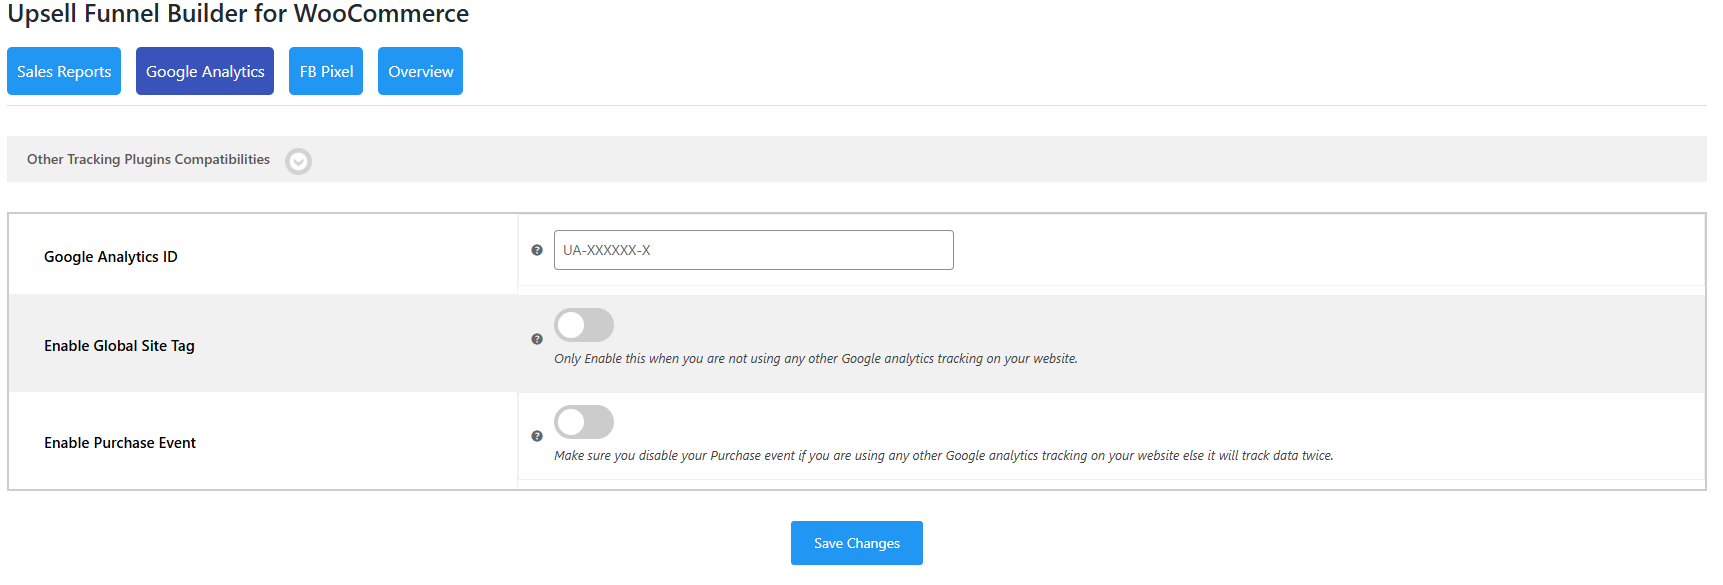
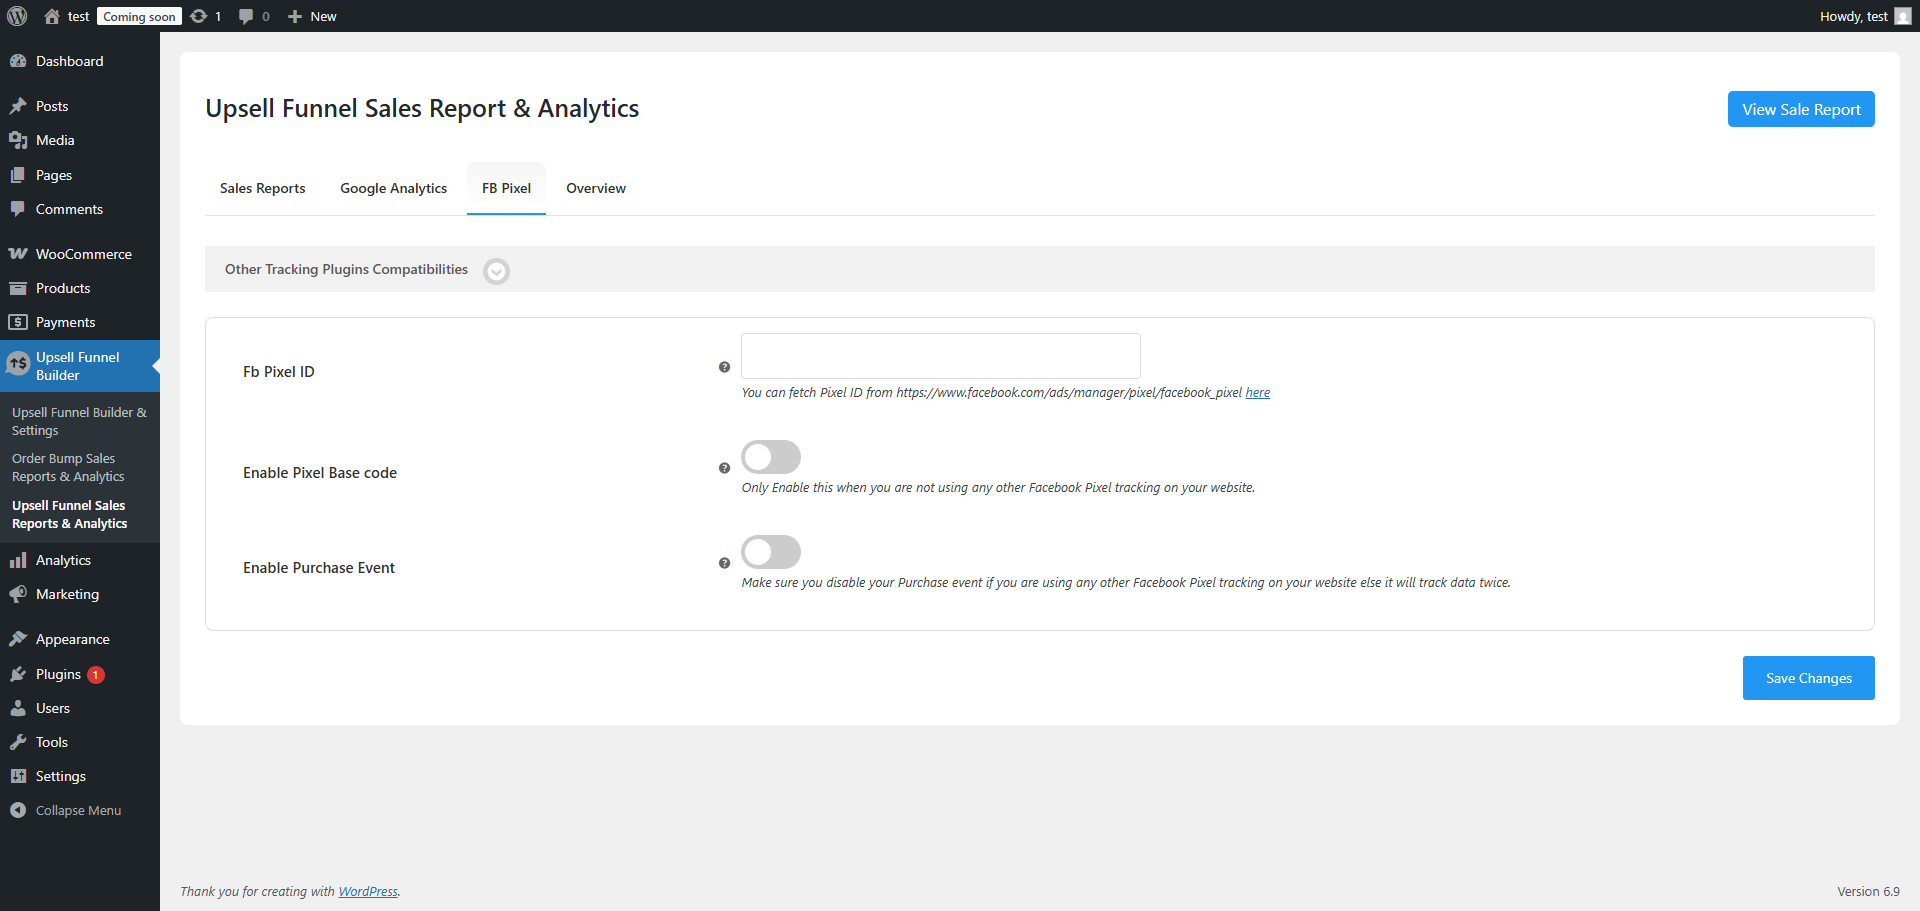
- New: GA4 and Facebook Pixel Tracking
- New: Product & Category Based Triggering
- New: Schedule Offers
- New: Upsell Templated Customization
- New: Page Builder Support.
- New: Latest WP (6.7.1) and WC (9.6.0) compatibility.
- Fixes: live bump features fixes.
- Fixes: WC coupon notification fixes.
- New: Compatibility with the side cart plugin.
- Fixes: Template layout fixes related to JS.
- New: Compatibility with the latest WP (6.7.1) and WC (9.5.1)
- New: Compatible with the Latest WP 6.6.2 and WC 9.3.3
- New: Compatibility with Direct Checkout for WooCommerce plugin by QuadLayers
- Fixes: Fixed console error on admin side.
- New: Compatible with the Latest WP 6.6.2 and WC 9.3.3
- New: Compatible with Latest WP 6.6.1 and WC 9.2.3
- Fix: Discount pricing issue on the template.
- Fix: New Template does not show during checkout.
- Fix: Checkbox unable to click on the template to add the product.
- New: Compatibility with latest WP (6.6.1) and WC (9.1.4).
- New: New Template For the Bump Offer
- New: Compatibility with WP (6.5.4) and WC (9.0.0)
- Fixes: Offer not show "Before Payment Gateway" location on checkout.
- New: Compatibility with WP (6.5.3) and WC (8.9.0)
- New: Compatibility with WP (6.5.2) and WC (8.8.3)
- Added: Banner Image in Overview Section
- New: AB testing.
- Support: Compatibility Latest WP (6.4.3) and WC (8.6.1)
- Fixes: UI/UX of admin backend.
- Added: Adding subscription notices.
- New: Shortcode for order bump.
- New: New template For order Bump
- New: Compatibility With Latest WP(6.4.2) and WC(8.5.1)
- Support : Compatibility With Latest WP(6.4.1) and WC(8.3.1)
- Support : Compatibility With Cart and Checkout Block.
- Enhancement: Work Of the all Popup (PRO)
- New: Compatibility with WP(6.3.2) and WC(8.2.1)
- Fixes: WC Session Issue On Creating Order Manually.
- Support: HPOS Compatibility.
- Support: Compatibility With Latest WP(6.3.1) and WC(8.1.1)
- New: Set any page as an order success page.
- Fixes: Issue with the Divi theme.
- New: Compatibility with WP(6.3.0) and WC(8.0.2)
- New : Compatibility with WP[6.3] and WC[8.0.0]
- Fix: Issue regarding the Recommendation popup
- New: Compatibility with latest WP(6.2.2) and WC(7.9.0)
- New: compatibility with latest WP(6.2.2) and WC(7.7.2)
- New: Compatibility with Checkout WC
- Fixed: Enhancement work of template
- New: Compatibility with Latest WP(6.2.0) & WC(7.6.1).
- Fixes: Minor bug fixes over the checkout page.
- Enhanced: Change the popup set to the radio button- global.
- New: WPML Compatibility.
- New: Compatibility with latest WP(6.1.1) and WC(7.5.1).
- Fixes: Pop-up Issue on the checkout page.
- New: Compatible with the latest WP (6.1.1) and WC (7.4.1)
- New: Compatible with the latest WP and WC
- New: Compatible with the latest WP and WC
- Enhancement: Changed the Countdown Offer Location on Admin Setting.
- Enhancement: Show pro features in a free version with an upgraded label [Appearance section].
- New: To Change the Offer Price size and color individually.
- New: Compatible with the latest WP and WC
- Fix: Decimal Point Issue Of Product Price.
- Fix: Issue Of Offer Price Format.
- Fix: Improved the compatibility with PHP 8
- New: Compatible with the latest WP and WC
- Fixed: No discount Price Feature
- Fixed: Theme Compatibility.
- New: Minor Bug fixes and Enhancement
- New: Compatible with the latest WP and WC
- New: Minor Bug Fixes
- New: Compatible with the latest WP and WC
- New: Minor Bug Fixes
- New: Compatible with the latest WP and WC
- New: Offer background color now customizable
- New: Minor Bug Fixes
- New: Compatible with the latest WP and WC
- New: Some substantial changes across different areas of the plugin.
- New: Minor Bug Fixes
- New: Compatible with the latest WP and WC
- New: Some substantial changes across different areas of the plugin.
- New: Minor Bug Fixes
- New: Compatible with the latest WP and WC
- New: Notice display of current version for WP Swings
- New: Minor Bug fixes
- New: Compatible with the latest WP and WC
- Variation products bug fix
- Role-based skip order bump
- Single product page link
- Delete data on uninstall
- Custom product image
- Bug Fixes
- Compatibility with Subscriptions For WooCommerce
- Compatibility with MWB Role Based Pricing for WooCommerce
- Compatibility with Ultimate Gift Cards For WooCommerce
- Improved: Compatibility with latest WP(5.8.1) and WC(5.6.0)
- Improved: Compatibility with latest WP(5.6) and WC(4.8.0)
- Improved: Compatibility with latest WP(5.5.3) and WC(4.7.0)
- Improved: Onboarding handling.
- New: Compatibility with Subscription products.
- New: Order Bumps Reporting and Behavioral Analytics.
- Improved: Better Security and Performance.
- Other: Issues and Bugs Fixed.
- New: Compatibility with the latest WordPress and WooCommerce.
- Other: Issues and Bugs Fixed.
- New: Select Offer Price format for Order Bumps
- New: Apply Global Custom CSS and Global Custom JS
- New: Added Compatibility with popular Checkout plugins
- Improved: Design Compatibility with popular themes
- Improved: Schedule Order Bumps on Multiple Weekdays
- Other: Issues and Bugs Fixed.
- Improved: Added multiple themes compatibility.
- First version