Vigilant - 100% Free Security Suite: Firewall, 2FA, Login, Headers, Scanner…
| 开发者 |
fernandot
ayudawp |
|---|---|
| 更新时间 | 2026年5月10日 23:41 |
| PHP版本: | 7.4 及以上 |
| WordPress版本: | 7.0 |
| 版权: | GPL v2 or later |
| 版权网址: | 版权信息 |
标签
下载
详情介绍:
- Firewall rules against common attacks (SQL injection, XSS, file inclusion)
- Security headers for browser protection
- Login attempt monitoring
- XML-RPC blocking
- WordPress version hiding
- Sensitive file protection (.htaccess, wp-config.php)
- Automatic backup of your existing configuration files
- JavaScript challenge - Every visitor must pass an automatic browser verification before accessing your site. Real browsers solve it in seconds, bots get blocked completely
- Aggressive rate limiting - Requests limited to 30 per minute with 15-minute blocks for offenders
- HTTP method restriction - Only GET, POST, and HEAD allowed. PUT, DELETE, PATCH, OPTIONS, and TRACE are blocked
- Empty user agent blocking - Requests without a user agent header are rejected
- Full XML-RPC lockdown - All XML-RPC access is blocked during the attack
- REST API restriction - Only authenticated users can access the REST API
- Auto-deactivation - Mode automatically turns off after 4 hours so you never forget it's on
- Email notifications - Get notified when the mode is activated and deactivated
- HMAC-signed cookies - Verified visitors receive a cryptographically signed cookie so they only see the challenge once
- Authenticator app (TOTP) - Google Authenticator, Authy, Microsoft Authenticator, or any TOTP-compatible app
- Email codes - One-time 6-digit verification codes sent via email
- QR code setup directly in user profiles
- 10 backup codes for emergency access if you lose your device
- Configurable grace period for users to set up their authenticator app
- Trusted devices feature - optionally allow users to skip 2FA on recognized devices for 30 days
- Role-based enforcement - require 2FA for administrators, editors, or any role
- Exclude specific users from 2FA requirements
- Admin tool to reset TOTP for users who lost their authenticator
- Configurable code expiry, attempt limits, and email sender name
- User notification emails when 2FA is enabled or method changes
- SQL injection blocking
- XSS (Cross-Site Scripting) attack prevention
- File inclusion protection (LFI/RFI)
- Directory traversal blocking
- Bad bot detection and blocking
- Rate limiting against DDoS and brute force
- IP whitelist and blacklist management
- User-Agent whitelist and blacklist with partial matching
- HTTP method restriction
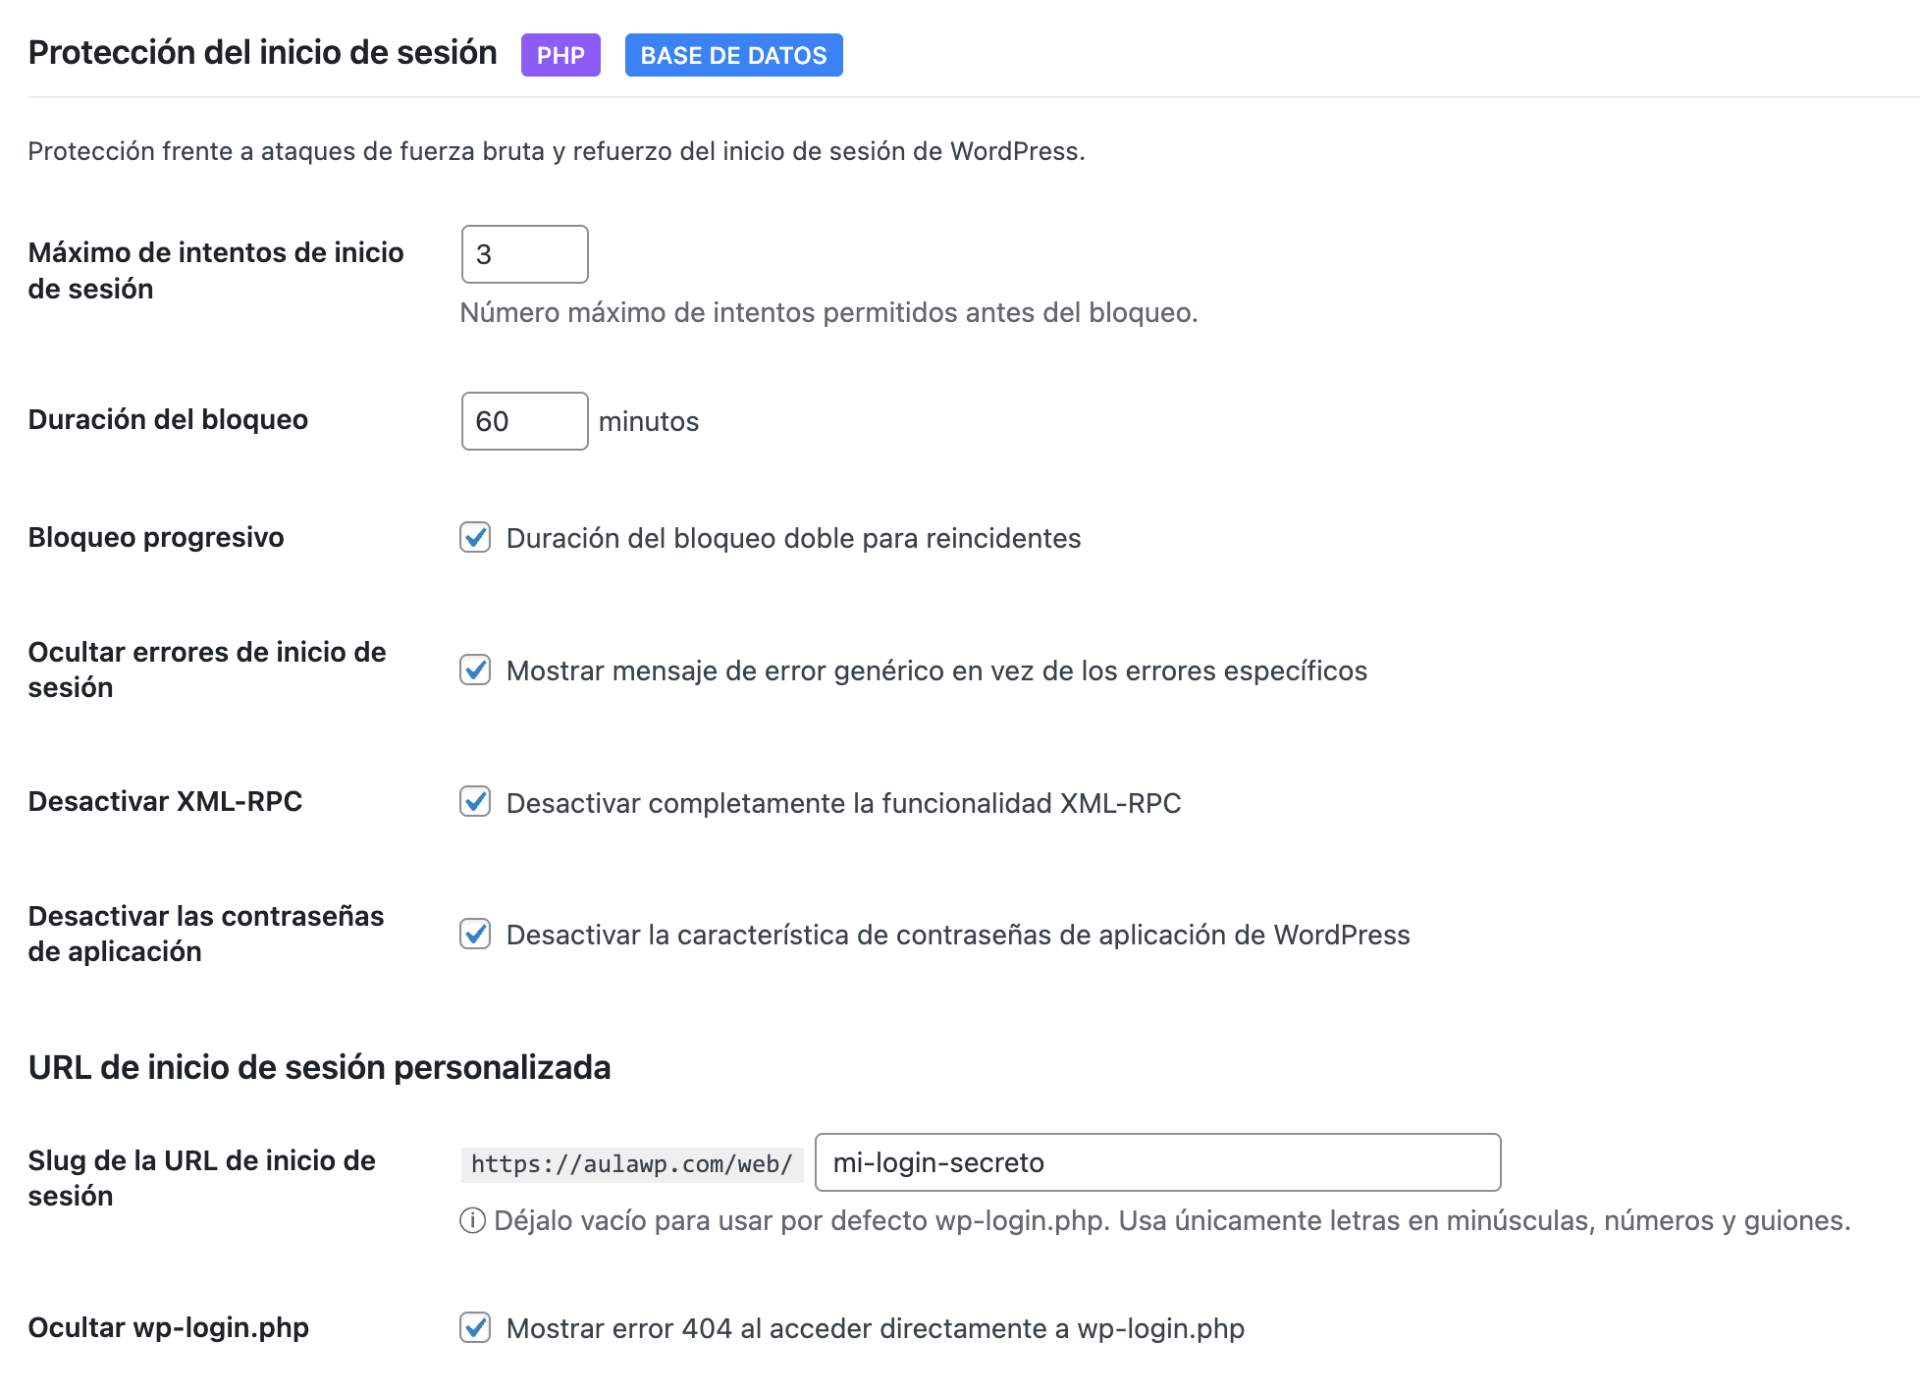
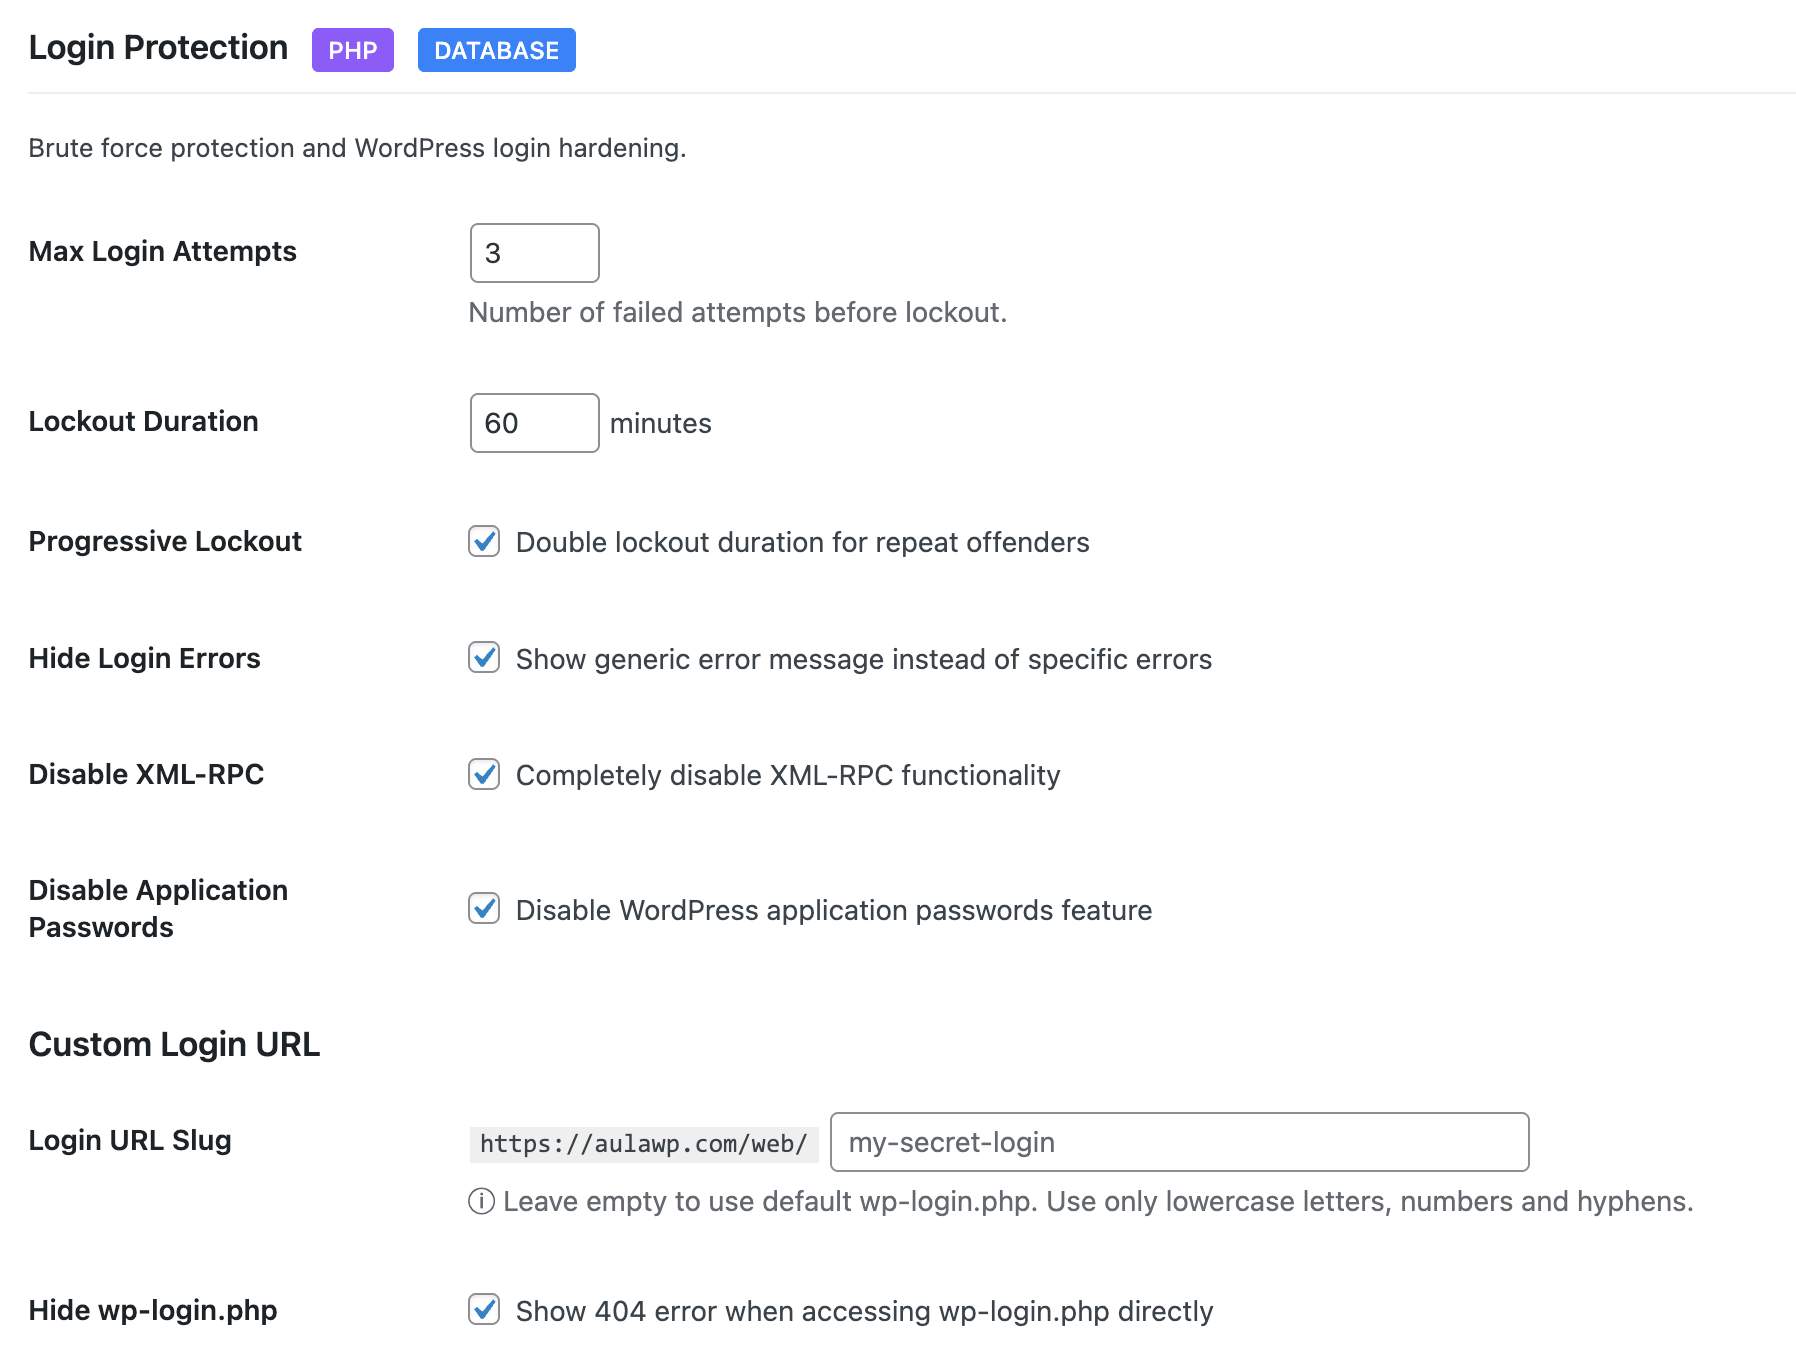
- Limit login attempts with configurable thresholds
- Progressive lockouts - longer blocks for repeat offenders
- Custom login URL - hide wp-login.php from bots
- Login URL change notifications to all admin-area users
- Hide login error messages - don't reveal valid usernames
- XML-RPC disable - block this common attack vector
- Application passwords control
- Admin login notifications via email
- IP whitelist for trusted locations
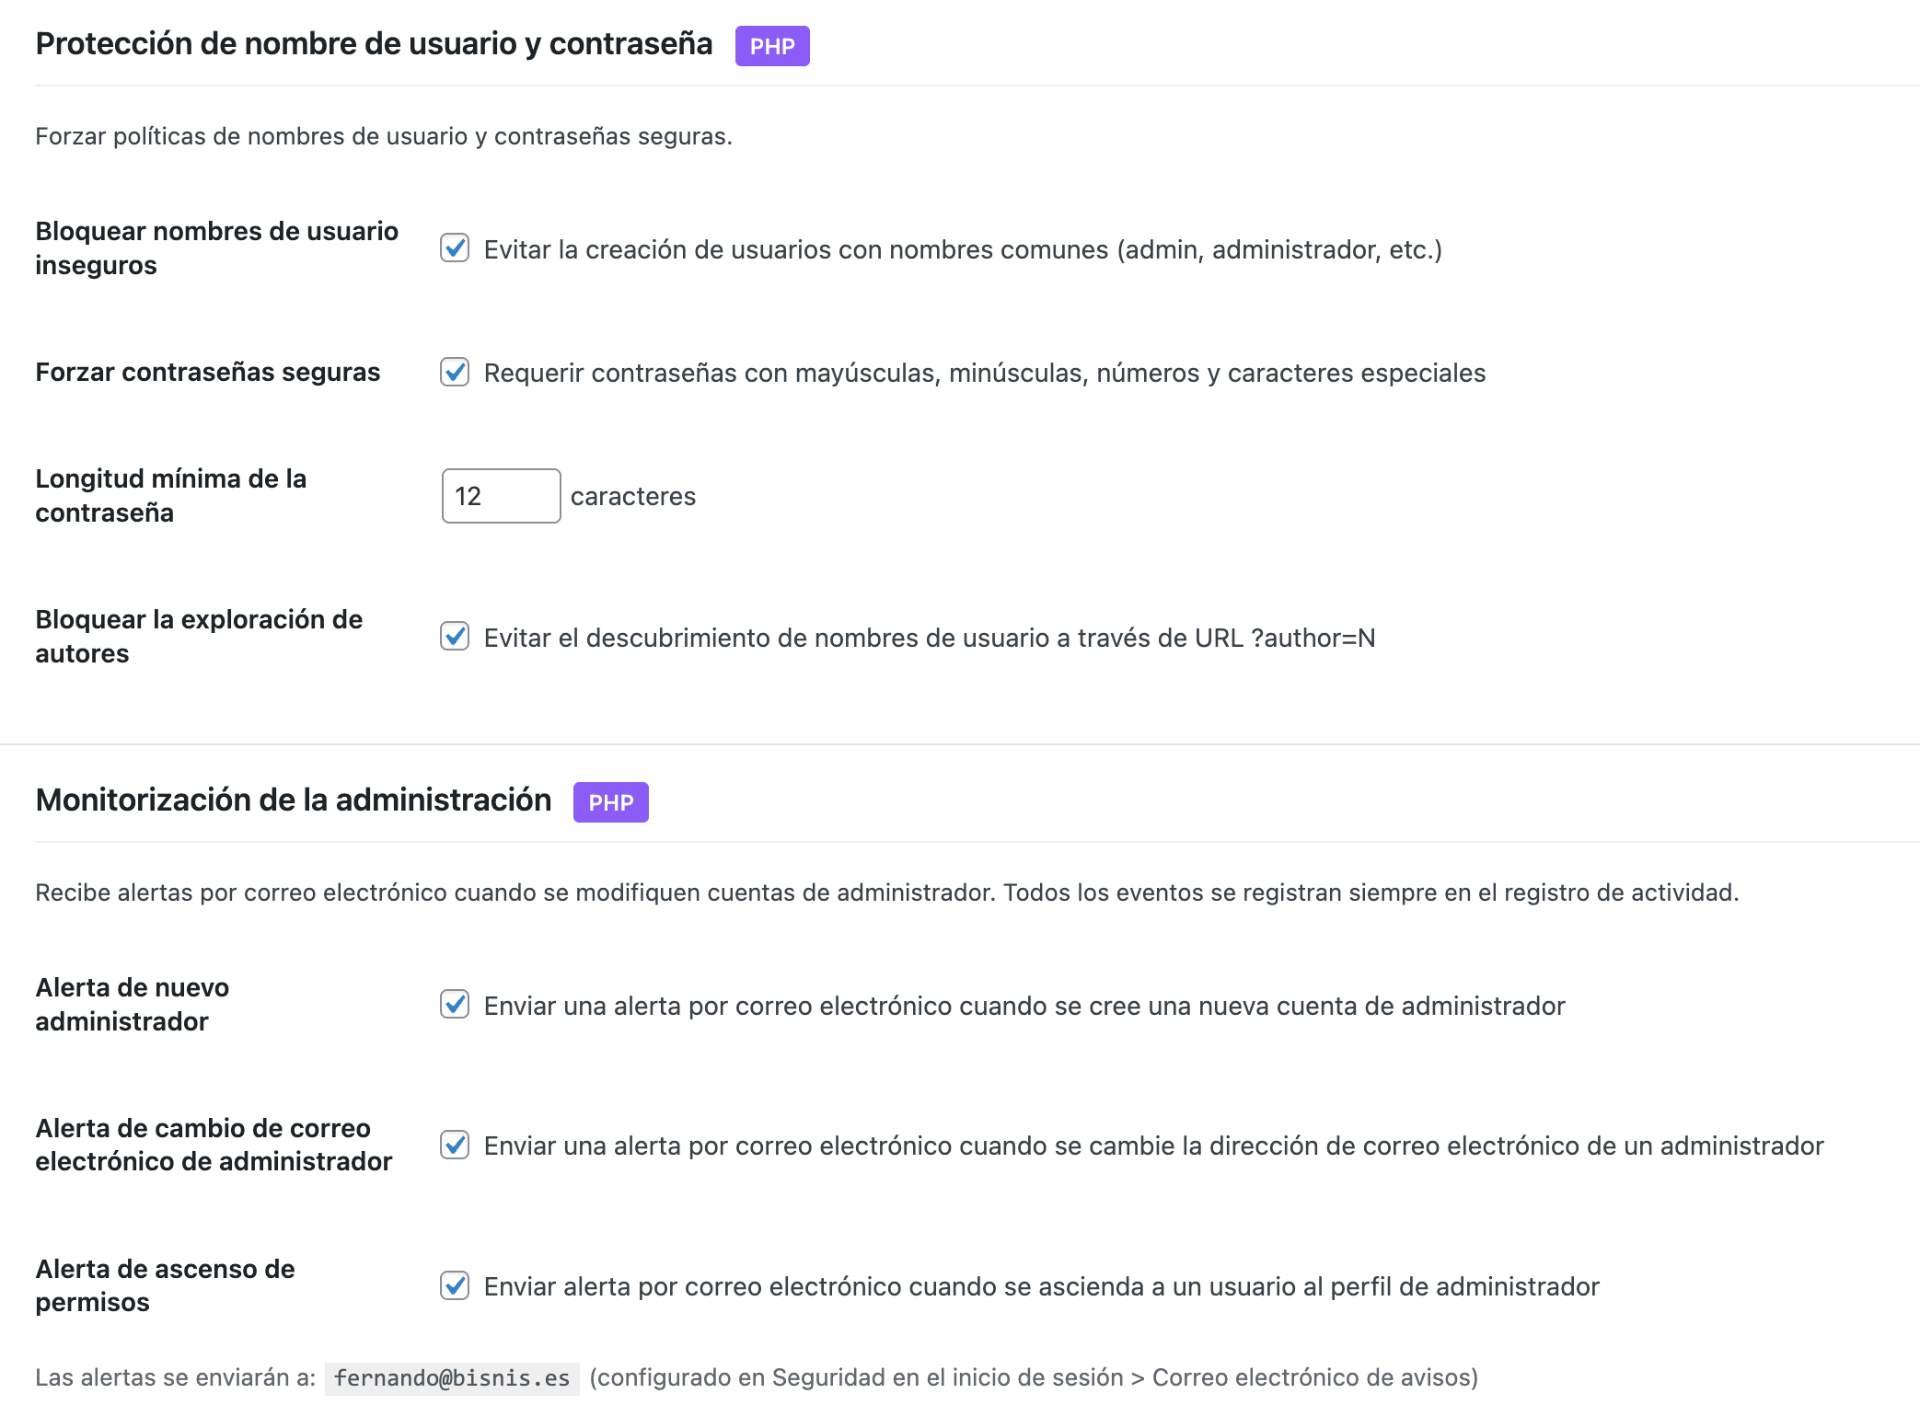
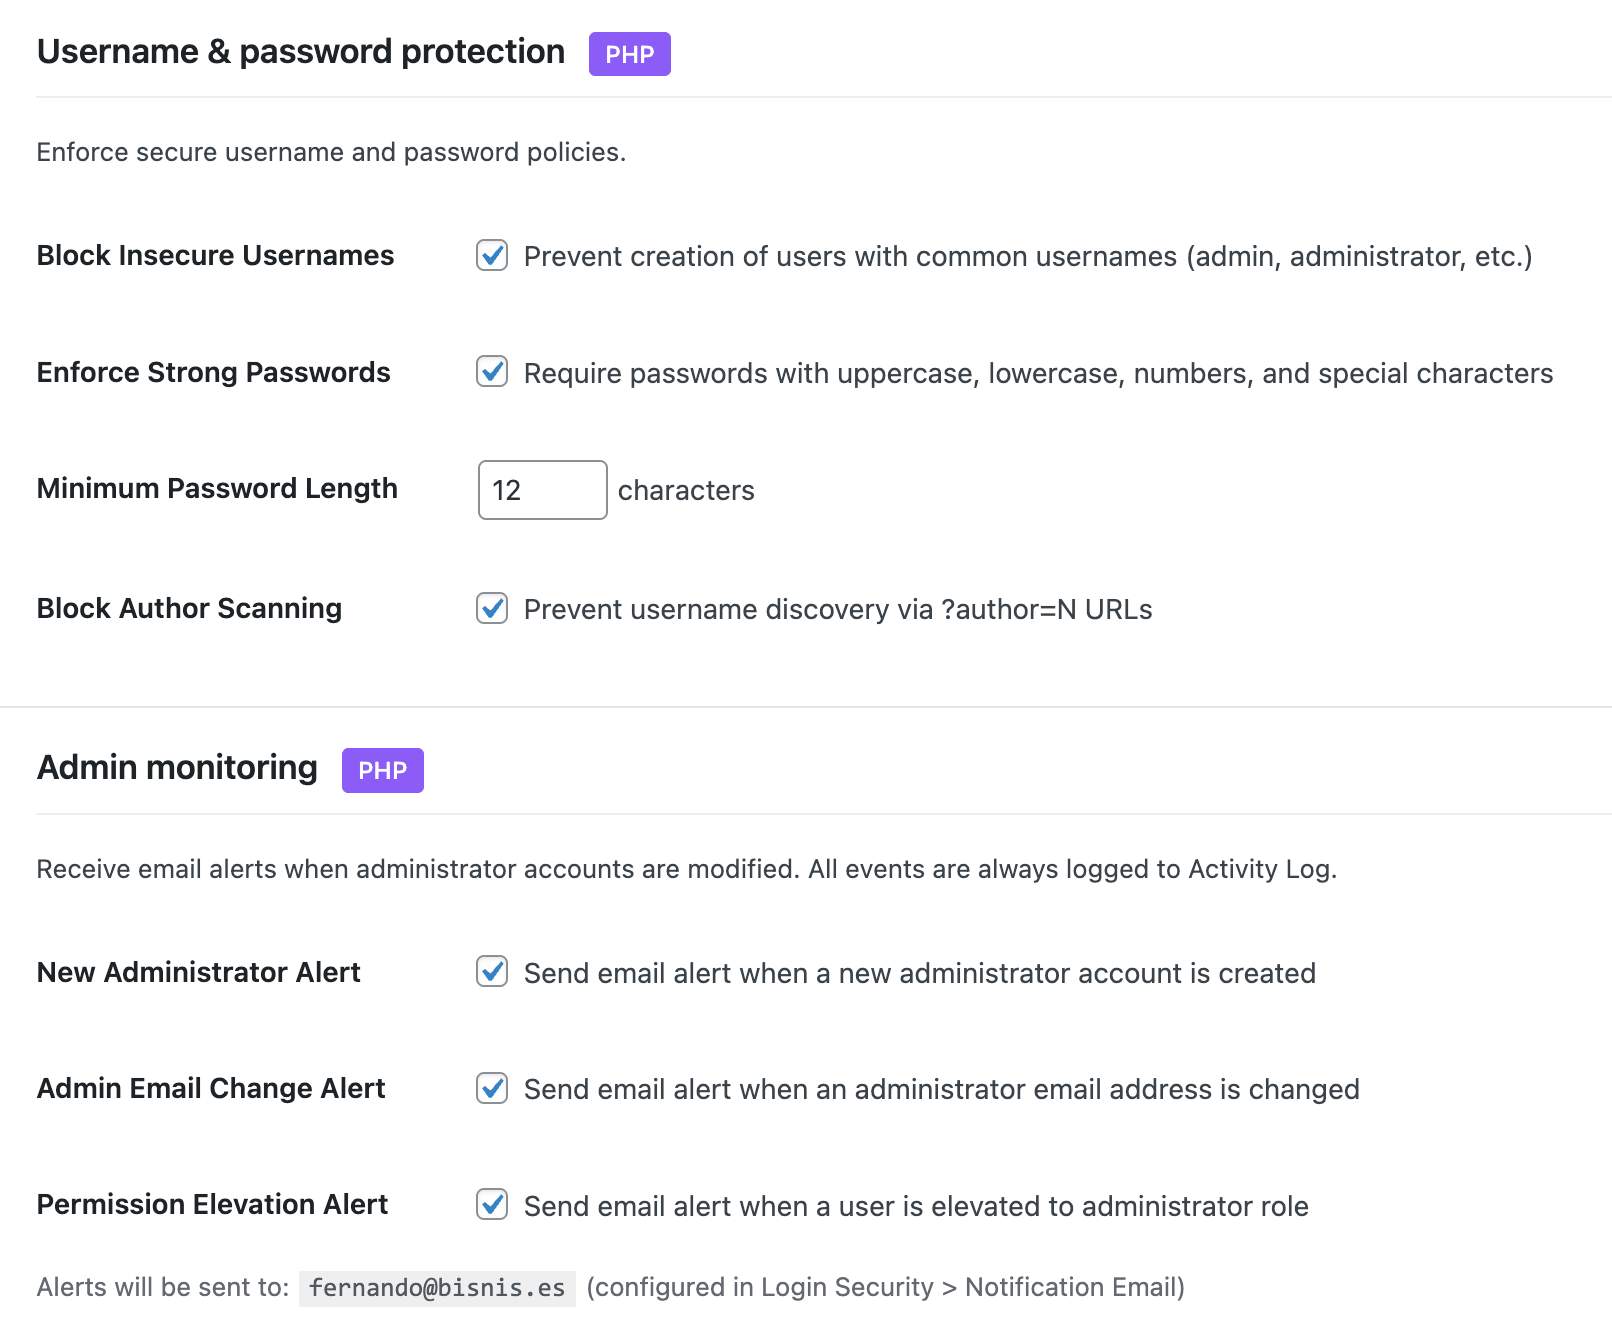
- Block insecure usernames (admin, test, root, etc.)
- Force strong passwords with minimum length
- Password expiration with configurable intervals
- Password history - prevent reusing old passwords
- Force password reset — by specific users, by role, or all users (post-hack recovery)
- Session limits - control concurrent logins per user
- Session management - view and revoke active sessions
- Email verification for new registrations
- Registration approval workflow - manually approve new users
- Admin account monitoring - alerts for new admins, email changes, password changes, privilege escalation
- Display name protection - prevent exposing login username publicly
- Content Security Policy (CSP) with visual builder
- HSTS (HTTP Strict Transport Security) with preload option
- X-Frame-Options - prevent clickjacking
- X-Content-Type-Options - prevent MIME sniffing
- Referrer Policy control
- Permissions Policy (camera, microphone, geolocation)
- Cross-Origin policies (COEP, COOP, CORP)
- HTTPS enforcer with automatic mixed content fix
- Built-in header testing tool
- WordPress core verification against official checksums
- Plugin and theme file monitoring with WordPress.org checksums
- Critical config files (wp-config.php, .htaccess) monitored against baseline — detects code injection even in files with no official checksum
- Line-level diff view of changes, with per-file approval workflow
- Suspicious code scanning for plugins and themes without checksums
- Extra file detection in plugins and themes (files not in original distribution)
- Two-level detection: strict obfuscation combos for plugins, broad patterns for uploads
- Uploads directory scanning for PHP files, double extensions, and .htaccess
- Root directory scanning for non-core PHP files (common attack vector)
- Smart .htaccess classification in uploads - distinguishes dangerous rules from protective ones
- String concatenation obfuscation detection
- Configurable notification levels (all issues, suspicious only, or disabled)
- Ignore list to dismiss known files from results
- Excluded paths and file extensions
- Scheduled automatic scans (daily, weekly)
- HTML formatted email alerts with severity sections
- Successful and failed login attempts
- Two-factor authentication events
- User account changes (creation, deletion, role changes)
- Content modifications (posts, pages)
- Plugin and theme activations/deactivations
- Security events and blocked threats
- HTTP request method tracking and filtering (GET, POST, PUT, DELETE)
- Enhanced log detail popup with grouped sections and quick actions
- One-click add IP or User-Agent to firewall whitelist/blacklist from log entries
- Direct IP lookup links to AbuseIPDB
- Configurable retention period
- Export logs to CSV
- Filter by event type, severity, request method, or date
- 40+ checks across 6 categories: SSL/TLS, HTTP Headers, WP Exposure, Access & Auth, Sensitive Files, and Internal Checks
- Single 0–100 score with A–E grade, plus per-category breakdown and explanatory details for every check
- 13 exclusive internal checks impossible from the outside: PHP end-of-life status, pending updates, inactive plugins, file permissions, default salts detection,
wp_table prefix,adminusername, administrators without 2FA enrolled, module status, recent audit errors, and last File Integrity scan result - DNS-only reputation lookup against Spamhaus ZEN, Barracuda BRBL and SpamCop SCBL (informational — listings are flagged but don't deduct from the score)
- Two-phase scan: fast local checks appear in under a second, remote checks stream in as they complete
- Weekly automatic scan with opt-in email alert if the score drops by 10+ points or a new critical check starts failing
- 30-scan history with sparkline trend and delta chip so you can see how changes to your site affect security over time
- "Go to setting" fix link on every failing check — jump straight to the exact Vigilant field that resolves it, with a visual pulse on arrival
- Smart header diagnostics report "configured but not being served" when a cache/CDN overrides your headers, instead of just marking it green or red
- wp-config.php security constants (DISALLOW_FILE_EDIT, etc.)
- WP_DEBUG detection - dashboard warning when debug mode is active in production
- Automatic removal of readme.html, license.txt, and licencia.txt (daily cleanup)
- Database prefix security check and one-click change tool
- Comment spam protection with honeypot fields
- Disable pingbacks and trackbacks
- Close comments on old posts
- WordPress head cleanup (remove version, RSD, WLW links)
- Feed management and security
- Three access modes: public, authenticated only, or selective
- Block user enumeration via REST API
- Protect sensitive endpoints
- Maintain compatibility with popular plugins (WooCommerce, Contact Form 7, Elementor)
- Database Backup - Download a full or partial database backup as ZIP with table selection
- Database Prefix Change - Change the default wp_ prefix to a random secure prefix
- Export/Import Settings - Transfer your configuration between sites
- Manual Backup - Create backups of .htaccess and wp-config.php on demand
- Reset to Defaults - Start fresh with one click
安装:
- Upload the plugin files to
/wp-content/plugins/vigilante/or install directly from the WordPress plugin repository - Activate the plugin through the 'Plugins' menu in WordPress
- Go to 'Vigilant' in the admin menu
- Apply a security preset or customize individual module settings
- WordPress 6.2 or higher
- PHP 7.4 or higher
- Apache or LiteSpeed server (for .htaccess features)
- SSL certificate recommended for HSTS
屏幕截图:


常见问题:
Will this plugin slow down my site?
No. Vigilant is optimized for performance. The firewall uses efficient pattern matching, database queries are cached with transients, and .htaccess rules execute at server level before PHP even loads.
What happens when I activate the plugin?
Vigilant immediately creates a backup of your existing .htaccess and wp-config.php files, then applies default security settings. All modules are enabled with balanced defaults suitable for most sites.
What happens when I deactivate the plugin?
All security modifications are automatically reverted. The .htaccess rules are removed, wp-config.php constants are restored to their original values, and scheduled tasks are cleared. Your site returns to its pre-Vigilant state.
How does two-factor authentication work?
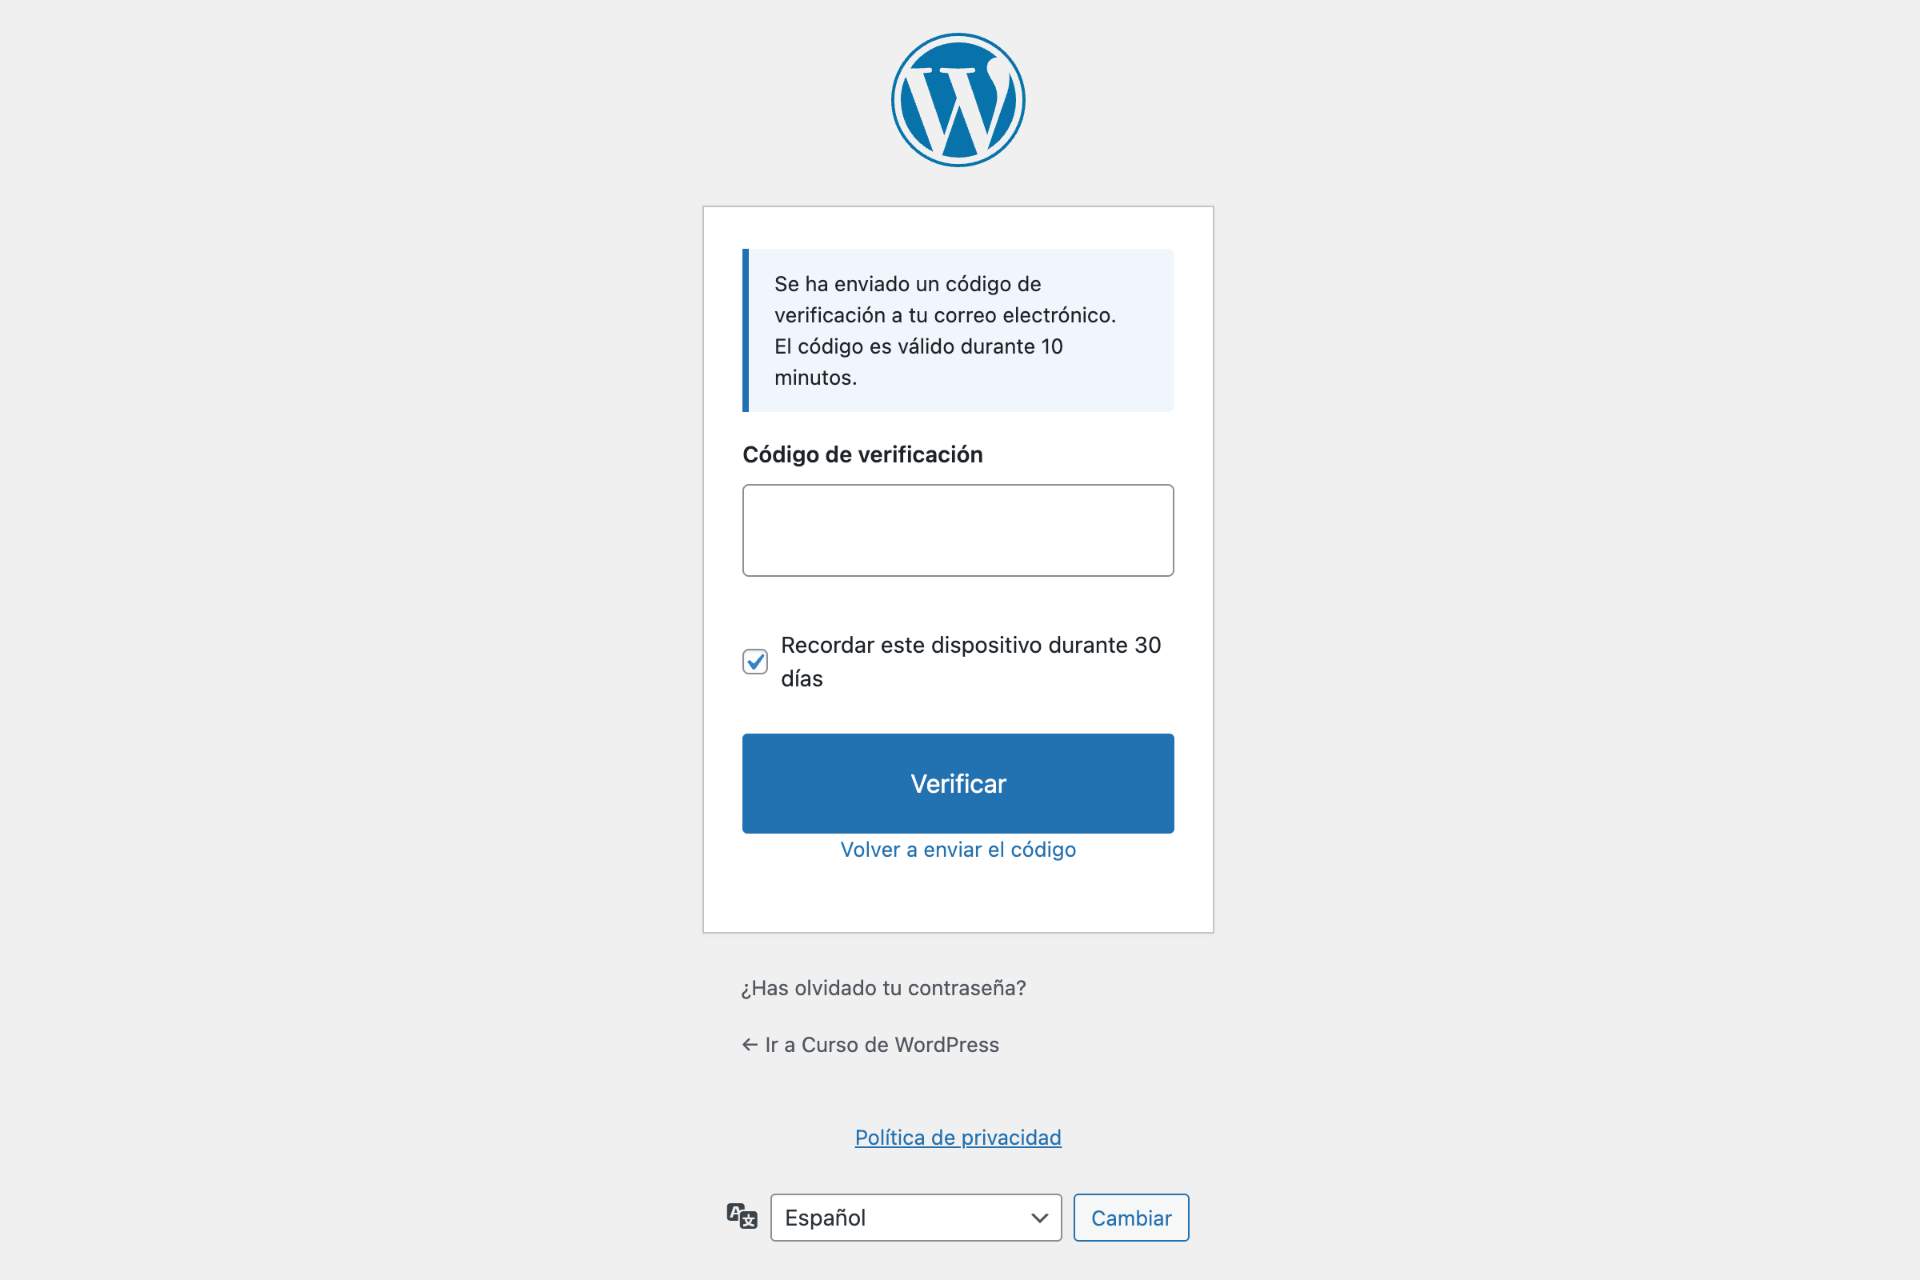
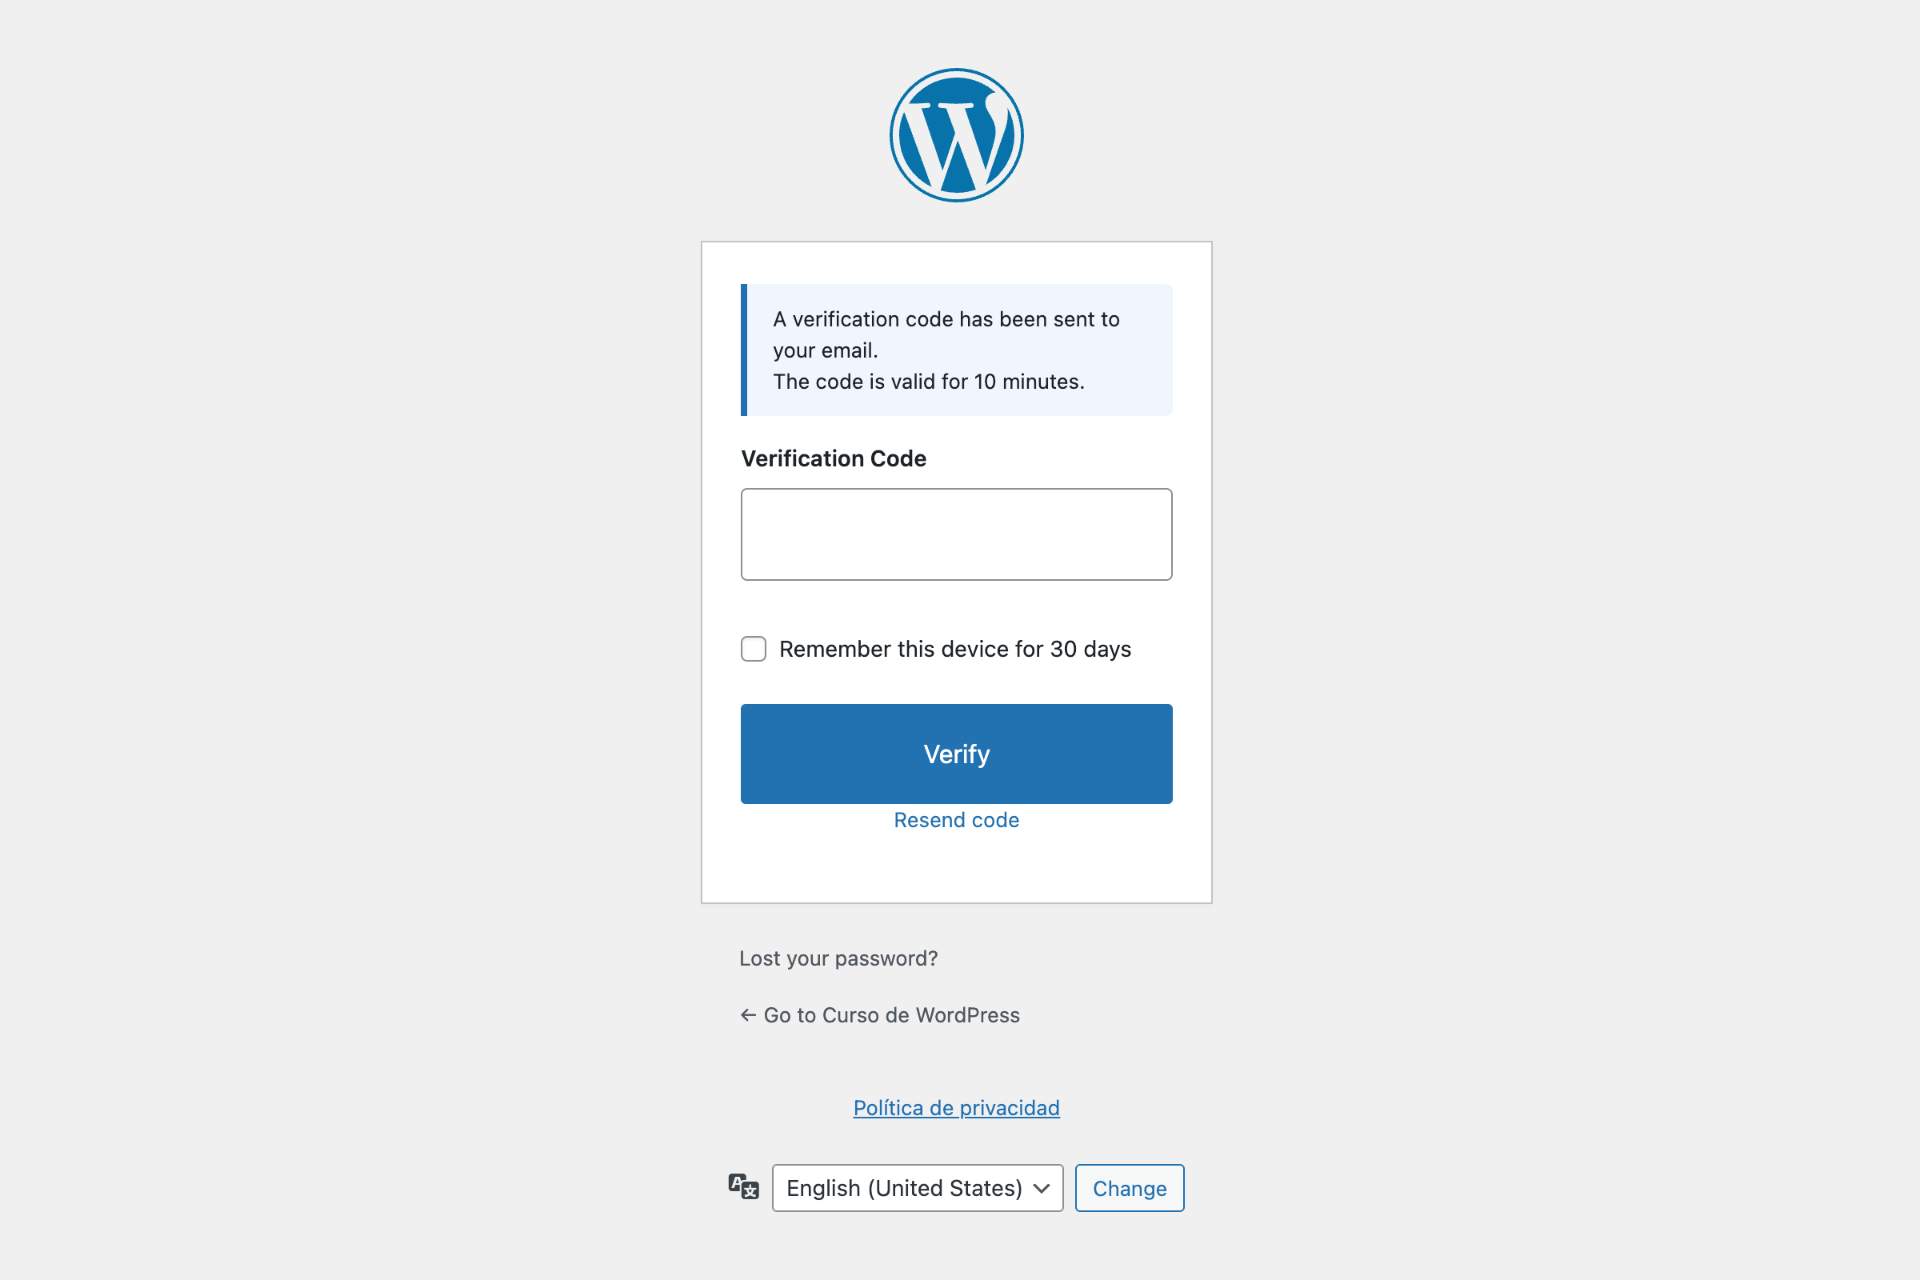
Vigilant supports two 2FA methods. With the authenticator app (TOTP), you scan a QR code in your profile to link an app like Google Authenticator or Authy, then enter a 6-digit code from the app on every login. With email codes, you receive a one-time code via email after entering your password. If enabled by the site administrator, you can mark your device as trusted to skip 2FA for 30 days.
What if I lose my phone or authenticator app?
When you set up TOTP, Vigilant generates 10 backup codes. You can use any of them as a one-time replacement for the authenticator code. If you run out of backup codes, an administrator can reset your TOTP from the plugin settings.
What if I don't receive the 2FA email code?
Check your spam folder first. You can click "Resend code" on the verification form. Codes expire after 10 minutes by default. If issues persist, an administrator can temporarily disable 2FA from the plugin settings.
Can I switch between email and authenticator app?
Yes. Go to Login Security > Two-Factor Authentication and change the verification method. If notifications are enabled, affected users will receive an email explaining the new method and how to set it up.
Which user roles require 2FA?
By default, 2FA is enforced for administrators and editors. You can customize which roles require 2FA in the Login Security settings, and exclude specific users individually.
How do I recover if I'm locked out?
Access your site via FTP/SFTP and either rename the plugin folder to disable it temporarily, or delete the vigilante_login_attempts table rows for your IP address in the database.
Will the firewall block legitimate users?
The firewall is configured to allow normal WordPress operations, including the block editor, REST API, and popular page builders. If you experience issues, you can whitelist specific IPs or adjust rate limiting thresholds.
Can I use this with other security plugins?
While Vigilant works standalone, running multiple security plugins can cause conflicts. We recommend testing in a staging environment first if you need to combine security solutions.
Does this work with caching plugins?
Yes. Vigilant is compatible with popular caching plugins. The firewall runs before cache layers, and .htaccess rules don't interfere with caching mechanisms.
Does this work with WooCommerce?
Yes. Vigilant includes compatibility settings for WooCommerce. The REST API security module automatically allows WooCommerce endpoints, and the firewall won't block payment gateway connections.
How do I test my security headers?
Use the built-in header testing tool in the Security Headers tab, or visit securityheaders.com with your site URL to get a security grade.
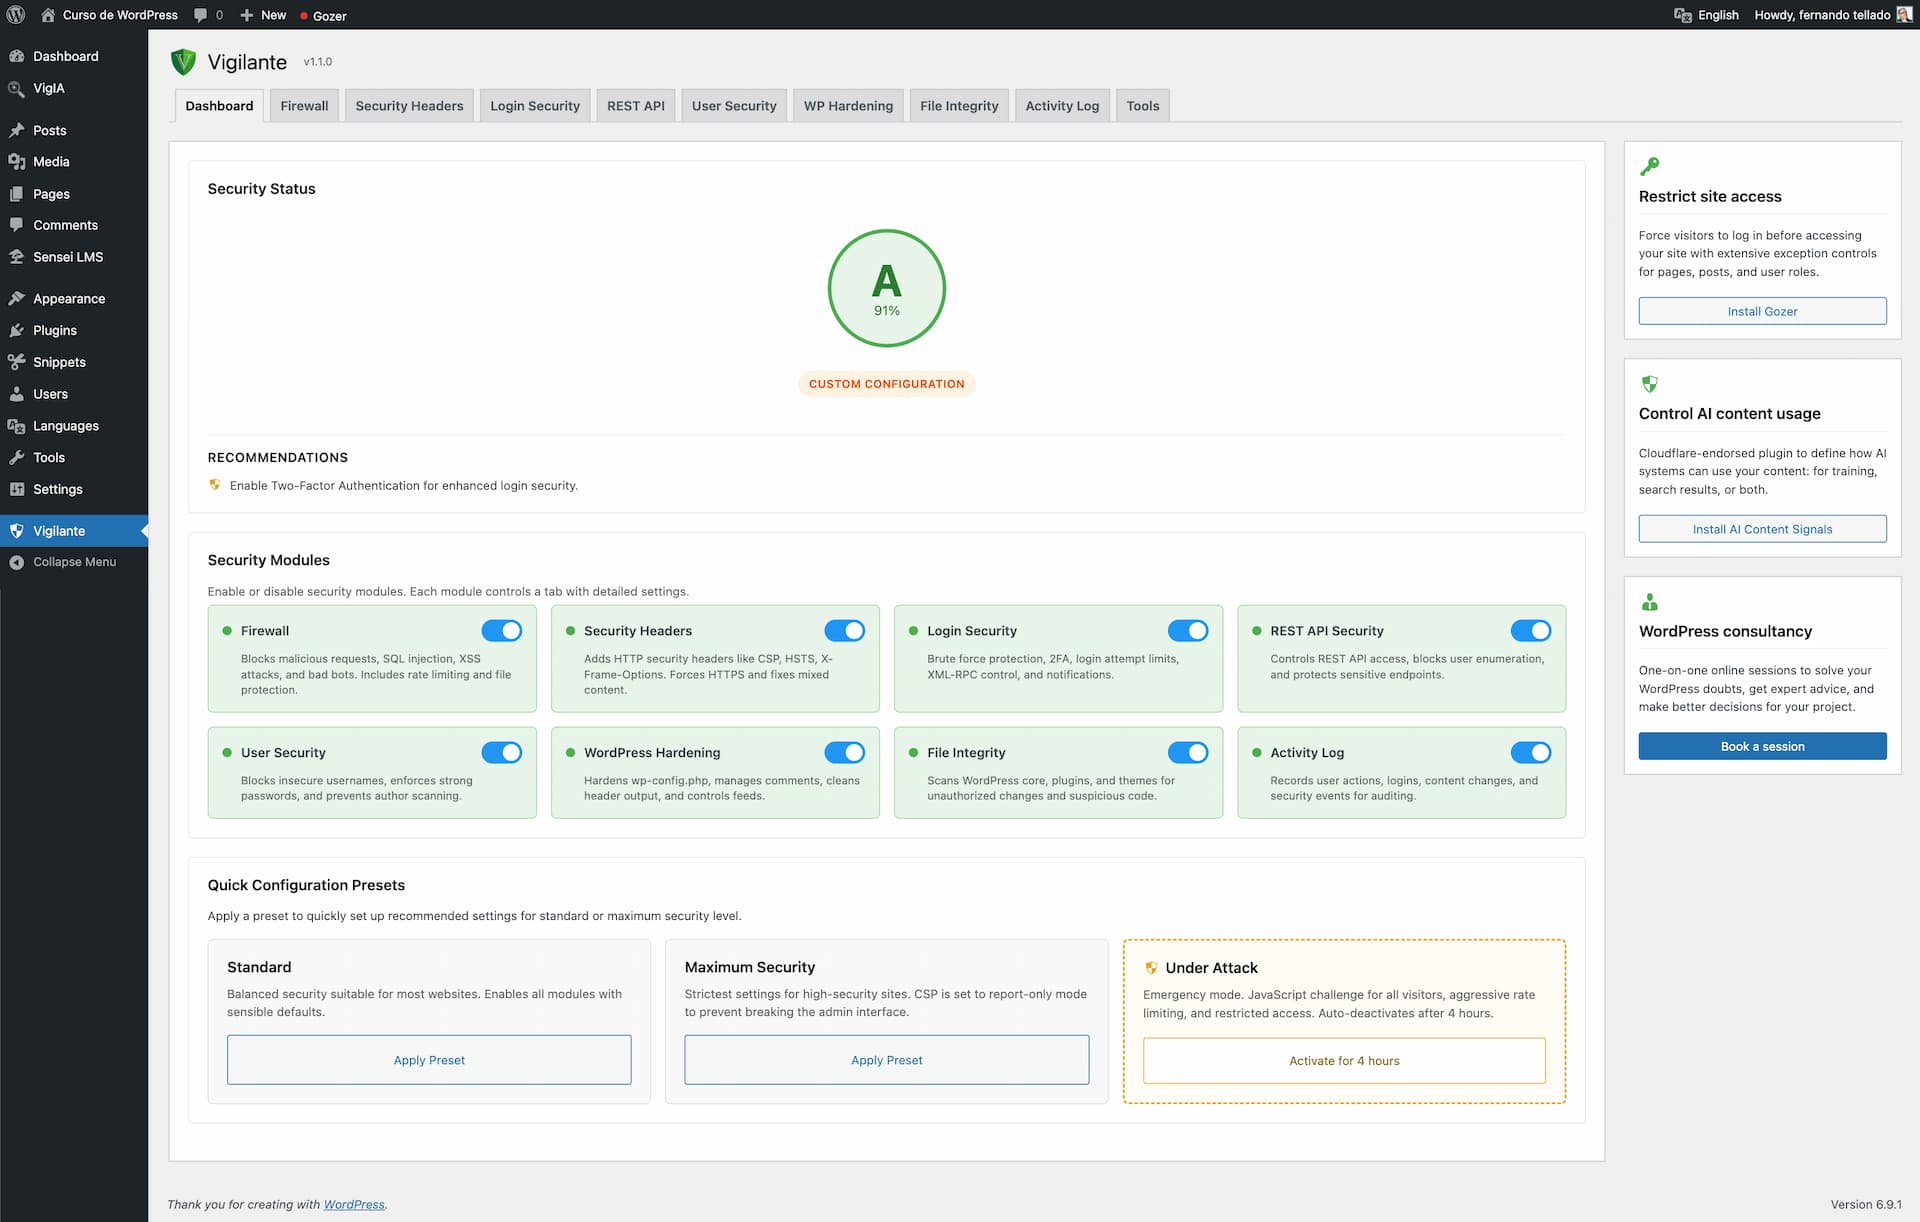
What is Security Check?
Security Check is an on-demand audit built into the Dashboard. It runs 40+ checks across 6 categories (SSL/TLS, HTTP headers, WordPress exposure, access and authentication, sensitive files, and internal checks) and returns a 0–100 score with an A–E grade. Unlike external online scanners, it runs entirely on your server and has access to 13 exclusive internal checks: PHP end-of-life status, pending updates, file permissions, default salts detection, administrators without 2FA enrolled, and more.
Does Security Check send my data to an external service?
No. All checks run on your server. The only external traffic is three DNS-only lookups against public blacklists (Spamhaus, Barracuda, SpamCop) for the reputation category — these are standard DNS queries with no authentication, no API keys, and no payload beyond your site's IP address. If you disable the reputation category, Security Check makes zero external network calls.
How often should I run Security Check?
Run it manually after any significant change (plugin update, server migration, new user role configuration). For ongoing monitoring, enable the weekly automatic scan from the widget. You'll only receive an email if the score drops by 10 points or more, or if a new critical check starts failing — so no spam from routine scans.
What is password expiration?
You can require users to change their passwords after a set number of days (30, 60, 90, etc.). Users receive warnings before expiration and are forced to change their password on next login when it expires. Password history prevents reusing recent passwords.
What is registration approval?
When enabled, new user registrations require manual approval by an administrator before the account becomes active. Pending users cannot log in until approved. You can configure auto-rejection after a set number of days.
What does email verification do?
New users must verify their email address by clicking a link before their account becomes active. This prevents fake registrations and ensures valid contact information.
How do session limits work?
You can limit how many concurrent sessions each user can have. When the limit is reached, either the new login is blocked or the oldest session is terminated, depending on your configuration.
Can I export the security audit log?
Yes. The security audit log can be exported to CSV format for external analysis or compliance reporting. You can also filter logs by event type, user, or date range before exporting.
What files does the integrity scanner check?
The scanner compares WordPress core files, plugin files, and theme files against official checksums from WordPress.org. Plugins and themes without available checksums are also scanned using strict obfuscation pattern detection. The uploads directory is scanned for PHP files, double extensions, and .htaccess files. Extra PHP files not present in original distributions are detected and, if they contain suspicious code, automatically flagged as suspicious.
How often does the file integrity scan run?
You can configure automatic scans to run daily or weekly. You can also run manual scans at any time. Email notifications support three levels: all issues, suspicious files only, or disabled.
What is the difference between Standard and Maximum presets?
Standard applies balanced settings suitable for most sites. Maximum applies stricter rules: lower rate limits, tighter CSP policies, required admin notifications, session limits, and more aggressive hardening. Maximum may require adjustments for sites with complex functionality.
Where are backups stored?
Backups are stored in wp-content/vigilante-backups/. This location persists through plugin updates. The directory is protected with .htaccess rules to prevent direct access.
What is Under Attack mode?
Under Attack mode is an emergency feature you can activate when your site is experiencing an active attack. It adds a JavaScript challenge that real browsers solve automatically in a few seconds, while bots and automated scripts are blocked completely. It also applies aggressive rate limiting, blocks restricted HTTP methods, and restricts API access.
Will Under Attack mode affect my logged-in users?
No. Logged-in users, admin pages, cron jobs, AJAX requests, and the login page are all excluded from the JavaScript challenge. Only unauthenticated frontend visitors see the verification page.
What if I forget to turn off Under Attack mode?
It automatically deactivates after 4 hours. You will also receive an email notification when it activates and deactivates.
Does Under Attack mode change my regular security settings?
No. It operates independently from your preset configuration (Standard or Maximum). Your regular settings are untouched and continue working normally after Under Attack mode deactivates.
How does the database backup work?
Go to Vigilant > Tools > Database Backup. Select which tables to include (or leave all selected), then click Download. The backup is generated as a ZIP file containing a SQL dump. No files are stored on the server.
What does changing the database prefix do?
WordPress uses wp_ as default table prefix. Changing it to a random prefix adds a layer of protection against SQL injection attacks that target default table names. Go to Vigilant > WP Hardening > Database Hardening. Always create a backup before changing the prefix.
How do I exclude management services like ManageWP from the firewall?
Go to Vigilant > Firewall > User-Agent Lists and add the service name (e.g., ManageWP, MainWP, UptimeRobot) to the User-Agent Whitelist. Partial matching is used, so entering "ManageWP" will match any User-Agent string containing that keyword.
Can I send security notifications to someone other than the site admin?
Yes. Go to Vigilant > Settings & Tools > Notification settings. You can add additional email recipients (one per line) and optionally uncheck the WordPress admin email. This is useful for maintenance professionals managing multiple sites who need to receive all security alerts.
Can I customize notification recipients programmatically?
Yes. Use the vigilante_notification_recipients filter. It receives and returns an array of email addresses used for all administrative notifications:
add_filter( 'vigilante_notification_recipients', function( $recipients ) { $recipients[] = 'security-team@example.com'; return $recipients; } );
更新日志:
- New: Per-user exclusion list for Password Expiration. Below the affected roles you'll find an instant search picker (same UX as the 2FA exclusion), so you can keep, say, a service account or a long-tenure editor out of the rotation policy without having to remove their entire role from the affected list.
- Improved: the controlled login rejection while a forced reset is pending is now logged to the Activity Log (event type
force_reset_login_blocked) so it's clearly distinguishable from a regular wrong-password attempt, and the login form now shakes on this error code so the user notices the form rejected their input for a specific reason. - Fix: forced password reset by admin had two compounding failures — the email link arrived already expired (the flow ran
wp_set_password()afterget_password_reset_key(), and that clearsuser_activation_keyin the same UPDATE) and a user who remembered their original password could keep logging in because the login interception hook only fired on incorrect-password errors. Now the reset key isn't touched (link works on first try), the pending-reset flag blocks login regardless of credential correctness, and all active sessions are destroyed the moment an admin triggers the reset. - Fix: reset loop after a forced password change. After the user finally set a new password,
after_password_resetcleared the force-reset flag — but never updatedvigilante_password_changed, so on the very next login the password expiration module flagged the brand-new password as expired and bounced the user back toprofile.phpindefinitely. Clearing the force-reset flag now also resets the expiration tracking metas, so the just-reset password is treated as fresh. - Fix: a stale "must change password" flag would survive after the admin removed the user's role from the affected list (or added them to the new exclusion list). The redirect and the admin notice now re-validate the user against the current rules and clear the stale flag instead of looping forever to the profile page.
- Fix: requesting a password reset on a site with a custom login URL returned a 404. WordPress core redirects to
wp-login.php?checkemail=confirmafter a successful lost-password submission, but the hidden-login guard only allowed requests with a knownaction=parameter, so the confirmation page hit the 404 fallback. There's now alostpassword_redirectfilter that sends the user back to the custom login URL with the same query string, plus a defensive whitelist for?checkemailand?password=changed. - Fix: "Hide login errors" was masking every Vigilant-specific message (lockout, 2FA challenge, pending approval, force-reset…) on translated sites. The filter matched the rendered message against English patterns, but
__()returns the translation, so on Spanish/French/etc. installs the patterns never hit and the user always saw the generic "Invalid username or password". Detection now hookswp_login_errorsand matches by error code, which is locale-independent; the legacy string fallback stays for third-party plugins that filterlogin_errorsdirectly. For older changelog entries, please check the changelog.txt file