
Converter for Media - Optimize images | Convert WebP & AVIF
| 开发者 | mateuszgbiorczyk |
|---|---|
| 更新时间 | 2026年6月3日 21:30 |
| 捐献地址: | 去捐款 |
| PHP版本: | 7.4 及以上 |
| WordPress版本: | 7.0 |
| 版权: | GPLv2 or later |
| 版权网址: | 版权信息 |
标签
下载
详情介绍:
- If you have just installed the plugin, you can optimize images with one click. Image size will be smaller after generate AVIF and WebP!
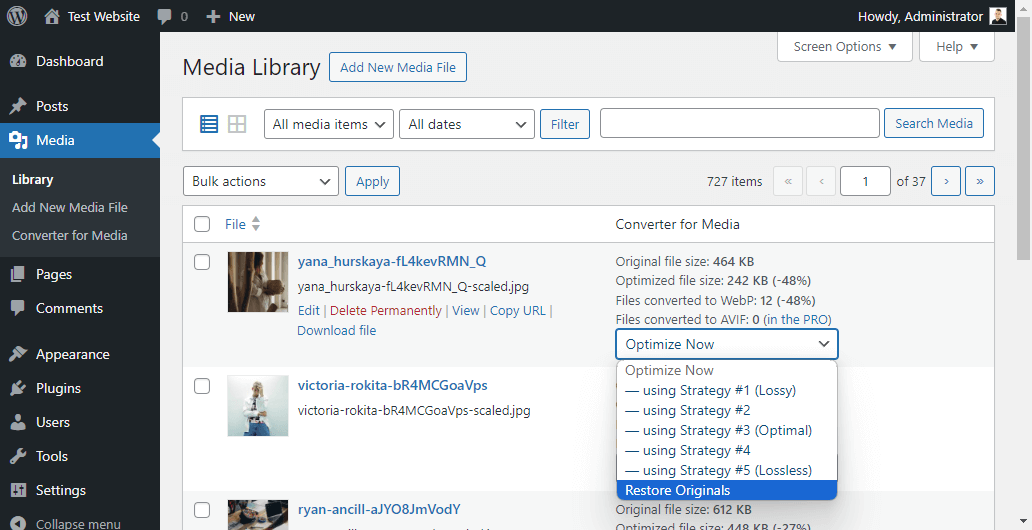
- New images that will be added to the Media Library will be converted automatically.
- Our image optimizer does not modify your original images in any way. This means security for you and your files. Files converted to AVIF and WebP format are saved in a separate directory: /wp-content/uploads-webpc/.
- You lose nothing - if you had to remove the plugin, it will remove everything after itself. It does not leave any trace, so you can check it with ease.
/uploads directory but also from /plugins and /themes directories. This allows full integration with WebP and AVIF formats!
Development of the plugin
If you love our plugin, leave a ★★★★★ review on WordPress.org — it really makes our day and helps others discover it!
Please also read the FAQ below. Thank you for being with us!
安装:
- Upload the plugin files to the
/wp-content/plugins/webp-converter-for-mediadirectory, or install the plugin through the WordPress plugins screen directly. - Activate the plugin through the
Pluginsscreen in WordPress Admin Panel. - Use the
Settings -> Settings -> Converter for Mediascreen to configure the plugin. - Click on the
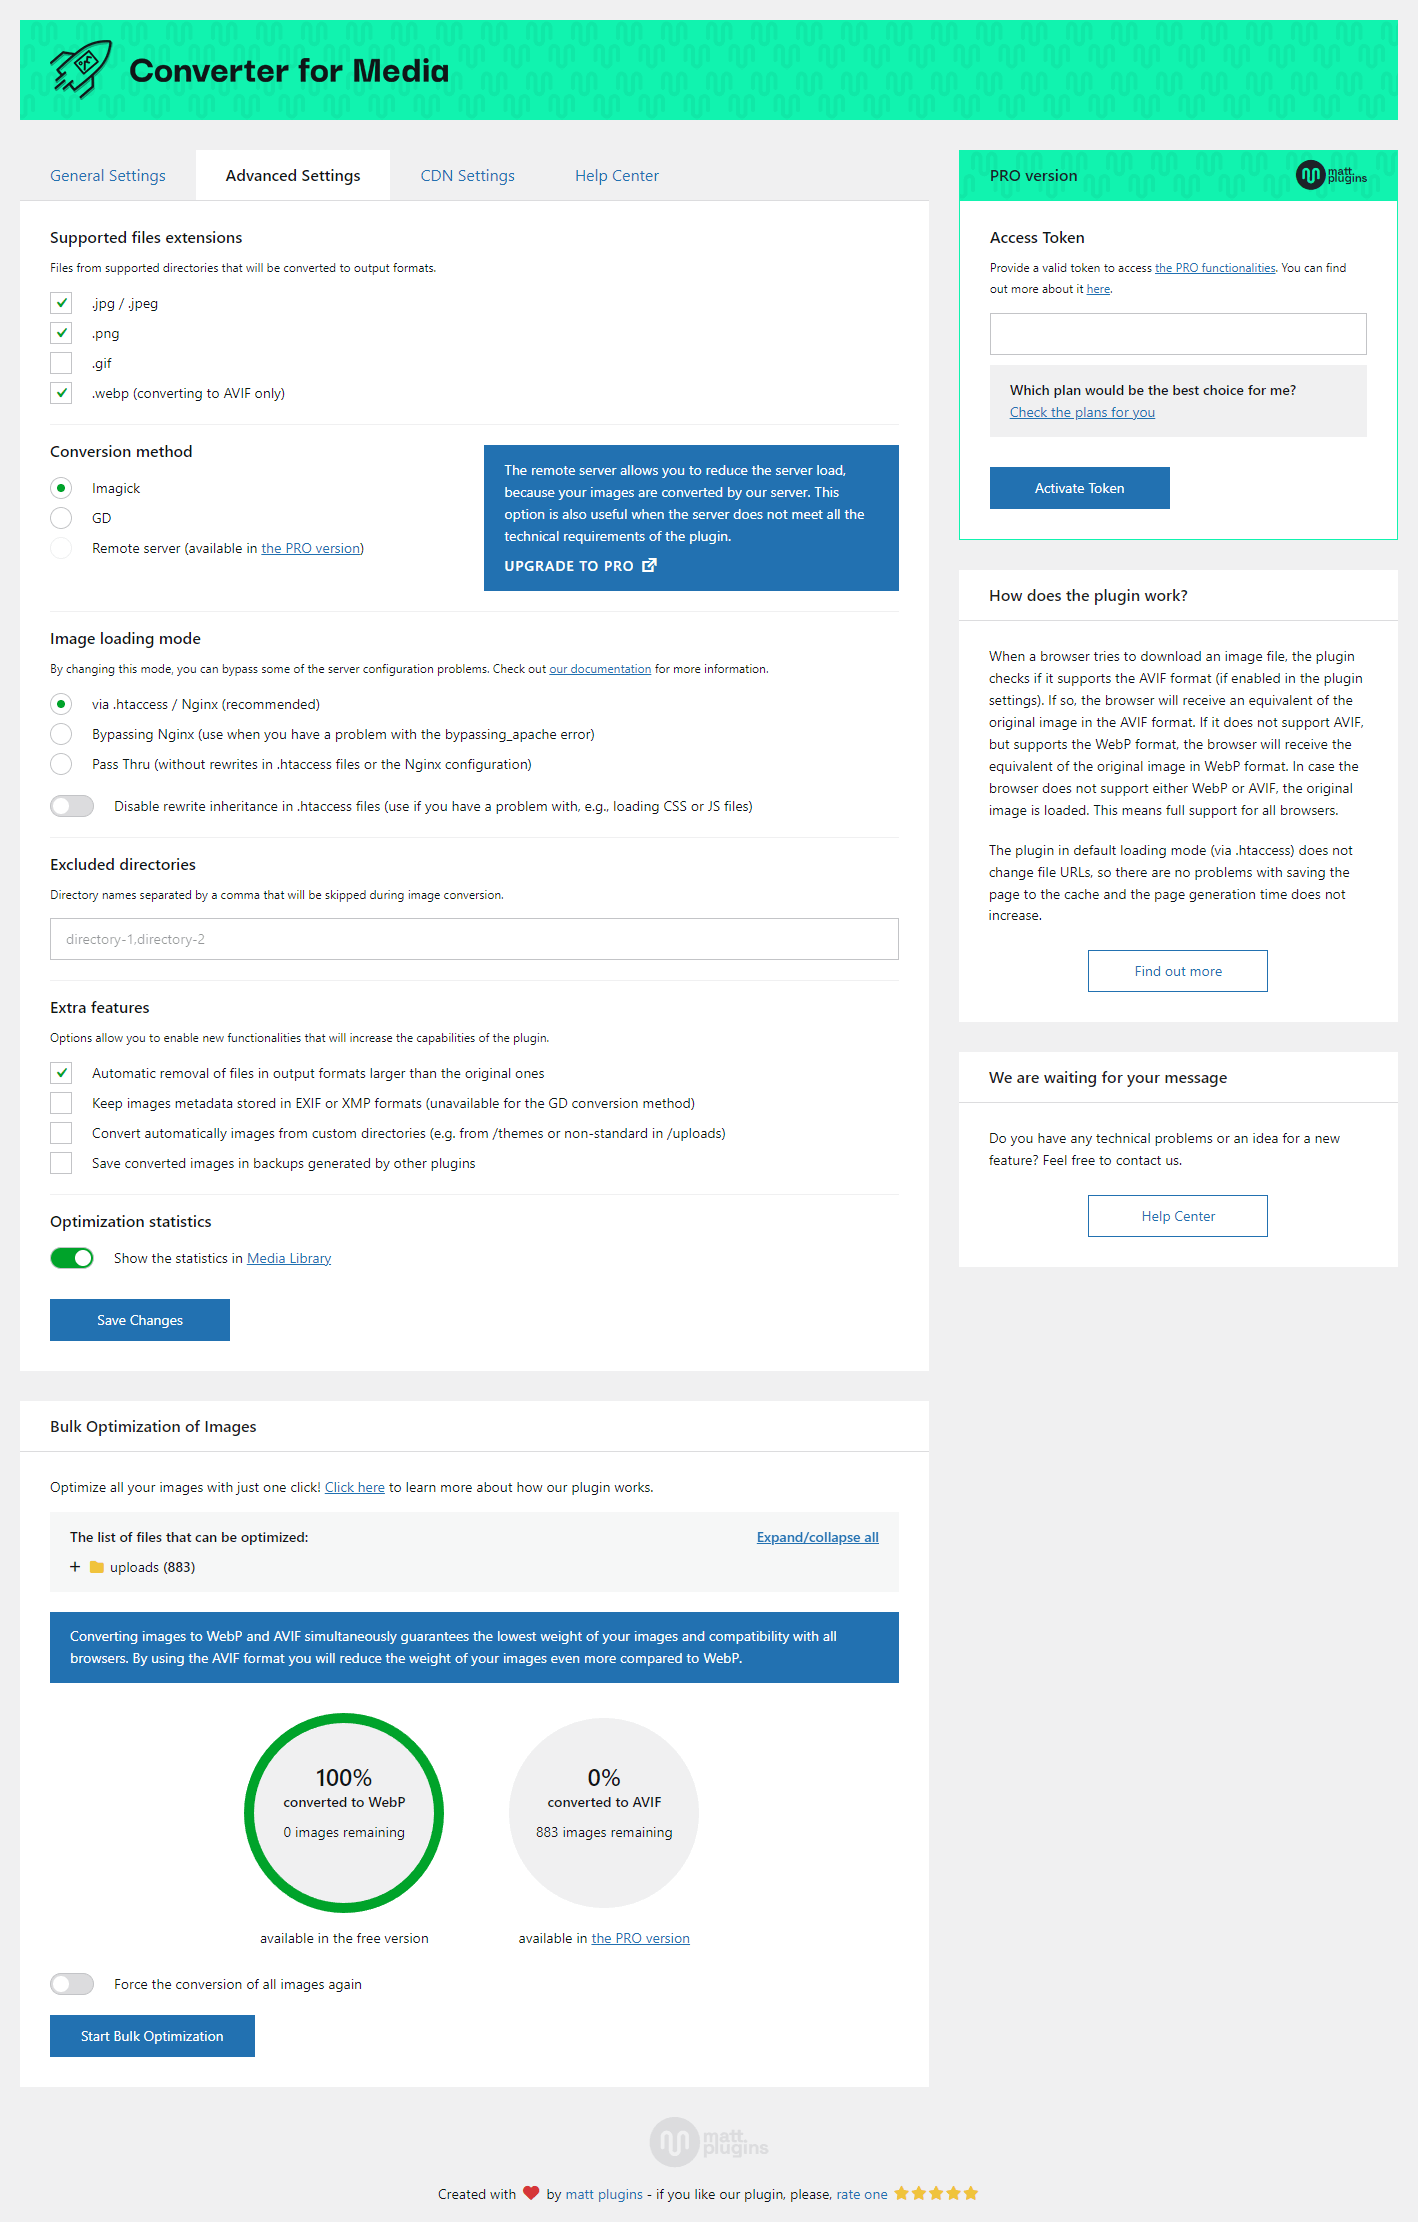
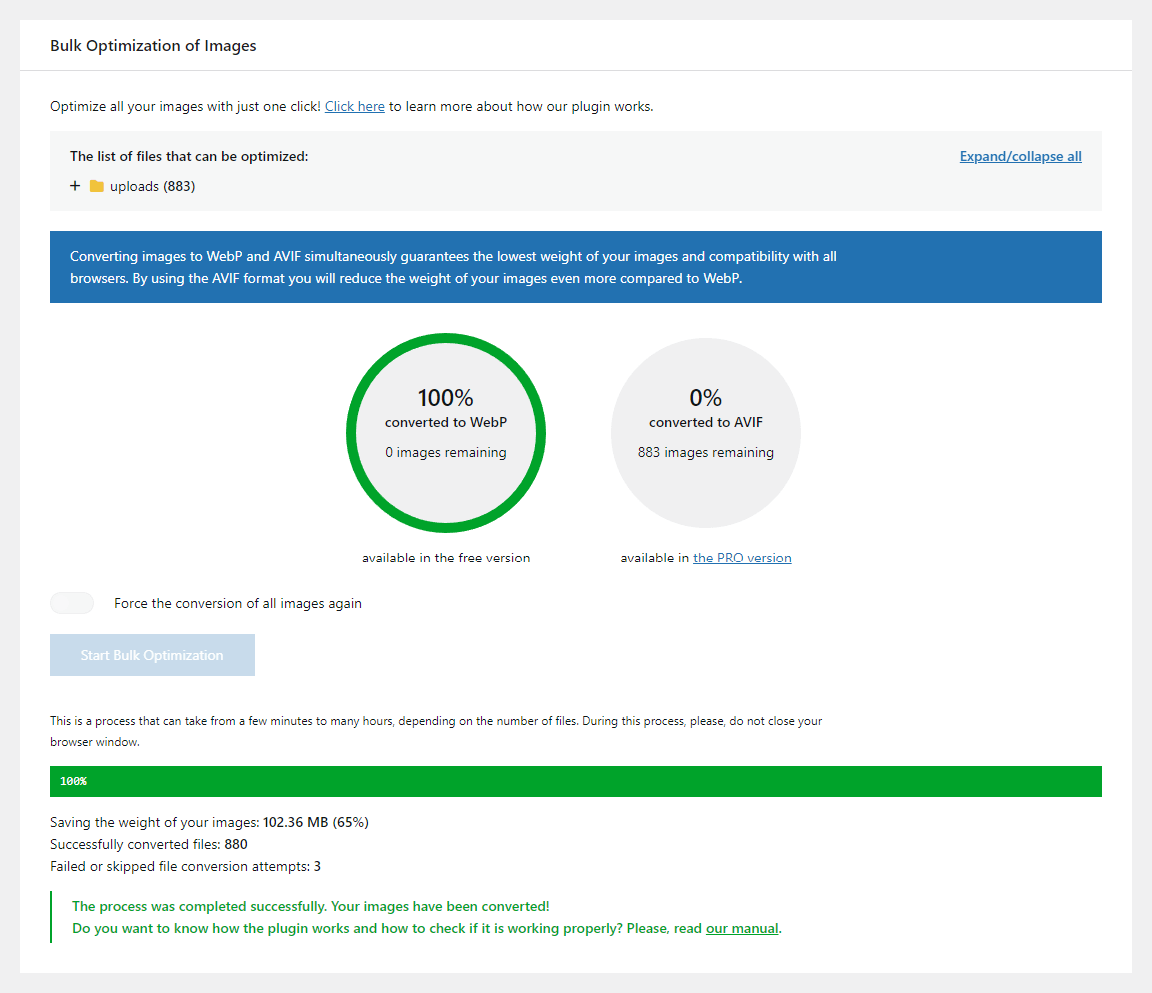
Start Bulk Optimizationbutton and wait. - Check if everything works fine using this tutorial.
屏幕截图:

常见问题:
How can I report security bugs?
You can report security bugs through the Patchstack Vulnerability Disclosure Program. The Patchstack team help validate, triage and handle any security vulnerabilities. Report a security vulnerability
How to get technical support? (before you ask for help)
Before you add a new thread, read all other questions in this FAQ and other threads in the support forum first. Perhaps someone had a similar problem and it has been resolved. When adding a thread, follow these steps and reply to each of them: 1. Do you have any errors on the plugin settings page? Please read this thread if you have any errors. 2. URL of your website. 3. Screenshot of the Help Center tab on the plugin settings screen - please take a screenshot of the ENTIRE page. 4. Please do the test, which is described in the FAQ in the question "How to check if the plugin works?". Please send a screenshot of Devtools with the test results. Please remember to include the answers to all questions by adding a thread. It is much easier and accelerates the solution of your problem.
Configuration for Nginx
If you are using a Nginx server that does not support .htaccess rules, additional Nginx server configuration is required for the plugin to work properly. Please read this tutorial for more information.
Configuration for Nginx Proxy
If you are using a Nginx server that supports .htaccess rules, but you still have a server configuration error on the plugin settings page, additional Nginx server configuration is required for the plugin to work properly. Please read this tutorial for more information.
Error on plugin settings screen?
If you have an error on the plugin settings screen, first of all, please read it carefully. They are displayed when there is a problem with the configuration of your server or website. The messages are designed to reduce the number of support requests that are repeated. It saves your and our time. Please read this thread for more information.
Error while converting?
You can get several types of errors when converting. First of all, carefully read their content. For the most part, you can solve this problem yourself. Try to do this or contact the server administrator.
If you get an error: File "%s" does not exist. Please check file path. means that the file_exists() function in PHP returned false using the file path given in the error message. Check this path and make sure it is correct.
If you get an error: File "%s" is unreadable. Please check file permissions. means that the is_readable() function in PHP returned false using the file path given in the error message. Check the permissions for the file and the directory in which the file is located.
If you get an error: "%s" is not a valid image file. means that the file is damaged in some way. Download the file to disk, save it again using any graphics program and add it again to the page. If the error applies to individual images then you can ignore it - just the original images will load, not WebP.
If you get an error: Image "%s" converted to .webp is larger than original and converted .webp file has been deleted. means the original image weighed less than WebP. This happens when images have been compressed before. Disable the "Automatic removal of files in output formats larger than original" option in plugin settings to force always using WebP.
What are requirements of plugin?
Practically every hosting meets these requirements. You must use PHP at least 7.0 and have the GD or Imagick extension installed. The extension must support WebP format. If you have an error saying that the GD or Imagick library is not installed, but you have it installed then they are probably incorrectly configured and do not have WebP support.
They are required native PHP extensions, used among others by WordPress to generate thumbnails. Your server must also have the modules mod_mime, mod_rewrite and mod_expires enabled.
An example of the correct server configuration can be found here. The link to your current configuration can be found in the Help Center tab on plugin settings screen.
Note the items marked in red. If the values marked in red do not appear in your case, it means that your server does not meet the technical requirements. Pay attention to the WebP Support value for the GD library and WEBP in the list of supported extensions for the Imagick library.
In a situation where your server does not meet the technical requirements, please contact your server Administrator. We are not able to help you. Please do not contact us about this matter, because this is a server configuration problem, not a plugin.
Also, REST API must be enabled and work without additional restrictions. If you have a problem with it, please contact the Developer who created your website. He should easily find the issue with the REST API not working.
How to check if the plugin works?
You can find more information on how the plugin works in our manual.
How to change the path to uploads?
This is possible using the following types of filters to change default paths. It is a solution for advanced users. If you are not, please skip this question.
Path to the root installation directory of WordPress (ABSPATH by default):
add_filter( 'webpc_site_root', function( $path ) { return ABSPATH; } );
Paths to directories (relative to the root directory):
add_filter( 'webpc_dir_name', function( $path, $directory ) { switch ( $directory ) { case 'uploads': return 'wp-content/uploads'; case 'webp': return 'wp-content/uploads-webpc'; case 'plugins': return 'wp-content/plugins'; case 'themes': return 'wp-content/themes'; } return $path; }, 10, 2 );
Note that the /uploads-webpc directory must be at the same nesting level as the /uploads, /plugins and /themes directories.
Prefix in URL of /wp-content/ directory or equivalent (used in .htaccess):
add_filter( 'webpc_htaccess_rewrite_path', function( $prefix ) { return '/'; } );
For the following sample custom WordPress structure:
... ├── web ... ├── app │ ├── mu-plugins │ ├── plugins │ ├── themes │ └── uploads ├── wp-config.php ...
Use the following filters:
add_filter( 'webpc_site_root', function( $path ) { return 'C:/WAMP/www/project/web'; // your valid path to root } ); add_filter( 'webpc_htaccess_rewrite_path', function( $prefix ) { return '/'; } ); add_filter( 'webpc_dir_name', function( $path, $directory ) { switch ( $directory ) { case 'uploads': return 'app/uploads'; case 'webp': return 'app/uploads-webpc'; case 'plugins': return 'app/plugins'; case 'themes': return 'app/themes'; } return $path; }, 10, 2 );
After setting the filters go to Settings -> Converter for Media in the admin panel and click the Save Changes button. .htaccess files with appropriate rules should be created in the directories /uploads and /uploads-webpc.
How to exclude paths from converting?
To exclude selected directories, provide them in the Excluded directories field in the Advanced Settings tab in the plugin settings.
In this field, you can enter a directory name or path. Here are examples:
20232024/012023,2024/01To exclude selected files, use the following filter (in this case with the suffix "-skipped" in a filename, e.g. image-skipped.png):
add_filter( 'webpc_supported_source_file', function( bool $status, string $file_name, string $server_path ): bool { $excluded_suffix = '-skipped'; if ( strpos( $file_name, $excluded_suffix . '.' ) !== false ) { return false; } return $status; }, 10, 3 );
Argument $server_path is the absolute server path to a directory or file. Inside the filters, you can apply more complicated rules as needed.
Changes to excluded directories and files take effect before images are converted - they do not affect already converted images. These images must be manually removed from the directory: /wp-content/uploads-webpc/.
Support for custom directories
The plugin supports the following directories by default:
/gallery/plugins/themes/uploadsIf you want to add support for a custom directory, add the following code to the functions.php file in your theme directory (use a correct directory name instead ofcustom-directory):
add_filter( 'webpc_source_directories', function ( $directories ) { $directories[] = 'custom-directory'; return $directories; } );
Remember that this directory must be located in the /wp-content directory.
How to run manually conversion?
By default, all images are converted when you click on the Start Bulk Optimization button. In addition, conversion is automatic when you add new files to your Media Library.
Remember that our plugin takes into account images generated by WordPress. There are many plugins that generate, for example, images of a different size or in a different version.
If you would like to integrate with your plugin, which generates images by yourself, you can do it. Our plugin provides the possibility of this type of integration. This works for all images in the /wp-content directory.
It is a solution for advanced users. If you would like to integrate with another plugin, it's best to contact the author of that plugin and give him information about the actions available in our plugin. This will help you find a solution faster.
You can manually run converting selected files, you can use the action to which you will pass an array with a list of paths (they must be absolute server paths):
do_action( 'webpc_convert_paths', $paths, true );
An alternative method is to manually start converting the selected attachment by passing the post ID from the Media Library. Remember to run this action after registering all image sizes (i.e. after running the add_image_size function):
do_action( 'webpc_convert_attachment', $post_id, true );
To delete manually converted files, use the following action, providing as an argument an array of absolute server paths to the files (this will delete manually converted files):
do_action( 'webpc_delete_paths', $paths );
Support for WP-CLI
The plugin supports WP-CLI, which enables faster image conversion from the server level. More information on how to get started with WP-CLI can be found in the Handbook. The supported commands are described below.
Checking how many maximum images for conversion are on website:
wp converter-for-media calculate
Converting all images:
wp converter-for-media regenerate
Converting all images (with "Force convert all images again" option):
wp converter-for-media regenerate --force
Does plugin support CDN?
The website files (WordPress files) and the images from the Media Library must be on the same server. If they are, everything should work fine. If only your images are on another CDN server, unfortunately correct operation is impossible, because such images are managed by another server. Current list of supported CDN servers:
- BunnyCDN (refer to the instructions before use)
更新日志:
[Added]Blocking of automatic image conversion when uploading images to Media Library during some server configuration errors[Added]Blocking of automatic image conversion via WP-Cron during some server configuration errors[Added]Blocking ofregeneratecommand in WP-CLI during some server configuration errors
[Changed]Minimum required PHP version from 7.1 to 7.4[Added]Compatibility with PHP 8.5[Added]Support for WordPress 7.0
[Fixed]Handling of trailing slashes in REST API endpoint URLs
[Fixed]Fatal error when source image is not a valid image file
[Fixed]Displaying notification about Cloudflare cache
[Changed]The Pass Thru loading mode is now restricted to standard WordPress directory structures only
[Security]Replaced cURL-based fetching with native readfile(), implemented a whitelist of trusted website URLs and stricter extension validation in the Pass Thru loading mode to prevent unauthorized server-side requests (CVE-2026-1356)[Security]Implemented physical path identity verification for the Pass Thru loading mode using realpath() to provide extra protection against Directory Traversal[Security]Added X-Content-Type-Options: nosniff header for browser-side protection in the Pass Thru loading mode[Fixed]Priority logic for loading next-generation image formats (AVIF/WebP)[Added]Automatic refresh of an image loading mode after a plugin update[Added]Significant performance boost for the Pass Thru loading mode by direct filesystem access instead of cURL requests[Added]Support for Content-Length headers to optimize image delivery in the Pass Thru loading mode
- Version superseded by 6.5.2
[Fixed]Rewrite rules to handle environments where RewriteRule may receive an absolute filesystem path[Changed]Field to select the format to which the images should be converted[Added]Settings field to modify the prefix used in RewriteRule to fix the absolute filesystem path issue See changelog.txt for previous versions.