Product Table for WooCommerce by WBW
| 开发者 | woobewoo |
|---|---|
| 更新时间 | 2026年4月15日 05:31 |
| 捐献地址: | 去捐款 |
| PHP版本: | 3.3 及以上 |
| WordPress版本: | 6.9 |
详情介绍:
安装:
屏幕截图:
常见问题:
"我如何开始?"
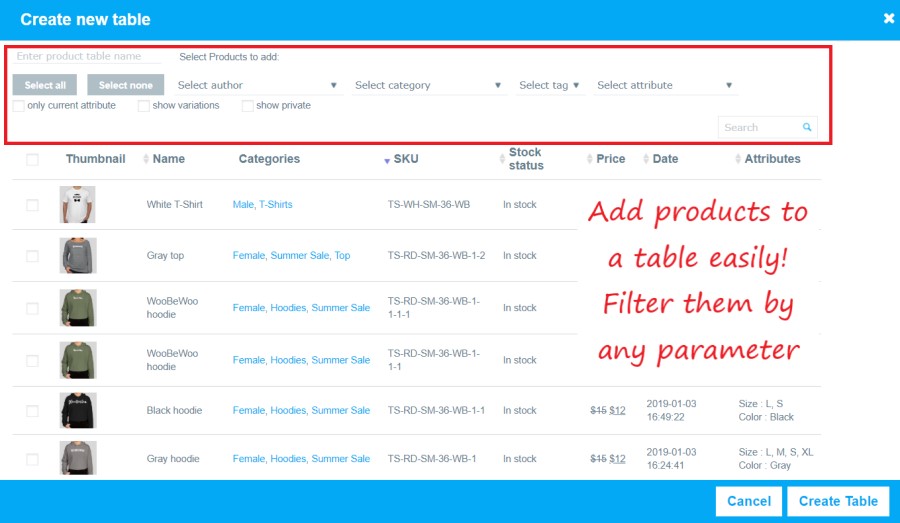
首先,您应该安装它。然后,要创建第一个数据表,您需要:
- 点击“添加新表”。
- 输入表的标题,然后点击“确定”。
- 选择所需的产品并将它们添加到表内容管理中。
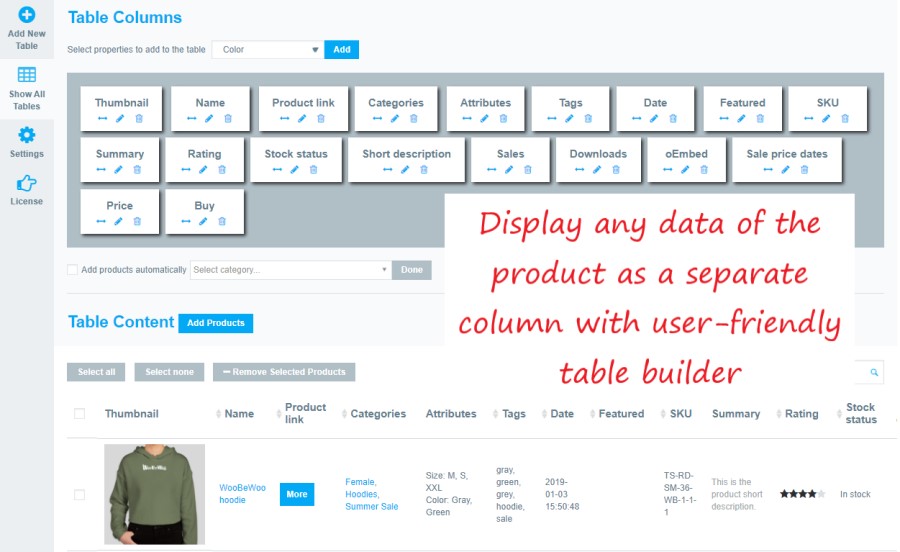
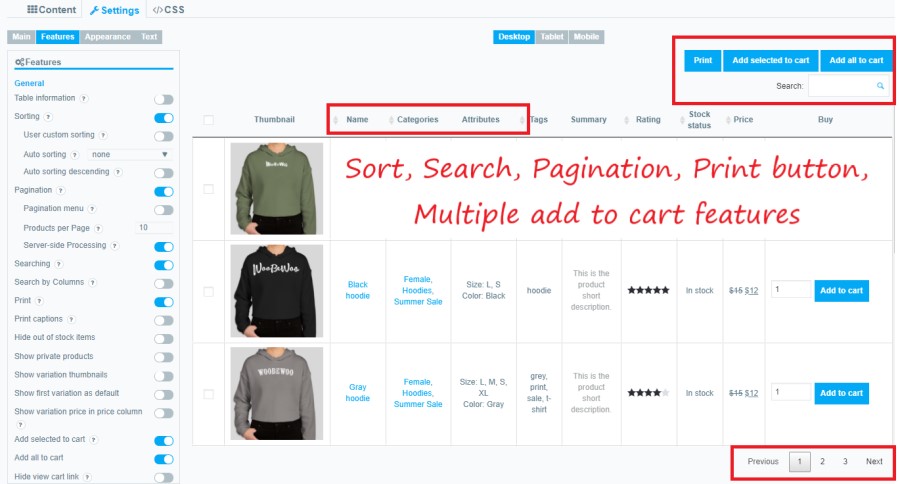
- 选择并添加列到表格中:名称、缩略图、分类、特色、价格、库存数量、日期、SKU、评分、库存状态、属性、摘要、购买按钮。
- 使用代码将 WooCommerce 产品表添加到网站内容中:表格短代码和表格 PHP 代码。
在产品表中可以显示什么?
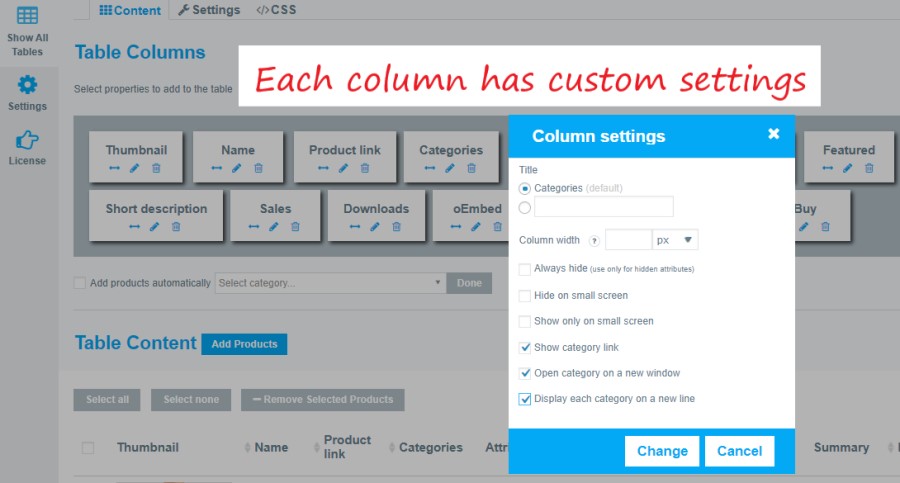
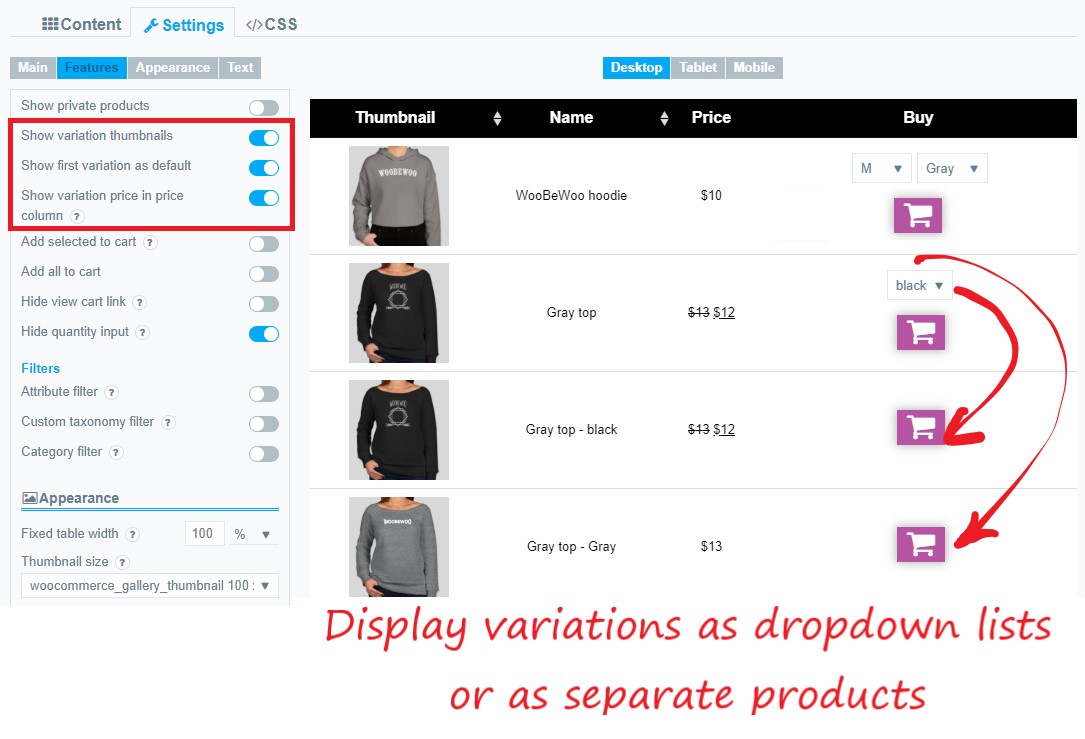
The product table includes the following columns: Name, Thumbnails, Categories, Featured, Price, Color, Size, Customizable, Date, SKU, Rating, Stock status, Attribute, Summary, Buy button. You can make your custom column if you click an edit icon and change a title. The plugin uses the product data already created by WooCommerce itself. This means that you can add products to WooCommerce manually or import them using a CSV/XML import plugin, and they will display in the product table. All information about the Main table settings and options you can find in our tutorial.
什么是响应模式?
The responsive mode is the practice of designing a website that provides a nice and proper view, adapts to the screen dimensions, and works properly on a range of different devices PC desktops, mobile phones, tablets. Responsive mode is the practice of designing a website that provides a nice and proper view, adapts to the screen dimensions, and works properly on a range of different devices PC desktops, mobile phones, tablets. The plugin provides 4 different modes of Responsive design according to your needs: Standard, Automatic column hiding, Horizontal scroll, and Disable Responsivity mode. More info you can find here in the article Responsive mode.
将产品表格添加到页面的方法
To add a product table go to the Product Table Plugin and use shortcodes from the list of tables or copy shortcode above the main tabs. There are available Table Shortcode and PHP code.
- 将短代码复制并粘贴到您的网站内容中,然后产品表插件将使用您在此表中调整的设置在适当的文章/页面上显示您创建的表格。
- 可以将表格的 PHP 代码插入页面代码中的任意位置,以便在该位置准确显示,例如在页面的页眉或页脚中。此外,它还可以插入到主题模板的代码中,以便在所有页面上显示。
如何向表格添加自定义字段?
To add the custom field to the product table, you need to follow these steps: 首先,您需要在高级自定义字段插件(免费)中创建一个自定义字段,以便用于添加数据。
- 移动到自定义字段,然后点击“添加新字段组”。
- 请确保选择“产品”帖子类型。这对于使自定义字段出现在您的产品的添加/编辑屏幕上至关重要。
- 按“添加字段”并添加标签、字段名称,然后选择您需要的字段类型。您可以添加任何类型的字段:文本、链接、图像、oEmbed、文件、WYSIWYG 编辑器等。
- 移动到产品并点击“添加新产品/编辑产品”。
- 向下滚动到创建的自定义文件,添加数据链接、图片、代码等,然后更新/发布产品页面。
- 移动到产品表(专业版必须处于激活状态)并创建或编辑该表。
- 将具有此自定义字段的产品添加到表中。使用搜索或排序功能以便更好地导航。
- 接着,添加具有自定义字段的列。
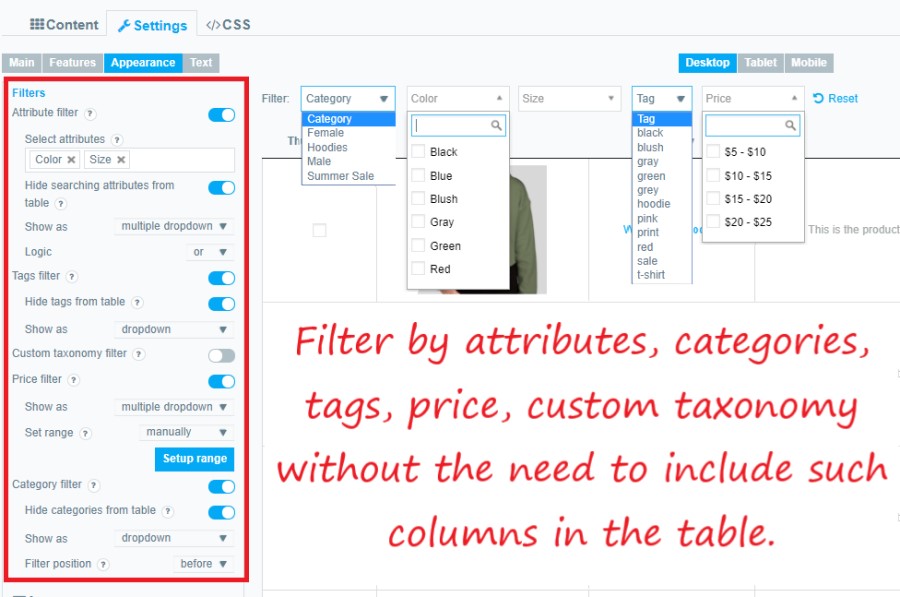
如何将自定义分类法添加到表中?
Create custom taxonomies quite easily using Custom Post Type UI that is fully compatible with the WooCommerce Product Table. With the help of taxonomies, you can store and show extra product data. So, they are designed to store re-usable information that can be used to group and filter products. You can also use taxonomies to filter products using the WooCommerce Product Table plugin. Follow this step by step tutorial to create taxonomies, add them to the product and display in the table.
如何在产品表中添加多重加入购物车选项?
- 您需要添加一个购买属性。为此:
- Click on the Content
- Select Set Table Properties
- Choose and add Buy property.
- Navigate to Settings -> Features. Then, you will see a list of available options, find and check the "Multiple add to cart" button. Click on the Save button. Multiple add to cart option is the most beneficial for small and low-cost items. Some more information about Multiple add to cart usage you can find it here.
如何将产品添加到产品表中?
The plugin uses the product data already created by WooCommerce itself. This means that you can add products to WooCommerce manually or import them using a CSV/XML import plugin, and they will display in the product table. In this tutorial, you can find an instruction how to add a product to WooCommerce
To create an order form, the translation in Simplified Chinese is: 如何创建订单表格?
Order form enables users to quickly scan and compare all your products. Also, it changes how products are displayed in your store. First of all, the order form lists multiple products all on top of each other in contrast to the standard WooCommerce store, where each good takes up a relatively large amount of space. Such product displays allow customers to quickly see all the important features before they buy it. Look at detailed instruction Step by step: how to create add an order form to the WooCommerce store.
Where do I report security bugs found in this plugin?
Please report security bugs found in the source code of the plugin through the Patchstack Vulnerability Disclosure Program. The Patchstack team will assist you with verification, CVE assignment, and notify the developers of this plugin.
更新日志:
- Fix - Patch broken access control vulnerability.
- WC tested up to: 10.7.
- Readme.txt - Changelog - Truncated.
- Readme.txt - Rename plugin from "Product Table by WBW" to "Product Table for WooCommerce by WBW".
- WC tested up to: 10.5.
- Dev - Coding standards improved.
- Dev - URI - Improved.
- Dev - Coding standards improved.
- Dev - Coding standards improved.
- Dev - Coding standards improved.
- Tested up to: 6.9.
- WC tested up to: 10.4.
- Fix - Improved compatibility with newer versions of JQuery.
- WC tested up to: 10.2.
- Dev - Coding standards improved.
- WC tested up to: 10.1.
- Dev - Coding standards improved.
- WC tested up to: 10.0.
- Fix - Fixed error "Uncaught RangeError: Maximum call stack size exceeded" while saving tables.
- WC tested up to: 9.9.
- 与 WooCommerce 的 B2B 兼容性已修复。
- 小问题修复
- Fixed link View details
- Fixed pre-sorting by categories
- Minor issues fix
- Added compatibility with defaults and preselects for WooFilter plugin
- 安全更新
- Minor issues fix
- 代码改进
- Security update
- Minor issues fix
- 修复了与 Floating WPF-filter 的兼容性问题。
- 在主搜索中过滤添加了 ACF 字段。
- Code improvement
- Minor issues fix
- 添加挂钩
- Minor issues fix
- 修复了数量=0 时添加到购物车的问题
- 自述文件改进
- 代码小优化
- Minor issues fix
- Minor issues fix
- Added option Add all to cart Only with quantity>0
- 基于区域设置的排序已添加。
- 为排序添加了服务器区域设置
- Minor issues fix
- 与 WP Statistics 的冲突已解决。
- Minor issues fix
- Minor issues fix See changelog for all versions.