WPC Product Timer for WooCommerce
| 开发者 | wpclever |
|---|---|
| 更新时间 | 2026年6月25日 14:50 |
| 捐献地址: | 去捐款 |
| WordPress版本: | 7.0 |
| 版权: | GPLv2 or later |
| 版权网址: | 版权信息 |
标签
下载
5.2.9
3.4.0
3.2.4
3.4.1
3.2.3
3.3.0
3.4.2
3.4.3
3.4.4
3.4.5
3.5.0
3.5.3
3.2.2
3.2.0
3.2.1
3.5.8
3.5.9
3.5.2
4.0.0
4.0.1
4.0.2
5.1.5
4.2.1
4.2.2
5.0.0
4.0.5
5.0.5
5.0.6
5.1.0
3.5.7
5.0.1
3.7.0
4.0.3
4.1.1
4.2.4
4.2.7
5.0.2
3.7.2
5.0.3
3.6.0
5.1.3
5.2.4
3.5.5
5.1.7
5.2.0
5.2.1
5.1.4
5.2.2
5.2.3
4.0.4
4.1.0
4.2.0
4.2.3
4.2.5
4.3.0
5.0.4
5.1.2
3.5.4
3.6.1
4.3.1
5.1.6
5.2.5
3.5.1
3.7.1
4.2.6
5.2.6
5.2.8
5.3.0
5.3.1
5.3.2
5.4.0
5.4.1
3.5.6
5.1.1
5.2.7
5.4.2
详情介绍:
WPC Product Timer for WooCommerce is an all-in-one powerful tool for setting time-based conditions when it comes to managing products’ prices and availability. This is the only simple plugin for dealing with complex tasks that involve setting the time and date of implementation. As a strongly versatile timer, WPC Product Timer lets users take full control of when the products go on sale, be visible and purchasable using a wide range of time conditionals and actions available for choice. WPC Product Timer makes product management an effortless task and reduces a great amount of workload for shop owners on sale seasons & busy times.
Document
HOT! Get the basics of timers-setting and typical examples from the complete Online Documentation here.
As WPC Product Timer mostly works in the back-end, if you'd like a front-end solution, try our new plugin WPC Countdown Timer for increasing the conversion rate and level up the appearance of your store with a beautiful timer.How to set up timers on a single product page https://www.youtube.com/watch?v=5WwZNXGA2kA Features
- Simple, intuitive & user-friendly admin interface
- Complete time conditionals: on a timely basis, recurring period, or an exact date & time
- Up to 15 date and time conditionals which can be combined for more complex ones
- Choose the time and date from the visual calendar
- Allow complicated time & date combination in time conditionals
- Allow setting separate time & date range and using them simultaneously
- Adjust the product’s visibility: set products as visible or hidden
- Adjust product listings: set featured or unfeatured
- Adjust the stock condition: set products as in stock or out of stock
- Adjust the availability: set products as purchasable or unpurchasable
- Adjust the time range for sale & regular prices
- Enable/disable sold individually
- Compatible with all WordPress themes, WPC & WooCommerce plugins
- Premium: Add multiple actions to a product. It’s unlimited.
- Premium: Lifetime update & fast, dedicated support.
- (1) A new item will be opened for sale in your shop on the next Monday.
- (2) You will stop selling an old-fashioned product starting from this weekend.
- (3) You will be running a sale event for one week starting from the first day of the next month.
- (4) You want to hide some products from search at certain times of the day.
- (5) Some products from your store are seasonal, so they’re purchasable at certain periods of time only.
- (6) You have items that are temporarily unsellable, but you still want to keep them visible to your customers.
- (7) Your shop sells Christmas decorative ornaments from December 1st to December 24th every day from 7:00 to 21:00.
- (8) Your restaurant serves breakfast before 9 A.M. and desserts after 8 P.M. only.
- (9) You’d like to run festive sale campaigns on holidays, i.e., on New Year’s Day, Independence Day, Labor Day, Thanksgiving, and Christmas Day.
- (10) Your shop has recurring flash sales every Monday to keep buyers motivated to shop more often & get a fast turnover of stock.
- (11) You sell alternating items on odd days and even days of the month.
- (12) You have a need to hide your newly arrived product for stock checks from July 3rd to July 31st, then put it on sale at $29 for a week to promote sales upon product launch and change it back to its regular price at $39 from 8:00 August 15th.
- On an exact date: as in (1)
- Set a date range: as in (3), (7)
- Multiple dates: as in (9) & (5), users can add up to 5 separate dates.
- Before/ after a date: as in (2)
- Before/after date & time: (7)
- On even/ odd dates: as in (11)
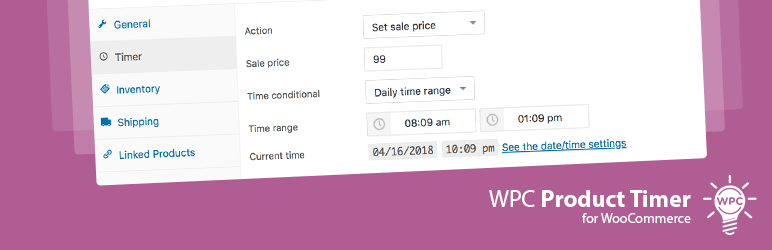
- Daily time range: as in (4)
- Daily before /after time: as in (8)
- Weekly on every specific date (10)
- Week No.
- Month No.
- Everyday
- Set sale price
- Set regular price
- Set featured
- Set unfeatured
- Set unpurchasable
- Set out of stock
- Set hidden
- Enable Sold Individually
- Disable Sold Individually
- Incorrect: Weekly on every Thursday, Friday >> Correct: These are two date parts (2 weekdays, must separate them into 2 actions: [Action 1] Weekly on every Thursday, [Action 2] Weekly on every Friday.
- Incorrect: Daily time range: 6 AM-6 PM, 8 PM-10 PM >> Correct: These are two time ranges, must separate them into 2 actions: [Action 1] Daily time range: 6 AM-6 PM, [Action 2] Daily time range: 8 PM-10 PM.
- Correct: Weekly on every Monday, Daily time range: 6 AM-6 PM >> This is achievable, which means “from 6 AM to 6 PM (time part) of every Monday of each week (date part)”
- Correct: On odd dates, Weekly on every Monday >> This is achievable and applicable to any day that satisfies BOTH conditions: “24 hours of all odd dates that are Mondays of the week".
- Correct: Date range: 01-31 March, Weekly on Every Monday, Daily after time: 5 PM >> This is achievable and applicable to any day that satisfies all conditions, which means “after 5 PM of all Mondays in March.”
安装:
- Please make sure that you installed WooCommerce
- Go to plugins in your dashboard and select "Add New"
- Search for "WPC Product Timer," Install & Activate it
- When adding/editing the product, you can choose the "Timer" tab, then add action and time conditional
更新日志:
5.4.2
- Updated: Optimized the code
- Fixed: Minor CSS/JS issues in the backend
- Updated: Compatible with WP 7.0 & Woo 10.8
- Updated: Optimize the code for better performance
- Fixed: Minor CSS/JS issues in the backend
- Updated: Compatible with WP 6.9 & Woo 10.6
- Updated: Optimized the code
- Updated: Compatible with WP 6.9 & Woo 10.4
- Fixed: Some "violation of the directory" issues
- Updated: Optimized the code
- Updated: Compatible with WP 6.8 & Woo 10.3
- Fixed: Minor CSS/JS issues in the backend
- Updated: Compatible with WP 6.8 & Woo 10.2
- Updated: Optimized the code
- Fixed: Minor CSS/JS issues in the backend
- Updated: Optimized the code
- Fixed: Minor CSS/JS issues in the backend
- Updated: Compatible with WP 6.8 & Woo 9.9
- Updated: Optimized the code
- Updated: Compatible with WP 6.7 & Woo 9.7
- Updated: Compatible with WP 6.7 & Woo 9.5
- Updated: Optimized the code
- Updated: Compatible with WP 6.7 & Woo 9.4
- Added: Filter hooks: woopt_check_timer, woopt_check_roles, woopt_get_action_result, woopt_get_product_actions
- Updated: Optimized the code
- Updated: Compatible with WP 6.6 & Woo 9.2
- Added: Action enable/disable on-sale
- Updated: Compatible with WP 6.5 & Woo 8.9
- Fixed: Minor CSS/JS issues in the backend
- Updated: Compatible with WP 6.5 & Woo 8.8
- Updated: Optimized the code
- Updated: Compatible with WP 6.4 & Woo 8.5
- Updated: Optimized the code
- Added: Action's name (for management use only)
- Updated: Optimized the code
- Fixed: Variation's price
- Updated: Compatible with WP 6.3 & Woo 8.0
- Fixed: Minor CSS/JS issues in the backend
- Updated: Optimized the code
- Fixed: Minor JS issue in the backend
- Updated: Optimized the code
- Added: "Price base" for set regular/sale price action ...
- Released