
Payment Gateway Braintree WooCommerce
| 开发者 | wp.insider |
|---|---|
| 更新时间 | 2026年1月4日 08:50 |
| 捐献地址: | 去捐款 |
| PHP版本: | 6.0 及以上 |
| WordPress版本: | 6.9 |
| 版权: | GPLv2 or later |
| 版权网址: | 版权信息 |
详情介绍:
WooCommerce Braintree Payment Gateway allows you to accept credit card payments on your Woocommerce store via the Braintree gateway. It authorizes credit card payments and processes them securely with your Braintree merchant account.
It is compatible with WooCommerce High-Performance Order Storage (HPOS) feature.
Plugin Functionality:
- Easy to install and configure.
- Compatible with WordPress/Woocommerce plugins.
- You don't need any extra plugins or scripts to process the transaction.
- Accepts all major credit cards.
- It has the 3D secure payment support.
- Uses the latest version of Braintree library.
- Automatic payment confirmation to update order transaction.
- Very simple and clean Code to add a Braintree payment method to woocommerce.
安装:
Automatic Installation
- Login to your WordPress Admin area
- Go to "Plugins > Add New" from the left hand menu
- In the search box type "WooCommerce Braintree Payment Gateway"
- From the search result you will see "WooCommerce Braintree Payment Gateway" click on "Install Now" to install the plugin
- A popup window will ask you to confirm your wish to install the Plugin.
- Download the plugin zip file
- Login to your WordPress Admin. Click on "Plugins > Add New" from the left hand menu.
- Click on the "Upload" option, then click "Choose File" to select the zip file from your computer. Once selected, press "OK" and press the "Install Now" button.
- Activate the plugin.
- Open the Settings page for WooCommerce and click the "Checkout" tab.
- Click on the sub tab for "Braintree".
- Configure your "Braintree" settings. See below for details.
- Enable/Disable - check the box to enable Braintree Payment Gateway.
- Title - allows you to determine what your customers will see this payment option as on the checkout page, default is "Credit card".
- Description - controls the message that appears under the payment fields on the checkout page.
- Sandbox - check the box to enable sandbox mode to test how would payments work for you, real payments will not be taken. Uncheck this option to put It in production mode.
- Sandbox Merchant ID/Merchant ID - enter your Braintree Merchant ID, this is gotten from your account page on Braintree website.
- Sandbox Public Key/Public Key - enter your Braintree Public Key, this is gotten from your account page on Braintree website.
- Sandbox Private Key/Private Key - enter your Braintree Private Key, this is gotten from your account page on Braintree website.
- Click on Save Changes for the changes you made to be effected.
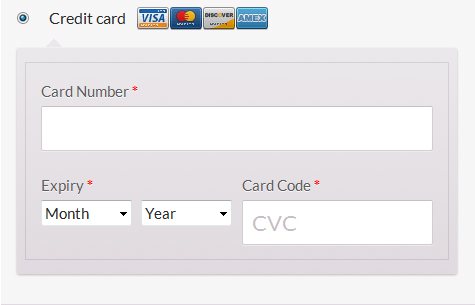
屏幕截图:
常见问题:
What Do I Need To Use The Plugin
- You need to have WooCommerce plugin installed and activated on your WordPress site.
- You need to open an account on Braintree website.
Will my customers be able to checkout using their credit cards after I install this plugin?
Yes
Does this Plugin support WooCommerce Subscriptions?
No, It doesn't, but this functionality is in plan for the near future.
Does this plugin require the SSL?
As an online merchant, it is your responsibility to make sure the information you collect from your customers is protected so yes, you need it.
更新日志:
2.0.1
- Updated the display name and banner graphic.
- Updated the Braintree library to the latest version.
- Tested to work with the latest version of WooCommerce, Braintree and WordPress.
- Added HPOS feature compatibility.
- Removed the admin notice for the secure checkout option which has been removed from WooCommerce.
- Updated for WooCommerce v8.3.1
- Tested on latest WP version.
- Updated to work with 3DS version 2.
- Updated the Braintree SDK to latest.
- Postponed plugin init to ensure other addons have loaded.
- Modified plugin code to follow WP Coding Standards.
- Updated Braintree PHP SDK to prevent deprecation notice when using PHP 7+.
- Fixed WooCommerce settings URL in force SSL notice.
- Fixed inability to proceed with payment when 3D Secure is not enabled in Braintree account.
- Added 3D Secure support.
- Added a function_exists check to see if Braintree library is already loaded.
- Replaced a deprecated call with the new method.
- Added a link to the addon's settings menu.
- Added woocommerce tested upto version number in the plugin header.
- Display error when the transaction is declined. Thanks to @bolint for making this change.
- Fixed a typo.
- Upgraded the Braintree library to the latest version.
- PHP version check changed from 5.2.1 to 5.4.0
- Updated Braintree PHP Client Library to version 3.9.0.
- Added customer information to Braintree.
- PHP version check changed from 5.3 to 5.2.1
- Updated Braintree PHP Client Library to version 2.35.2. Released December 17, 2014.
- First release