
Worldline Global Online Pay for WooCommerce
| 开发者 |
woocommerce
automattic syde worldlinelogeecomsupport worldlineisv |
|---|---|
| 更新时间 | 2026年3月2日 21:43 |
| PHP版本: | 7.4 及以上 |
| WordPress版本: | 6.9 |
| 版权: | GPLv2 |
| 版权网址: | 版权信息 |
详情介绍:
安装:
- WordPress Version 6.3 (or newer) installed.
- An active WooCommerce store version 8.7 (or newer).
- PHP version 7.4 or newer.
- Worldline Merchant Account
- Log in to your WordPress Admin panel.
- Navigate to Plugins > Add New.
- Search for the “Worldline GoPay for WooCommerce” plugin.
- Click on Install Now and wait until the installation finishes.
- Click the Activate button on the success page (or activate it later in Plugins > Installed Plugins).
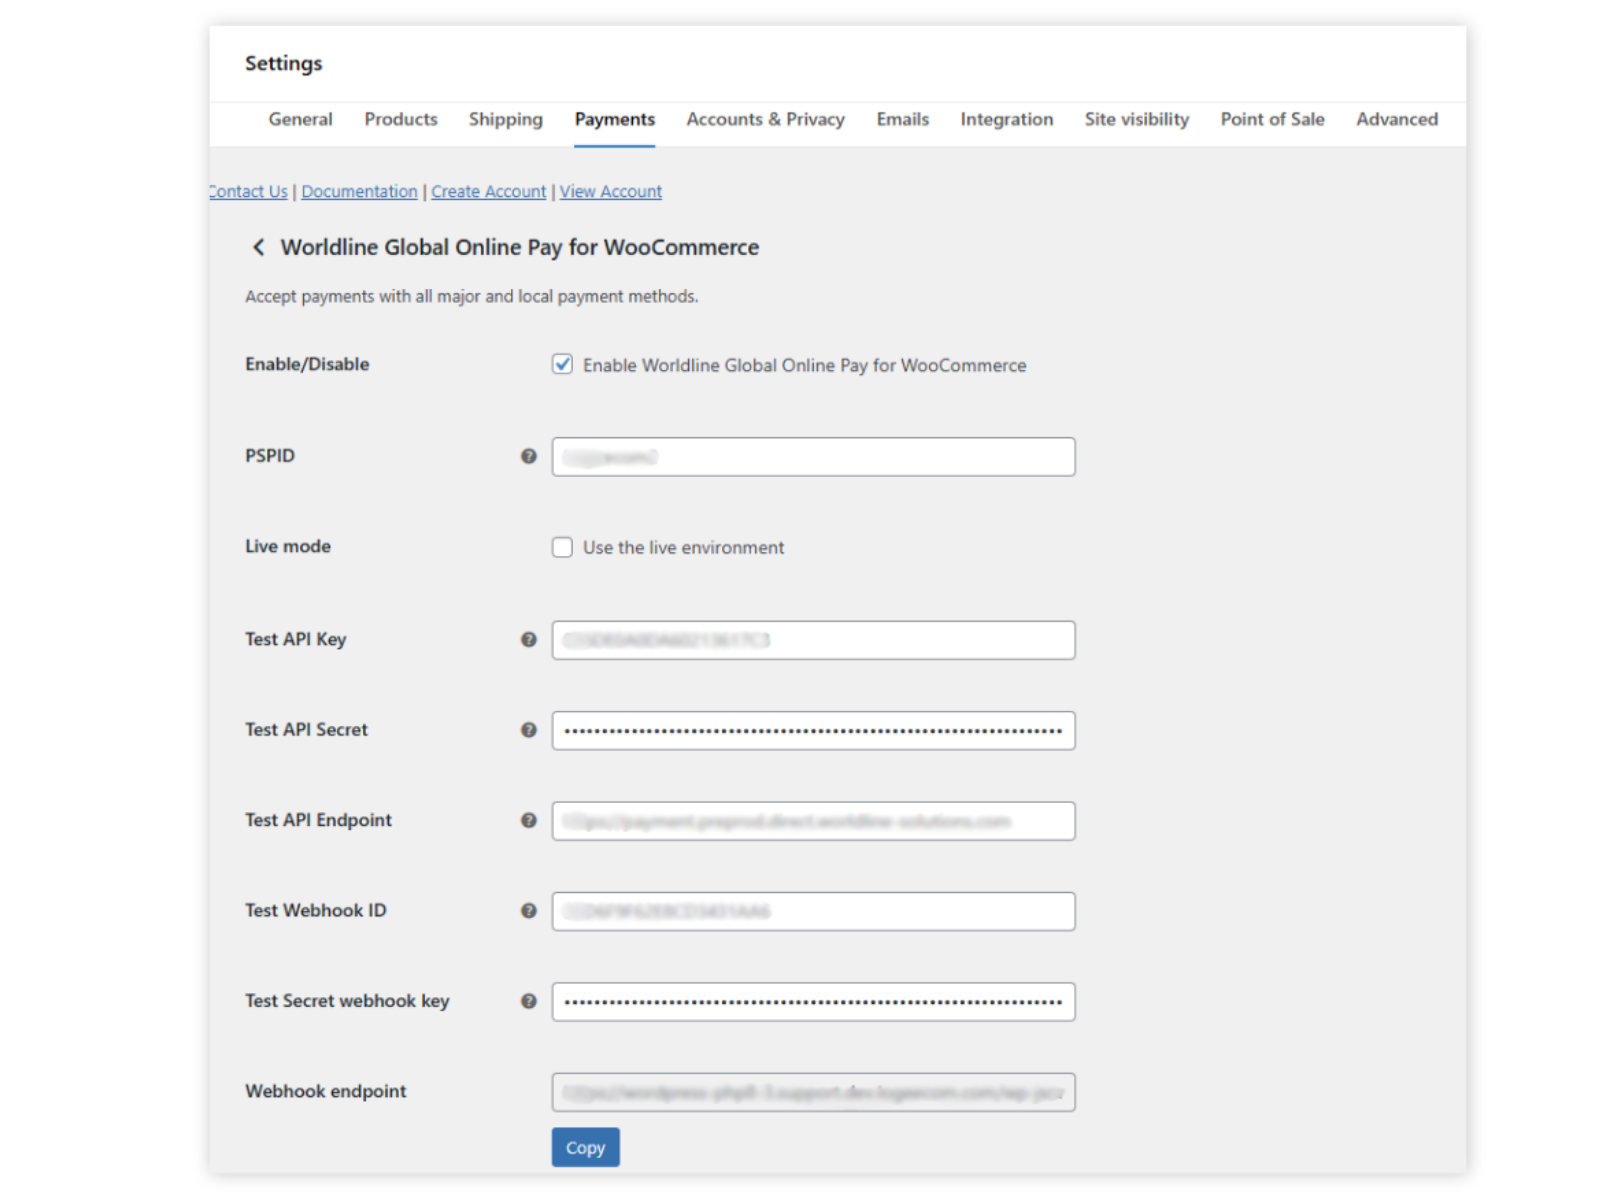
- After activating the Worldline GoPay for WooCommerce plugin, navigate to WooCommerce > Settings > Payments.
- Click “Manage” on Worldline GoPay for WooCommerce.
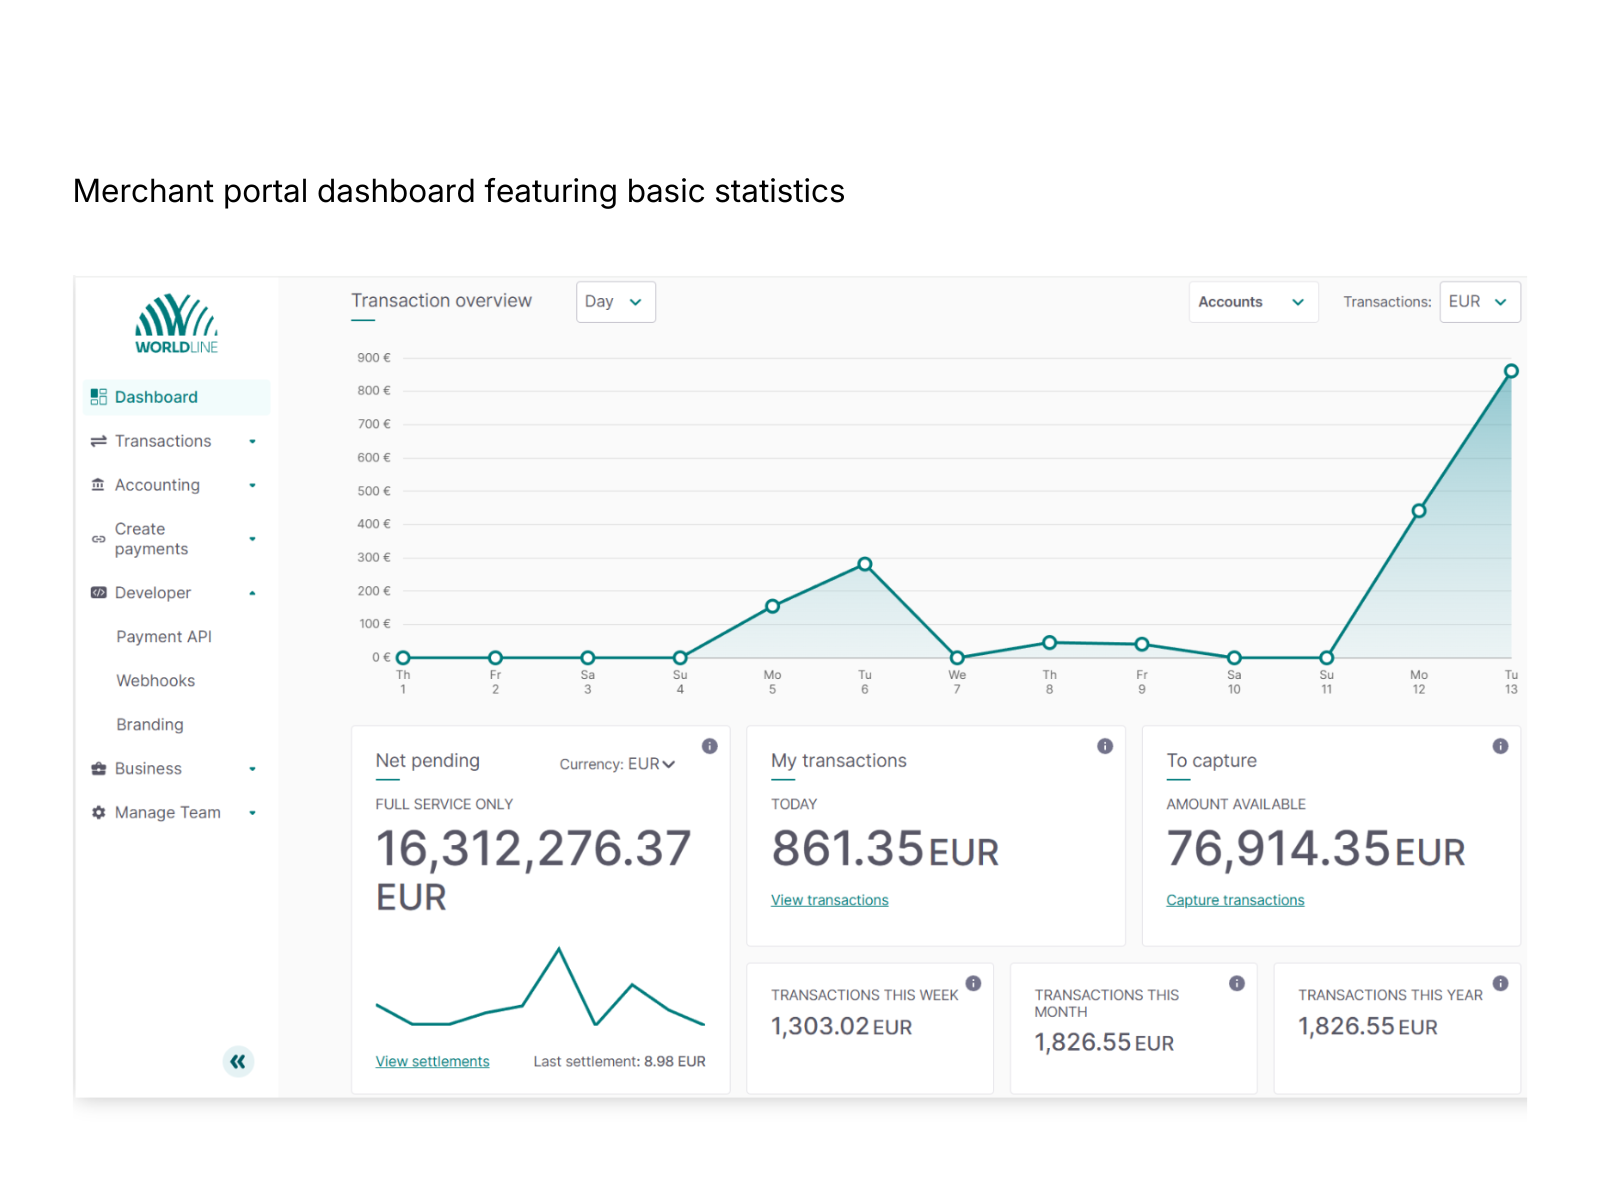
- Fill in the PSPID, API Key, and API Secret fields (live/test depending on your environment) from your Worldline Merchant Portal (Developer > Payment API).
- Click on “Save changes” to store these settings in the plugin.
- Navigate to Developer > Webhooks inside Worldline Merchant Portal and click “Generate webhook keys”.
- Copy the generated details into the fields “Webhook ID” and “Secret webhook key” inside the plugin.
- Choose if you’ll use manual or automatic webhook URL configuration under “Webhook URL Configuration”.
- Automatic (Recommended): The URL(s) listed below will be used for transactions from this store, and any webhook URL(s) configured in the merchant portal will be ignored. You can add up to 4 additional webhook URLs in “Additional Webhook URLs”.
- Manual: Copy the “Store Webhook URL” from the plugin configuration and add the webhook endpoint in the Worldline back office at Developer > Webhooks by clicking “Add Webhook Endpoint”.
- Click on “Save changes” to store these settings in the plugin.
屏幕截图:
常见问题:
How do I start using Worldline GoPay with WooCommerce?
To start using the Worldline GoPay for WooCommerce plugin, you need to:
- Install the plugin.
- Create a Worldline Merchant Account.
- Enter your API credentials into the plugin settings.
- Enable your desired payment methods.
How do I set up the Worldline GoPay for WooCommerce plugin
You can follow the steps outlined in the “Installation” tab on this page to install the plugin on your WooCommerce shop. Alternatively, you can find a more detailed installation guide on our documentation website.
Do I need a Worldline merchant account to use this plugin?
Yes, you need to create a Worldline Merchant Account to use this plugin. However, you can first request a free test account to explore the plugin’s features before committing to it.
What are the requirements to use the plugin?
To use the Worldline GoPay for WooCommerce plugin, you need to meet the following requirements:
- You need to have an active WooCommerce store version 8.7. or newer.
- You need to update your WordPress to version 6.3. or newer.
- You need PHP version 7.4 or newer.
- You need to have an active Worldline Merchant Account to process live payments.
Do I need to be PCI-DSS certified to use this plugin?
Yes, but you only need the lowest PCI-DSS certification (SAQ-A) when using Worldline GoPay for WooCommerce plugin. Its design ensures that all sensitive data is handled by Worldline directly. You can get the required SAQ-A certification level by filling in a Self-Assessment Questionnaire you can find and download on our official documentation portal.
How can I test the Worldline GoPay for WooCommerce plugin?
You can use a Worldline test account to simulate payments before connecting a live Merchant Account. When you log into your test account, you can complete payments using test cards without affecting live data.
What type of logging or debugging tools are available?
The Worldline GoPay for WooCommerce plugin stores log data of API calls, webhooks, and transaction events for up to 30 days for debugging purposes. You can use this log data to communicate with our support team more efficiently and with fewer back-and-forth emails should any issue arise. Our support team is at your disposal for anything from interpreting your log data to providing assistance with debugging. Get in touch with any questions or issues through this form.
Does the plugin support WooCommerce Subscriptions?
Unfortunately, no. The plugin doesn’t currently support WooCommerce subscriptions.
How can I contact Worldline GoPay for WooCommerce plugin support?
If you need help setting up the plugin, we recommend reviewing our official plugin documentation. In case you need additional support, please create a new thread on the support forums or contact our support team through this form.
更新日志:
- Updated: Branding of Pledg changed to Sofinco
- Updated: Branding of iDeal changed to iDEAL | Wero
- Improved: Offer the possibility to only accept instant bank transfer.
- Fixed: Branding for Worldline Bank Transfer solution
- Added: Support of payment method “SEPA Direct Debit”
- Fix: Stability for 3DS exemption capabilities
- Fixed issue with displaying order on legacy Order data storage
- Improved exemptions capabilities related to 3DS exemption types
- Improved: Add subbrand for Apple Pay and Google Pay payment details
- Fix: Translation of card brands in the back-end
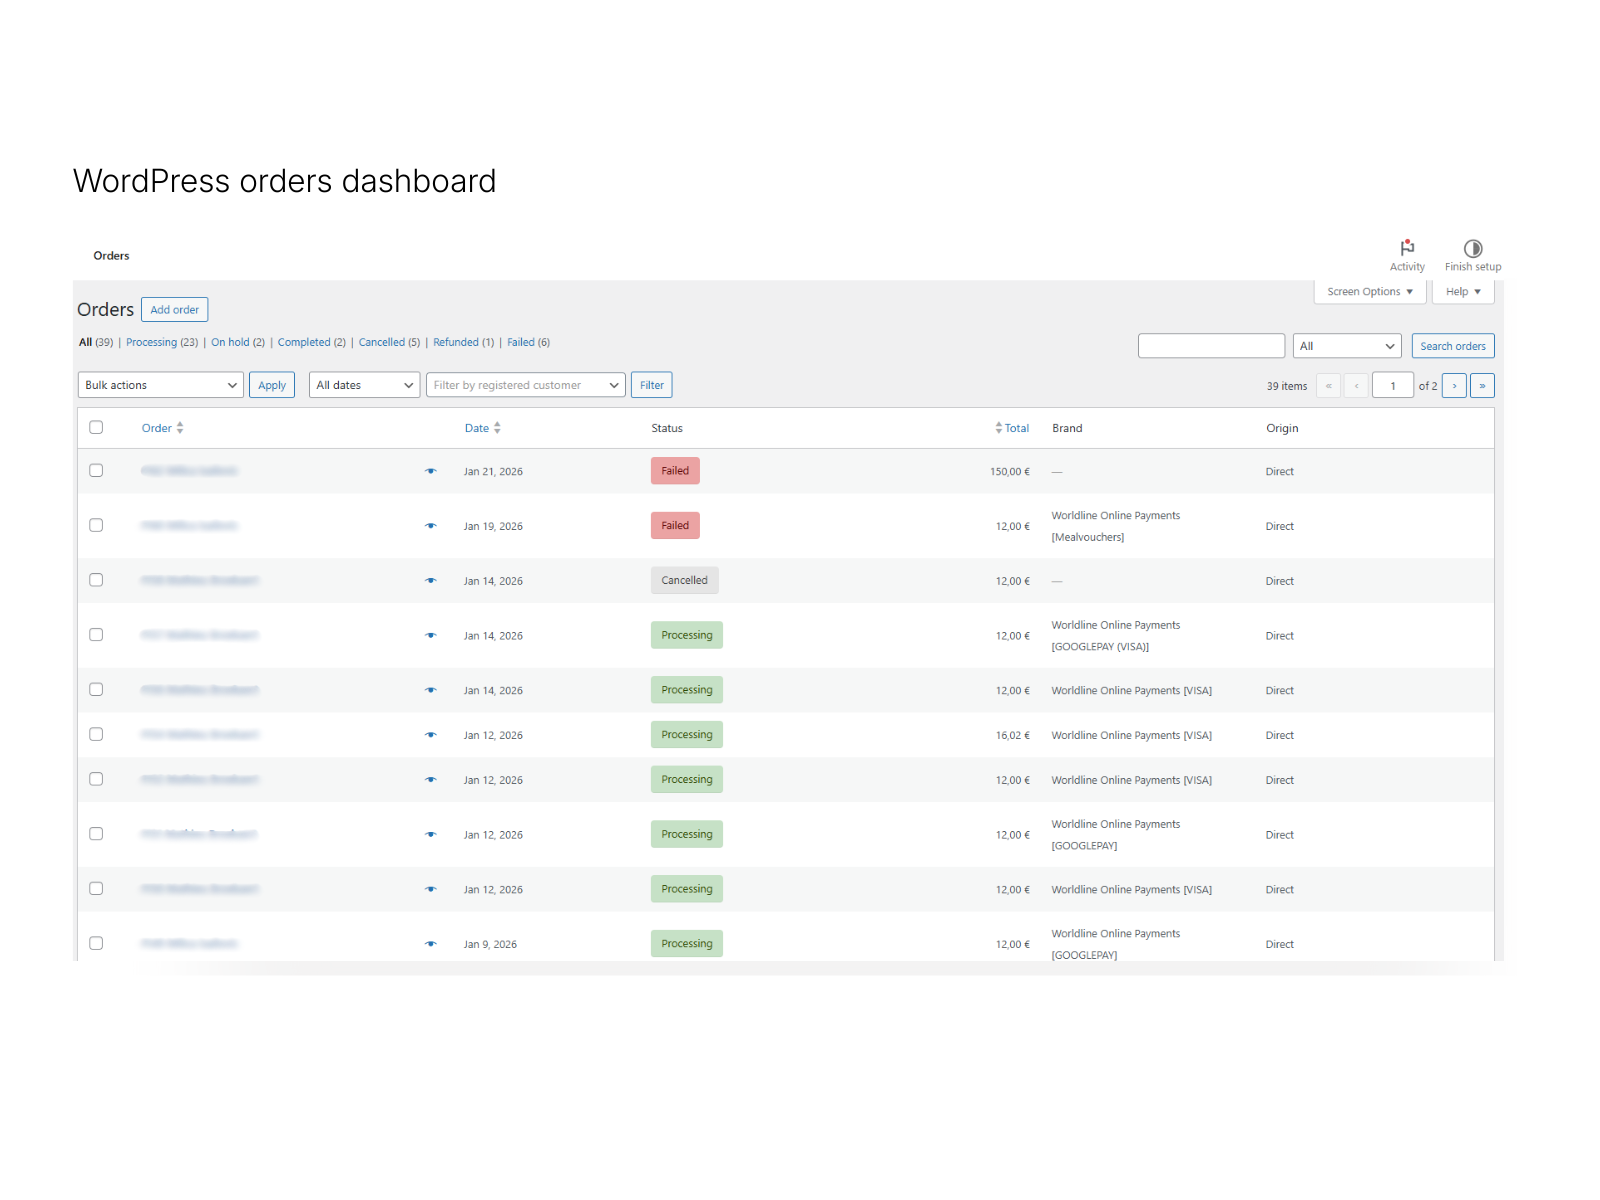
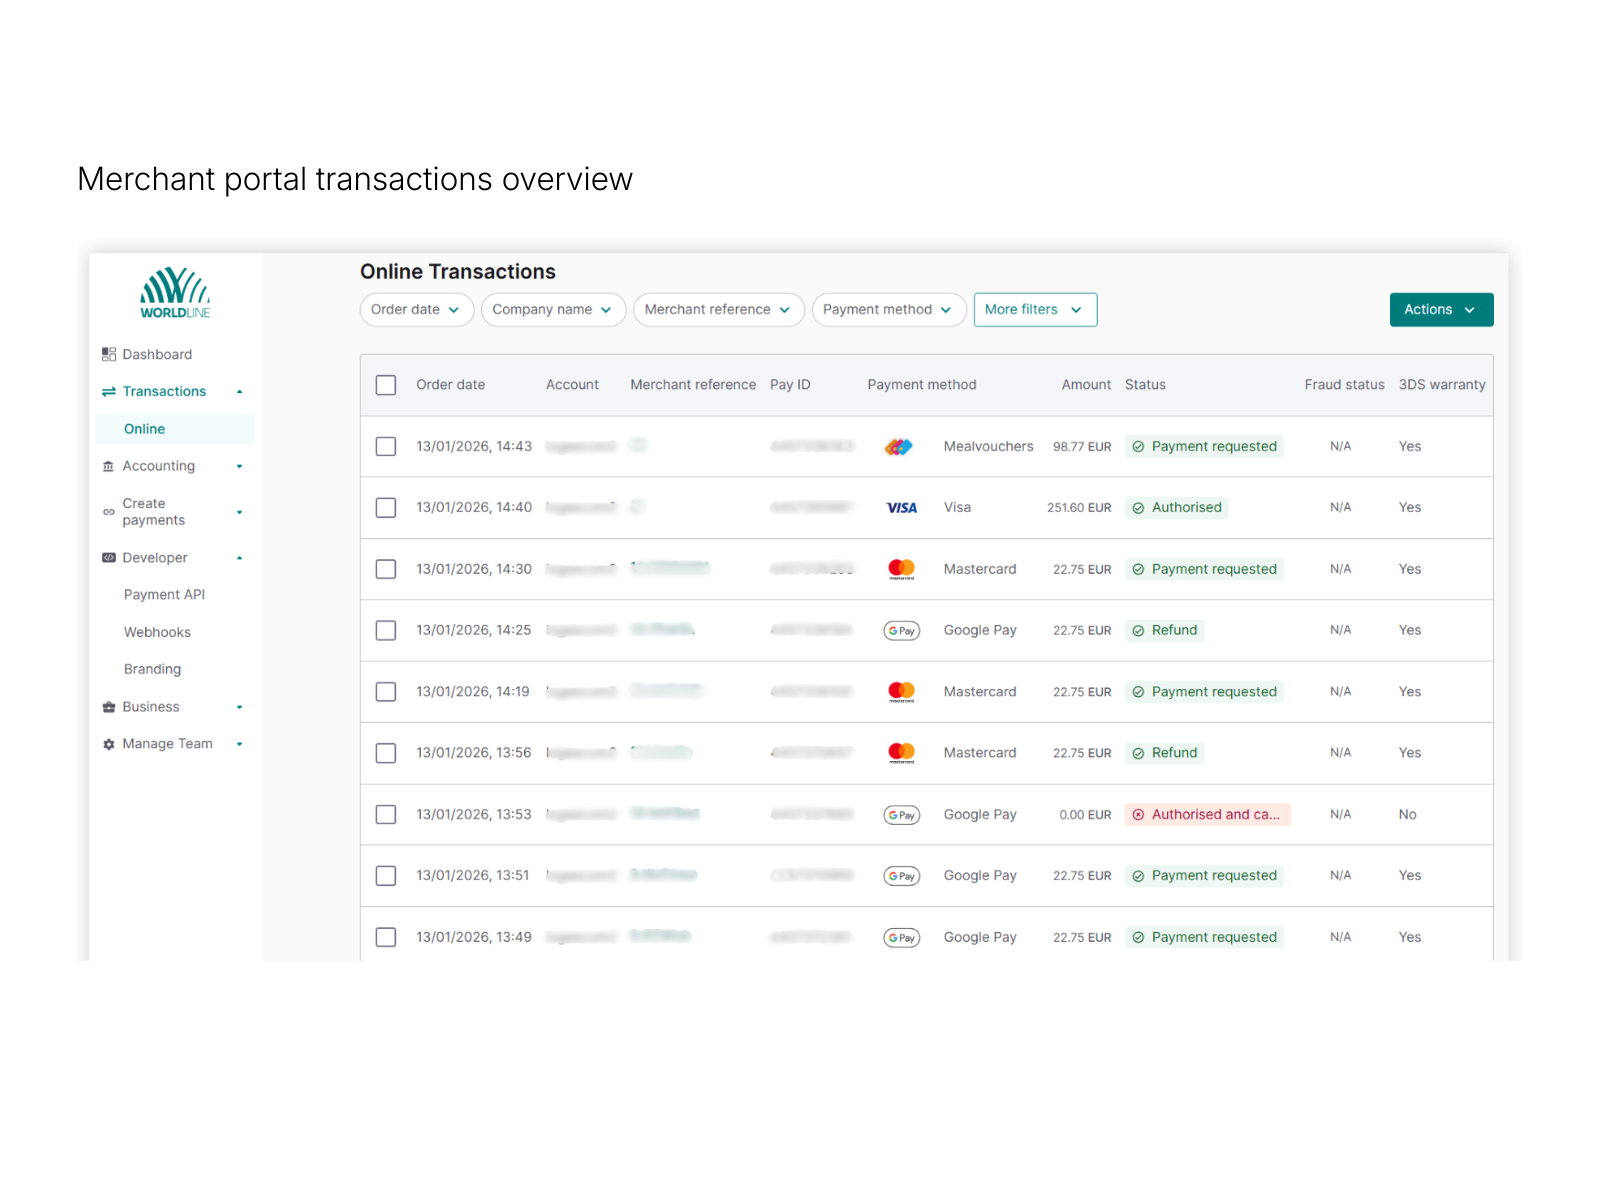
- Added: Additional information about transactions in orders overview and order details.
- Improved: Apple Pay is now supported with all browsers and devices
- Added: Possibility to auto-include primary webhooks URL in the payload of payment request, and to configure up to 4 additional endpoints.
- Added: Possibility to configure which logos will be displayed next to the “Credit cards” checkout option.
- Added: Orders that contain virtual and downloadable products will immediately go in a Completed status once the payment has been completed.
- Remove the Checkout Type field
- Add new payment method: Pledg
- Manage exemption for FR markets
- Fix language used for hosted checkout
- Change surcharge settings title
- Add pending order cancellation cron job logic
- Add upload logo for hosted payment to plugin settings page
- Change author URI and contributor
- Add missing 3DS parameters for Credit Card payments
- Fix storing the wrong API key in the database
- Fix Apple pay issue
- Fix plugin configuration page
- Fix translation issue
- Change plugin title to Offre e-commerce de CAWL
- Fix fatal error issue
- Add PayPal payment method
- Add Mealvouchers payment method
- Add CVCO payment method
- Add EPS payment method
- Allow SCA exemptions with Transaction Risk Analysis.
- Show totals with Surcharge on the checkout page.
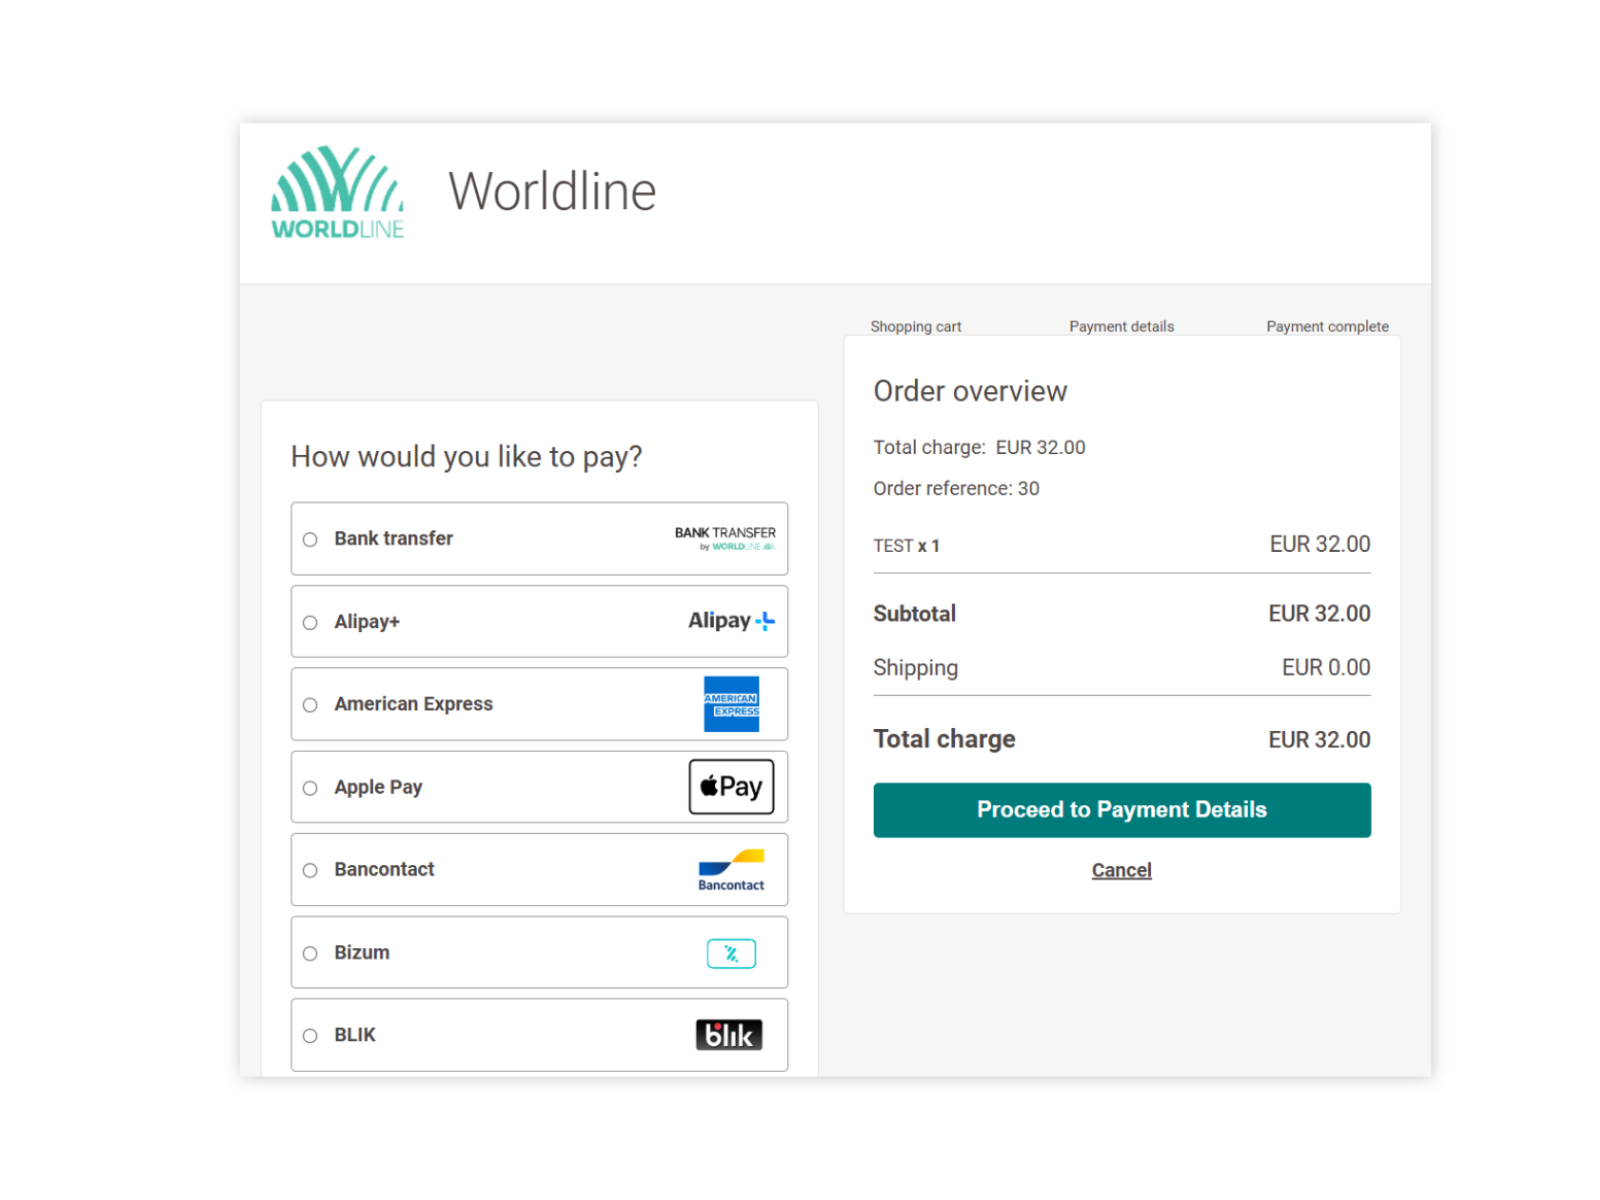
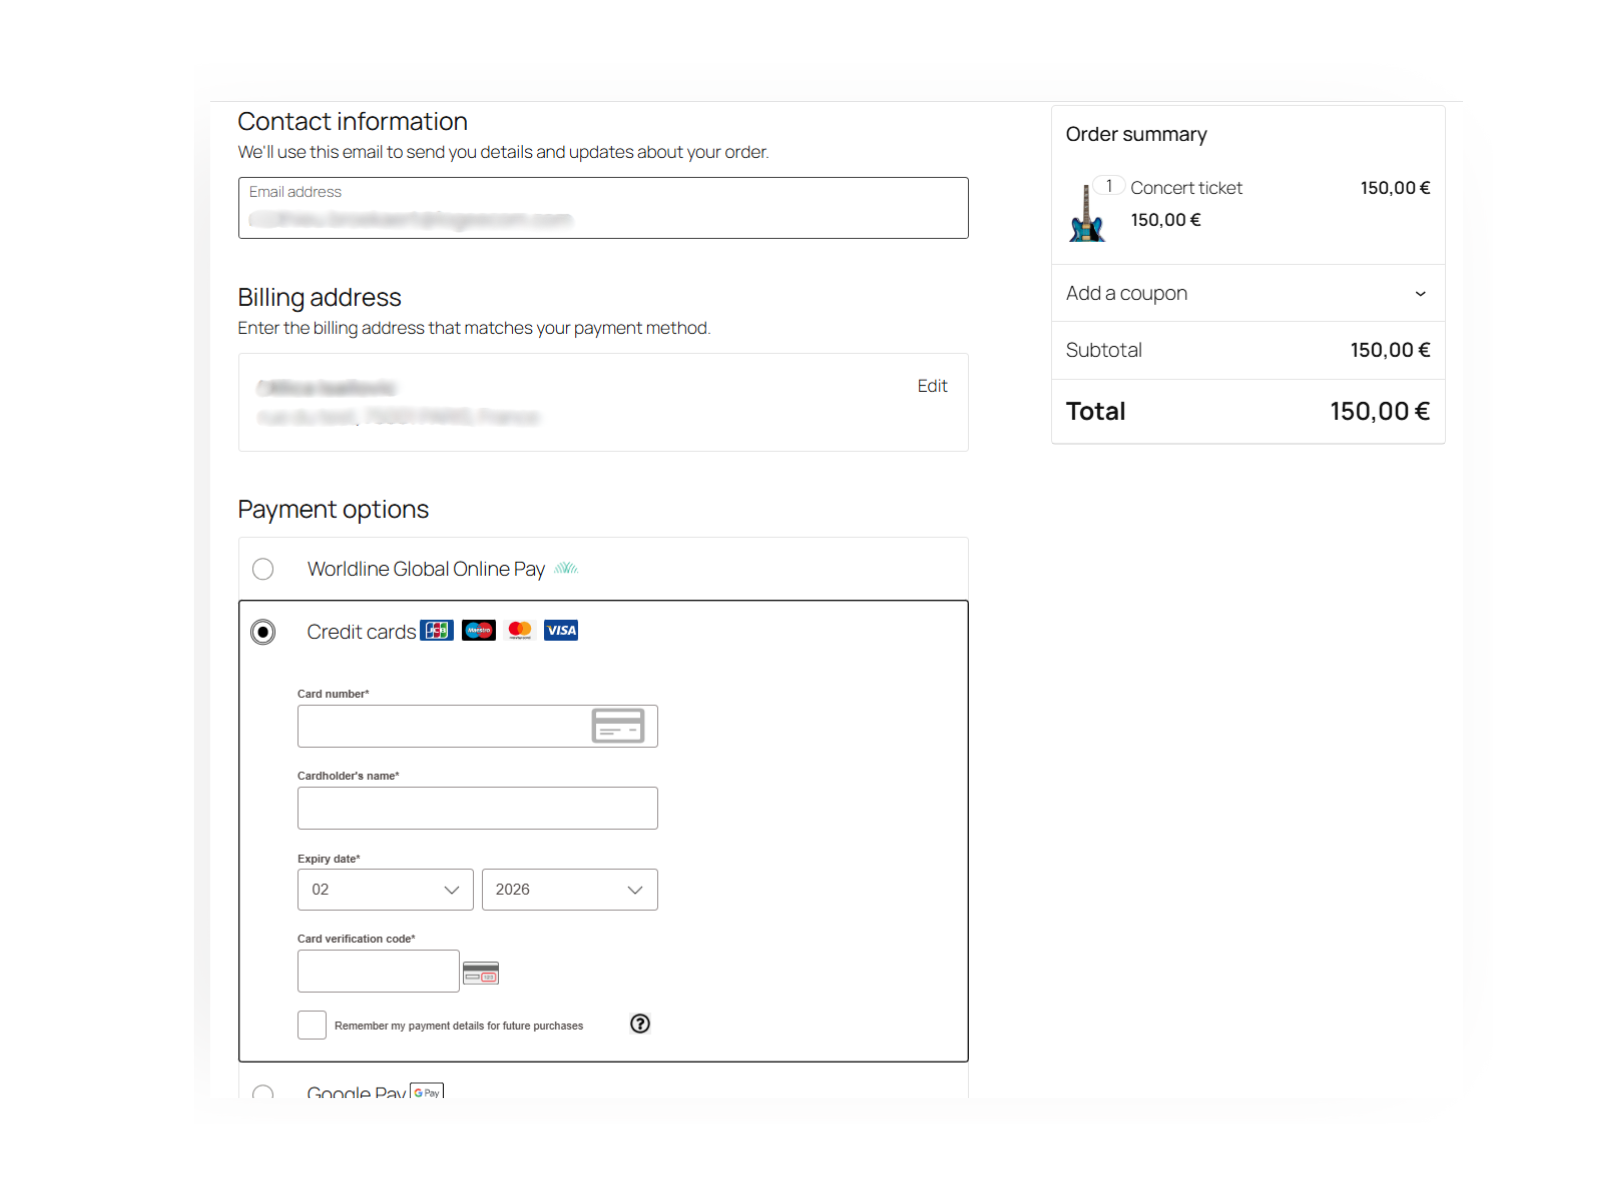
- Add payment method logos on checkout.
- Improve settings tooltips.
- Added single payment methods (Klarna, PostFinance, Twint).
- Allow to capture payments automatically after the specified time.
- Improve UI in WooCommerce 9.6+.
- Show saved cards on the Pay for Order page.
- Handle saved cards in Hosted Tokenization.
- Add payment method icons in checkout.
- Fix handling of orders that had multiple payment attempts.
- Enable 3DS by default.
- Added Hosted Tokenization (credit cards) payment method.
- Added single payment methods (ApplePay, BankTransfer, GooglePay, iDeal).
- 3DS improvements (Frictionless Flow, Exempt Flow & Challenge Flow).
- Allow to specify templates of hosted tokenization and hosted checkout pages.
- Allow to change the payment method title.
- Allow to disable submission of the cart data.
- Allow to set test and live webhook credentials separately.
- Improve refunding, mark refunded items.
- Fix payment method title.
- Initial release.