WP Shopify
| 开发者 |
fahadmahmood
invoicepress |
|---|---|
| 更新时间 | 2025年2月18日 23:32 |
| PHP版本: | 4.3 及以上 |
| WordPress版本: | 6.8 |
| 版权: | GPLv2 or later |
| 版权网址: | 版权信息 |
详情介绍:
安装:
- Login to the Shopify 2 Admin Panel.
- Go to Apps, then click the "Manage private apps" link at the bottom of the page.
- Click the "Generate API credentials" button.
- Set the Private app name to "Product Display" and be sure you have Read access to Products, variants and collections.
- Click the save button, and note your Private app API key and Password.
- In your WordPress admin, do the following:
- In Plugins->Installed Plugins, click the "Activate" link under WP Shopify.
- In Settings->WP Shopify, set your Shopify URL, API Key and password. To show a specific product on your blog, use the shortcode [wp-shopify-product] with parameter "id" as a self closing tag.\ So showing product 617935406 would be done as follows:
屏幕截图:
常见问题:
How should I know that my store is configured properly?
To configure your store properly, you will need Storefront API access. To achieve this, go to Apps and sales channels > develop apps > create an app and configure storefront API integration. Make sure to check all the access scopes (checkboxes) and save. You will get the Storefront API access token to configure your store on the plugin settings page. [youtube http://www.youtube.com/watch?v=3Q7P1D1owwc]
Video tutorial showing the credentials and the crown icon
Enter all the credentials correctly in the required fields on the plugin settings page, a crown icon in the top right will appear. And the go to store button will be active as well as redirecting you to your Shopify store. [youtube http://www.youtube.com/watch?v=YKlkpEKK1Sk]
Is there any step-by-step guide to install and configure this plugin?
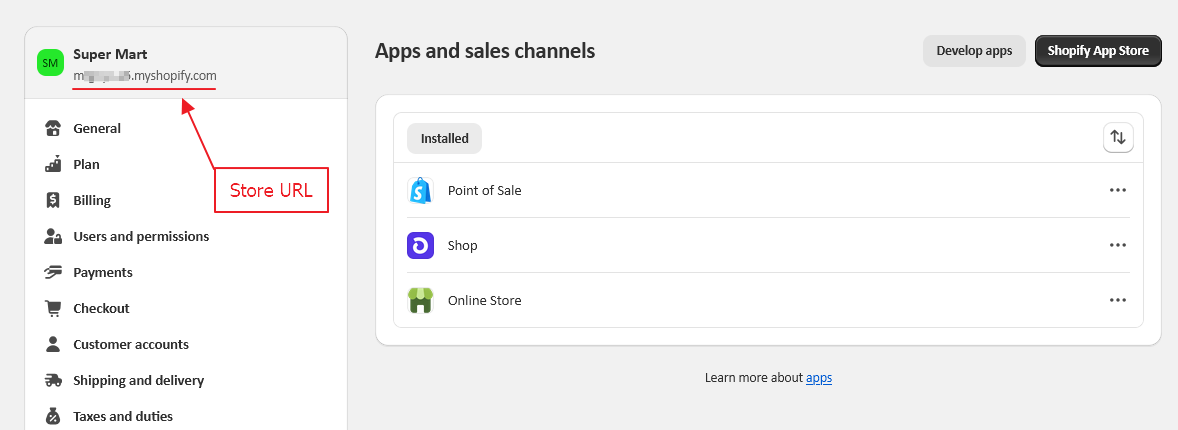
Configure this plugin with Shopify Store by following the steps below: 👉 1. Create a store or if you have an existing one, find the URL screenshot-9.png 👉 2. Create an APP and Install that APP on your store [youtube http://www.youtube.com/watch?v=3Q7P1D1owwc] 👉 3. Configure the storefront within your store APP screenshot-10.png 👉 4. Get the app storefront API access token, API key and API secret key to insert in the required input fields on the plugin settings page. Save changes and check the outcome. [youtube http://www.youtube.com/watch?v=YKlkpEKK1Sk] screenshot-8.png
更新日志:
- New: Clear cart and a trash icon added to remove the items. [18/02/2025]
- New: button_type="js" provided with the normal theme as well. [15/02/2025]
- Fix: Notice: Function _load_textdomain_just_in_time was called incorrectly. [12/12/2024]
- Fix: Fatal error: Uncaught TypeError: array_map(): Argument #2 ($array) must be of type array, bool given. [18/11/2024]
- New: Update settings page interface. [06/11/2024]
- Fix: [WP Shopify] Warning: Undefined variable $o. [Thanks to @hyuman][16/05/2024]
- Video tutorial link added for the storefront API keys. [Thanks to Mary Mueller][04/04/2024]
- Concatenation related issue resolved. [Thanks to Niko Moustoukas][08/03/2024]
- Fix: https://wordpress.org/support/topic/created-api-with-keys-etc-nothing-but-errors/ [Thanks to @kindred][01/04/2024]
- Updated description with the helpful guidelines. [Thanks to @kira01][28/01/2024]
- Translatable strings. [Thanks to @bichareh][11/08/2023]
- Translatable strings. 03/08/2023 [Thanks to @bichareh]
- Accessibility feature revised. 10/03/2023 [Thanks to JAMES MENENDEZ / FKQ]
- Accessibility feature added. 01/03/2023 [Thanks to JAMES MENENDEZ / FKQ]
- Video tutorial removed from the support tab. 06/02/2023 [Thanks to Joshua Stokes & Andrew Robbins]
- Back to shop link added through the shortcode on single product page. 20/12/2022 [Thanks to KC Clark]
- JS based add to cart button included in the shortcodes as a new attribute "button_type". 14/10/2022 [Thanks to Roman von Contzen]
- Search filter attribute added to the collection based shortcode. 22/06/2022 [Thanks to KC Clark]
- url-type and thumb-size attribues added to the collections shortcode. 14/09/2022 [Thanks to James Menedez]
- Settings page css tweaks. 19/06/2022 [Thanks to KC Clark]
- Capri theme added in premium version. 14/05/2022 [Thanks to Dylan Ence]
- GraphQL implemented with access token. 17/04/2022 [Thanks to Maria Abad-Guillen]
- Stylesheet path fixed for shotcodes function. 14/04/2022 [Thanks to kamasi]
- Updated version with help tab.
- Updated version for WordPress.
- Fatal error fixed. [Thanks to @adabob and @andrewmrobbins]
- Shortcode improved with two more attributes. [Thanks to lakewebworks]
- Languages added. [Thanks to Abu Usman]


