dlb's Send-A-Link
| 开发者 | DrandLomB |
|---|---|
| 更新时间 | 2019年10月14日 05:57 |
| PHP版本: | 3.5.1 及以上 |
| WordPress版本: | 5.2.3 |
| 版权: | GPLv2 or later |
| 版权网址: | 版权信息 |
详情介绍:
- Show visitors a link (icon and/or text) to send an email by adding a function call to your templates or a shortcode to your pages/posts.
- The input form, confirmation page, and email message are all based on easily modifiable HTML templates.
- Spam protection includes CAPTCHA verification and limiting any given IP address to two messages per minute.
- Send-A-Link loads fast because code is compact and does not use jQuery.
- Send-A-Link uses Javascript/AJAX for fast, inobtrusive form handling, but it degrades gracefully to provide full functionality to clients without Javascript.
- Built and tested on WordPress v3.5.1; although it might work on earlier versions, it has not been tested on them.
- Privacy reassurance that email addresses are not stored, but IP's are
- Make the "send another message" link consistently re-display form with fields pre-filled
- Localize to be ready for translation, including delivery of po and mo files and some instruction on how to use POEDIT to customize the wording, regardless of language. This could especially apply to the error messages.
- Attempt to use PHP's DOM handling routines for more robust and reliable formatting of responses when client does not have Javascript available
- Use a stored procedure to flush log daily to reduce number of times it is done
- Rewrite using class construction
- Add admin screens to specify some things now defined in constants and templates
- Make it easy to turn CAPTCHA off or on
- Make it easy to use other CAPTCHAs
安装:
Plugins > Add New in your blog's Administration menu. Search for "dlb" and click on the Install now link under dlb's Send-A-Link. Then click the Activate Plugin link.
The manual method requires several steps: (1) Download the zip file to your computer. (2) Unzip the file. (3) Upload the dlbs-send-a-link folder to your wp-content/plugins directory. (4) Go to Plugins > Installed Plugins in your blog's Administration menu and click the Activate link under dlb's Send-A-Link.
Customization of dlb's Send-A-Link is further described in the FAQ. Generally, it will be necessary to copy dsl-page.html, dsl-templates.html, and dsl.css from the plugin folder to your theme folder. Modify dsl-page.html to match the structure of your theme's page.php file. Modify dsl-templates.html to reflect the URL of your blog. Modify dsl.css to match the look & feel of your blog.
You need to register at http://captchas.net (It's free!) to obtain your own Username and Secret Key. Copy file dsl-captcha.php from the plugin folder to the theme folder. Change the values of $id and $key from "demo" and "secret" to your own Username and Secret Key respectively.
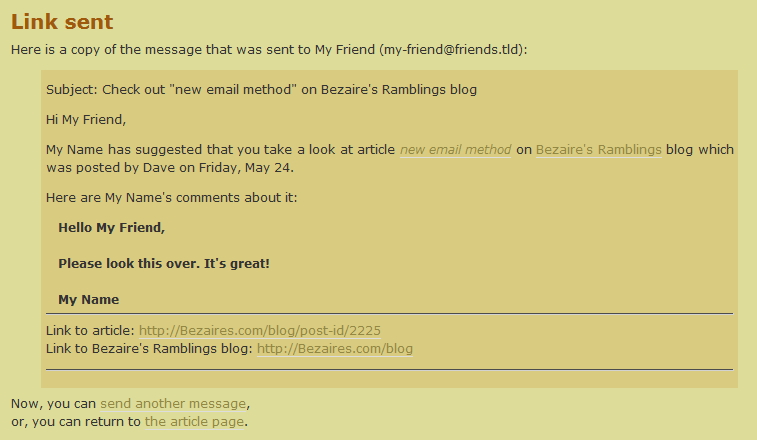
Finally, insert the shortcode [dsl-link] in your posts/pages wherever you want to show a link or icon to your visitors offering the opportunity to send a message. In your templates, insert the function dslLink(), typically as: if( function_exists('dslLink') ) { echo dslLink(); }. See FAQ to customize it.屏幕截图:

常见问题:
How can I change the wording and styles in the email message and on the Send-A-Link pages?
Most of the visible elements are defined in the template and CSS files. You can make your modifications to a copy of them stored in your theme folder so that they are retained when you upgrade to a new version of Send-A-Link.
What are the template and style file names?
The input form template is dsl-page.html. The confirmation page and email message templates are in file dsl-templates.html. The CSS styles are in file dsl.css.
Can I change the icon and text in the link?
Yes. The parameters for shortcode [dsl-link] and function dslLink() are as follows: show can be "icon", "text", or "both" to display only the icon, only the text or both; iconfile is the name of your icon file, with a path relative to the plugin folder; text is shown as a tooltip and on the link if show is either "text" or "both". In the shortcode, enter them like this: [dsl-link show="both" text="Your Text" iconfile="myIcon.gif" ]. In the function, enter them like this: dslLink( array( "show" => "both" , "text" => "Your Text" , "iconfile" => "myIcon.gif" ) ).
How can I change to wording on the form's submit button?
This can only be changed in file dsl.php. Search for the definition of DSL_SUBMIT_BUTTON_VALUE. This change will need to be made again after an upgrade to a new version.
How can I change the maximum number of characters allowed in names and comments?
This can only be changed in file dsl.php. Search for the definitions of DSL_MAX_COMMENT_CHARS, DSL_MAX_NAME_CHARS, and DSL_MIN_NAME_CHARS. These changes will need to be made again after an upgrade to a new version.
How can I change the minimum time between sends?
This can only be changed in file dsl.php. Search for the definition of DSL_MIN_SEND_INTERVAL. This change will need to be made again after an upgrade to a new version.
How can I change the wording in the error messages?
In this version of the plugin, the error messages must be changed by editing file dsl.php, which is heavily commented to make it easier to navigate and alter the code. A future release will make this easier by using the WordPress localization system. These changes will need to be made again after an upgrade to a new version.
更新日志:
- Use latest version of (CaptchasDotNet.php) from https://captchas.net/sample/php/captchasdotnet
- Change all references to "http" to "https" in CaptchasDotNet.php
- Remove call-by-reference for PHP v5.3 and above compatibility by
- Changed line 736 in file dsl.php from dslSubstitutePlaceholders(&$input) to dslSubstitutePlaceholders($input)
- First production release
- Correct regression error with showing values on error screens without Javascript enabled
- Candidate for final release pending complete testing
- Degrades gracefully to provide full functionality to users without Javascript
- Loads CAPTCHA configuration file from theme folder
- Implements activate and deactivate routines to provide a database table for logging
- Logs IP address and time for every mail sent
- Flushes all log records more than one day old
- Limits send rate from an IP address to one message every 30 seconds
- Moved the last bit of visible text from Javascript file to template file
- Added dlb's Send-A-Link to the WordPress.org Plugin Directory
- Improved the formatting and installation instructions in readme.txt
- Initial release
- Allows visitors to send someone an email containing a link to the post/page.
- Visitor can optionally include comments in the message.
- Provides a function to put into templates and a shortcodeto to put into posts/pages to show an icon or text link to send an email.
- The input form, confirmation page, and email message are based on HTML templates
- Customized CSS styles and templates can be stored in the theme folder
- Uses Javascript/AJAX for fast, inobtrusive form handling.
- Loads fast, based on compact code that does not use jQuery.
- Code is heavily commented, especially regarding WordPress plugin interfaces and AJAX features.
- Built and tested on WordPress v3.5.1; might work on earlier versions, but has not been test on them.