Tag Pilot FREE - Google Tag Manager Integration for WooCommerce
| 开发者 |
Handcraft Byte
Tag Concierge tagconcierge |
|---|---|
| 更新时间 | 2025年12月2日 19:09 |
| PHP版本: | 7.0 及以上 |
| WordPress版本: | 6.7.1 |
| 版权: | GPLv2 or later |
| 版权网址: | 版权信息 |
详情介绍:
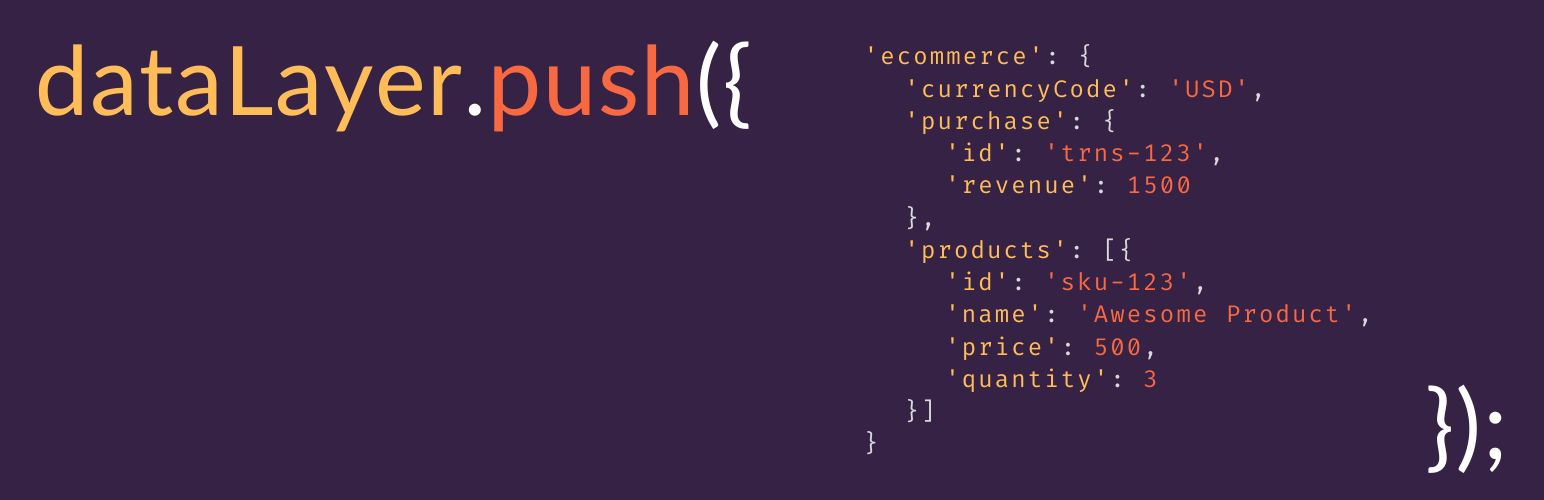
Tracking eCommerce events via Google Tag Manager and DataLayer makes adding new growth channels a straighforward task. Regardless of a number of connected platforms the data quality and events coverage stays the same.
https://youtu.be/tTluZ8l94VA
This plugin, once activated, starts pushing standard GA4 eCommerce events into GTM DataLayer. Once the data is there you can leverage Google Tag Manager containers to connect virtually any analytics o marketing platform, even if you're still undecided on your choice.
To speed up the process, our plugin offers pre-packaged integrations for GA4 and Facebook Pixel. You can be up and running in minutes, bypassing the need for time-consuming GTM configuration. See how it works here:
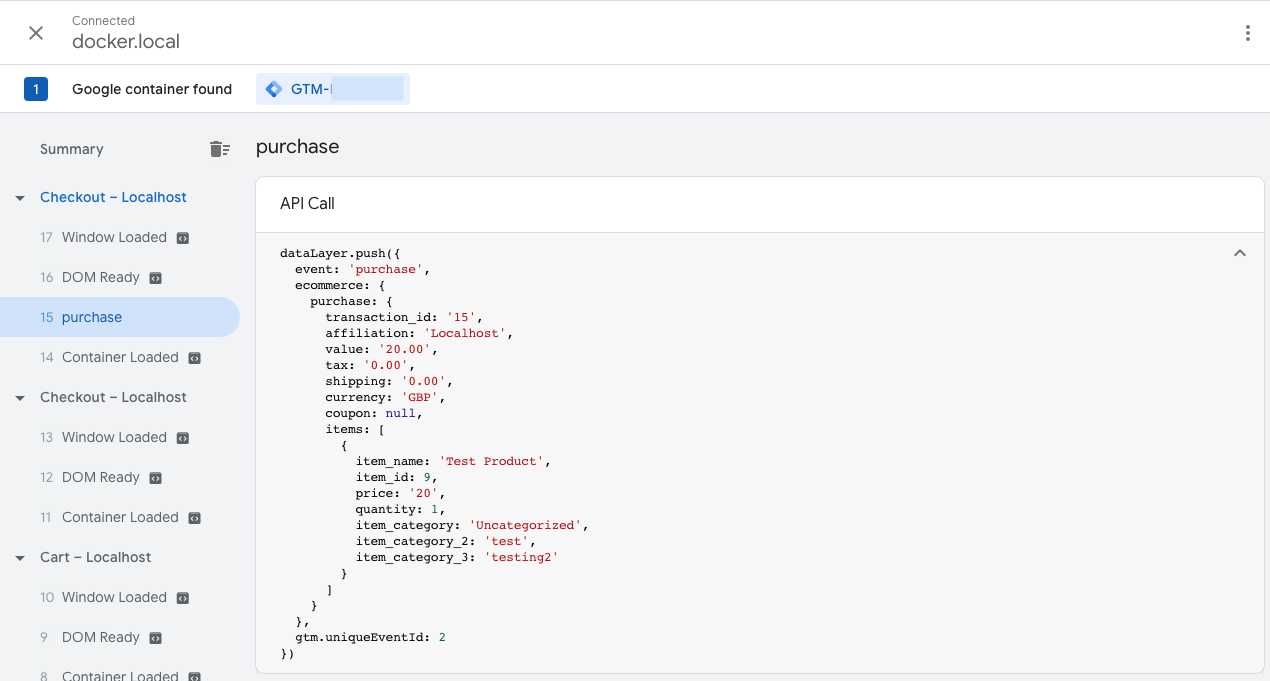
Check live demo here (perform typical shop activities - add to cart, purchase - to see how events are triggered). This demo showcase all PRO plugin features - FREE version is limited to 2 events listed below.
More information and documentation can be found here.
Example scenarios
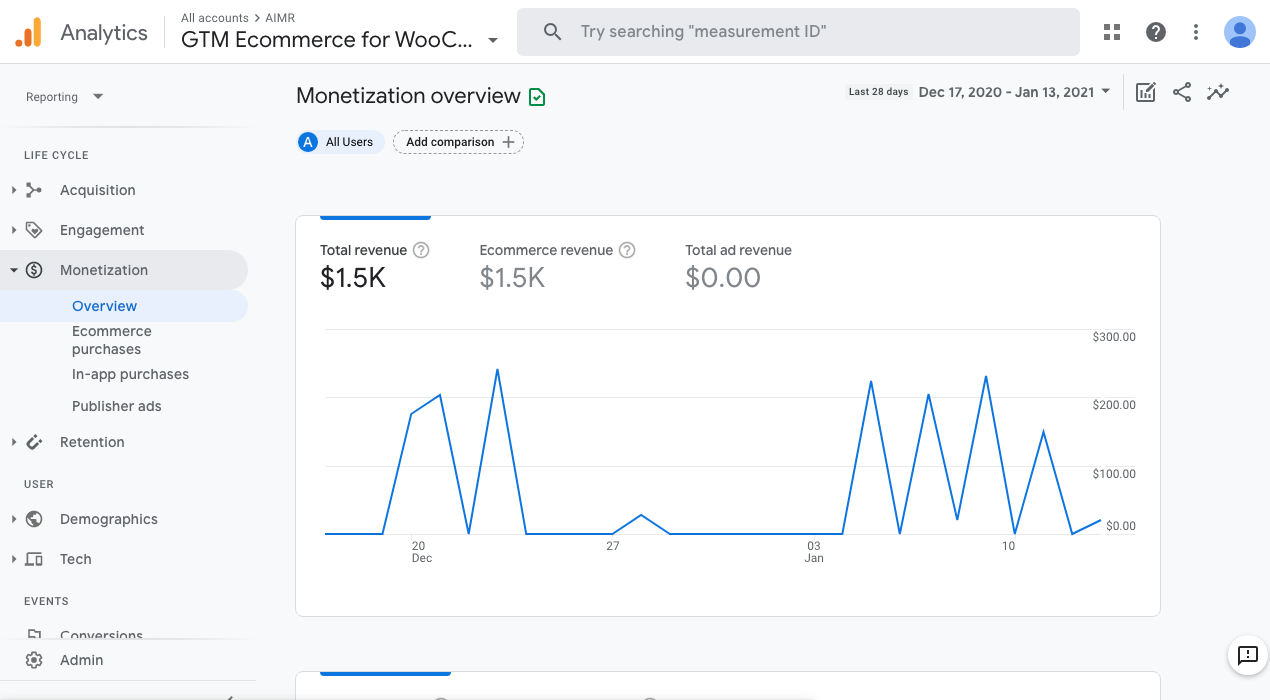
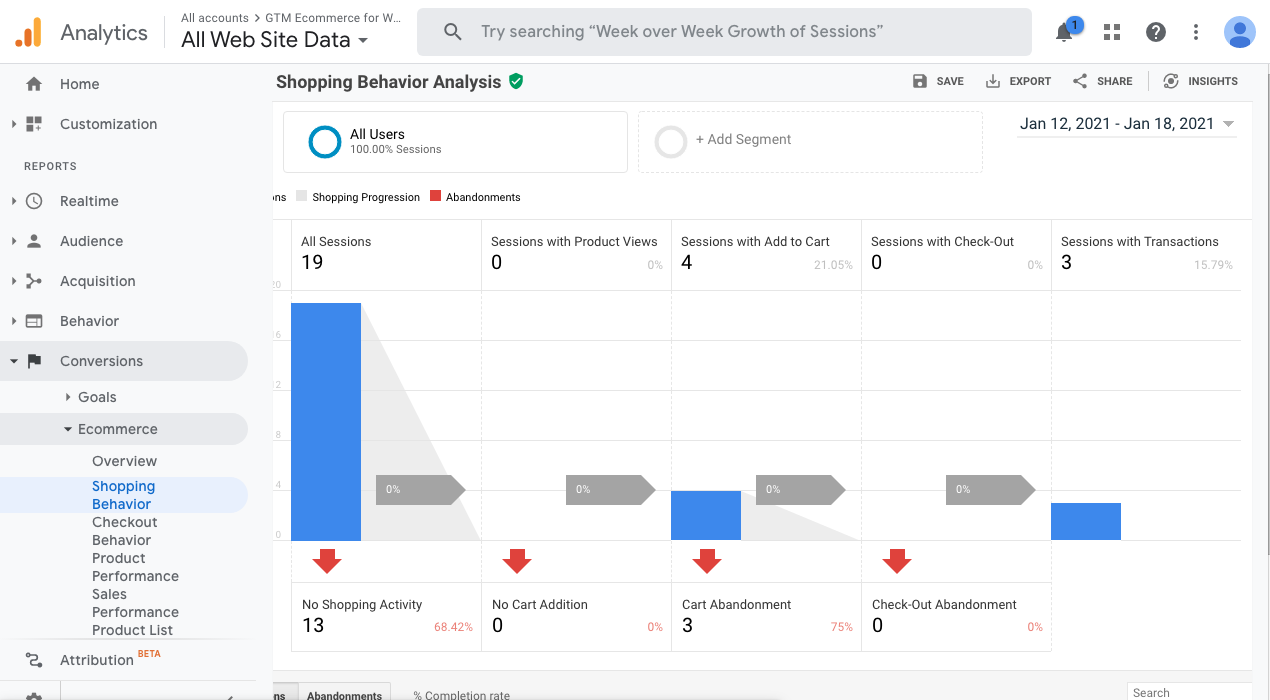
- Analyse eCommerce behaviors and study your sales funnel in Google Analytics 4
- Get most out of Facebook and Instagram paid campaigns with conversion tracking
- Optimise your Google Ads campaigns with Enhanced Conversion (requires PRO version)
- Expand to new platforms with TikTok, Pinterest and Microsoft UET presets (requires PRO version)
- Add To Cart
- Purchase
- view_item_list
- select_item
- view_item
- add_to_cart
- view_cart
- remove_from_cart
- begin_checkout
- add_billing_info
- add_payment_info
- add_shipping_info
- purchase
- user_data
- Google Ads (Enhanced Conversions)
- Google Ads Dynamic Remarketing
- Facebook Pixel (Advanced Matching)
- Microsoft UET / Bing Ads
- TikTok
- Consent Mode
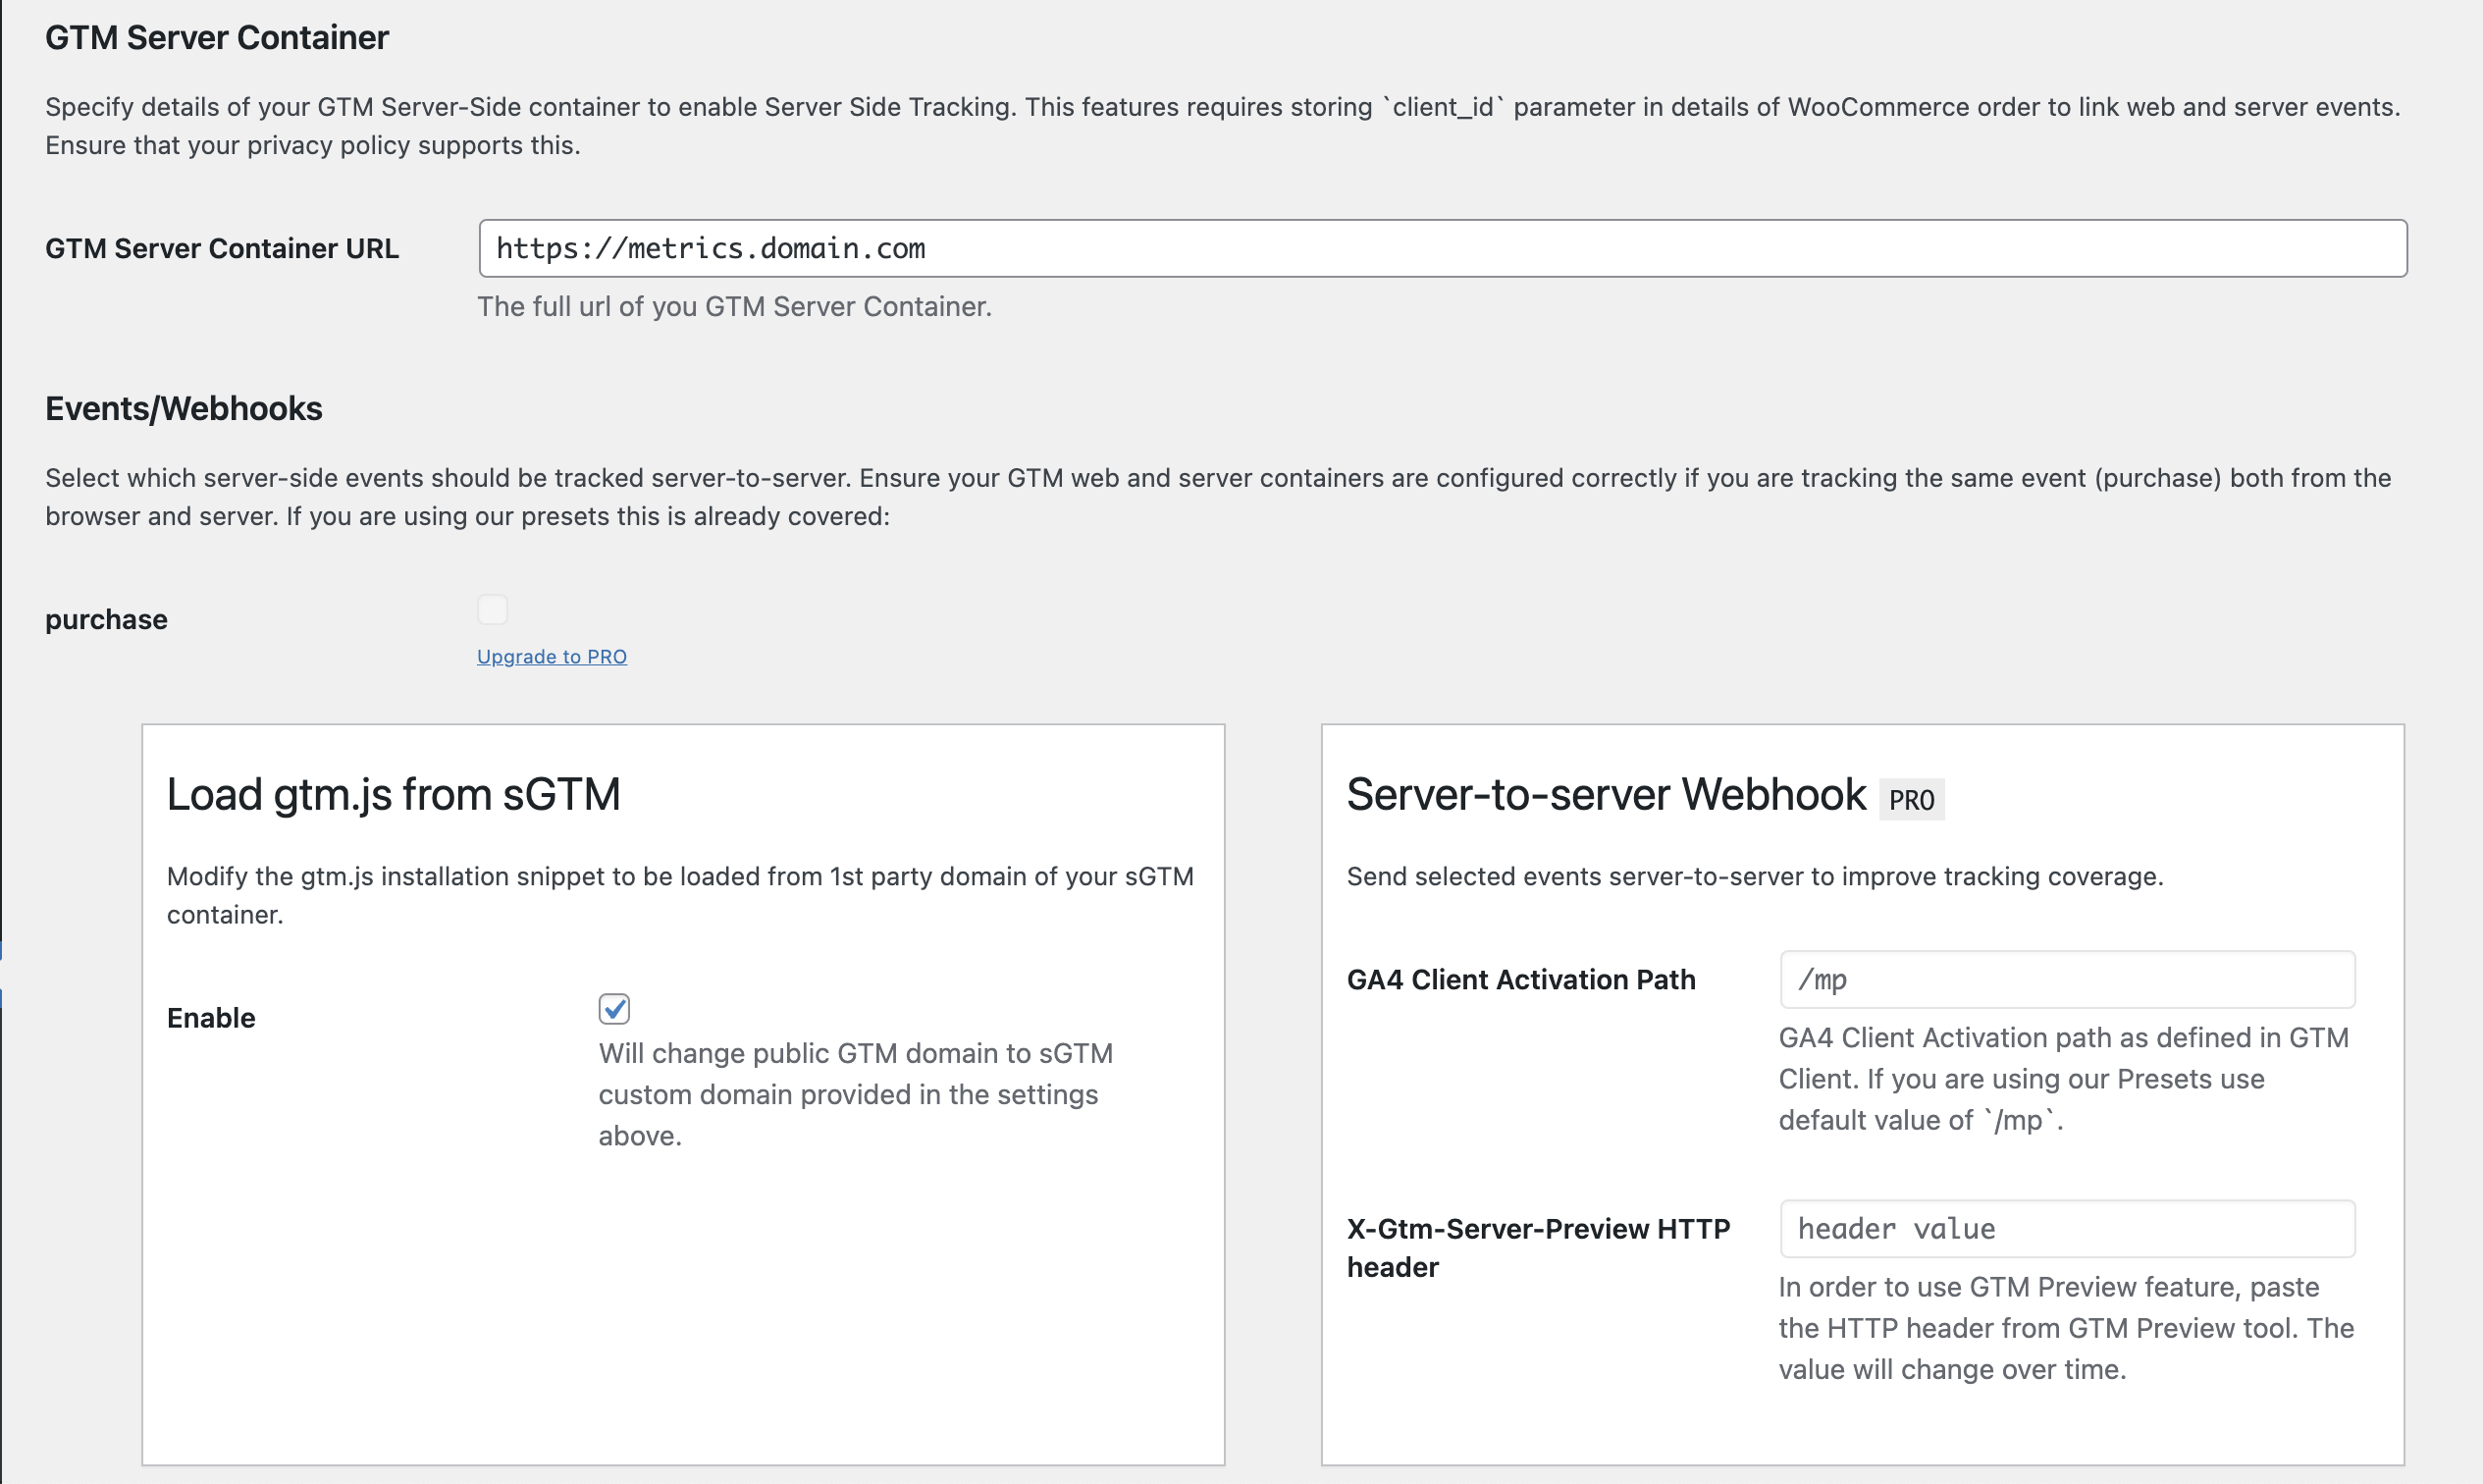
- Server-side GTM
- WooCommerce Brands
- Yith Brands
- WooCommerce Quick View
- WooCommerce Wishlists
- WPC Smart Wishlist
- WooCommerce Multilingual
- WPML
- Polylang
安装:
- Upload or install GTM for WooCommerce plugin from WordPress plugins directory.
- Activate the plugin through the
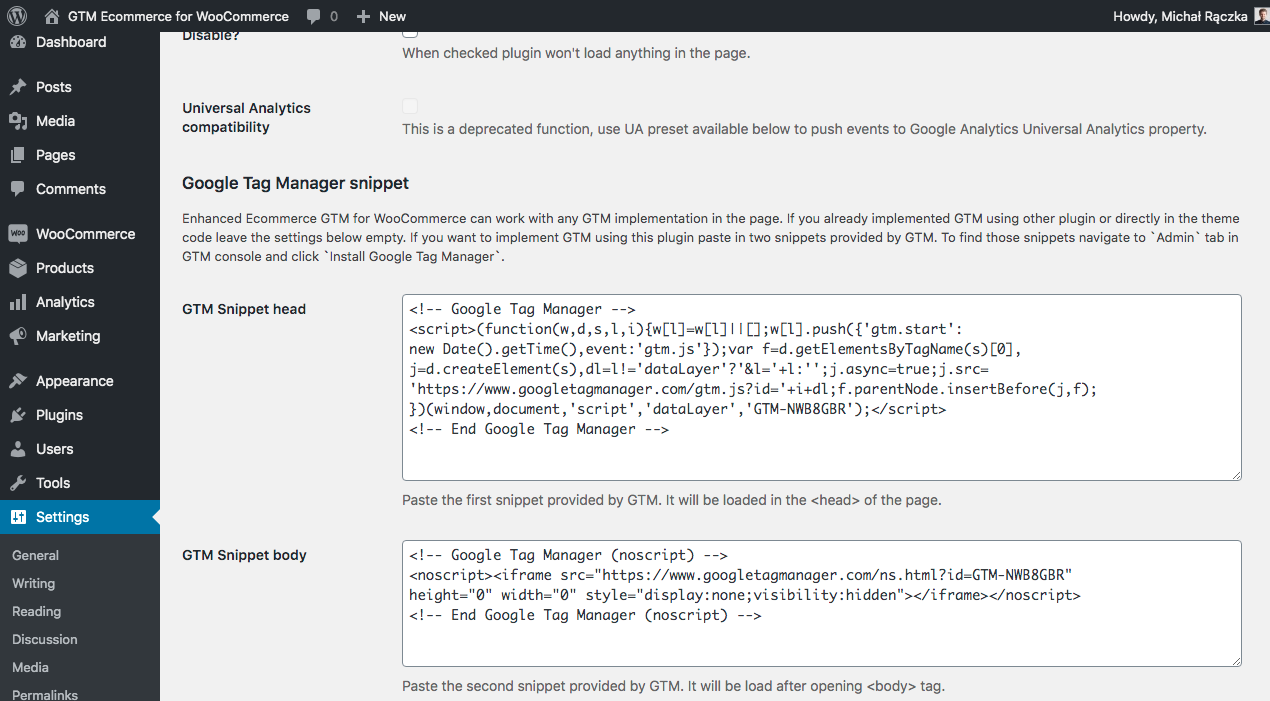
Pluginsmenu in WordPress. - That's it! If GTM is already implemented in your WordPress your eCommerce data will be pushed to GTM DataLayer. If not head to
Settings > Google Tag Managerand paste in GTM snippets. - Go to your Google Tag Manager workspace and define what you want to do with the tracked data. We know that settings up the GTM workspace may be cumbersome. That's why the plugin comes with a GTM container presets that you can import to your GTM workspace to create all required Tags, Triggers, and Variables in few simple clicks.
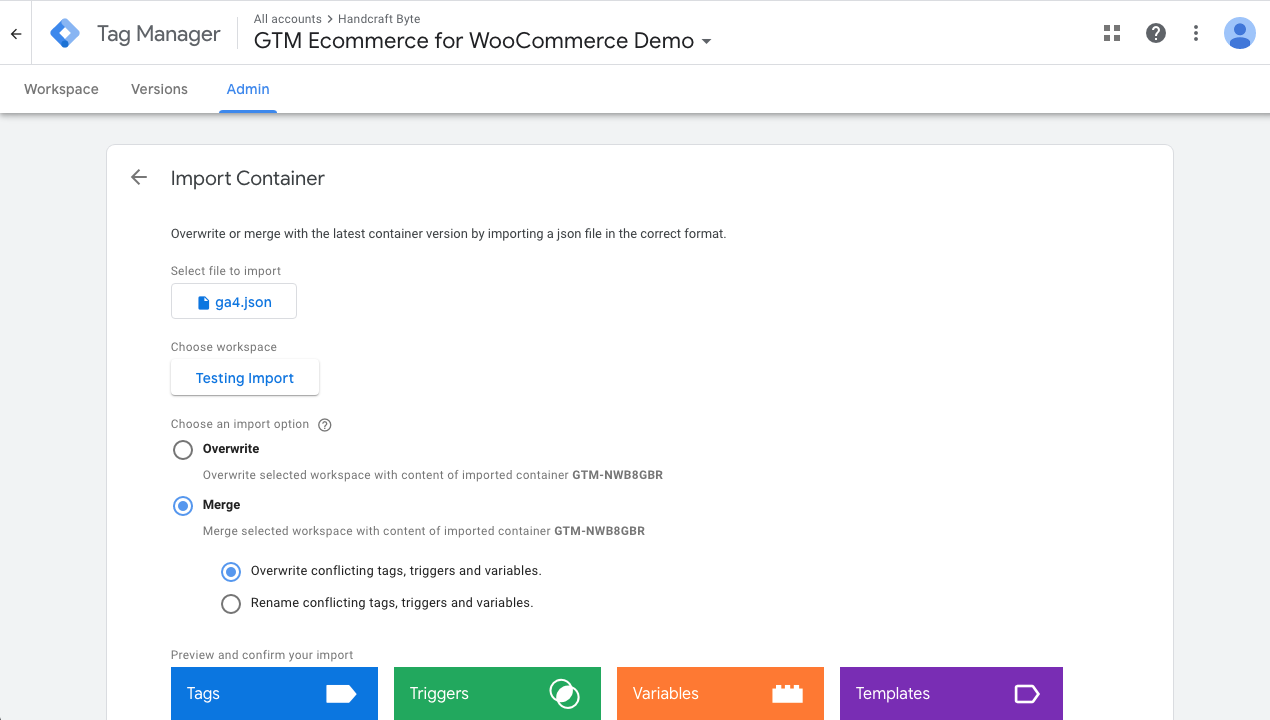
Settings > Google Tag Manager and click GTM Presets tab. Look for GTM Preset that you would like to install. Save it as a JSON file on your computer.
Then in GTM go to the Admin panel of your workspace. Click Import Container. Choose the container file you have just downloaded. Decide which workspace it should go to. Then select Merge and Overwrite conflicting tags, triggers and variables. as import options.
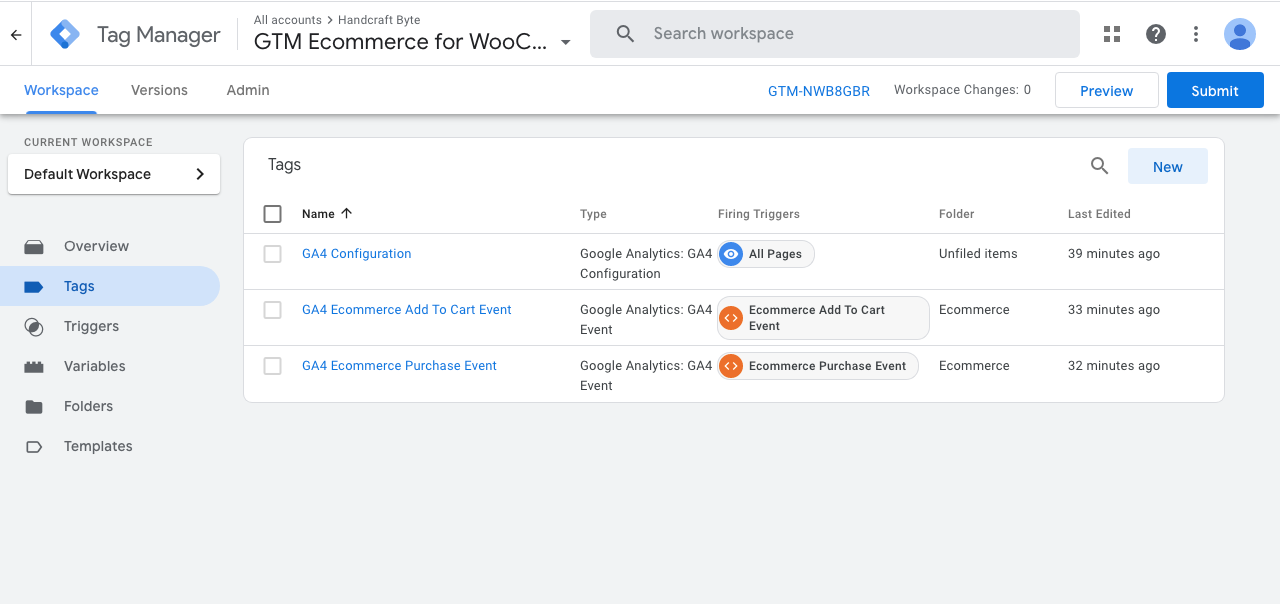
Hit Confirm to create tags, variables, and triggers for pushing Ecommerce events to the GA4 property.
The last step is to define GA4 Measurement ID. Go to Variables find a variable with the GA4 Measurement ID name, click to edit it. Then paste your GA4 Measurement ID in the Value field.
If you are importing Facebook Pixel preset you can find the tracking ID in FBP Pixel ID variable.
Save and submit all the changes to make it live.
You can find more detailed guides here.屏幕截图:

常见问题:
How to inject GTM tracking snippet?
By default this plugin push eCommerce information to the GTM DataLayer object that can be installed by other plugins or directly in the theme code. It can also embed GTM snippets, go to settings to configure it.
How to setup my GTM tags and triggers now?
We know that settings up the GTM workspace may be cumbersome. That's why the plugin comes with GTM container presets that you can import to your GTM workspace to create all required Tags, Triggers, and Variables. See the Installation tab above or our guides for details.
What eCommerce events are supported?
This version of the plugin supports just purchase and add_to_cart events.
Our PRO version available here supports more.
Is GA4 supported?
Yes! Just use the appropriate preset available in the settings screen of the plugin
更新日志:
1.12.4
- prevent errors when WooCommerce is not active
- improved order monitor statistics
- fixed error with undefined
wc_get_containerWooCommerce function
- orders monitor improvements
- introduced orders monitor
- events inspector enhancements
- added product feed generator
- added default consent mode state
- added server-side GTM snippet modifier
- added ability to add extra parameters to ecommerce object
- introduced tools gallery
- improved styling of events inspector
- removed unnecessary code
- tested against the latest versions of WordPress and WooCommerce
- tested against the latest versions of WordPress and WooCommerce
- documentation and wording adjustments
- push
ecommerce: nullto dataLayer before every event - send product name without variant attribute as the main product name
- added PHP types
- fix PHP errors and improve code linting
- tested against the latest versions of WordPress and WooCommerce
- tested against the latest version of WordPress
- add links to professional services
- add documentation links on presets gallery
- remove BETA badge from GTM server-side
- tested against the latest version of WooCommerce
- tested against the latest versions of WordPress and WooCommerce
- tested against the latest versions of WordPress and WooCommerce
- tested against the latest versions of WordPress and WooCommerce
- added 'discount' property to ecommerce item
- tested against the latest version of WooCommerce
- tested against the latest version of WooCommerce
- improved Google Analytics 4 events attributes
- tested against the latest versions of WordPress and WooCommerce
- fixed dynamic property in GtmEcommerceWoo\Lib\GaEcommerceEntity\Item object
- tested against the latest version of WooCommerce
- tested against the latest versions of WordPress and WooCommerce
- fixed events inspector's console z-index property
- added distinction for recently added presets in presets gallery
- fixed issue with product price in 'purchase' event
- tested against the latest version of WooCommerce
- tested against the latest version of WooCommerce
- changes priority of Google Tag Manager snippet loading on 'wp_head' hook
- removes 'ecommerce' key from event object, when there is no items and no value
- added new server-side tracking settings
- tested against the latest version of WooCommerce
- tested against the latest version of WooCommerce
- fixed 'gtm_ecommerce_woo_event_after_processing' filter
- tested against the latest version of WordPress
- added 'gtm_ecommerce_woo_event_after_processing' filter after event object data processing
- added Google Tag Manager dataLayer clearing before pushing ecommerce events
- added 'currency' property to ecommerce events
- tested against the latest version of WordPress
- tested against the latest version of WooCommerce
- tested against the latest version of WooCommerce
- declare compatibility with WooCommerce High-Performance Order Storage (HPOS)
- tested against latest versions of WordPress and WooCommerce
- fix issue with preset download
- adjust the name to WordPress directory requirements
- tested against latest versions of WordPress and WooCommerce
- adjust required PHP version
- tested against latest versions of WordPress and WooCommerce
- simplify loading the GTM Presets gallery
- removed missing WooCommerce notification
- removed 'data-cfasync' attribute as it was causing issues in certain scenarios
- enhanced add_to_cart event to work on dynamic product pages
- upgraded dependencies
- added 'data-cfasync' attribute
- ask for feedback to enhance user support
- fix picking up the quantity in add_to_cart event
- fix casting issue PHP 8.0
- updated documentation
- tested against latest versions of WordPress and WooCommerce
- add
valueproperty to all events - introduce
gtm_ecommerce_woo_eventfilter and extra properties - improve handling product categories
- fix handling of add_to_cart
- test against latest WordPress and WooCommerce
- remove testing code
- test against latest WooCommerce and WordPress versions
- introduce secured endpoint for obtaining debugging info
- switch the monitoring API to edge endpoints for performance gains
- improve add_to_cart JS not to be blocked by other scripts (click vs submit)
- link to the new version of the theme validator
- show presets versions
- WordPress code styling applied
- tested with most recent versions of WordPress and WooCommerce
- moved purchase data into top level ecommerce property
- added Tag Concierge Monitoring integration
- tested with most recent versions of WordPress and WooCommerce
- fix handling taxes
- introduce filters to customize events and properties
- Theme Validator enhancements
- move injecting dataLayer down in wp_footer hook to allow loading jQuery in the footer
- safeguard add_to_cart event when non-product is loaded in the page
- tools for verifying tracking: Event Inspector & Theme Validator
- rework settings with tabs
- renamed the plugin to match PRO version
- presets in a grid for easier discovery and download
- supported events settings
- remove settings tabs
- added missing file
- release correct version
- fixed critical bug
- introduce Theme Validator that allows for remote tracking debugging
- improve jQuery callbacks
- Rely on core WordPress and WooCommerce hooks to cover more themes
- Update documentation
- Update documentation
- Facebook Pixel preset!
- Remove depratacted UA setting
- Update internal UUID for downloading presets
- Allow more complex GTM presets, UA compatible preset available!
- Fix order items without categories
- Force initializing dataLayer variable
- Fix products without categories
- Fix PHP 7.2 compatibility issue
- Fix add_to_cart on single page
- Fix embedding JS for DOM Ready triggers
- Fix missing JS file
- Replace JSON file with external GTM preset generator
- Fix missing GTM container JSON file
- Fixed settings sections
- Provide a GTM container to import in a workspace
- Document possible UA compatibility feature
- Fix disabling plugin
- Initial version