Microblog Poster - Auto Publish on Social Media
| 开发者 | cybperic |
|---|---|
| 更新时间 | 2021年8月30日 17:59 |
| PHP版本: | 3.0 及以上 |
| WordPress版本: | 5.8 |
| 版权: | GPLv2 or later |
| 版权网址: | 版权信息 |
标签
links
social networks
automatic
facebook
social media
twitter
auto publish
microblogging
bookmarking
bookmarks
delicious
linkedin
auto update
automation
tumblr
backlinks
social media auto publish
social network auto publish
blogger
cross post
cross-post
diigo
social signals
auto posts
auto submit
plurk
auto updates status
publish to twitter
publish to facebook
下载
1.7.6
1.8.2
1.9.5.8
1.2.7
1.5.1
1.5.2
1.6.0
1.6.1
1.6.3
1.6.4
1.6.5
1.0
1.1
1.2
1.2.1
1.2.2
1.2.3
1.2.4
1.2.5
1.2.6
1.2.61
1.3.0
1.3.1
1.3.2
1.3.3
1.3.4
1.3.5
1.3.6
1.3.7
1.3.8
1.3.9
1.4.1
1.4.2
1.4.3
1.4.4
1.4.5
1.4.6
1.4.7
1.4.8
1.4.9
1.6.6
1.6.7
1.6.9
1.7.1
1.7.3
1.7.5
1.7.7
1.7.8
1.8.0
1.8.1
1.8.5
1.8.6
1.8.7
1.8.8
1.8.9
1.9.0
1.9.2
1.9.5.1
1.9.5.2
1.9.5.3
1.9.5.4
1.9.5.5
1.9.5.6
1.9.5.7
1.4.0
1.5.0
1.6.2
1.6.8
1.7.0
1.7.2
1.7.4
1.7.9
1.8.3
1.8.4
1.9.1
1.9.3
1.9.4
1.9.5
2.0.1
2.1.1
2.1.2
2.1.3
2.1.4
2.1.5
详情介绍:
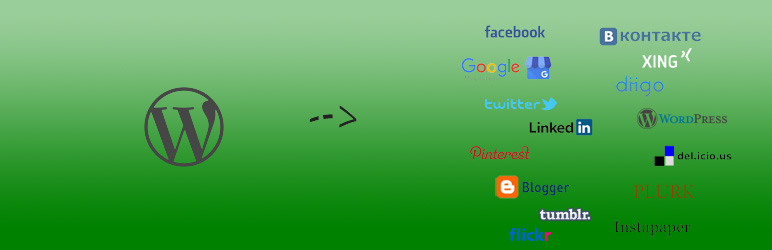
Auto publish to your social media accounts your new blog posts/pages/custom post types.
You only have to configure your social network accounts like Facebook, Google My Business, Twitter, LinkedIn, Tumblr..
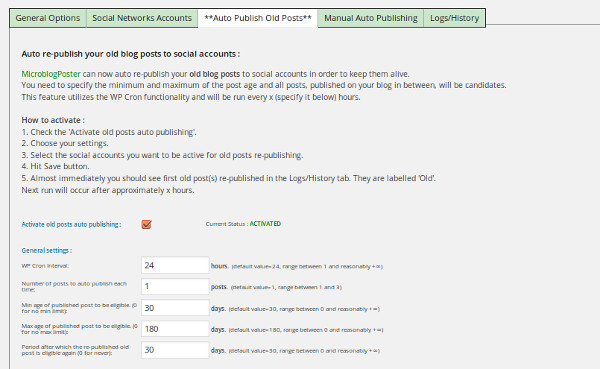
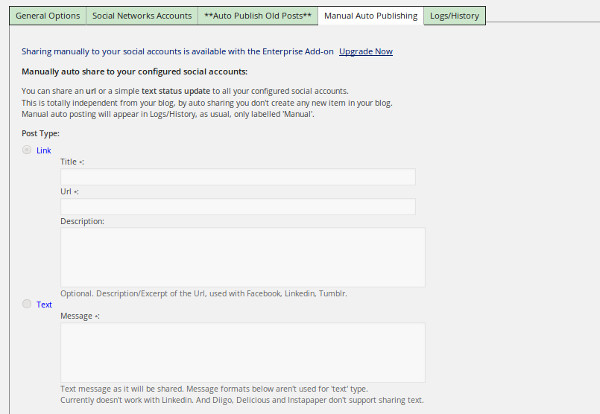
Auto re-publish old blog posts to all your configured social accounts.
By auto sharing your old blog posts, you keep them alive and increase traffic to your blog!
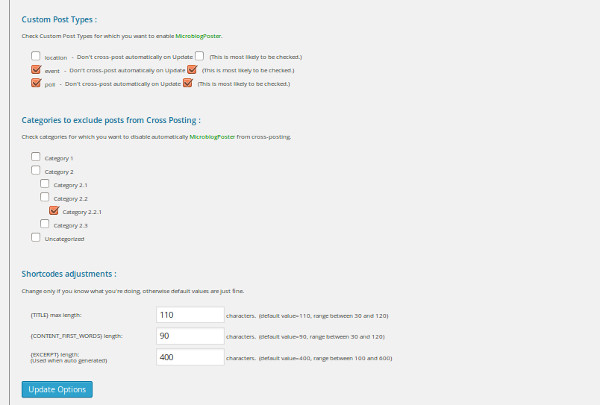
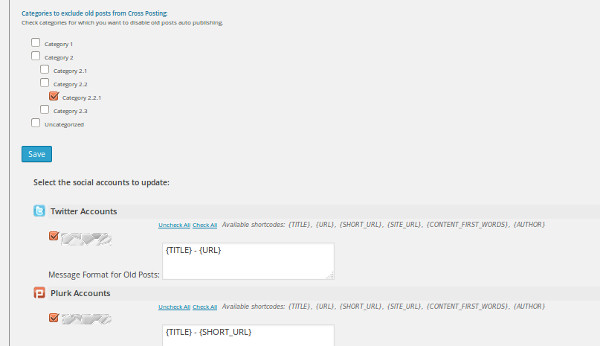
Additionally Filter posts to be published/cross posted to social networks based on categories.
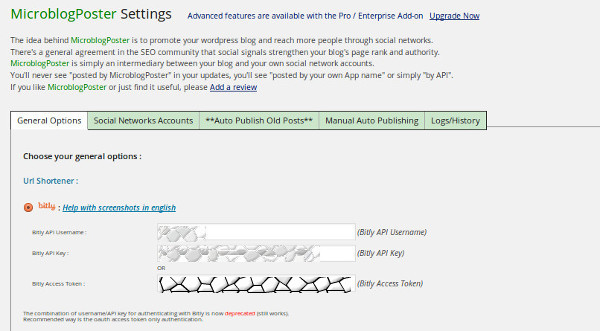
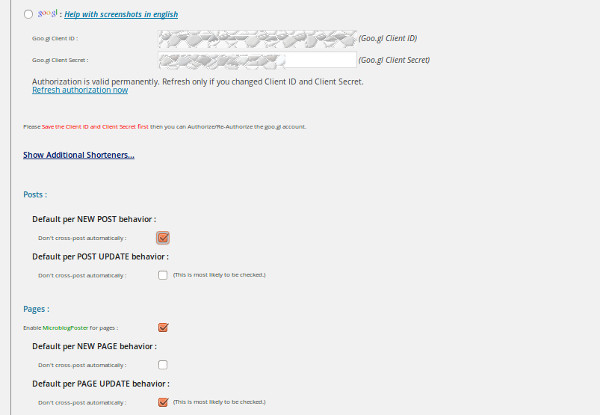
(General section settings)
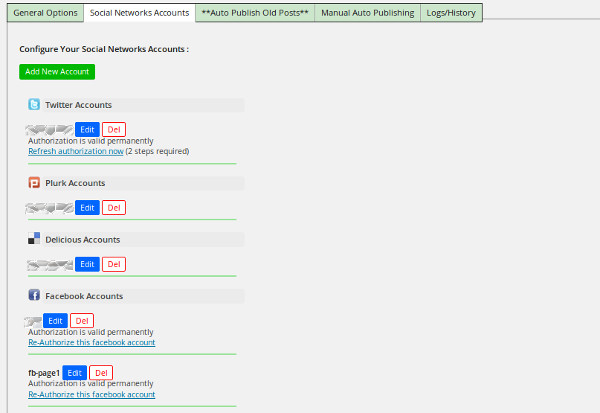
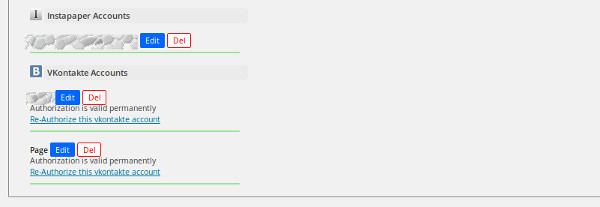
Multiple Accounts per social site supported.
Possibility to nicely format the posted message per account, shortcodes supported.
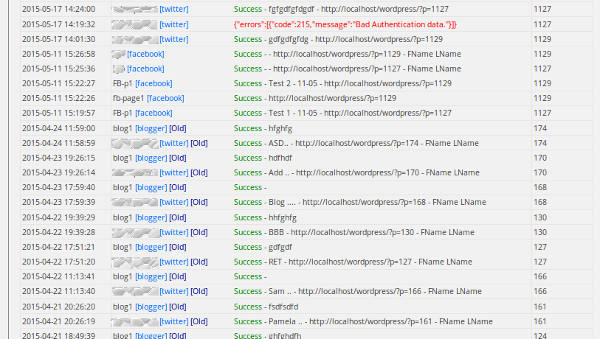
Logs are generated each time there is an auto posting activity for each configured social network account.
Easily follow the automated sharing process from Microblog Poster's logs section and debug your configuration if needed.
Wordpress Multisite fully compatible. Rather than doing the 'Network activation',
activate Microblog Poster for each sub blog.
Please visit Microblog Poster's website , or
Contact us , we're providing support in the following languages:
- We speak english ;
- Причамо српски ;
- Nous parlons français ;
- twitter.com - Auto post to your account.
- facebook.com - Auto publish to profile / page wall.
- business.google.com - Auto publish to Google My Business.
- plurk.com - Auto post to your account.
- diigo.com - Auto submit bookmark of your blogpost.
- linkedin.com - Auto publish to profile wall
- tumblr.com - Auto publish to your blog.
- blogger.com (blogspot.com) - Auto publish to your blog.
- instapaper.com - Auto submit bookmark of your blogpost.
- vk.com (vkontakte.com) - Auto publish to profile wall.
- pinterest.com - Auto publish to pinterest board.
- flickr.com - Auto publish to flickr.
- wordpress blog - Auto publish to another blog.
- Auto publish to social media networks your new blog content
- Auto publish old posts, tweet old posts
- Sends out social signals and auto share to social media networks
- Social signals and backlinks auto generator
- Cross post to facebook , cross post to twitter
- Facebook auto publish, Twitter auto publish, Pinterest auto publish
- Auto publish to facebook , tumblr
- Auto share to twitter , facebook , linkedin
- Auto post to social media networks, Auto tweet
安装:
- Upload the contents of the microblogposter folder to your /wp-content/plugins/ folder.
- Activate the Plugin through the 'Plugins' menu in WordPress
- Settings->MicroblogPoster, configure your social network accounts.
- The plugin is ready, it will automatically cross posts to social networks whenever you publish a new blog post.
- In order to auto post updates through the Twitter API you'll need to create your own Twitter App here: https://apps.twitter.com/
- Once you have created your Twitter App you have to change its Access Level to be Read and Write. Browse to the settings tab and click on 'Modify App Permissions'. Check the Access Level to be Read and Write. Save your Settings.
- Once this is done return to the API Keys tab, at the bottom you should have a button 'Create My Access token', please do it.
- Now, on the API Keys tab you have all what you need, i.e. API (Consumer) key / secret, Access token and Access token secret.
- If you don't see immediately the Access Token at the bottom, please refresh the API Keys tab page.
- Please browse to this url http://www.plurk.com/PlurkApp/ and click on 'Create a New Plurk App'. For App Type choose 'Third-party web site integration'. For App Website you can put http://localhost
- Once you are back on 'My Plurk Apps' page, click the edit button and copy your App Key and App Secret.
- Not finished yet, you need the second pair of credentials. On 'My Plurk Apps' page, this time click on 'Test Console' button.
- First, click on 'Get Request Token', then some processing is done. After that, click on 'Open Authorization Url', you'll be redirected to a new page and you will have to grant the permission in order to get your verification code.
- Finally, return to the previous page and generate your Token Key and Token Secret by clicking on 'Get Access Token' and by providing the verification code.
- Now, you can copy your Token Key and Token Secret. Coupled with the App key and App secret you've got previously you can configure your plurk account in the Social Accounts Section.
- Please browse to this url https://developers.facebook.com/apps and click on 'Apps' -> 'Create new App'. Note: If you can not click on 'Create new App', you'll need first to 'Register as a Developer'. Then the creation of New App will be available.
- Fill in your 'App Name' and then, click continue.
- Enter the required Security Check.
- Once on the basic settings of your new App, for the field 'App Domains' enter your Blog domain name (example: mydomain.com) Then click 'Add Platform' and choose 'Website'.
- For the field 'Site url' enter your Blog Url. (example: http://mydomain.com) Save changes.
- Make your App Live by browsing to 'Status & Review'.
- Copy your 'App ID' and 'App Secret' and configure your Facebook account in MicroblogPoster's Social Accounts Section.
- Follow the link provided by MicroblogPoster to authorize your App posting on your behalf.
- Please browse to this Url: https://www.diigo.com/api_keys/new/ and generate your Diigo API Key. (You need to be logged in)
- Please browse to this Url https://www.linkedin.com/secure/developer and click on 'Add New Application'.
- Fill in the required informations. For 'Live Status', select Live. Leave everything else by Default. Click the button 'Add Application'.
- Copy 'Api Key' and 'Secret Key', and click 'Done'.
- Configure your Linkedin account in the Social Accounts Section.
- Follow the link provided by MicroblogPoster to authorize your App posting on your behalf.
- In order to auto post updates through the tumblr Api you'll need first to create your own tumblr App here: http://www.tumblr.com/oauth/apps
- Once, you have created your tumblr App copy your 'OAuth Consumer key'.
- Also click on 'Show Secret key' and copy your 'Secret key'.
- This is it, you can now configure your Account in the Social Accounts section.
- Please browse to this url: https://console.developers.google.com/ Select 'API Project', then on left side select 'APIs & auth'. The 'APIs' tab is selected by default.
- Scroll down and locate 'Blogger API v3'. Click the 'OFF' button in order to request the activation.
- After few days you'll receive an email from Google asking to complete the activation. Please follow the steps provided.
- Please browse to this url again: https://console.developers.google.com/ Select 'API Project', then on left side select 'APIs & auth' -> 'Credentials'
- Click on 'Create new Client ID'
- For 'Application type', select 'Web application'. For 'Authorized Javascript Origins', enter your blog url (ex: http://www.yourblog.com) For 'Authorized Redirect Uri', enter the Url when you're on the settings of MicroblogPoster. It is something like http://www.yourblog.com/wp-admin/options-general.php?page=microblogposter.php Click 'Create Client ID'.
- Copy the Client ID and Client secret and configure your account under MicroblogPoster.
- MicroblogPoster will provide you a link in order to authorize the App posting on your behalf.
- Please browse to this url: https://vk.com/dev Select 'Standalone Application', then click 'Connect Application'.
- Get the code by SMS and then confirm it. Click 'Confirm'.
- On the settings tab of your newly created Application for 'Application Status' select 'Application on and visible to all'. Click 'Save'.
- Copy the Application ID and secure key and configure your account in MicroblogPoster.
- Follow the link provided by MicroblogPoster to authorize your App posting on your behalf.
- Last step is to save the 'Access Token' that you'll get when authorizing the account.
- Please browse to this url: https://developers.pinterest.com/apps/ then click 'Create App'.
- Copy the 'Consumer key' and 'Consumer secret'.
- Configure your account in MicroblogPoster.
- Please browse to this url: https://www.flickr.com/services/apps/create/noncommercial/? and create your App.
- Copy the 'Consumer key' and 'Consumer secret'.
- Configure your account in MicroblogPoster.
屏幕截图:


常见问题:
My blog is hosted on shared hosting, can I use MicroblogPoster?
Warning about inherent php script execution time limitation that some Hosting Providers apply on shared accounts (max_execution_time PHP setting). Since MicroblogPoster needs time to update all your social accounts when publishing a new blog post, this limit might be reached and script execution stopped. In order to avoid it, please limit the number of social accounts based on your environment script execution time limit.
The PHP cURL extension is required?
Yes, otherwise the plugin simply won't function at all.
More General FAQs ..
Auto Publish Old Posts FAQs ..
Auto Publish in Category-Driven Mode ..
更新日志:
2.1.5 (30-08-2021)
- Removed xing network.
- Code cleaning.
- Removed google+ network.
- Fixed twitter auto posting.
- Removed friendfeed and delicious networks.
- Fixes -> Bringing enterprise features to free version
- Bringing enterprise features to free version
- Bringing pro features to free version
- Fixing fancybox javascript bug.
- Fixing javascript bug.
- Fixing facebook scopes.
- Improvement related to duplicate posts issue.
- Improving buttons design.
- Improving Google My Business auto posting.
- Plugin's banner update.
- Added Google My Business locations auto posting in Enterprise version.
- Fixing help urls.
- Changing help urls to https.
- Added facebook via buffer.
- Fixing vk.com api calls.
- Cosmetic UI changes.
- Fixed facebook api changes.
- Fixed the double escaping issue.
- Updating help page urls.
- Fixed vk.com authorization.
- Removed the picture parameter from facebook posting.
- Improving the control dashboard for scheduled posts.
- bug: fixing save button disabled for twitter account creation.
- bug: fixing select accounts for old posts auto publish.
- Added support for Google+ via Buffer.
- Fixing facebook authorization.
- Added support for multiple pinterest boards.
- Added support for wordpress based blogs.
- Added Auto Re-Publish custom post types in paid versions.
- Added polish translation (pl_PL).
- Added Flickr auto publish.
- Added a Category-Driven Auto Publishing in Enterprise Add-on.
- Updated help pages.
- Added support for VKontakte page auto publish.
- Added support for VKontakte event auto publish.
- Fixed tumblr image bug.
- Sending full url to pinterest now.
- Added support for Facebook page auto publish.
- Added support for Pinterest auto publish.
- Added turkish translation.
- Adapted the free version of the plugin to work together with the new Ultimate Add-on.
- Added possibility to auto publish with image to tumblr.
- Possibility to apply_filters to blog content prior to auto publishing.
- Improved vk.com auto posting.
- Delaying the call to functions in WPINC/pluggable.php since they can be replaced via plugins.
- Added 'Who can auto publish' setting.
- Added russian translation.
- Added ukrainian translation.
- Added deutsch translation.
- Added support for Xing auto publish.
- Added italian translation.
- Removed relative paths for images.
- Updated code for Facebook API recent changes.
- Urgent, fixing possible SQL injection.
- Urgent, sanitizing Post data properly.
- Urgent, fixing possible SQL injection.
- Added possibility to auto publish with image to twitter (only with paid add-on)
- Added spanish translation.
- Added portuguese translation.
- FriendFeed was shut down so we're removing it from our list of supported networks.
- Urgent Linkedin API changes. Auto posting to groups isn't available anymore.
- Removed obsolete scope parameter for facebook authorization.
- Added serbian translation (sr_RS).
- Added french translation (fr_FR).
- Fixed bug, if the field 'Message Format' is empty don't post anything instead.
- Fixed blogger multiple links bug when used on multiple blogs.
- Sending full image to facebook instead of thumbnail.
- Facebook API 2.3 fix for auto publish to pages.
- Blogger auto publish improvements.
- Linkedin auto publish improvements.
- Urgent linkedin api fix.
- Added possibility to auto re-publish old posts to all social accounts configured.
- Added support for vkontakte auto publish.
- Added support for new lines in message format field.
- Fixed bug about tumblr.com accounts when edited.
- Added more url shorteners in Enterprise version.
- Adapted the free version of the plugin to work together with the new Enterprise add-on. Additional features available.
- Added support for goo.gl url shortener.
- Improved auto posting for scheduled items.
- Added support for instapaper auto publish.
- Added support for blogger (blogspot) auto publish.
- Added support for custom post types.
- Enabled twitter authorization process interactively, which allows to use multiple twitter accounts with a single twitter App.
- Added possibility to adjust length of : {EXCERPT}, {CONTENT_FIRST_WORDS}, {TITLE}.
- Improved auto publishing to linkedin.
- Added following shortcodes : {EXCERPT}, {MANUAL_EXCERPT}, {AUTHOR}, {CONTENT_FIRST_WORDS}.
- Improved auto posting to delicious and diigo.
- Improved auto posting to friendfeed.
- In logs section, added 'Empty Logs' button.
- Added support for tumblr.
- Improved design of plugin's settings page.
- Fixed internal error 500 that was occurring for some PHP/web server configurations, related to the use of method_exists function.
- Added 'Settings' link on plugins page.
- Adapted the free version of the plugin to work together with the new pro add-on. Additional features available with the pro add-on.
- Fixed critical error about a PHP warning produced by variable not being an array. Later that produces header already sent error.
- Added currently recommended way of authentication with bit.ly (oauth).
- MicroblogPoster's control checkbox moved from right side to center.
- Dropped support for identi.ca because of the complete change of their API.
- Added possibility to choose plurk qualifier.
- In general section exclude posts from checked categories cross-posting automatically.
- linkedin.com is now supported.
- facebook posting improvements (text only or share a link).
- Added possibility to post featured image (facebook and linkedin cross posting).
- Logging failed authorizations to help debugging.
- linkedin.com is now supported.
- facebook posting improvements (text only or share a link).
- Added possibility to post featured image (facebook and linkedin cross posting).
- Logging failed authorizations to help debugging.
- Urgent twitter api fix
- diigo.com is now supported
- Added possibility to cross-post on new page creation.
- General options layout improvements + added options for page cross posting.
- Logs are now generated for each new blog post per social account.
- Tabified the plugin settings page, added logs section.
- Added option for default post update behavior.
- Facebook account authorization process improved.
- Fixed several small bugs.
- Possibility to format the message that's posted, shortcodes support.
- For HTTP Auth sites, passwords are stored encrypted in db.
- New option for delicious site, choose if tags included.
- Bug fix, double escaping.
- facebook.com is now supported.
- 'default per post behavior' option added.
- added images for each supported site.
- Multiple Accounts per site supported.
- More user friendly plugin settings interface.
- Added microblogging site friendfeed.com
- Added bookmarking site delicious.com
- Added microblogging site identi.ca
- First version of Plugin Released.