Intranet & Private Site - All-In-One Intranet
| 开发者 |
lionsher
nathansingh chrisakelley dimensionmedia slaFFik jaredatch smub |
|---|---|
| 更新时间 | 2026年3月5日 10:10 |
| PHP版本: | 7.0 及以上 |
| WordPress版本: | 6.9 |
| 版权: | GPL-3.0-or-later |
详情介绍:
- Internal company communications and announcements
- Employee handbooks, policies, and procedures
- Knowledge bases and documentation wikis
- Project collaboration and team coordination
- HR portals for onboarding and training materials
- Client portals with restricted access to project files
- Page and post access - all frontend content requires authentication
- REST API protection - unauthenticated REST API requests are blocked with a 401 error, preventing data leaks through the API
- XML-RPC blocking - XML-RPC is disabled entirely when privacy is active, closing another potential access vector
- Search engine blocking - the robots.txt file is automatically updated to disallow all crawling, keeping your private content out of search indexes
- Pingback suppression - outgoing pingbacks and trackbacks are disabled so your private site does not announce itself to external services
- When a new user is created, they are automatically added to every active sub-site in the network with the selected role
- When a new sub-site is created, all existing users are automatically added to it with the selected role
- Install and activate the plugin from the WordPress plugin directory
- Go to Settings > All-In-One Intranet in your WordPress admin (or Network Admin > Settings > All-In-One Intranet for multisite)
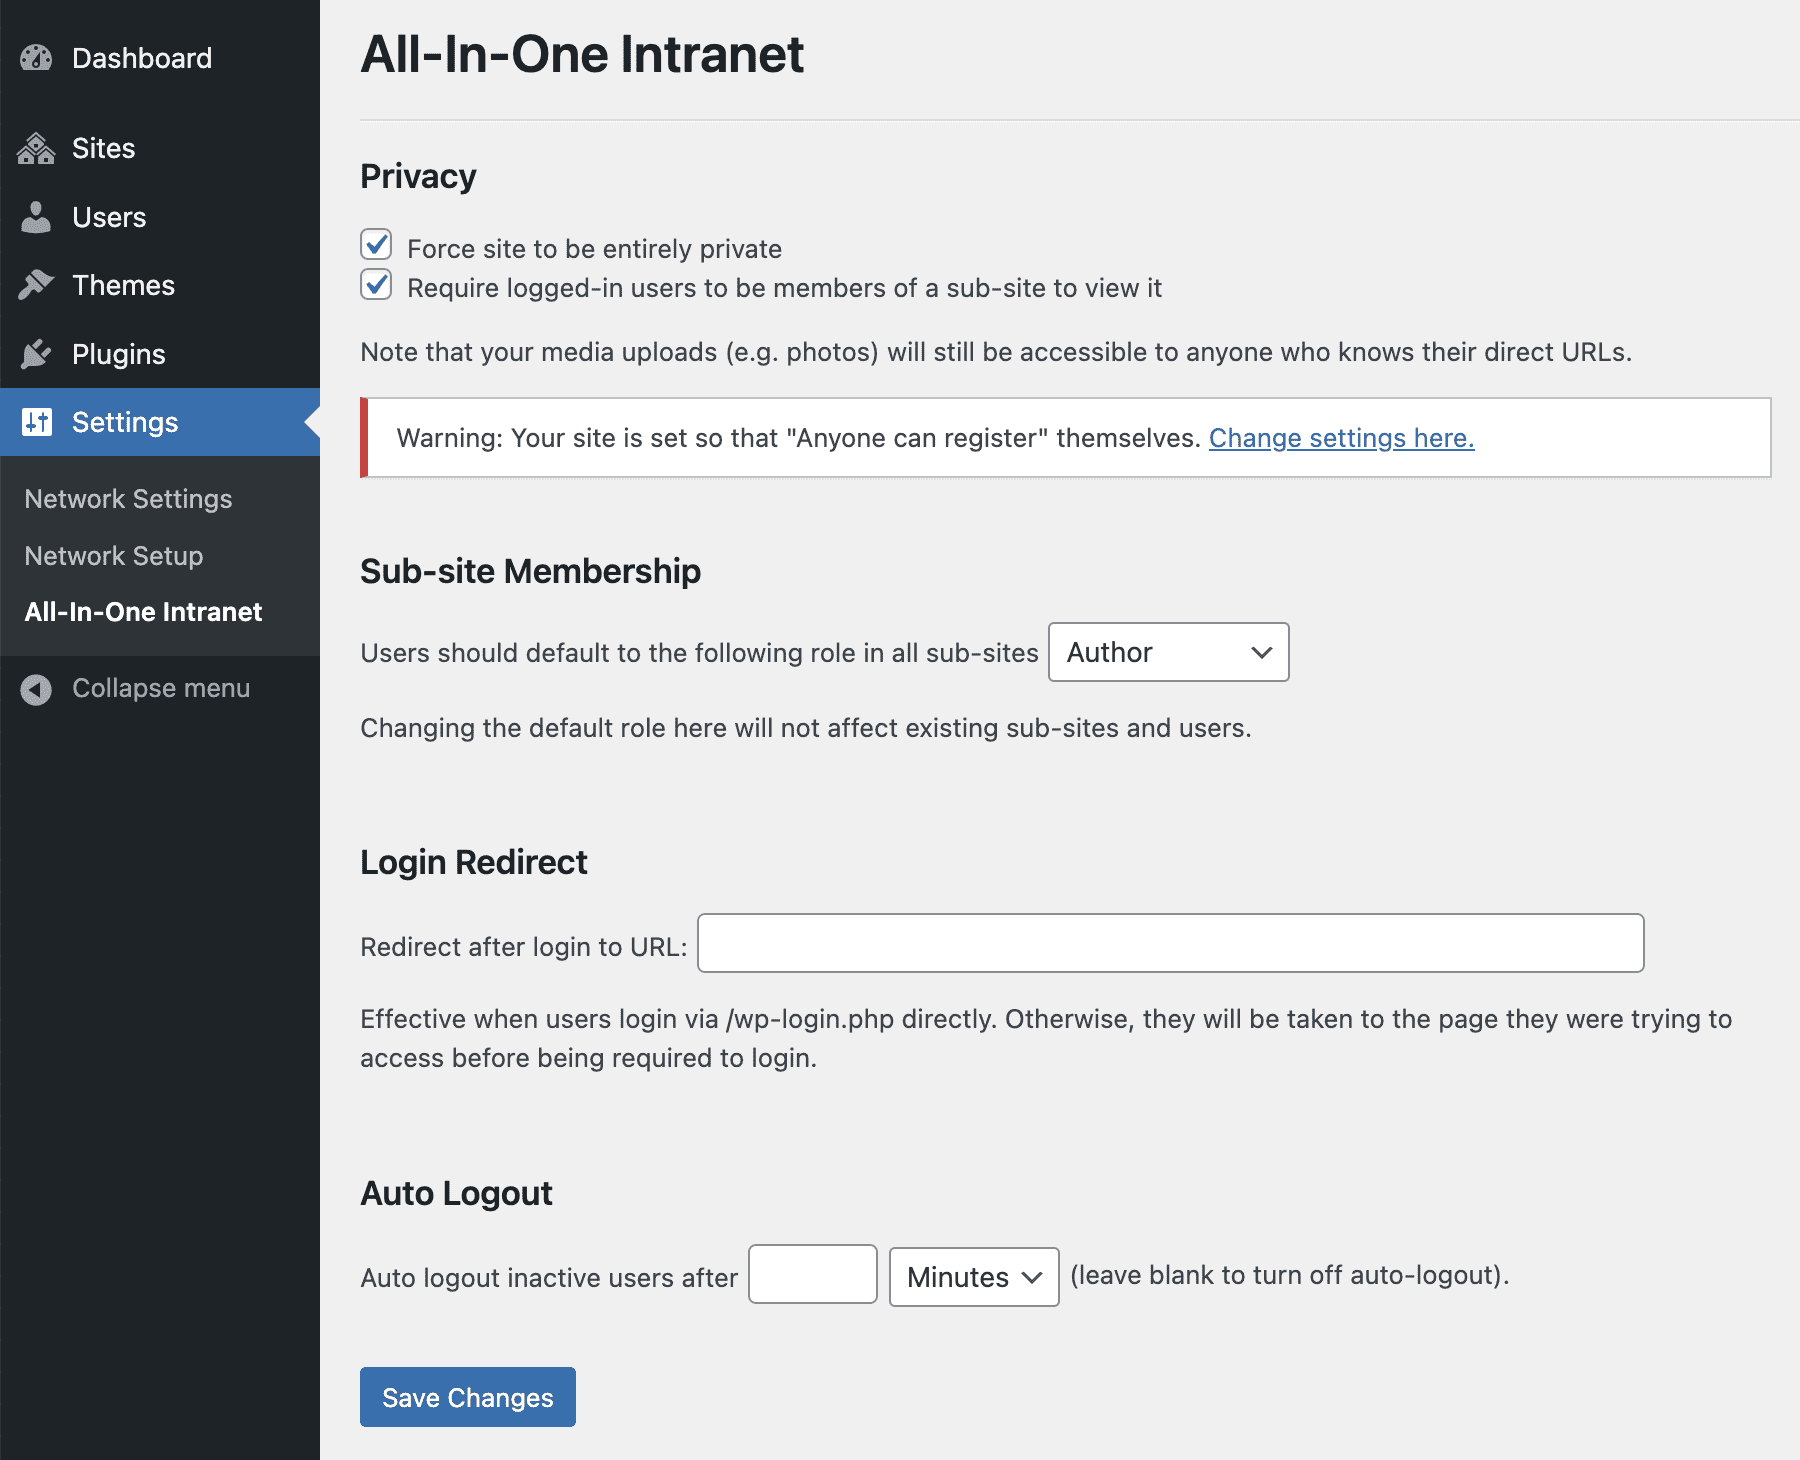
- Check the box labeled "Force site to be entirely private"
- Click Save Changes
- Go to Settings > All-In-One Intranet
- Find the Auto Logout section
- Enter a number in the time field (e.g., 30)
- Select the time unit from the dropdown: Minutes, Hours, or Days
- Click Save Changes
- Go to Settings > All-In-One Intranet
- Find the Login Redirect section
- Enter the full URL of your desired landing page (e.g.,
https://example.com/welcome) - Click Save Changes
/wp-login.php will now land on that page instead of the WordPress dashboard. Users who were redirected to the login page from a specific URL will still return to that URL after logging in.
How to Set Up a WordPress Multisite Intranet
For organizations running a WordPress multisite network:
- Go to Network Admin > Settings > All-In-One Intranet
- Enable "Force site to be entirely private" to restrict the entire network to logged-in users
- Optionally enable "Require logged-in users to be members of a sub-site to view it" for per-site access control
- Under Sub-site Membership, select a default role to automatically assign users to sub-sites
- Click Save Changes
- Authentication enforcement - uses WordPress's built-in
auth_redirect()function for reliable login redirection - REST API lockdown - blocks unauthenticated API requests, preventing data access through endpoints like
/wp-json/wp/v2/posts - XML-RPC disabling - completely disables XML-RPC when privacy is active
- No-role user handling - on single-site installations, users who are logged in but have no assigned role are logged out and shown an error message, preventing access by deactivated accounts
- Registration monitoring - displays admin warnings if WordPress is configured to allow open registration, which would undermine your private site setup
- Nonce verification - all settings forms use WordPress nonce validation to prevent cross-site request forgery
- Capability checks - settings pages require
manage_options(single site) ormanage_network_options(multisite) capabilities
aioi_allow_public_access filter for developers who need to make specific pages or endpoints accessible without authentication.
This filter runs during both the template redirect check and the REST API dispatch check. Return true to allow public access for the current request:
add_filter( 'aioi_allow_public_access', function( $allow ) { // Allow public access to a specific page if ( is_page( 'public-landing' ) ) { return true; } return $allow; } );
This is useful for exposing specific landing pages, webhook endpoints, or custom API routes while keeping the rest of the site private.
Google Workspace Integration
If your organization uses Google Workspace (formerly Google Apps), two companion plugins extend your intranet:
- Google Apps Login - lets employees sign in to WordPress using their Google Workspace accounts. Domain admins can manage WordPress access entirely from the Google Admin Console, and only authorized employees can access the intranet.
- Google Drive Embedder - allows authors to embed Google Docs, Sheets, Slides, and other Drive files directly into pages and posts. Useful for intranets where documentation lives in Google Drive.
安装:
- Go to your WordPress admin control panel's plugin page
- Search for 'All-In-One Intranet'
- Click Install
- Click Activate in the plugin card
- Go to 'All-In-One Intranet' under Settings in your WordPress admin area to configure the plugin
- Upload
all-in-one-intranetdirectory and contents to the/wp-content/plugins/directory, or upload the ZIP file directly in the Plugins section of your WordPress admin - Go to Plugins page in your WordPress admin
- Click Activate
- Go to 'All-In-One Intranet' under Settings in your WordPress admin area to configure the plugin
屏幕截图:
常见问题:
How do I make my WordPress site completely private?
Install and activate the plugin, then go to Settings > All-In-One Intranet and check "Force site to be entirely private." All pages, posts, and custom content types will require login. The REST API and XML-RPC are also locked down automatically.
Does the plugin protect uploaded media files?
No. Media files (images, PDFs, videos, etc.) that are uploaded through WordPress remain accessible to anyone who knows the direct URL. This is because WordPress serves media files directly through your web server, bypassing PHP and plugin logic. This limitation is common to most WordPress privacy plugins. If direct media file protection is a requirement, you would need a server-level solution or a dedicated download protection plugin in addition to All-In-One Intranet.
Does it block the WordPress REST API?
Yes. When the private site option is enabled, all unauthenticated REST API requests receive a 401 error response. This prevents external tools, scripts, or bots from accessing your content through API endpoints like /wp-json/wp/v2/posts. Authenticated requests from logged-in users continue to work normally.
How does auto-logout work?
The plugin records a timestamp each time a logged-in user loads a page. On the next page load, it compares the current time against the stored timestamp. If the difference exceeds the configured idle time, the user is logged out immediately. The idle timer resets on every page load, so users who are actively browsing are never interrupted. You can set the timeout in minutes, hours, or days.
Can I set a custom page for users to see after login?
Yes. In the Login Redirect section of the plugin settings, enter the full URL of the page you want users to land on after logging in. This overrides the default WordPress behavior of sending users to the dashboard. Note that if a user was trying to reach a specific page before being asked to log in, they will be redirected back to that page instead of the custom redirect URL.
Does it work with WordPress multisite?
Yes. The plugin is fully compatible with WordPress multisite. In a multisite network, the settings are managed from the Network Admin area. You can make the entire network private, require users to be members of individual sub-sites before accessing them, and automatically assign roles to users across sub-sites when new users or new sites are created.
Can I allow certain pages to remain public while the rest of the site is private?
Yes, but it requires a small amount of code. Use the aioi_allow_public_access filter in your theme's functions.php file or a custom plugin. For example, to keep a page with the slug "public-info" accessible without login:
add_filter( 'aioi_allow_public_access', function( $allow ) { if ( is_page( 'public-landing' ) ) { return true; } return $allow; } );
Does it block search engines from indexing my site?
Yes. When the private site option is enabled, the plugin overrides the robots.txt file to disallow all crawling. It also disables outgoing pingbacks and trackbacks, so your site does not announce new content to external services or ping aggregators.
Does it work with caching plugins?
Generally, yes. Most WordPress caching plugins bypass the cache for logged-in users and do not cache redirects, so the privacy enforcement works as expected. However, aggressive full-page caching at the server level (Varnish, Nginx FastCGI cache) may serve cached pages to unauthenticated users if not configured to respect WordPress login cookies. If you use server-level caching, make sure it bypasses the cache when WordPress login cookies are absent.
What happens to users with no role on my site?
On a single-site WordPress installation, users who are logged in but have no assigned role are treated as unauthorized. The plugin logs them out and displays a message explaining that they do not have permission to access the site. This prevents access by accounts that have been deactivated by removing their role rather than deleting them.
Does it block XML-RPC access?
Yes. When the private site option is active, the plugin completely disables XML-RPC. This prevents any remote access through the XML-RPC protocol, including third-party apps and services that use it to interact with WordPress.
Is it compatible with custom login page plugins?
The plugin uses WordPress's built-in auth_redirect() function to send unauthenticated users to the login page. Most custom login page plugins work by intercepting the standard login URL and redirecting to a custom page. Because All-In-One Intranet relies on standard WordPress authentication functions, it is generally compatible with custom login page plugins. The login redirect feature also works regardless of whether the user logs in through the default or a custom login page.
更新日志:
- Changed: Compatibility with WordPress 6.9.
- Fixed: Made sure the XMLRPC is also safeguarded against unauthorized access.
- IMPORTANT: The minimum WordPress version is now WordPress v5.5.
- IMPORTANT: The minimum PHP version is now PHP v7.0.
- Added: Multisite-specific options: "Require logged-in users to be members of a sub-site to view it"
- Added: "Sub-site Membership" - assign a user role for newly added users.
- Changed: Compatibility with WordPress 6.6.
- Fixed: Several security-related improvements in various parts of the plugin.
- Fixed: Code style improvements.
- Security update and added WordPress 5.7 compatibility.
- Security update and added WordPress 5.6 compatibility.
- Security update and added WordPress 5.4.1 compatibility.
- Ready for WP 4.9. Disables unauthenticated calls to WP REST API by default.
- Now supports localization - please contribute your translations!
- Changed which WordPress hooks are used to check for auto-logout. This is to widen compatibility with certain Themes.
- On non-multisite WordPress, now restricts access to users who have no role, as well as those who aren't logged in at all.
- Ready for public release.